
Chapter 24. Writing .NET Visualizations For Windows Media Player
In This Chapter
• The COM Visualization API
• Creating a .NET Visualization API
• Using the .NET Visualization API
In this chapter, we have some fun using Windows Media Player, a popular application for playing music files and much more. Windows Media Player has a variety of interesting areas for software developers, and the area this chapter focuses on is visualizations.
A visualization is an animated picture that changes with the music (or any audio) being played by Windows Media Player. Visualizations usually change shape or color based on the characteristics of the music, giving the user something to watch while listening. Windows Media Player 7 comes with over 25 visualizations, such as “Water” shown in Figure 24.1 (bearing a similar resemblance to this book’s cover), and Windows Media Player 8 comes with even more visualizations. The fun part for programmers is that any number of visualizations can be created and added to the list shown by the player’s menus.
Figure 24.1. Windows Media Player, showing a visualization while music plays.

The look of the player itself is known as its skin and, in the case of Figure 24.1, looks like a human head. The skin, which can be customized, is completely independent of the visualization, which displays itself inside the dedicated area that often looks like a little television screen.
Unlike skins, each visualization is implemented as a COM object that gets called upon to turn sound into a picture. This works as follows:
1. Windows Media Player records a “snapshot” of the current audio at regular intervals. This snapshot contains frequency and waveform data.
2. As soon as the snapshot is taken, Windows Media Player calls a function implemented by the currently selected visualization COM object, passing the audio data.
3. The COM object’s implementation uses the data to output a static picture.
4. Windows Media Player displays the output picture. The way in which it is displayed can depend upon the player’s current skin.
This process repeats continuously, so the series of pictures can look like an animation.
Whereas the arcade game in the previous chapter demonstrated using COM Interoperability with a .NET client, this chapter’s example demonstrates using COM Interoperability with a COM client. Although the direction of interaction is opposite, we’re still going to be writing the .NET side of the application. With Windows Media Player as a COM client, you can write .NET objects that plug seamlessly into an architecture designed for COM.
In addition to just writing visualizations that are compatible with Windows Media Player’s requirements, this chapter puts together a .NET class library that exposes visualization functionality with a .NET style, complete with events and its own custom attribute. After this new .NET API is introduced, we’ll show a few sample visualizations built on top of it.
The code in this chapter uses Windows Media Player 7, which can be downloaded from www.microsoft.com/windows/windowsmedia/. It can also be used with Windows Media Player for Windows XP (Version 8). As with the previous chapter, all of the source code can be downloaded from this book’s Web site.
The COM Visualization API
Before creating the .NET Visualization API, we’ll begin with an overview of the current COM Visualization API. For a COM object to be a visualization, it must:
• Be registered specially as a visualization under the registry key HKEY_LOCAL_MACHINESoftwareMicrosoftMediaPlayerObjectsEffects.
• Implement a single COM interface known as IWMPEffects.
As these two steps indicate, visualizations are also known as effects. The special registration is needed so Windows Media Player can quickly provide the user with a list of the visualizations installed on the machine. Figure 24.2 displays the contents of this area of the registry, and Figure 24.3 displays the View, Visualizations menu in Windows Media Player that corresponds to these registry contents. Each visualization is represented by a registry key with a Properties subkey containing a name, description, and CLSID of the COM object that implements IWMPEffects for the visualization.
Figure 24.2. The Windows Registry branch containing visualization data.
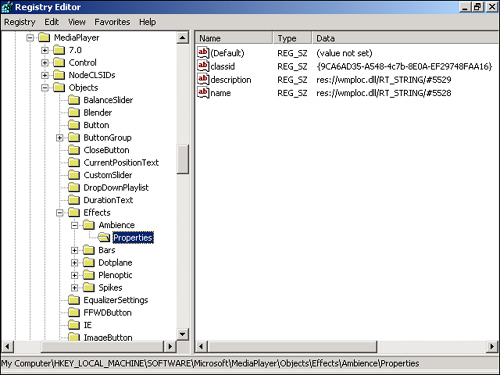
Figure 24.3. The list of visualizations, as displayed by Windows Media Player for the registry contents shown in Figure 24.2.

The Windows Media Player SDK comes with a Windows Media Visualization Wizard specifically for unmanaged Visual C++ that helps with the custom registration, and even provides a default implementation of IWMPEffects. We don’t make much use of this wizard in this chapter, because our visualizations are written in managed code. This wizard, however, generates an effects.idl file that contains the definition of IWMPEffects, as shown in Listing 21.1 in Chapter 21, “Manually Defining COM Types in Source Code.” You should refer to this listing and its instructions for creating the IDL file if you’re interested in viewing the original IWMPEffects definition.
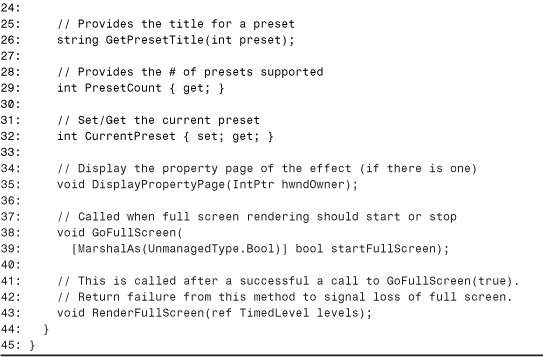
The most important method of IWMPEffects is the first one—Render. This is the one method that gets called repetitively to handle the drawing. First we’ll look in detail at how to implement Render, then we’ll look briefly at the other ten methods.
The Render Method
The Render method has three parameters—a pointer to a TimedLevel structure, an HDC, and a pointer to a RECT structure. The TimedLevel structure contains all the information about the currently playing audio. It is defined as follows in IDL:
typedef struct tagTimedLevel
{
unsigned char frequency[2][SA_BUFFER_SIZE];
unsigned char waveform[2][SA_BUFFER_SIZE];
int state;
hyper timestamp;
} TimedLevel;
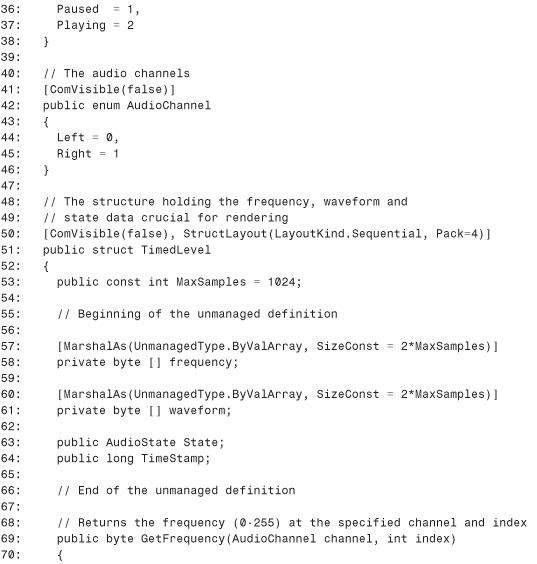
The two-dimensional frequency array contains a snapshot of the audio’s frequency spectrum. The first leftmost dimension corresponds to the left audio channel, and the second leftmost dimension corresponds to the right audio channel. If the audio is not stereo, the data in the second half of the array is undefined. The rightmost dimension has an element for frequency values ranging from 20 Hz in the first slot to 22,050 Hz in the last. Because the array contains unsigned characters (bytes), each data value is a number ranging from 0 to 255. SA_BUFFER_SIZE, the size of the second dimension, is a constant set to 1,024. This data can be used for graphics equalizer effects.
The two-dimensional waveform array is structured just like the frequency array, however each element contains an independent snapshot of the audio’s power. Therefore, each time Render is called, the waveform array data consists of 1024 mini-snapshots taken at an extremely short time interval. Although each data value ranges from 0 to 255, the real value falls between –128 and 127, so 128 is sometimes subtracted from the array’s elements when visualizations use these values. This data can be used for oscilloscope effects.
The state field has one of the values of the following enumeration:
typedef enum PlayerState
{
stop_state = 0,
pause_state = 1,
play_state = 2
};
With this information, a visualization can alter its effects based on whether the audio is currently stopped, paused, or playing.
Finally, the timestamp field, a 64-bit integer, gives a relative time for when the data snapshot occurred. This value can be used for timing animations.
Render’s HDC parameter is a handle to a Windows device context. This is a standard drawing surface in Windows programming, and can be passed directly to many GDI functions. Using this HDC, all you have to worry about is drawing on it with Windows pens, brushes, and so on.
The RECT structure, just as in the previous chapter, is a standard Windows rectangle that defines the size and position for the usable area of the device context. Because there’s no way to know in advance the size of the visualization window (because it can be changed by the user or the skin settings), you should always use the rectangle when drawing on the device context.
Other Methods
Although the Render method is the most important one to implement, there are several other methods in the IWMPEffects interface. Some of these are necessary (but trivial to implement) whereas others are completely optional.
Before looking at these other methods, you need to understand some of the Windows Media Player visualization terminology. From a programmer’s perspective, a visualization is a class that implements IWMPEffects and is registered specially. From a user’s perspective, however, a visualization is a group of effects known as presets. Any visualization could have just one preset or hundreds of presets. A common use of presets is to provide variations of the same basic effect. For example, a visualization that displays twinkling stars could have a handful of presets that each use a different background color for the sky. On the other hand, these sorts of options could also be provided to the user using a single preset and a property page with customizable features. The choice is yours, but no matter how many presets you have, you’ll need to implement a few methods to tell Windows Media Player about them.
The following list describes the remaining functions in IWMPEffects:
• RenderFullScreen. Called repeatedly instead of Render only if and when the visualization is in full-screen mode.
• GetCapabilities. Informs Windows Media Player of the visualization’s capabilities. The DWORD out parameter must be set to one or more of the following flags bitwise-ORed together:
• EFFECT_CANGOFULLSCREEN (0x1)—The visualization is capable of full-screen rendering.
• EFFECT_HASPROPERTYPAGE (0x2)—The visualization has a property page.
• EFFECT_VARIABLEFREQSTEP (0x4)—The visualization uses frequency data with variable size steps. See Windows Media Player documentation for more information about this setting.
• DisplayPropertyPage. Called when the user requests to see the properties of the visualization, but only if GetCapabilities returns a value that indicates that the visualization has a property page. Has an HWND parameter that should be used as the owner window for the displayed property page.
• GoFullscreen. Called when the visualization is switching into or out of full-screen mode. A boolean parameter is set to true if entering full-screen mode; false if leaving. This is only called if GetCapabilities returns a value that indicates that the visualization supports full-screen rendering.
• GetPresetCount. Called when Windows Media Player wants to know how many presets the visualization supports.
• GetCurrentPreset. Called when Windows Media Player needs to know the index of the current preset.
• SetCurrentPreset. Called when Windows Media Player wants to set the current preset.
• GetPresetTitle. Called when Windows Media Player wants the title for a given preset index.
• GetTitle. Called when Windows Media Player wants the title of the visualization.
• MediaInfo. Supplies the visualization with data about the currently playing audio: title, number of audio channels (1 for mono, 2 for stereo), and the sample rate in Hertz.
Creating a .NET Visualization API
The goal of this chapter is to create and use a .NET Visualization API that, although based on COM, doesn’t appear to have anything to do with COM to users of the API. This means using no attributes defined in System.Runtime.InteropServices, no awareness of COM or Win32 data types, and so on. Unfortunately, “hiding the COM” is not entirely possible because any visualizations must be registered, but having to run REGASM.EXE at installation time is something we’ll have to live with.
The next four code listings comprise the BookExamples.WindowsMediaPlayer assembly that contains the .NET Visualization API. Because there’s no official Windows Media Player type library, this assembly contains the managed definition of the IWMPEffects interface and its supporting types, as well as a Visualization class that .NET components will derive from to become visualizations rather than implementing an interface. All of the types in this assembly are placed in the namespace BookExamples.WindowsMediaPlayer.
The IWMPEffects Interface
Let’s begin by looking at the managed definition of IWMPEffects. Listing 24.1 contains the same definition created in Chapter 21 with all of its user-friendly modifications above and beyond what the type library importer could do.
Listing 24.1. IWMPEffects.cs. The Manually Written Definition for the IWMPEffects COM Interface

Notice that the public keyword is omitted in the definition of IWMPEffects, so it is a private interface. The .NET Visualization API is going to expose a public abstract class instead, so authors of .NET visualizations can derive from the class and implement as little as two members rather than implementing the entire interface.
Despite all the user-friendly customizations to our .NET IWMPEffects definition, it would have been nice if we could have changed Render’s third parameter to be a System.Drawing.Rectangle type rather than a simple RECT. Making such a transformation would seamlessly provide .NET components with their native rectangle type instead of a struct that will almost certainly be transformed into a System.Drawing.Rectangle in the method’s implementation. In some limited scenarios, making such a modification in a managed signature would be legal—but not here. The System.Drawing.Rectangle value type looks like the following from COM’s perspective (in IDL):
[
typedef [uuid(...), version(1.0),
custom(0F21F359-AB84-41E8-9A78-36D110E6D2F9, "System.Drawing.Rectangle")
]
struct tagRectangle
{
long x;
long y;
long width;
long height;
} Rectangle;
Whereas the third and fourth 32-bit fields of RECT correspond to the rectangle’s right edge and bottom edge, respectively, the third and fourth 32-bit fields of Rectangle correspond to the rectangle’s width and height. So, if we were guaranteed that Render is always called with a rectangle whose top and left coordinates are both zero (which is not true), we could have performed this trick. That’s okay, though, because you’ll see that Listing 24.3 (a little later in the chapter) does the next best thing to avoid having visualizations use the RECT type.
Supporting Structs and Enums
The .NET definition of IWMPEffects used some value types and enumerations that also need .NET definitions. Listing 24.2 contains the definitions for these supporting types.
Listing 24.2. SupportingTypes.cs. The Manually Written Definitions of Structs and Enums Used by the IWMPEffects Interface


Lines 1 and 2 list two namespaces—System for FlagsAttribute and System.Runtime.InteropServices for ComVisibleAttribute, StructLayoutAttribute, and MarshalAsAttrbiute (and their associated enum types). One thing might strike you about the five types defined in this listing—why are they all marked as COM-invisible? Don’t we want to interact with COM? Yes, we do want to interact with COM, but having these value type definitions exposed is not necessary for this to occur. For classes and interfaces originally defined in the COM world (such as IWMPEffects), we can use ComImportAttribute as a way of saying “don’t expose my definition to COM because I’m already defined elsewhere.” Because ComImportAttribute doesn’t apply to structs, this listing uses ComVisible(false) for the same purpose. These types need to be public so .NET components can use them when implementing visualizations, but there’s no need to expose them to COM because we can assume, for example, that a COM client would get the definition of TimedLevel from the same place it gets the definition of IWMPEffects (such as effects.idl).
Unlike COM classes and interfaces, for which it is harmful to omit ComImportAttribute from the .NET definition, it is often fine to expose duplicate definitions of a value type. In this case, it’s a little nicer to make them COM-invisible so new COM clients that may be written to host visualizations don’t have to deal with name ambiguity if using the definitions of RECT and TimedLevel from an IDL file while importing a type library exported from one of our .NET visualizations.
Caution
Avoid marking value types with ComVisible(false) if they’re used in important types that are not marked with ComImportAttribute, because this limits what COM clients can directly do with members using such value types as parameters. In the case of RECT and TimedLevel in Listing 24.2 shown previously, it’s okay to make the .NET definitions COM-invisible, because all COM interaction should be done through the single IWMPEffects interface (which is marked with ComImportAttribute).
The definition of RECT in Lines 7–19 should look familiar. It’s just like the definition from Listing 23.20 in the previous chapter. Both this struct and TimedLevel are marked with sequential layout and a packing size of four just for clarity. The VisualizationCapabilities, AudioState, and AudioChannel enumerations encapsulate information from Windows Media Player documentation. Whereas VisualizationCapabilities is used as a parameter inside IWMPEffects, the other two enumerations are used by the TimedLevel structure. The System.FlagsAttribute custom attribute is used on VisualizationCapabilities to indicate that the values can be combined together with a bitwise OR operator.
The definition of TimedLevel, on Lines 50–98, begins by defining a MaxSamples constant set to the maximum number of data samples. It then has the four fields that the unmanaged structure also defines—an array containing frequency data, an array containing waveform data, the current state of the player, and a time stamp. Notice that the arrays are defined as one-dimensional despite the fact that they are really two-dimensional. This has to be done because the marshaler doesn’t support multidimensional C-style arrays as fields of a structure. Therefore, we have no choice but to define them as one-dimensional and mark the size as the sum of the dimensions from each of the elements (2 * MaxSamples). Each array is now “flattened,” with the first 1,024 elements containing the samples corresponding to the left audio channel (the 0th leftmost array dimension) and the last 1,024 elements containing the right audio channel’s samples (the last leftmost array dimension).
Because dealing directly with these one-dimensional arrays in our visualizations would be cumbersome and error prone, they are defined as private. Instead of allowing .NET components to access these elements directly, public methods are added to the structure to expose the data in an intuitive way. All of these changes are legal because private fields of a value type are equivalent to public fields from COM’s point of view, and additional methods don’t affect COM’s view of a value type. Although COM clients can’t see these definitions due to the ComVisible(false) marking, it’s still crucial that the definition match the data of the original definition so the marshaler can construct the types appropriately when data is passed in from COM.
The GetFrequency and GetWaveform methods return the raw byte value contained in the respective array corresponding to the passed-in audio channel (left or right) and index. Rather than throwing an exception because of a negative index, these methods simply return zero. This is helpful for visualizations because the Render method sometimes receives rectangles with negative bounds, so this cuts down on the rectangle validation that Render implementations would have to do. Both of these methods have a scaled version, which returns an integer between zero and the passed in maxValue rather than a byte between 0 and 255. These methods are helpful for visualizations because scaling the data to the size of the rectangle is a common task. Had there been one main set of data in TimedLevel rather than two, implementing an indexer (default parameterized property) would be a natural choice to provide users with two-dimensional array syntax rather than having to call a method like GetFrequency. An indexer still could have been defined with three “dimensions”—audio channel, index, data type (frequency or waveform)—but that doesn’t seem any easier to use or more readable than the current scheme.
The Visualization Class
As explained earlier, the managed definition of the IWMPEffects interface is private because our .NET visualizations will solely use implementation inheritance. The class they will all extend is Visualization, the only class that implements the IWMPEffects interface. Visualization is an abstract class (MustInherit in VB .NET), requiring derived classes to implement its Render method and Title property. This is done because, from the end user’s point of view, it doesn’t make sense to have an empty visualization showing up in Windows Media Player’s list. By being abstract, subclass authors can derive from it and install their own visualization without worrying about a base visualization appearing in the list. Recall that abstract classes are not registered by the RegistrationServices API because it’s impossible to instantiate them.
The Visualization class, shown in Listing 24.3, exposes an API that’s slightly different than even the managed definition of IWMPEffects. Although the goal is to provide a .NET-like API, it’s important to remain somewhat faithful to the original COM APIs so programmers experienced with the COM APIs can jump right in. In addition, the closer the APIs represent the COM APIs, the more useful existing documentation can be.
Listing 24.3. Visualization.cs. The Abstract Visualization Class That Exposes the .NET Visualization API
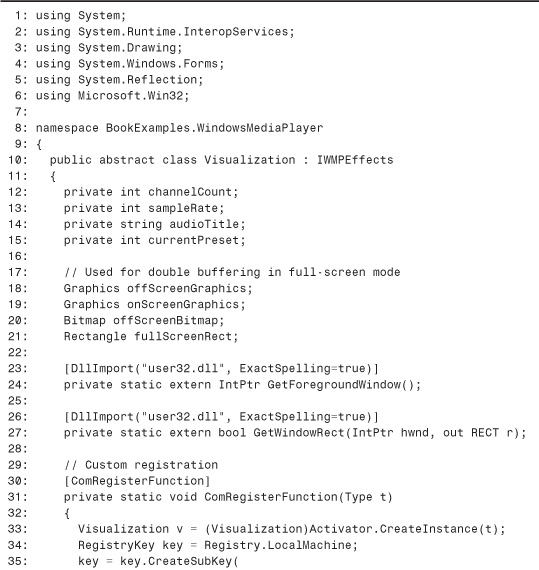


Lines 1–6 list several namespaces—System for IntPtr, Type, Enum, and more; System.Runtime.InteropServices for DllImportAttribute, ComRegisterFunctionAttribute, and ComUnregisterFunctionAttribute; System.Drawing for Graphics, Bitmap, and Rectangle; System.Windows.Forms for IWin32Window; System.Reflection for BindingFlags; and Microsoft.Win32 for Registry and RegistryKey. Lines 12–15 define four private fields that can be accessed with public properties defined later in the listing, and Lines 18–21 define four private fields that are used for double buffering when rendering in full screen mode. The two PInvoke functions in Lines 23–27 are also used later in the listing for full-screen rendering.
Lines 30–42 contain the custom registration function, and Lines 45–57 contain the custom unregistration function. The first thing the registration function does in Line 33 is to use the Type parameter to create an instance of the current type being registered. Although the object created is statically typed as Visualization, the instance at run-time is some non-abstract subclass. We can always be sure that the Type object corresponds to a non-abstract class with a public default constructor because registration does not occur (and thus no custom registration function is called) for anything else. Lines 34–41 use the .NET Framework’s registry APIs in Microsoft.Win32 to create a subkey in the registry spot where Windows Media Player looks for visualizations. The visualization’s Title property is used for the subkey containing the other information.
Tip
Although using a short title for the subkey name (Line 37 in Listing 24.3) matches the conventions used by other visualizations, you might want to consider using the type’s CLSID instead to prevent name collisions. Windows Media Player displays the contents of the subkey’s name value rather than extracting the title from the subkey itself, so a human-readable subkey is not necessary.
The Title property is used again for the name value, and the Description property is used for the description value. To obtain the CLSID for the visualization type, Line 38 uses the GUID property of Type and the “B” string format (just as we saw in Chapter 12, “Customizing COM’s View of .NET Components”). In the custom unregistration function, the added subkey and values are removed. On Line 48, we need to create an instance of the class again to determine the title of the visualization we’re unregistering. These custom registration functions aren’t exposed to subclasses, yet they’ll handle all the registration so derived classes don’t need to know or care about them.
Tip
Ideally, custom registration functions should avoid instantiating the type being registered. Running the object’s constructor could be a slow operation if it contains a lot of code, it could cause unwanted side effects, or even cause failure if the class author didn’t expect the object to be created in the context of registration.
For this example, one way to avoid the need to create an instance would be to require subclasses to implement static (Shared in VB .NET) Title and Description properties that can be invoked inside the registration functions without needing an instance of the type. Such a requirement, however, might seem awkward to subclass authors, and compilers won’t be able to help in enforcing this rule. (This is the same scheme used with ICustomMarshaler and the requirement to also implement a static GetInstance method, described in Chapter 20, “Custom Marshaling.”) Contrast this to having an abstract Title property, for which subclasses that don’t implement this can’t even compile.
For this example, the documentation of the Visualization class should simply warn subclass authors that an instance is created during registration/unregistration, and thus they can avoid doing work in the class’s default constructor.
Lines 60–75 define three simple read-only properties that provide access to the channelCount, sampleRate, and audioTitle fields. The contents of these fields are filled in by the MediaInfo method later in the listing. Lines 78–82 define the CurrentPreset property from the IWMPEffects interface. The property is marked virtual (Overridable in VB .NET) in case derived classes want to change the implementation. Notice that although the definition of CurrentPreset in the IWMPEffects interface carefully listed the set accessor before the get accessor, the ordering doesn’t matter here. Although the ordering would affect the class interface if the class were marked with ClassInterface(ClassInterfaceType.AutoDual), COM clients would have no prior expectation about the method ordering of such new interfaces.
Lines 85–91 contain the two properties used by the custom registration functions—Description and Title. The Title property is abstract, forcing a derived class to return a string through this property. The Description property, however, is simply virtual because it’s not crucial that every visualization has a unique description (although it would be nice). The default description in Line 87 is appropriate, although not very helpful to end users.
Lines 97–103 define three events raised by the Visualization class—MediaChange, EnterFullScreen, and ExitFullScreen. The code that raises these events appears a little later in the listing. All three events use the standard System.EventHandler delegate because they have no additional information to communicate when they are raised.
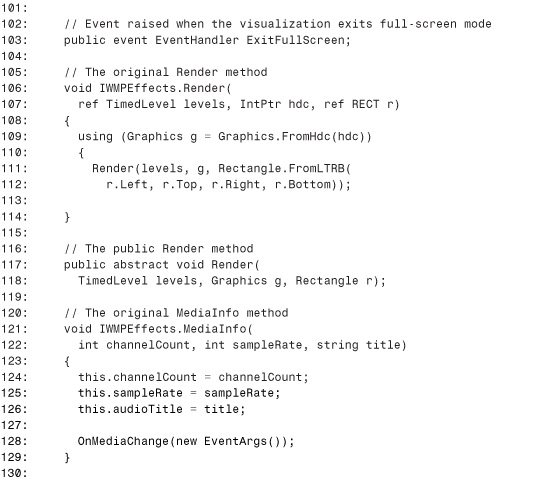
Lines 106–114 contain the implementation of IWMPEffects.Render using explicit interface implementation. This means that the method is not accessible from the class type. Instead, users can only call such a method by casting an instance of the class to the interface type the method is defined on. Because the IWMPEffects interface is private to the BookExample.WindowsMediaPlayer assembly, this Render method is essentially private to .NET components but COM clients can still call the method through the IWMPEffects interface. Recall that in Visual Basic .NET, the same effect can be achieved by marking the class’s method with Private. For example:
Private Sub Render _
(ByRef levels As TimedLevel, hdc As IntPtr, ByRef r As RECT) _
Implements IWMPEffects.Render
So, why do we bother hiding Render from .NET components? Because we added a public overloaded Render method with parameter types that are more natural to work with in managed code. This overloaded Render, defined on Lines 117 and 118, is an abstract method that must be implemented by subclasses. The TimedLevel parameter is by-value instead of by-reference (because there’s no need to modify the contents of the structure inside Render), the HDC parameter is now the type System.Drawing.Graphics, and the RECT parameter is now a System.Drawing.Rectangle. To make this work, COM calls the original Visualization.Render method and, in Lines 109–113, the Render overload implemented by the subclass is called. This code uses Graphics.FromHdc to transform the HDC into a Graphics object, and Rectangle.FromLTRB (that’s LeftTopRightBottom) to transform the values of RECT to a Rectangle.
Line 109 uses C#’s using construct to dispose the Graphics object deterministically. Recall that this is equivalent to the lengthier code:
Graphics g = Graphics.FromHdc(hdc);
try
{
Render(levels, g, Rectangle.FromLTRB(
r.Left, r.Top, r.Right, r.Bottom));
}
finally
{
((System.IDisposable)g).Dispose();
}
The cast to IDisposable is sometimes necessary, for cases in which the object hides the Dispose method through explicit interface implementation. Therefore, in languages without this construct (such as VB .NET), the lengthier try/finally pattern should be used.
Lines 121–129 also use explicit interface implementation for the MediaInfo method. The method simply updates the class’s private fields with the data and calls OnMediaChange.OnMediaChange is a protected virtual method defined in Lines 132–135 that raised the MediaChange event so a subclass can find out when a media change occurs. If the subclass is interested in the characteristics of the current media, it can use the CurrentChannelCount, CurrentSampleRate, and CurrentAudioTitle properties.
Lines 139–156 use the power of reflection to give a sensible default implementation of the Capabilities property. Because all visualizations deriving from this class support full-screen rendering (as you’ll see later in the listing), this method returns VisualizationCapabilities.CanGoFullScreen by default. However, we’d like the method to return this value bitwise-ORed with VisualizationCapabilities.HasPropertyPage if the current instance overrides the DisplayPropertyPage method. Therefore, we check if the current type has a public instance called DisplayPropertyPage using the binding flag DeclaredOnly. This means that the method has to be defined on the most derived type to be found. If the method is not found, Type.GetMethod returns a null instance. This implementation saves the subclass author from having to override the Capabilities property when overriding HasPropertyPage, which is error prone and easy to forget. Of course, the Capabilities property can always be overridden to provide different behavior if you don’t like what it does. Note that the current implementation doesn’t work if a subclass overrides HasPropertyPage and then a subclass of the subclass wants to inherit this functionality. To accommodate this, Capabilities would have to use reflection to traverse the inheritance hierarchy, looking for the most-derived HasPropertyPage (and stopping once it reaches the base Visualization type).
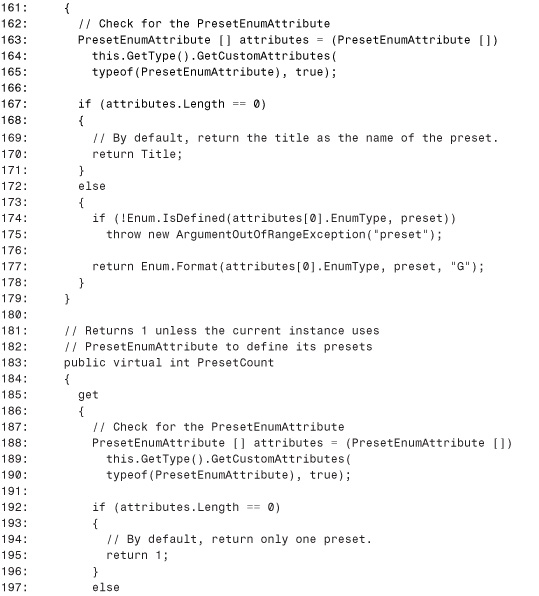
The next two methods do some magic with a custom attribute to save subclass authors from additional work. GetPresetTitle, in Lines 160–179, must return a string corresponding to the preset number given. Rather than forcing each subclass with multiple presets to re-implement this method, this base method checks for a custom attribute on the current instance that contains an enumeration of all the supported presets. This custom attribute—PresetEnumAttribute—will be defined in Listing 24.4. We check for the attribute in Lines 163–165 by calling GetCustomAttributes on the current type instance, passing the type of PresetEnumAttribute. Because we pass true for the inherited parameter (and because the definition of the attribute allows inheritance), the attribute will be found even if the most derived class isn’t marked with it. If the attribute isn’t found, the length of the returned array is zero and the title is returned as the name of the one and only preset in Line 170. This is a reasonable default since many skins display only the preset name of the currently running visualization. If the custom attribute is found, Line 174 checks to see if the passed-in value is one of the enum’s members using Enum.IsDefined. If the number is in the valid range, Enum.Format is used to return the string representation of the enumeration value.
The PresetCount property, implemented in Lines 183–202, uses the same manner of checking for the PresetEnumAttribute. If found, the number of enum members is returned (obtained using Enum.GetValues in Line 199). If not, one is returned because the default behavior is having a single preset. The way in which PresetEnumAttribute is used assumes that the members of the enumeration have contiguous values starting at zero. Also, the preset names can only be as expressive as an enum member (in other words, no spaces). Still, using the attribute can be much more convenient and maintainable than implementing CurrentPreset, GetPresetTitle, and PresetCount. If you want multi-word presets, you can always override these methods instead.
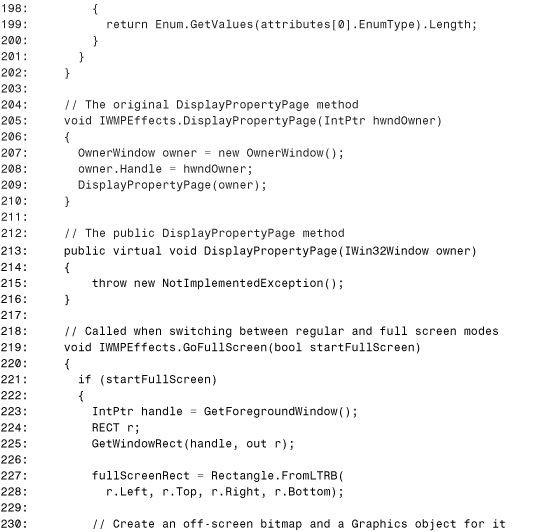
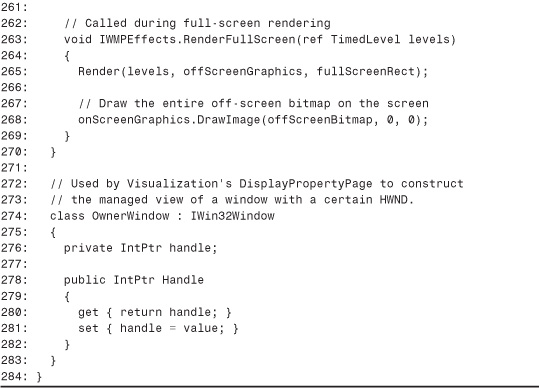
The DisplayPropertyPage method, just like Render, is explicitly implemented so an overloaded method with a .NET-friendly parameter is exposed to others. In this case, the pair of methods is used to transform the HWND parameter into an IWin32Window interface. IWin32Window is defined in the System.Windows.Forms assembly, and has a single read-only Handle property of type System.IntPtr. The System.Windows.Forms.Form class implements this interface. The goal of this method is to display a dialog with the owner window specified by the passed-in HWND. The Form class has a ShowDialog method, but its owner parameter is the IWin32Window type, hence the need for the transformation. The implementation of DisplayPropertyPage in Lines 205–210 needs to construct some object implementing IWin32Window that it can pass to the public DisplayPropertyPage overload. Unfortunately, we can’t construct a Form object because there’s no way to set its handle; only a way to get it. Therefore, Line 207 creates an instance of an OwnerWindow object that supports getting and setting its handle. OwnerWindow is a simple class defined in Lines 274–283 that implements IWin32Window but also adds a set accessor to the Handle property. Because it implements the required interface, it can be passed to the DisplayPropertyPage overload, after its Handle property is set to the passed in HWND on Line 208. The base implementation of the DisplayPropertyPage overload (Lines 213–216) simply throws a NotImplementedException.
The base implemenation of GoFullScreen on Lines 219–248 does a few transformations to accommodate rendering in full-screen mode without any additional work needed by derived classes. The transformations done when entering full-screen mode (Lines 223–237) are similar to the implementation of Render, except that an HWND and RECT need to be obtained for the foreground window using the Win32 APIs GetForegroundWindow and GetWindowRect. To avoid too much flickering, GoFullScreen’s implementation sets up double buffering during the render process. It does this by creating an off-screen Graphics object as well as an on-screen Graphics object. After the objects are initialized, OnEnterFullScreen is called in Line 237 to raise the EnterFullScreen event. When exiting full-screen mode (Lines 242–246) the necessary objects are disposed, and the ExitFullScreen event is raised by a call to OnExitFullScreen.
Notice that GoFullScreen’s boolean parameter is not marked with MarshalAs(UnmanagedType.Bool) as in the interface. This doesn’t really matter because Windows Media Player only knows about and uses the IWMPEffects interface, which has the correct marking. If other COM clients attempted to use class interfaces for any derived classes, the GoFullScreen method would simply have a VARIANT_BOOL parameter instead of BOOL unless each class used MarshalAsAttribute on it. Because the goal is to hide the COM from derived visualization classes, there’s no need to do this.
Lines 251–260 contain the OnEnterFullScreen and OnExitFullScreen methods, which raise the two corresponding events. In Lines 263–269, RenderFullScreen is explicitly implemented. It calls the same abstract Render method in Line 265 as called by our implementation of IWMPEffects.Render, but passes the off-screen Graphics object and full-screen Rectangle object created inside GoFullScreen. After the call, it draws the contents of the off-screen bitmap to the on-screen display because we’re using double buffering.
Listing 24.4 contains the code for the PresetEnumAttribute that can be used by classes derived from Visualization.
Listing 24.4. PresetEnumAttribute.cs. The Custom Attribute Used by Visualization Classes to be Associated with a List of Presets
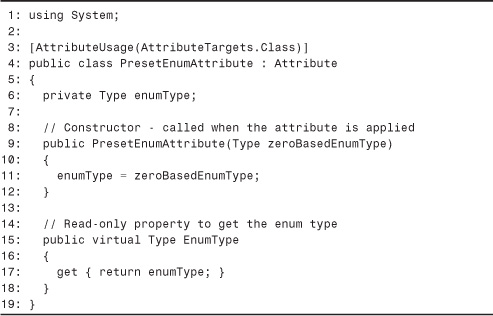
The custom attribute is just about as simple as it can get. The AttributeUsageAttribute indicates that it’s valid only on classes, and the private field on Line 6 stores the enum type. Lines 9–12 contain the constructor with a Type parameter, and Lines 15–18 contain a read-only property that returns the type instance.
That completes the source files for the BookExamples.WindowsMediaPlayer assembly. To compile it, you can run the following at a command prompt:
csc /t:library /out:BookExamples.WindowsMediaPlayer.dll IWMPEffects.cs SupportingTypes.cs Visualization.cs PresetEnumAttribute.cs /r:System.Drawing.dll /r:System.Windows.Forms.dll /r:System.dll
For COM components that implement visualizations, Microsoft recommends that they be installed in the Visualizations subfolder where Windows Media Player is installed. For .NET components, the Global Assembly Cache is a great place to install the assembly, but you could also place it in the Visualizations directory instead. If you decide to put the visualizations created in this chapter in this directory, you should place the BookExamples.WindowsMediaPlayer assembly either in this same directory or in the GAC. If you choose the latter you’ll need to give the assembly a strong name, but it’s a great idea to do this anyway. By installing it in the GAC, you don’t need to worry about a different publisher overwriting your assembly with a file that has the same name.
Using the .NET Visualization API
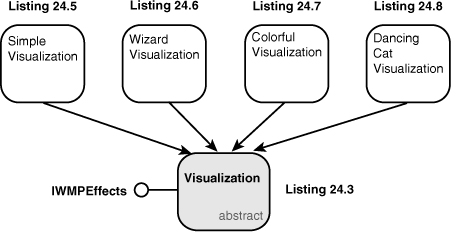
Now that the BookExamples.WindowsMediaPlayer assembly is available, let’s use it to create some visualizations. In this section, we look at four different visualizations. All of these derive directly from Visualization, as shown in Figure 24.4.
Figure 24.4. Four visualizations based on the BookExamples.WindowsMediaPlayer assembly.
A Simple Visualization
Listing 24.5 contains the simplest possible visualization (written with Visual Basic .NET), yet the resulting effect is still interesting to watch.
Listing 24.5. SimpleVisualization.vb. The SimpleVisualization Class Demonstrates a Basic Use of the .NET Visualization API in Visual Basic .NET
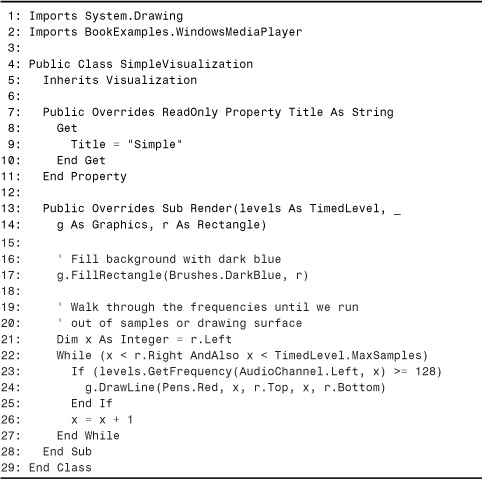
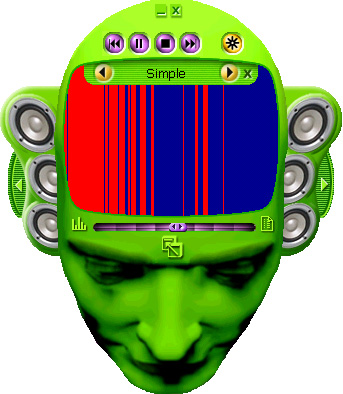
Lines 1–2 import two namespaces: System.Drawing for Render’s Graphics and Rectangle parameters and BookExamples.WindowsMediaPlayer for the Visualization base class. (Notice how System.Runtime.InteropServices isn’t on the list.) The SimpleVisualization class does the minimum amount of work necessary to be a visualization by only implementing the abstract Render and Title members. The Title property is implemented in Lines 7–11, and returns “Simple” as the title. Because it doesn’t override the GetPresetTitle method, “Simple” is also used for the name of the one and only preset.
Lines 13–28 contain the implementation of Render. Because this is the “.NET-ized” Render, the implementation can directly use the System.Drawing.Graphics and System.Drawing.Rectangle parameters seamlessly. Line 17 fills the entire rectangle with a dark blue color, and Lines 21–27 draw a vertical red line in places where a corresponding frequency is greater than a certain threshold.
Each pixel on the rectangle’s X-coordinate represents a data point in the array of frequencies. Because the number of samples (TimedLevel.MaxSamples) could be less or greater than the width of the rectangle in pixels, the While loop stops when hitting either the right edge of the rectangle or the maximum number of samples—whichever comes first. Line 23 checks the frequency for each data point by calling the handy GetFrequency method we defined previously in Listing 24.2. For simplicity, the visualization only uses the frequencies in the left audio channel. A threshold of 128 is chosen because it falls in the middle of the range of frequency values returned (0-255). If the frequency is in the upper half, a vertical red line is drawn using Graphics.DrawLine.
That’s all there is to it. To compile this visualization, run the following:
vbc /t:library SimpleVisualization.vb /r:System.Drawing.dll /r:BookExamples.WindowsMediaPlayer.dll
If you’re placing it in the same Visualizations directory as the BookExamples.WindowsMediaPlayer.dll, you should register it with a codebase as follows (after moving it to its final location):
regasm SimpleVisualization.dll /codebase
If you give it a strong name and install it in the GAC, you’ll need the dependent BookExamples.WindowsMediaPlayer assembly there, too. It’s not necessary to register BookExamples.WindowsMediaPlayer.dll because the abstract Visualization class doesn’t get registered.
To see this simple visualization in action, open Windows Media Player and choose View, Visualizations, Simple, Simple from the menu. Figure 24.5 displays the result of using SimpleVisualization while music is playing.
Figure 24.5. The Simple visualization, as shown in Windows Media Player.
Tip
When running visualizations, be aware that Windows Media Player does not support them when playing MIDI files. To see your visualizations run, be sure you’re playing music in a supported format.
The Wizard Visualization
The next visualization we’ll create is called WizardVisualization, not because it contains an animated wizard, but because it is based on the visualization generated by the unmanaged C++ Windows Media Visualization Wizard. This visualization makes use of two presets—one called “scope” that looks like an oscilloscope, and another called “bars” that looks like a graphic equalizer. Listing 24.6 contains the C# source code for this visualization.
Listing 24.6. WizardVisualization.cs. The WizardVisualization Class Is Based on the Sample Visualization Generated by the Windows Media Visualization Wizard

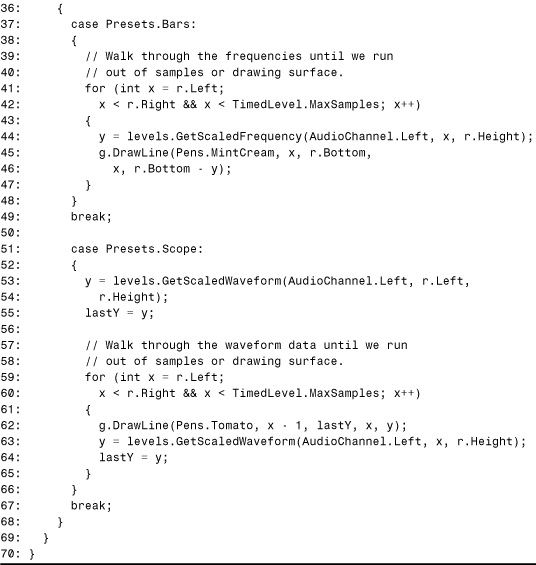
Lines 1–2 use the same two namespaces for the same reasons as the previous listing. Lines 5–9 define the Presets enumeration which contains two members, one for each preset. The WizardVisualization class begins on Line 11 with the application of the PresetEnumAttribute custom attribute to associate the Presets type with the WizardVisualization class. Lines 14–23 contain the definitions of the overridden Title and Description properties that return strings to uniquely identify this visualization.
Finally, the Render method is contained in Lines 25–69. We begin again by filling the background with a solid color (Line 32), and this time the background color is black. Line 35 begins a switch statement that chooses which drawing logic is executed, based on the current preset. Notice that thanks to the work done in the base Visualization class, all the code needs to do is check the value of the CurrentPreset property, casting the integer to the appropriate enumeration.
For the bars preset, each X-coordinate has a vertical line extending from the bottom of the rectangle to a point representative of the frequency at that point. Like the previous visualization, the for loop scans the area from left to right, stopping as soon as it runs out of samples or reaches the end of the rectangle. Line 44 calls GetScaledFrequency with the rectangle’s height as the final parameter to get a value that ranges from the top to the bottom of the rectangle. Lines 45–46 draw the line using a “mint cream” pen.
The scope preset differs from the bars preset in two major ways:
• The audio’s waveform data is used instead of frequency data.
• Each data point is connected with a single line to the previous one, rather than each point connecting to the bottom of the rectangle.
Therefore, the drawing code in Lines 59–65 keeps track of the previous waveform value in each iteration of the loop using the lastY variable that was declared in Line 29. The line is drawn in Line 62 with a tomato-colored pen.
Compared to the unmanaged C++ generated by the Windows Media Player Visualization Wizard, it took very little code to get a visualization with the same functionality. Most of the savings in code can be attributed to using PresetEnumAttribute so the base class can handle the management of presets, and using the helper methods defined on the TimedLevel value type. Visualizations written this way can focus on the important part—drawing the pictures. Compiling and installing this visualization requires the same steps as the simple visualization (although with a different compiler). First, run the following:
csc /t:library WizardVisualization.cs /r:System.Drawing.dll /r:BookExamples.WindowsMediaPlayer.dll
Copy it to the Visualizations directory with the other assemblies, then register the assembly:
regasm WizardVisualization.dll /codebase
After this visualization has been installed, open Windows Media Player and select View, Visualizations, Wizard, Bars from the menu, or View, Visualizations, Wizard, Scope.
Figure 24.6 displays the result of using WizardVisualization with the Bars preset, and Figure 24.7 displays the result of using it with the Scope preset.
Figure 24.6. The Wizard visualization with the Bars preset, as shown in Windows Media Player.

Figure 24.7. The Wizard visualization with the Scope preset, as shown in Windows Media Player.

The Colorful Visualization
For this visualization, we’ll make use of the ability to display a property page so the user can customize the output. We’ll also display some of the media information provided by the base class properties. Listing 24.7 contains the C# source code for this visualization.
Listing 24.7. ColorfulVisualization.cs. The ColorVisualization Class Enables the User to Select a Background Color for the Visualization

Line 2 lists one more additional namespace than the previous visualizations—System.Windows.Forms. This is needed because the class overrides the HasPropertyPage method with an IWin32Window parameter. Line 7 defines a private field of type System.Drawing.Color that stores the background color chosen by the user. The initial color is set to lemon chiffon. Notice that the field is static. This is done because every time the user configures the visualization through its property page, Windows Media Player creates a new instance of the object.
Caution
Windows Media Player instantiates a new visualization object when setting properties, so don’t store user options set by a property page in instance members.
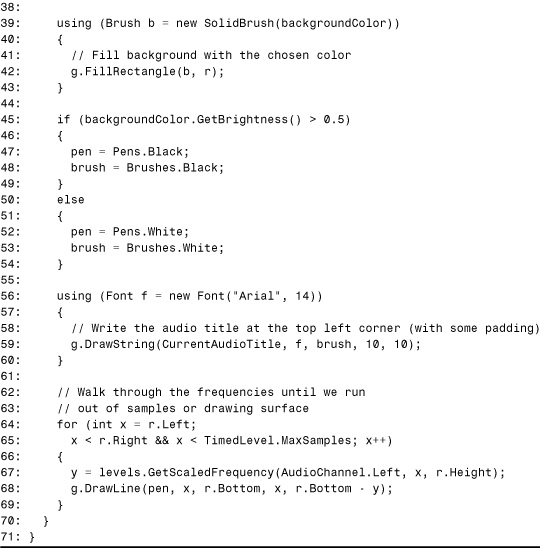
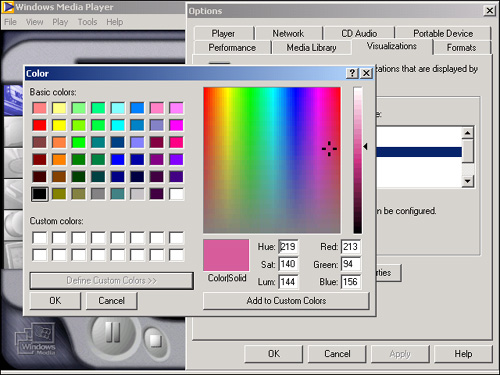
Lines 9–19 contain the usual Title and Description properties. In the implementation of DisplayPropertyPage (Lines 21–30), the common dialog for choosing colors is used for the user interface. Because these common dialogs (which derive from System.Windows.Forms.CommonDialog) are a different sort of control than a Form, we don’t need to use the owner parameter to tie the window to the caller’s window. The method simply creates a new ColorDialog instance, calls ShowDialog, and updates the background color if the user hit the OK button. The ColorDialog class has a Color property that makes retrieving the selected color easy (used in Line 28). Displaying a color dialog directly is taking the easy way out. You’d most likely want to create your own form and display that when the user requests it. In this case, simply create an instance of your form class and call ShowDialog, passing owner as the IWin32Window parameter.
The implementation of Render has a few more interesting things going on than in the previous visualizations. Unlike the others, which used only predefined pens and brushes, we need to create a new SolidBrush instance to paint the background with the color chosen by the user. Because brushes are scarce Windows resources, it’s important for them to be released as soon as the client is done with them. Hence, Brush implements IDisposable, and Lines 29–43 use C#’s using construct to dispose the brush deterministically. The code in Lines 39–43 is equivalent to:
Brush b = new SolidBrush(backgroundColor);
try
{
// Fill background with the chosen color
g.FillRectangle(b, r);
}
finally
{
((System.IDisposable)b).Dispose();
}
After the background has been painted, we’re ready to do some drawing. It’s important that the foreground drawing is done in a color that shows up nicely against the background. Because the user is only given the option to change the background color and not the foreground color, Lines 45–54 select an appropriate color. The heuristic used in Line 45 is to check the brightness of the color. If the brightness value (a floating point number from 0 to 1) is in the higher half, we’ll draw with black. Otherwise, we’ll draw with white. This simple check does a fine job at producing nice-looking results. Notice that the code sets both a brush and a pen to the chosen color. This is needed because the method draws text with a brush and draws lines with a pen. Also, notice that the predefined black and white pens and brushes are used, so we don’t need to create additional instances.
Tip
When using pens and brushes, try to use the built-in brushes and pens defined by System.Drawing.Brushes and System.Drawing.Pens with predefined colors. This eliminates the need to worry about disposing them.
Lines 56–60 draw a string inside the rectangle, at a location 10 pixels down and ten pixels to the right of the top-left corner. The string used is CurrentAudioTitle, the property defined by the base Visualization class. Again, C#’s using construct is used because fonts are scarce resources and implement IDisposable. Lines 64–69 draw bars in an identical fashion as the bars preset in WizardVisualization.
To run this visualization, compile the listing as follows:
csc /t:library ColorfulVisualization.cs /r:System.Drawing.dll /r:System.Windows.Forms.dll /r:System.dll /r:BookExamples.WindowsMediaPlayer.dll
Copy it into the Visualizations directory, then run:
regasm ColorfulVisualization.dll /codebase
After this visualization has been installed, open Windows Media Player and select View, Visualizations, Colorful, Colorful from the menu. Figure 24.8 displays the result of using this visualization. To exercise the DisplayPropertyPage functionality, choose Tools, Options... from the menu, then select the Visualizations tab. Select Colorful from the list and click the Properties button. Here is where DisplayPropertyPage is called, the results of which are shown in Figure 24.9.
Figure 24.8. The Colorful visualization, as shown in Windows Media Player.

Figure 24.9. Configuring the Colorful visualization with ColorDialog used as a property page.
The Dancing Cat Visualization
For the final visualization of this chapter, we’ll create a cat that dances to the music. This visualization uses bitmaps as a demonstration of .NET resources. Although the game in the previous chapter stored sounds and pictures as individual files, it’s doubtful that a professional application would do this. Instead, non-code materials like pictures, sounds, and even strings (for localization purposes) are typically stored as resources.
In the Windows world, there are now two distinct kinds of resources—managed and unmanaged. Both serve the same purpose, so the difference simply comes down to the internal format of the data and the APIs used to read and write them. Unmanaged resources (also called Win32 resources) would have been appropriate for the bitmaps and sounds used in the previous chapter because the DirectX for Visual Basic APIs have methods that work directly with unmanaged resources. Because there’s no compelling reason to use unmanaged resources in a visualization, the upcoming code uses managed resources.
To create the dancing cat animation, the visualization uses the four bitmaps shown in Figure 24.10.
Figure 24.10. Four bitmaps that make up the cat animation.

Two pictures show the cat facing left, and two show the cat facing right. Each pair differs by the location of the cat’s paws, so the cat can appear to walk. The red background will be treated as transparent in the visualization source code.
To embed these bitmaps as pictures in the visualization’s assembly, we must create a .resources file from the four pictures. There are many tools for doing this, and the one I chose was the ResEditor sample that is installed with the .NET Framework SDK. With this sample application, I selected the four bitmaps, named them “Left1”, “Left2”, “Right1”, “Right2”, then saved the file as DancingCatVisualization.resources. Later, the compilation steps show how to use this .resources file. This book’s Web site contains the .resources and corresponding .resx file containing these bitmaps. (The .resx file is an XML text file that can be converted to a binary .resources file using the .NET Resource Generator—RESGEN.EXE—that comes with the .NET Framework SDK.) Listing 24.8 contains the code for the visualization.
Listing 24.8. DancingCatVisualization.cs. The DancingCatVisualization Class Displays a Cat That Dances to the Music

The namespaces listed in Lines 1–5 contain three that the other visualizations don’t: System.Resources to read the bitmaps, System.Drawing.Drawing2D for a fancy paintbrush that enables the painting of a gradient background (one that smoothly flows from one color to another), and System for the IDisposable interface and the GC class. Line 9 contains the declaration of a two-dimensional array that contains the four cat bitmaps.
The constructor in Lines 11–23 does three things: creates a ResourceManager that enables us to extract the bitmaps, fills the 2-D array with the bitmaps, and sets a color key of red so the red parts of the bitmaps will appear transparent. When creating the ResourceManager in Lines 13 and 14, the type of the current class is passed as a parameter, which enables the embedded resources to be found in the current assembly.
Remember that because of the way the Visualization custom registration functions are implemented, the code in this constructor is going to get run during registration and unregistration of the assembly. This isn’t ideal, but workable as long as the code doesn’t cause an exception to be thrown. (If you didn’t embed the assembly’s resources correctly, you’ll see the error when running REGASM.EXE on it.)
Lines 16–19 fill the array so that the first dimension corresponds to the cat’s orientation (0 for left and 1 for right) and the second dimension corresponds to the two different stances. Whereas the previous chapter used DirectX APIs to set a red color key on the input bitmaps, Line 22 calls the managed API for “managed bitmaps”: System.Drawing.Bitmap.MakeTransparent.
Lines 25–29 contain standard finalizer and Dispose methods for disposing the bitmaps. Although the Windows Media Player client isn’t going to take advantage of calling Dispose, it’s good practice do this anyway because the class holds onto bitmaps that should be disposed of as soon as possible. And, when a .NET-aware media player comes along that plans on calling IDisposable.Dispose, these visualizations will be ready (of course, only if we communicate with the player through a COM object that uses the exact same COM interface). To dispose the bitmaps, we simply call Bitmap.Dispose on each one in Lines 27–28 and 36–37.
Lines 40–48 contain the standard Title and Description properties, and Lines 50–108 contain the Render method. Render begins by choosing a different course of action depending upon whether the audio is currently stopped, paused, or playing. This is done simply by checking the value of the TimedLevel parameter’s State field that we defined as an AudioState enumeration.
Lines 58–67, which contain the drawing code for the stopped state, fills the background using a LinearGradientBrush so the top is white, the bottom is dark gray, and points in between are mixtures of the two colors. The LinearGradientBrush has many ways to customize its painting, but the simple use here is enough to create a nice effect. In Line 65, we select a static image of the cat to display, and in Lines 66–67 we draw it in the center of the rectangle. The code for drawing in the paused state, in Lines 73–82, is identical to the code for the stopped state except for the color of the gradient (olive on top and light yellow on the bottom).
In Lines 88–105, the code for the playing state, we get to the dancing part. Lines 88–93 fill the background with a gradient that’s the exact opposite of the colors in the paused state (light yellow on top and olive on the bottom). Lines 96 and 97 choose an orientation and a stance for the cat. In other words, they determine which of the four bitmaps to display at the current point in time. The code switches these values in a regularly-timed manner using the TimedLevel parameter’s TimeStamp field. Because the TimeStamp value is in 100-nanosecond ticks (just like the Ticks property of System.DateTime), the number is divided so that the orientation reverses every second and the stance changes every tenth of a second.
After the values for orientation and stance are selected (either 0 or 1, thanks to the % 2) the picture is selected in Line 99. Notice that the audio does not affect this aspect of the cat’s dancing one bit. What the audio does effect is the placement of the cat bitmap.
Lines 100–104 contain the single lengthy call to DrawImage with the calculations for the placement of the cat. To determine the width, we begin by centering the cat (using (r.Width - cat.Width) / 2) then add an offset based on a representative frequency. GetFrequency is called to get the value for the first data point in the left audio channel. Because this is a value between 0 and 255, Line 111 subtracts 128 to get a value between–128 and 127. Finally, this value is divided by two to get a range of –64 to 63 (so the cat’s position doesn’t stray too far from the center). The result is that lower frequencies cause the cat to move to the left of the center, and higher frequencies cause the cat to move to the right of the center (assuming that the first frequency data point is good enough as a representative sample). The exact same calculation is done for the height of the cat, but using the waveform data instead.
Again, the code for this visualization is pretty simple but the result is fun to watch. Compiling the assembly can be done as follows, with the DancingCatVisualization.resources file in the same directory as DancingCatVisualization.cs:
csc /t:library DancingCatVisualization.cs /r:System.Drawing.dll /r:BookExamples.WindowsMediaPlayer.dll /res:DancingCatVisualization.resources
The /res option embeds the resources in the assembly. Copy DancingCatVisualization.dll to the Visualizations directory, then register it:
regasm DancingCatVisualization.dll /codebase
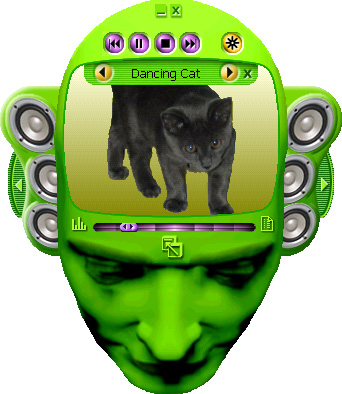
After this visualization has been installed, open Windows Media Player and select View, Visualizations, Dancing Cat, Dancing Cat from the menu. Figure 24.11 displays the result of using this visualization.
Figure 24.11. The Dancing Cat visualization, as shown in Windows Media Player.
If you feel like getting your hands dirty, you could play around with several improvements to make the dancing cat more lifelike. For example, perhaps the regularly timed picture changing should be replaced with an algorithm based on the audio, or maybe looking at just the first frequency/waveform data point is not good enough.
Looking at the previous listing, you might also be displeased with the handling of the multi-dimensional array. Code in the Render function needs to know what the zeros and ones in each dimension mean. A more readable solution would be to access the array by keys, for example:
cat = catPictures["left", "primary"];
rather than:
cat = catPictures[0, 0];
Such an array is often called an associative array. Of course, this behavior can be obtained using a default parameterized property, and for C# code this means creating an indexer.
If we wanted to use enumeration types rather than strings for both array indices, then the raw array could be used without having to implement an indexer. However, the result is not very pretty because of necessary casting:
cat = catPictures[(int)Orientation.Left, (int)Stance.Primary];
Tip
For parameters with a limited set of valid values, favor designing APIs that use enums rather than integers, strings, or even boolean types. Enumerations can be more intuitive than integers because the names of the members convey meaning. Enumerations are preferable to strings because they are essentially the strongly-typed version of a string. Enums:
• are just as readable to humans
• are less error-prone because typos are caught at compile time (and the method implementer doesn’t need to worry about case-sensitivity issues)
• clearly show what the valid values are
Enums with only two values are sometimes even preferable to boolean types, because the meaning is clearer in the caller’s code. Compare, for example, the following call:
urlBuilder.BuildUrl(UrlBuilderOptions.NoAbsolute);
versus
urlBuilder.BuildUrl(false);
To someone maintaining the code, UrlBuilderOptions.NoAbsolute conveys much more meaning than false.
Conclusion
This chapter demonstrated a real-world application that takes advantage of the way in which inheritance gets exposed to COM. Because every class appears to implement all the interfaces of its base classes, the visualizations were able to expose an IWMPEffects interface without necessarily being aware of it. Registration aside, the .NET visualizations written in this chapter don’t appear to have anything to do with COM.
When creating and running your own visualizations, any minor mistake could cause a hard-to-diagnose failure inside Windows Media Player. Here are some tips if you’re running into troubles:
• If the visualization doesn’t show up on the Windows Media Player menu, your class must not have been registered. Even if you’ve run REGASM.EXE, this could occur if your class is accidentally non-public, marked with ComVisible(false), or if it doesn’t have a public default constructor.
• If the visualization shows up in the menu but no presets appear, registration was successful but instantiating the component fails. Make sure the correct assembly is in the same directory as the BookExamples.WindowsMediaPlayer assembly and registered with a codebase that points to it, or make sure that both assemblies are installed in the Global Assembly Cache.
• If the visualization appears as all black, the Render method is probably throwing an exception. Consider using a debugger or adding diagnostic code to track down the problem.
• If you’re really stuck, you could write a small COM program that hosts your visualization object and attempts to use it the same way Windows Media Player does.
Figure 24.12 illustrates which portion of Windows Media Player’s menu gets its data from the registry and which portion gets its data from the instantiated component.
Figure 24.12. Windows Media Player menus and the source of their data.

The rendering code in this chapter used some simple APIs from the System.Drawing assembly. For more information about these classes and their members, see the .NET Framework documentation for the System.Drawing namespace installed with the SDK or online at msdn.microsoft.com.
This completes the comprehensive examples section of the book. Hopefully you can have some fun playing with these examples that exercise both directions of COM Interoperability and PInvoke. Even if you have more business-oriented applications in mind when using the .NET platform, these examples should still cover what you need to know when leveraging unmanaged code becomes a necessity.