
Chapter 14. Implementing COM Interfaces for Binary Compatibility
In This Chapter
• Getting Interface Definitions
• Binary Compatibility with Visual Basic 6 Classes
• Example: Implementing Office XP Smart Tag Interfaces
• Interface Implementation Shortcuts in Visual Studio .NET
• Common Problems When Implementing COM Interfaces
• COM Interfaces with Default CCW Implementations
• COM Interfaces Bridged to Different .NET Types
To conclude our examination of developing .NET components that are exposed to COM, we’re going to focus on implementing COM interfaces in managed code. A COM interface is simply an interface originally defined in COM with a unique IID.
A .NET component that implements a COM interface is sometimes said to be a COM-compatible component, or one that is binary-compatible with an existing COM component. This means that existing COM clients don’t need to be re-written or even recompiled in order to take advantage of .NET components because these new components implement the same old interfaces that COM clients expect. This process usually begins by importing a type library containing a COM interface definition, and ends with registering the assembly containing the .NET class implementing the interface (and possibly exporting a type library).
The process of implementing a COM interface is really no different than implementing a .NET interface. The main difference is that the interface’s documentation won’t exactly match the signatures in the .NET definition of the interface unless it happens to have any .NET-specific documentation. The other issue, discussed in the first section, is that whereas a metadata definition always exists for a .NET interface (otherwise it wouldn’t be a .NET interface), a metadata definition of a COM interface often doesn’t exist until you create one.
Many COM interfaces are already implemented by the CLR-supplied COM-Callable Wrapper (CCW) for any .NET object, so they don’t need to be implemented in managed code. If you look back at Figure 11.5 at the end of Chapter 11, “.NET Design Guidelines for Components Used by COM Clients,” you can see a bunch of COM interfaces listed as implemented by the Grid class inside OLEVIEW.EXE, such as IConnectionPointContainer, IMarshal, and ISupportErrorInfo. These extra interfaces make any .NET object a premier COM object with bells and whistles to enhance its interaction with other COM objects. These interfaces can be automatically implemented by CCWs because all .NET objects have rich information available that doesn’t come freely in the world of COM.
Because all of these “plumbing interfaces” are already implemented for your .NET classes, you’ll typically only need to worry about implementing application-specific COM interfaces to get higher level tasks accomplished. This chapter walks you through the process of implementing two COM interfaces defined by Microsoft Office XP. After that, we’ll look at what can be done if you want to provide your own customized implementations of the COM interfaces already implemented by your object’s CCW.
Getting Interface Definitions
One of the tricky parts of implementing a COM interface is getting the required metadata definition of it. There are essentially three ways to get a .NET definition of a COM interface:
• Use a COM interface already defined in a Primary Interop Assembly or elsewhere in the .NET Framework.
• Generate an Interop Assembly with the type library importer and use the definition contained inside.
• Write your own interface definition in source code.
The first option is recommended due to the identity issues discussed in Chapter 3, “The Essentials for Using COM in Managed Code.” Although implementing a COM interface is usually done for communication with COM components, there may be .NET components that wish to talk to yours using a well-known COM interface, and all .NET components must agree on the official interface definition. This option is also the easiest because you don’t have to worry about generating the interface definition. Therefore, this option is no different than implementing any .NET interface.
The second option is easy to do when a type library containing the interface definition already exists. The only caveats to this approach are the same caveats to using your own Interop Assemblies rather than Primary Interop Assemblies. If only COM components communicate with your object via the COM interface, then it doesn’t matter where you get the interface definition from. Of course, if no type library exists then you might be forced to create one from an IDL file or via some other mechanism.
The third option is the most difficult, and is the subject of Chapter 21, “Manually Defining COM Types in Source Code.”
Caution
Don’t attempt to define a COM interface in managed code before reading Chapter 21. Omitting the necessary custom attributes can be harmful to the Windows Registry.
Binary Compatibility with Visual Basic 6 Classes
Visual Basic 6 projects have a “binary compatibility” option that enables users to express their desire to be binary-compatible with an existing COM component. This option ensures that the same CLSIDs, IIDs, and LIBIDs are used when recompiling a project by examining the CLSIDs, IIDs, and LIBIDs in an existing type library. Because the CLR’s algorithms for generating LIBIDs, CLSIDs, and IIDs (discussed in Chapter 11) keeps them fixed when recompiling as long as you don’t make incompatible changes, and also because you can control your GUIDs using custom attributes, there’s no need for such an option in Visual Studio .NET when recompiling a .NET project. But if you’re rewriting a Visual Basic 6 component in Visual Basic .NET but want the new component to be binary compatible with the old one, you should reference the old component and implement its interfaces to be sure that you’re exposing everything in a compatible way.
Assume you have a simple VB6 class module called Class1 that has some methods and properties in a project called Project1. Although the class doesn’t appear to implement an interface within the VB6 IDE, the Class1 coclass actually implements a hidden _Class1 class interface. If you were to translate the source code for Class1 to VB .NET syntax, compiling it would not result in a class that’s binary compatible because it would have a different CLSID and its class interface would have a different IID. You could mark your class with GuidAttribute to give it the appropriate CLSID (which you’d need to obtain by opening your VB6 component’s type library in a viewer such as OLEVIEW.EXE). Because you can’t control the IID for your class interface, you’d need to suppress it using ClassInterface(ClassInterfaceType.None), then define and implement a real .NET interface containing the appropriate IID with the members of _Class1. (Or you could use ComClassAttribute and give it the appropriate CLSID and IID, which effectively does the same thing.) Still, you manually need to ensure that your new interface is binary-compatible with the old _Class1 interface, which may not even be possible. For example, there’s no way to define a .NET property that gets exposed to COM as a property with all three accessors (Get, Let, and Set).
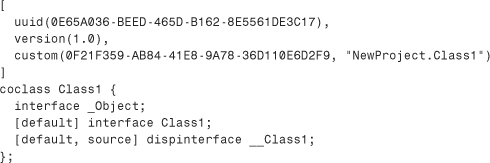
Therefore, the way to ensure binary compatibility is to reference an imported Interop Assembly for the VB6 project and implement its _Class1 interface, still suppressing the CLR-generated class interface because it’s not binary compatible with the VB6-generated class interface. Alternatively, you could implement the Class1 coclass interface generated by the type library importer, because it has the same members. This would look like the following in Visual Basic .NET:
Imports System.Runtime.InteropServices
Namespace NewProject
<Guid("0e65a036-beed-465d-b162-8e5561de3c17"), ProgId("Project1.Class1"), _
ClassInterface(ClassInterfaceType.None)> _
Public Class Class1
Implements Project1.Class1
...
End Class
End Namespace
The VB .NET NewProject.Class1 class is binary compatible with the VB6 Class1 class. The GuidAttribute is still needed to give the class the same CLSID as the VB6 class, and ProgIdAttribute is used to preserve the old ProgID because we had to change the fully-qualified name of the class to avoid a name conflict with the imported coclass interface.
Tip
It might seem undesirable to reference the old COM component when you’re writing a new .NET component that’s supposed to replace it. However, once you’ve obtained the type definitions from the imported Interop Assembly, you can discard the old COM component. Only .NET interface definitions in the Interop Assembly are required to make binary compatibility work.
If the original Visual Basic 6 class defined events, then the coclass would have not only implemented a hidden _Class1 class interface, but also exposed a hidden __Class1 source interface. The benefit of having the VB .NET class implement the coclass interface (Class1) rather than the real interface (_Class1) is that the event members are inherited by the coclass interface so the compiler can enforce that you’re implementing all the required events. To accomplish the same thing without implementing the coclass interface, you’d need to implement the two interfaces it would derive from: _Class1 and the importer-generated __Class1_Event interface. Still, in order to be binary compatible with a coclass that exposes a source interface, you’d need to use ComSourceInterfacesAttribute as follows:

This NewProject.Class1 class is now binary compatible with a Class1 class that exposes events. Such a class would be exported as follows (shown in IDL):
If your VB6 class implemented any interfaces besides its class interface, you’d need to obtain .NET definitions for those interfaces and implement them as well.
Caution
Be careful with .NET classes that implement coclass interfaces generated by the type library importer (such as Class1 in the previous example). Version 1.0 of the CLR has a bug such that passing a .NET object as a parameter typed as a coclass interface exposes a v-table to COM that contains only the methods of IUnknown and IDispatch (since, after all, the .NET coclass interface has no members directly defined on it). Therefore, attempting to call members of the original coclass’s default interface fails due to accessing memory that doesn’t belong to the v-table. This does not affect passing COM objects in such a way; only .NET objects passed to unmanaged code.
If a COM client queries for the original default interface (_Class1), it will receive the expected v-table rather than an empty one. Therefore, this problem is usually not noticed when COM marshaling is involved (which performs QueryInterface calls), but can appear when COM marshaling is avoided since the interface pointer is given directly to the client! To fix this, you could undo the coclass interface parameter/field replacement done by the importer in an Interop Assembly (by changing Class1 parameters and fields to _Class1) using the techniques of Chapter 7, “Modifying Interop Assemblies.”
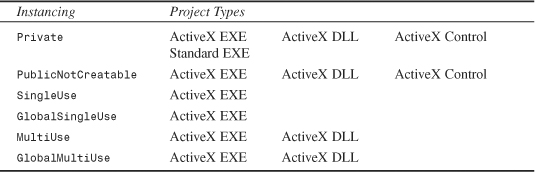
Unrelated to interfaces, Visual Basic 6 class modules have an Instancing property that determines whether or not external components are allowed to use or create instances of the class, as well as some additional behavior. The Instancing property has six valid values, and the type of project you create decides which of the values you can use. The rules for the Instancing property are summarized in Table 14.1.
Table 14.1. Values of the Instancing Property in Visual Basic 6, and the Project Types to Which Each Applies
If you’re concerned about replacing Visual Basic 6 components with .NET components that should exhibit the same instancing behavior, here is an explanation of what each of these settings mean, and how to achieve the same results with .NET components:
• Private. Other components cannot create instances of the class and the class isn’t described in the project’s type library. In .NET, making a class non-public achieves the same effect for both .NET and COM clients.
• PublicNotCreatable. Other components can use the class but cannot create instances of it. (This is the default setting for classes added to an ActiveX Control project.) In .NET, defining an internal default constructor achieves the same effect. Whereas any classes in the current assembly can instantiate the object and pass it to other components, other assemblies or COM components can only use an instance if one is passed to them.
• SingleUse. Allows other applications to create instances of the class, but each time an instance is created, a new instance of the component is started. There’s no built-in way to get this behavior in .NET, but you could create a surrogate executable that enforces this behavior.
• GlobalSingleUse. Like SingleUse, but the class’s members can be invoked like global functions. Doing the same thing as for SingleUse but defining all the members as static (or using a Module in VB .NET) can provide similar behavior for .NET clients. COM clients, however, are out of luck because only instance members are directly exposed.
• MultiUse. Allows other applications to create instances of the class. This is a standard public class with a public default constructor in .NET. (There needs to be a public default constructor for COM’s sake.)
• GlobalMultiUse.Like MultiUse, except that class members can be invoked like global functions (from other components only). Again, a similar effect can be achieved with static members, but COM clients cannot directly use them.
Example: Implementing Office XP Smart Tag Interfaces
To demonstrate implementing a regular COM interface (not a VB6 class interface), we’re going to create a smart tag component for Office XP. Smart Tags is a feature of Microsoft Office XP that enables certain types of data in a Word document or Excel spreadsheet to be recognized and tagged with extra information. A user can then choose customized actions by hovering the mouse over a tagged word or phrase and clicking on an icon that presents a context menu. Tagged text is indicated by a faint, dotted purple line. A canonical example is shown in Figure 14.1, in which a date is recognized by a smart tag. The user is given the choices of scheduling a meeting on this date or showing this date on a calendar.
Figure 14.1. A smart tag recognizes a date typed in a Word 2002 document.

Smart tags can be created either with an XML file or with a COM DLL. Of course, we’re going to look at the COM-based implementation for which smart tags are simply COM objects that need to implement interfaces defined in the Smart Tags type library. The two important interfaces are ISmartTagRecognizer and ISmartTagAction.
An object that implements ISmartTagRecognizer has the task of viewing text and recognizing the data it’s looking for. Applications such as Word 2002 or Excel 2002 continually call the ISmartTagRecognizer.Recognize method with strings from the document currently being edited. If the COM object recognizes the special text that it’s searching for, it can mark it with a unique label that essentially gives the text a “strong type” such as a date in the previous example.
But recognizing special types of information is only half the story. Acting upon special information is the other half. An object that implements ISmartTagAction enables applications to present the user with one or more actions (such as “Schedule a Meeting” or “Show My Calendar”) and implements those actions.
For our smart tag example, we’re going to implement a simple “Developer Terminology Smart Tag” (or DevTag for short). The idea is that a .NET component implementing ISmartTagRecognizer searches the active document for programming-related terms. If it finds any, it presents the user with the option to look up the term at MSDN Online (msdn.microsoft.com). While the commercial success of such a smart tag seems unlikely, developers such as yourself should appreciate such an addition to Office.
The recognizer and action objects in this example support two kinds of smart tags for two types of data—interfaces and technologies. The action for either type of information is the same; simply look up the word on MSDN Online. To recognize interfaces typed by the user, the recognizer simply looks for words at least three characters long that begin with a capital “I.” To recognize technologies, the recognizer checks for keywords. For simplicity, there are only two possible technologies—“.NET” and “COM.”
Figure 14.2 shows a .NET and COM representation of the two classes we’re going to implement—DevTagRecognizer and DevTagAction. According to the smart tag documentation, recognizers and actions need to implement the IDispatch interface in addition to the smart tag-specific interfaces. Fortunately, we know that this interface implementation is already taken care of by the CLR. In order to plug into Office XP, smart tag components must be registered in a special location of the Windows Registry. Therefore, we’ll use custom registration and unregistration functions to perform this extra work.
Figure 14.2. .NET and COM representations of the two classes implemented in Listing 14.1.
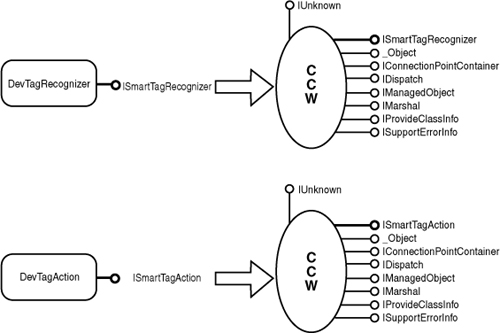
Listing 14.1 contains an implementation of the DevTag component in Visual Basic .NET. It uses an Interop Assembly imported from the Smart Tags type library.
Example 14.1. Implementing Two COM Interfaces—ISmartTagRecognizer and ISmartTagAction—in Visual Basic .NET


Lines 1–6 list several namespaces:
• System for Enum, Type, ArgumentException, and ArgumentOutOfRangeException
• SmartTagLib for the ISmartTagRecognizer and ISmartTagAction interfaces and related types
• Microsoft.VisualBasic for CreateObject
• System.Runtime.InteropServices for ComRegisterFunctionAttribute and ComUnregisterFunctionAttribute
• Microsoft.Win32 for Registry
Line 7 declares a namespace of Sams.SmartTags. The first two types in Lines 10–19 are enumerations that are used by the recognizer and actions. The Verbs enum defines the supported actions (also called “verbs” in some places of the API)—looking up an interface and looking up a technology. Although these two actions are really the same simple lookup, they are split into two because the text displayed to the user is slightly different depending on whether the current word is an interface or technology. The TagTypes enum defines the two tags supported—tags for interfaces and tags for technologies.
Line 22 begins the DevTagRecognizer class that implements ISmartTagRecognizer. Both the DevTagRecognizer and DevTagAction classes are marked with ClassInterfaceType.None to suppress their class interfaces. This isn’t necessary but it’s good practice, especially because each class already implements an interface exposing its important functionality. This interface contains five properties plus the important Recognize method. But first, the DevTagRecognizer class contains a pair of custom registration methods that should look familiar from Chapter 12, “Customizing COM’s View of .NET Components.”
The RegisterFunction method in Lines 26–31 uses the Microsoft.Win32.Registry class to add a custom subkey that Microsoft Office needs in order to know about the recognizer. We must add a subkey with the recognizer’s CLSID (including curly braces) so using t.GUID.ToString("B") does the trick. Because RegisterFunction is marked with ComRegisterFunctionAttribute, it gets invoked whenever the assembly is registered.
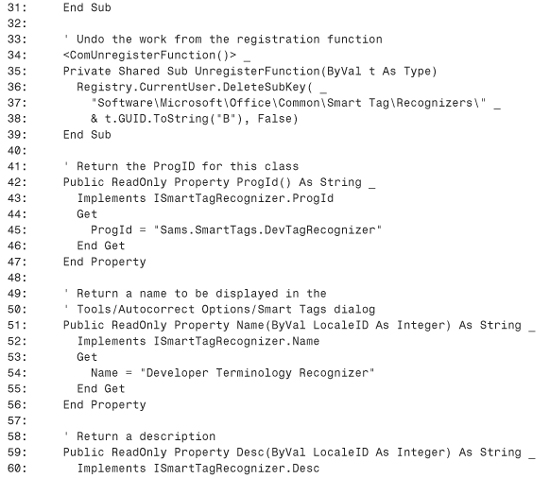
The UnregisterFunction method in Lines 34–39 undoes the registration by simply deleting the subkey that was added in RegisterFunction. As advised in Chapter 12, the two-parameter DeleteSubKey overload is used with False as the second parameter so no exception is thrown if the subkey doesn’t already exist. Because UnregisterFunction is marked with ComUnregisterFunctionAttribute, it gets invoked whenever the assembly is unregistered.
The ProgId property in Lines 42–47 has the job of returning the ProgID string for the recognizer class. Because the class has no ProgIdAttribute, it’s simply the fully-qualified class name. The Name property in Lines 51-56 returns a short title for the recognizer, and the Desc property in Lines 59–65 returns a description. For this simple example, all LocaleID parameters are ignored because we’re only prepared to deal with English.
The SmartTagCount property in Lines 68–73 returns the number of smart tags supported. We could just return 2, but to be more robust in case someone later adds members to the TagTypes enum, Line 71 calls GetValues on System.Enum to obtain an array of the TagType values, then calls Array.Length to get the desired number. The Enum identifier needs to be placed in square brackets on Line 88 because it’s a keyword in Visual Basic .NET.
Tip
When using enumerations, check out the handy static methods of the System.Enum type in the .NET Framework SDK documentation, such as Enum.GetValues and Enum.Format used in Listing 14.1.
The SmartTagName property in Lines 76–89 returns the official smart tag name for the corresponding integer passed in. The incoming integer is a number from 1 to SmartTagCount, which is represented by the TagTypes enum. (That’s why the values of the TagTypes enumeration needed to be explicitly defined as starting with the number 1.) An official smart tag name must be a unique string. The convention for this string is UniqueResourceIdentifier#TagName. The unique resource identifier (URI) should be related to your company name or URL. For this example, we use “schemas-sams-com/DevTag” for the URI in Lines 80 and 82. For the tag name, we use “interface” for interface tags and “technology” for technology tags. The SmartTagDownloadURL property returns an empty string in Line 97 because this simple smart tag does not support downloadable actions.
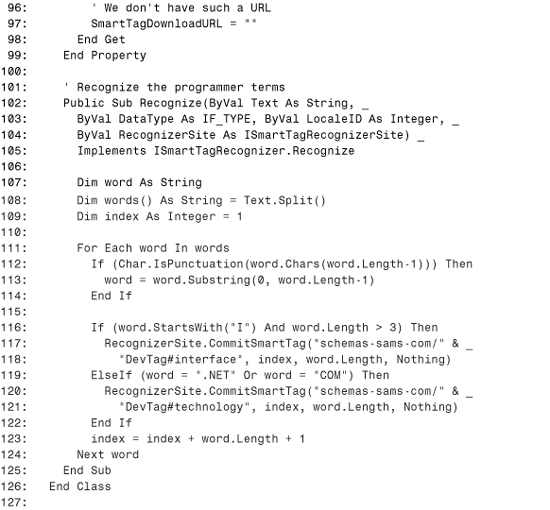
Finally, the Recognize method in Lines 102–125 does the work of recognizing the developer terms. Because the incoming Text string can contain multiple words and we’re just interested in recognizing single words, Line 108 calls the string’s Split method to obtain an array of words (using whitespace as the delimiter). Lines 111–124 enumerate through the collection of words. After removing the ending punctuation if it exists (Lines 112–114), Line 116 checks for an interface-like word and Line 119 checks for a technology word. If such a word has been found, the method calls CommitSmartTag on the RecognizerSite parameter to embed the smart tag in the active document. CommitSmartTag needs the official tag name, the index in the Text string where the tag should begin, the length of the tagged portion of text, and sometimes custom information (not used in this example). The index variable, which gets updated on Line 123, keeps track of the current index in the Text string. That completes the simple recognizer.
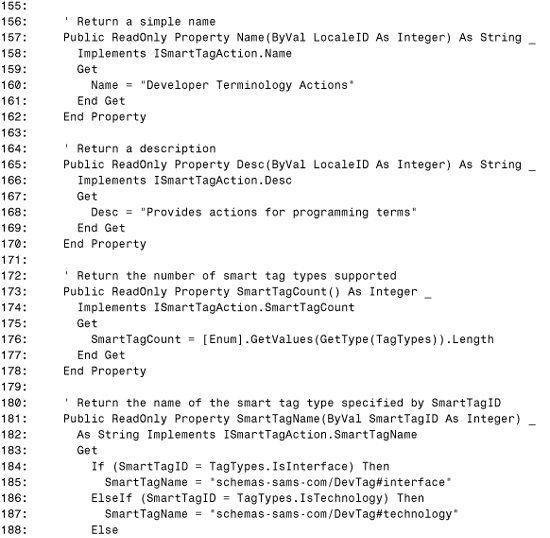
The DevTagAction class begins on Line 129, implementing ISmartTagAction’s ten properties and an important InvokeVerb method. As with DevTagRecognizer, custom registration methods appear in Lines 133–146 to add a custom subkey to make Microsoft Office aware of the action. The ProgId, Name, Desc, SmartTagCount, and SmartTagName properties in Lines 149–194 serve the same purpose as in the recognizer.
The SmartTagCaption property in Lines 197–211 returns a string caption corresponding to the incoming SmartTagID parameter. These captions are displayed in the context menu when a user clicks on the Smart Tag icon. In this implementation, we return “Developer Term: Interface” for the interface lookup action and “Developer Term: Technology” for the technology lookup action. The VerbCount property in Lines 215–226 returns the number of verbs for the passed-in smart tag name. Both smart tag types in this example have only one verb, which is the action of looking up a word.
The VerbID property in Lines 230–243 returns an integer corresponding to a Smart Tag name and verb index. These IDs can be arbitrary non-zero numbers, and this property uses the values of the Verbs enumeration to return either LookupInterface or LookupTechnology as the verb IDs. These are used by the InvokeVerb method and VerbCaptionFromID property for distinguishing between different actions.
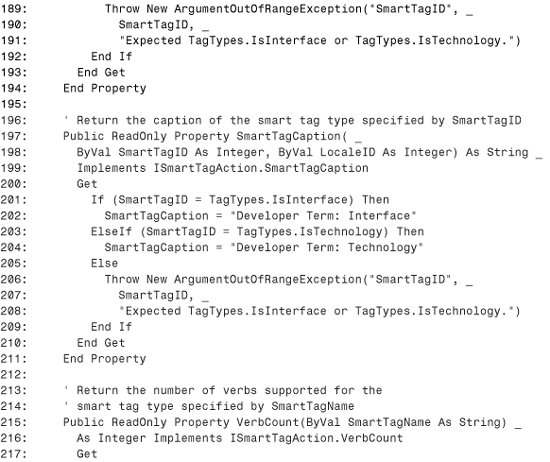
The VerbCaptionFromID property is implemented in Lines 246–262, and returns text that is displayed to the user for each action. We return either “Find online documentation for this interface” or “Find online documentation for this technology” depending on the value of the VerbID parameter.
The VerbNameFromID property in Lines 265–270 returns a short name corresponding to each verb ID. For this, we use the handy System.Enum.Format method to return the name of the Verbs member that corresponds to the VerbID value. This means that LookupInterface is returned for 1 and LookupTechnology is returned for 2. The “G” format specifier instructs Enum.Format to return the name rather than a number represented as a string.
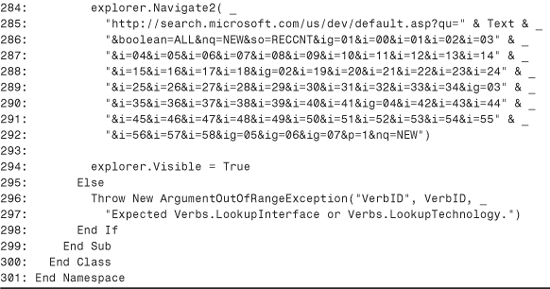
Finally, the InvokeVerb method in Lines 273–299 gets to do some real work! For both LookupInterface and LookupTechnology verbs, we create an instance of an Internet Explorer Application object from its ProgID. Line 283 uses the Microsoft.VisualBasic.CreateObject method to instantiate the object, then Line 284 makes a late-bound call to Navigate2 to browse to the appropriate MSDN Online search page. Notice the string passed to Navigate2: a reasonable-looking URL concatenated with the Text string (which is the word tagged by the recognizer) concatenated with a huge amount of information. This ugly string currently works when searching for a word on MSDN Online. Of course, because MSDN’s search engine is outside of our control, we can’t always count on this URL always working. However, for illustration, it works just fine at the time of writing. Line 294 makes Internet Explorer visible so the user is presented with the desired Search Results page.
Running the Example Using Visual Studio .NET
To see this example in action, you need to have Office XP installed on your computer. Although the Office XP Smart Tag SDK has helpful documentation and samples, it is not necessary to download it because the Smart Tag type library is installed by Office XP itself.
If you use Visual Studio .NET as your development environment, you can perform the following steps:
1. Create a new Visual Basic .NET class library project and replace the contents of Class1.vb with the contents of Listing 14.1 (available on this book’s Web site).
2. Right-click on the project in the Solution Explorer and select Properties.
3. Under Configuration Properties, Build, check the Register for COM Interop option.
4. After clicking OK, select Project, Add Reference... from the menu.
5. On the COM tab, select Microsoft Smart Tags 1.0 Type Library. This is the file MSTAG.TLB that should be registered if Office XP is installed.
6. Build the project by selecting Build, Build from the menu.
7. Close all running instances of Office XP applications and Internet Explorer.
8. Open Microsoft Word and try it out. To ensure that your smart tag was found and activated, select AutoCorrect Options... from the Tools menu and look for the recognizer’s name in the list on the Smart Tags tab. This is pictured in Figure 14.3.
Figure 14.3. Viewing the list of recognizers registered and instantiated by Microsoft Office.

Figure 14.4 shows the use of our smart tag in a Word document, and Figure 14.5 shows the Internet Explorer window that appears when an action is executed. You might have to adjust the Office security settings to get this example to work on your computer.
Figure 14.4. The DevTag component being used by Microsoft Word 2002.
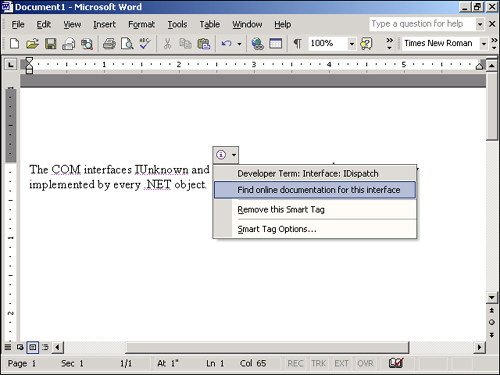
Figure 14.5. Selecting “Find online documentation for this interface” for “IDispatch” presents a Web browser window with useful links.

Because the Register for COM Interop option registers the assembly created in Listing 14.1 with a codebase, no extra work was needed for the example to work. In practice, you would want to give both assemblies a strong name, and perhaps install them in the Global Assembly Cache (GAC) by doing the following:
1. Generate a key pair using the .NET Framework Strong Name Utility (SN.EXE), if you don’t already have your own key pair:
sn -k MyKey.snk
3. Copy the output MyKey.snk file to your Visual Studio .NET project directory.
4. Import a type library for the Smart Tags type library (MSTAG.TLB) by running TLBIMP.EXE with the /keyfile option, using the file created in Step 1:
TlbImp pathMSTAG.TLB /keyfile:MyKey.snk
6. The path should point to the location of MSTAG.TLB, which should be the Common FilesMicrosoft SharedSmart Tag directory under your Program Files folder. This creates an assembly with the filename SmartTagLib.dll. If there were a Primary Interop Assembly available for the Smart Tags type library, you could skip this step and use the PIA in Step 4 because it would already have a strong name.
7. Add the following at the top of the source file, after the existing Imports statements:
Imports System.Reflection
<Assembly: AssemblyKeyFile("....MyKey.snk")>
9. The .... is needed because the path for the key file is relative to the output directory.
10. Rather than referencing the Smart Tags type library from Visual Studio .NET (causing a new Interop Assembly to be imported without a strong name), reference the Smart Tags Interop Assembly created in Step 2 as a regular .NET component. This can be done by selecting Project, Add Reference..., then clicking the Browse... button on the .NET tab to find the assembly.
Tip
In a Visual C# project, you can reference a type library and give the imported Interop Assembly a strong name all within the IDE, without having to run TLBIMP.EXE separately. To do this, go to the project’s Properties page (by right-clicking on the project in the Solution Explorer) and select Common Properties, then General. Next to Wrapper Assembly Key File, type the name of the key file. Unlike using AssemblyKeyFileAttribute, this filename is relative to the project directory. Visual Basic .NET projects don’t have this option because it is assumed that any strong-named Interop Assemblies should be Primary Interop Assemblies, and you need to use TLBIMP.EXE to create a Primary Interop Assembly anyway (discussed in Chapter 15, “Creating and Deploying Useful Primary Interop Assemblies”).
13. Install both assemblies in the GAC using Global Assembly Cache Utility (GACUTIL.EXE):
gacutil -i DevTag.dll
gacutil -i SmartTagLib.dll
Running the Example Using Only the .NET Framework SDK
Using a computer that only has Office XP and the .NET Framework SDK, you can perform the following steps:
1. Import a type library for the Smart Tags type library (MSTAG.TLB) by running TLBIMP.EXE, as shown in the previous section. The /keyfile option could be omitted if you plan to rely on registering a codebase:
TlbImp pathMSTAG.TLB
3. This creates an assembly with the filename SmartTagLib.dll.
4. Create a DevTag.vb text file with the contents of Listing 14.1.
5. Compile the file:
vbc /t:library DevTag.vb /r:SmartTagLib.dll
7. Register the assembly:
regasm DevTag.dll /codebase
9. Be sure that the Smart Tag Interop Assembly (SmartTagLib.dll) and DevTag.dll are either in the same directory or in the GAC (if they have strong names).
10. Close all running instances of Office XP applications and Internet Explorer.
11. Open Microsoft Word and try it out. To ensure that your smart tag was found and activated, select AutoCorrect Options... from the Tools menu and look for the recognizer’s name in the list on the Smart Tags tab, shown earlier in Figure 14.3.
Interface Implementation Shortcuts in Visual Studio .NET
If you were implementing an interface from scratch rather than copying and pasting this book’s source code, you could take advantage of interface implementation shortcuts built into Visual Studio .NET projects. In a Visual Basic .NET project, All you need to do is list your class as implementing an interface, for example:
Implements ISmartTagRecognizer
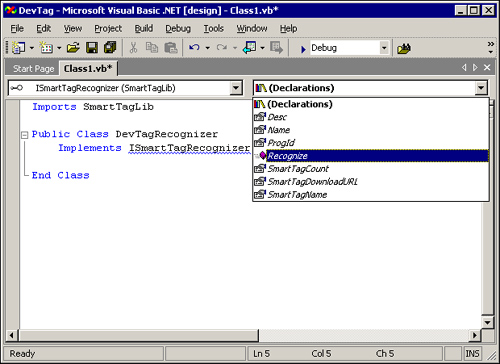
Then, you can select the interface name from the left drop-down box above the code, and select each member you want to implement in the right drop-down box. The IDE inserts an empty definition for each member you select, one at a time. This is shown in Figure 14.6.
Figure 14.6. Selecting members of an interface in a Visual Basic .NET project to avoid typing the signatures.
The same kind of shortcut is available for Visual C# projects, but it’s well hidden. Again, all you need to do in source code is mark your class as implementing an interface, for example:
public class DevTagRecognizer : ISmartTagRecognizer
Once you’ve done this, open the Class View window, expand your class node, then expand the Bases and Interfaces node. Right-click on the name of the interface you wish to implement, then select Add then Implement Interface.... This fills the class with dummy implementations of all the methods all at once. This process is shown in Figure 14.7.
Figure 14.7. Selecting Implement Interface... in a Visual C# Project to avoid typing the signatures.

Both of these shortcuts require that you first list the interface in the source code class declaration as one you’re planning on implementing. If the interface is defined in a different assembly, you must also reference that assembly before attempting to use either shortcut.
Caution
The danger of using these shortcuts for COM interfaces is that the interface members’ custom attributes (such as DispIdAttribute, MarshalAsAttribute, and so on) are not automatically placed on the generated class signatures. If you plan on exposing class members to COM via a class interface, you should manually add the necessary custom attributes. Otherwise, marking the class with ClassInterface(ClassInterfaceType.None) to suppress the class interface means that you never have to worry about marking the class signatures with the custom attributes that already exist on the interfaces you’re implementing.
If you don’t have Visual Studio .NET, then you can’t take advantage of the IDE’s ability to fill in method signatures for an implemented interface. This can make implementing a large interface quite tedious. For a .NET interface such as System.IConvertible, the .NET Framework SDK documentation displays every member prototype in Visual Basic .NET, C#, C++, and JScript, so copying and pasting can be done to speed up the process. For COM interfaces such as ISmartTagRecognizer, the documentation typically doesn’t address the needs of .NET languages. Still, the Visual Basic 6-focused documentation in the Office XP Smart Tag SDK works fine for Visual Basic .NET programming once you remember the various syntax changes.
Caution
When declaring and implementing interface methods using documentation geared toward Visual Basic 6 code, remember that Long in VB6 is now Integer in Visual Basic .NET, and Integer in VB6 is now Short in Visual Basic .NET!
As an example of such syntax changes, the following Visual Basic 6 code:
Private Property Get ISmartTagRecognizer_Name(ByVal LocaleID As Long) As String
ISmartTagRecognizer_Name = "Developer Terminology Recognizer"
End Property
must be translated to the following Visual Basic .NET code:
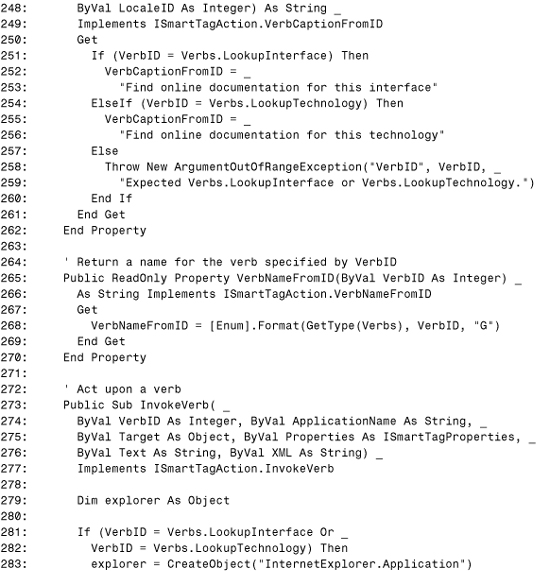
Public ReadOnly Property Name(ByVal LocaleID As Integer) As String _
Implements ISmartTagRecognizer.Name
Get
Name = "Developer Terminology Recognizer"
End Get
End Property
By default, members of Visual Basic 6 classes that implement an interface member are private, because you typically don’t want to expose the member with the mangled InterfaceName_MemberName name on your Visual Basic 6 class interface. In Visual Basic .NET, such members are public by default because the member name is preserved and calling members directly on classes is common practice in .NET.
Tip
If you’re unsure about signature transformations from a type library to an assembly, you can always run ILDASM.EXE on the Interop Assembly to get the exact .NET interface definition rather than guessing at what the members look like. Of course, this requires the ability to understand IL Assembler syntax in terms of your programming language. IL Assembler syntax is covered in Chapter 7.
Common Problems When Implementing COM Interfaces
Three common problems arise when attempting to implement COM interfaces in a .NET class, dealing with:
• Parameterized properties
• Interface inheritance
• Returning Specific HRESULTs
Parameterized Properties
This book’s Web site includes the previous DevTag example in C#. Implementing the two Smart Tag interfaces in C# ends up being confusing, because the language doesn’t enable you to define, use, or implement non-default parameterized properties. Because most of the properties in ISmartTagRecognizer and ISmartTagAction are parameterized (with at least a LocaleID parameter), the accessor methods must be implemented instead. For ISmartTagRecognizer, this means implementing get_Name, get_Desc, get_SmartTagName, and get_SmartTagDownloadURL methods instead of Name, Desc, SmartTagName, and SmartTagDownloadURL properties. For ISmartTagAction, this means implementing get_Name, get_Desc, get_SmartTagName, get_SmartTagCaption, get_VerbCount, get_VerbID, get_VerbCaptionFromID, and get_VerbNameFromID instead of the corresponding properties. For example, implementing the accessor method looks like the following for ISmartTagRecognizer.get_Name:
// Return a name for the Tools/Autocorrect Options/Smart Tags dialog
public string get_Name(int LocaleID)
{
return "Developer Terminology Recognizer";
}
Fortunately, the interface implementation shortcut in Visual Studio .NET (for Visual C# projects) recognizes when interfaces have unsupported properties and emits accessor method signatures instead.
Another confusing aspect of properties is that although Visual Basic .NET lets you use properties with by-reference parameters, the compiler does not allow you to define such a property. What’s worse is that unlike C#, which enables you to define accessor methods when encountering an unsupported property, Visual Basic .NET provides no workaround for implementing such an interface. Therefore any COM interfaces with parameterized properties whose parameters are passed by-reference cannot be implemented in Visual Basic .NET.
Interface Inheritance
Implementing a COM interface that derives from an interface other than IUnknown or IDispatch requires special care in Visual Basic .NET. As mentioned in Chapter 4, “An In-Depth Look at Imported Assemblies,” .NET definitions of COM interfaces must contain all their base interface members except for IUnknown and IDispatch, despite the fact that their base interfaces also contain definitions for the same members. These duplicated member definitions can cause unexpected compilation errors, described in this section.
Chapter 21 describes how to define a proper definition for the IPersistStream COM interface, which derives from IPersist. The base IPersist interface has a GetClassID method that must be redefined on the derived IPersistStream definition. If you reference this definition and attempt to implement IPersistStream in Visual Basic .NET in the straightforward manner:
Public Sub GetClassID(ByRef pClassID As System.Guid) _
Implements IPersistStream.GetClassID
pClassID = Me.GetType().GUID
End Sub
you’ll get a compilation error:
'PersistableClass' must implement 'Sub GetClassID(ByRef pClassID As System.Guid)' for interface 'IPersist'.
Because there are two definitions of GetClassID—one directly on IPersistStream and one on the base IPersist interface—you must state that you’re implementing both:
' Implementation for both IPersistStream.GetClassID and IPersist.GetClassID
Public Sub GetClassID(ByRef pClassID As System.Guid) _
Implements IPersistStream.GetClassID, IPersist.GetClassID
pClassID = Me.GetType().GUID
End Sub
Unfortunately, the interface implementation shortcut in Visual Studio .NET projects doesn’t provide an easy way to handle this situation. You must manually add the base interface member names to each applicable Implements statement.
You don’t usually encounter this problem in C# because interface members are implemented simply by having a member with the same name:
// Implementation for both IPersistStream.GetClassID and IPersist.GetClassID
public void GetClassID(out Guid pClassID) { pClassID = this.GetType().GUID; }
C#, however, runs into the same problem as VB .NET when using explicit interface implementation, requiring both copies of the GetClassID method to be implemented separately:
// Implementation for IPersistStream.GetClassID
void IPersistStream.GetClassID(out Guid pClassID)
{
((IPersist)this).GetClassID(out pClassID);
}
// Implementation for IPersist.GetClassID
void IPersist.GetClassID(out Guid pClassID)
{
pClassID = Guid.NewGuid();
}
Using explicit interface implementation on a member, indicated by adding the interface name and a period before its name, means that the member can’t be called on the class type directly. Instead, an instance of the class must be cast to the interface (such as IPersist or IPersistStream) in order to call it. This capability enables you to implement several interfaces with a member of the same name and provide separate implementations for each interface’s member. Explicit interface implementation is used throughout the .NET Framework as a way of “hiding” members for documentation purposes. For instance, the base types like System.Int32 and System.Boolean explicitly implement System.IConvertible so their class definitions in object browsers aren’t cluttered with methods that aren’t commonly used.
The exact equivalent of C# explicit interface implementation in Visual Basic .NET is simply marking a class’s member (that implements an interface member) Private rather than Public.
Tip
Using explicit interface implementation in conjunction with a COM interface can be useful for making the interface’s methods less noticeable to .NET clients used to dealing with the class itself. At the same time, an explicitly implemented COM interface looks no different to COM clients that call methods through the COM interface anyway.
When manually defining a COM interface in source code (covered in Chapter 21), making it private and explicitly implementing it is a handy way to make “.NET-invisible” methods that only COM clients can call directly. Other .NET assemblies cannot use private interface types, and if a class explicitly implements the interface then there is no way other .NET assemblies can call the members.
Returning Specific HRESULTs
If you’re implementing a COM interface, it’s likely that its members require your implementation to return specific HRESULTs in response to specific error or warning situations. There’s no real problem with returning specific HRESULTs to COM clients when implementing a member of a COM interface, but it’s often unclear how to go about it.
.NET definitions of COM interfaces don’t typically expose HRESULT return values directly, especially if the interface definitions were generated by the type library importer. Therefore, you typically need to throw an exception with a specific HRESULT value in order for your COM clients to see the appropriate return value. This can always be done with System.Runtime.InteropServices.COMException, for example (in C#):
// return CO_E_WRONG_SERVER_IDENTITY (0x80004015)
throw new COMException("Wrong Server Identity", unchecked((int)0x80004015));
The unchecked syntax is required to cast this unsigned value to a signed integer. See Chapter 11 for more information about throwing other exception types that can be exposed to COM with the desired HRESULT values.
You could even throw an exception with a success HRESULT value if necessary, although your performance will suffer if this needs to be done often. The best way to return a success HRESULT is to change the .NET definition of the interface to use PreserveSigAttribute, as shown in Chapter 7. This could also be done even when returning failure HRESULT values to help performance by never throwing exceptions.
COM Interfaces with Default CCW Implementations
Although implementing a COM interface such as ISmartTagRecognizer or ISmartTagAction may have been straightforward, there are a handful of well-known COM interfaces that require special consideration. From COM’s view, the interfaces covered in this section appear to be magically implemented by any .NET object because all CCWs provide default implementations of them based on the metadata for the .NET object being wrapped. For these interfaces, it can be important to understand the behavior of each default implementation and what you can do to alter it.
Having a few standard COM interfaces implemented on your behalf is nothing new for programmers using Visual Basic 6, ATL in Visual C++, or Visual J++. For example, a simple ActiveX DLL authored in Visual Basic 6 automatically implements IUnknown, IDispatch, IConnectionPoint, IConnectionPointContainer, IExternalConnection, IProvideClassInfo, and ISupportErrorInfo. A simple ActiveX Control authored in Visual Basic 6 automatically implements over 20 interfaces!
IUnknown
As discussed in Chapter 2, “Bridging the Two Worlds—Managed and Unmanaged Code,” all COM objects must implement the IUnknown interface. The three methods of IUnknown enable clients to use reference counting on COM objects and enable clients to discover other implemented interfaces at run time (like a cast operation). No .NET classes need to implement IUnknown in order to be exposed to COM because every CCW provides an IUnknown implementation on behalf of its .NET object.
Unlike any other COM interface, the CLR does not provide a way to replace the IUnknown implementation provided for .NET objects (besides swapping the object with your own COM object while performing custom marshaling, as explained in Chapter 20, “Custom Marshaling”). If you attempt to obtain a metadata definition of IUnknown by importing a type library containing its definition, you’ll find that the imported definition contains no methods. Even if you defined your own managed IUnknown interface with the appropriate methods, implementing such an interface would have no effect because the CCW would ignore it.
A CCW’s implementation of AddRef and Release does what you’d expect to manage its reference count. The QueryInterface implementation, which enables the user to ask for an interface pointer, is more interesting. Although you can’t provide your own implementation, you can control its behavior using the custom attributes explained in Chapter 12.
Of course, the supplied QueryInterface implementation follows the COM rules, namely:
• QueryInterface must preserve an object’s identity. Calling QueryInterface with the same IID multiple times on the same object instance must return the same physical pointer value.
• The set of interface pointers returned by QueryInterface on the same instance must be static. If QueryInterface succeeds for a given IID once, it must always succeed in future calls (and vice-versa).
• QueryInterface must be reflexive, symmetric, and transitive. These rules boil down to the fact that no matter what the type of the interface pointer is on which you’re calling QueryInterface, you can get back a pointer to any of the interfaces the object instance implements. It doesn’t matter if it’s the same interface type as the one you already have, or one that you used before.
When a CCW’s QueryInterface method is called, it successfully returns an interface pointer corresponding to the IID passed for the riid parameter if its value corresponds to:
• IUnknown
• The other COM interfaces that the CCW provides on behalf of the .NET object: IDispatch (but only if the .NET class is COM-visible), IMarshal, IProvideClassInfo, ISupportErrorInfo, IConnectionPointContainer, and sometimes IObjectSafety.
• IManagedObject, a CLR-specific interface also provided by the CCW that contains a handful of methods used internally by the CLR. Clients could query for this interface to check whether the COM object is a CCW for a .NET object.
• Any class interfaces exposed by the object instance for its class type and any COM-visible base classes (although any class interface contains the COM-visible members of base class interfaces regardless of the COM-visibility of the base classes themselves). Because the definition of System.Object is marked with ClassInterface(ClassInterfaceType.AutoDual), you can always successfully obtain an _Object interface from a CCW’s QueryInterface implementation.
• Any COM-visible public interfaces implemented by the object instance. This includes interfaces implemented by the class and its base classes.
• Any COM interfaces implemented by the object instance (indicated with the ComImportAttribute on the interface definition). This also includes interfaces implemented by the class and its base classes. COM interfaces do not require a public .NET definition in order to be obtainable by QueryInterface. Interfaces that are marked COM-invisible are even obtainable via QueryInterface if (and only if) they are marked with ComImportAttribute. For a COM interface, a COM client would need to obtain its definition from somewhere other than the assembly’s exported type library because interfaces marked with ComImportAttribute are not re-exported.
IDispatch
IDispatch, introduced in Chapter 2, is the most common interface other than IUnknown that COM objects implement. Although Chapter 12 demonstrated that not every .NET interface is exposed to COM as deriving from IDispatch, every COM-visible .NET object has an IDispatch implementation exposed through its CCW. If a class is marked with ClassInterface(ClassInterfaceType.AutoDual) or left with the default ClassInterface(ClassInterfaceType.AutoDispatch), then the CCW’s IDispatch implementation provides access to all public COM-visible members of the class and its base classes. If a class is marked with ClassInterface(ClassInterfaceType.None) and it only implements interfaces that derive directly from IUnknown when exposed to COM, the methods of IDispatch can still be called on any dual interfaces exposed by base classes, such as the ever-present _Object class interface. However, calling the IDispatch members of an interface such as _Object only provides access to methods defined directly on that interface (such as the methods of System.Object).
As with IUnknown, the CLR does not enable a .NET class to implement IDispatch directly and have it used by a CCW. The only useful thing you can do with a .NET definition of IDispatch (which can be found as an empty interface in the PIA for the OLE Automation type library) is make a .NET class marked with ClassInterfaceType.None implement it, because this is the only way to make the type library exporter create a coclass whose default interface is IDispatch. (Some COM clients may care about this.) At run time, however, the CLR ignores the fact that this dummy IDispatch interface is implemented
Tip
IUnknown and IDispatch are the only two interfaces special-cased by CCWs such that .NET classes cannot directly implement them to expose custom implementations to COM. Any other COM interface can be directly implemented, even ones that otherwise would have been implemented by the CCW.
The CLR’s handling of IDispatch differs from its handling of IUnknown in two major ways:
• The CLR provides two different implementations of IDispatch, selected via (what else?) custom attributes on .NET classes.
• Any .NET class can provide its own implementation of IDispatch by implementing a different interface—System.Reflection.IReflect.
Two Built-In Implementations
The two CLR implementations of IDispatch are:
• The internal implementation. This is the default implementation and is based on the CLR’s reflection technology.
• The compatible implementation. This implementation simply delegates to the standard OLE Automation implementation of IDispatch.
The two implementations behave almost identically for common uses. After discussing how to choose an implementation for a .NET class, we’ll examine the differences between them.
Selecting an Implementation
The desired implementation can be chosen via the IDispatchImplAttribute custom attribute defined in System.Runtime.InteropServices. This attribute has an enum parameter of type IDispatchImplType with the following values:
• InternalImpl. Use the internal implementation.
• CompatibleImpl. Use the OLE Automation implementation.
• SystemDefinedImpl. This is obsolete and should not be used. The CLR treats SystemDefinedImpl the same as InternalImpl.
Caution
.NET classes that are exposed to COM with a default dispinterface always use the internal IDispatch implementation. This affects two types of classes:
• Those marked with ClassInterface(ClassInterfaceType.None) whose first implemented interface is a dispinterface (one marked with InterfaceType(ComInterfaceType.InterfaceIsIDispatch)).
• Those with the default class interface behavior, as if they were marked with ClassInterface(ClassInterfaceType.AutoDispatch).
For such classes, the IDispatchImplAttribute custom attribute is simply ignored. This means that IDispatchImplAttribute must be used in conjunction with ClassInterfaceAttribute so either an auto-dual class interface or an explicitly defined dual interface is exposed as the coclass’s default interface.
As with other custom attributes that can be placed on classes, IDispatchImplAttribute can be marked on an entire assembly to control the implementation for all the classes contained within, and individual classes can override the assembly-level setting. This looks like the following in Visual Basic .NET:
Imports System.Runtime.InteropServices
<Assembly: IDispatchImpl(IDispatchImplType.CompatibleImpl)>
<ClassInterface(ClassInterfaceType.AutoDual)> _
Public Class UsingCompatibleIDispatch
...
End Class
<IDispatchImpl(IDispatchImplType.InternalImpl)> _
Public Class UsingInternalIDispatch
...
End Class
Notice that it was necessary to mark the UsingCompatibleIDispatch class with an auto-dual class interface so the CompatibleImpl setting isn’t ignored.
Both implementations are always based on a single interface—the default interface. This means that when a COM client makes a QueryInterface call for IDispatch, the returned interface pointer can only be used to invoke members of the default interface, not the members of the other interfaces that the class might implement. This “single” default interface, however, is usually the class interface that contains all the public members of the class. Plus, you can still call the IDispatch methods on any dual interface implemented by a .NET object to access additional methods that might not be exposed on a default interface. The IDispatch implementation chosen affects the IDispatch methods for all interfaces that the class implements; not just the default interface.
The Compatible IDispatch
The compatible implementation uses the standard implementation provided by OLE Automation (in OLEAUT32.DLL), which is equivalent to using the CreateStdDispatch API. The important drawback to this implementation is that it requires a type library containing definitions of the types being used. If the CLR can find an existing type library for the assembly, it will use it. Otherwise, the CLR generates an in-memory type library on-the-fly, which can cause a significant slow-down in an application. Note that an entire type library (and possibly additional type libraries for referenced assemblies) must be generated, even if type information is only required for a single interface. Generated type libraries are never persisted to a file nor registered.
Tip
If you decide to use the compatible IDispatch implementation, you should export, deploy, and register a type library with your assembly to avoid the expense of on-the-fly type library generation every time the application is run.
The following algorithm is used to locate an existing type library:
1. Look for a registered type library with the appropriate Library Identifier (LIBID).
2. If no type library is registered, check if the assembly has its type library embedded as a resource.
3. If no type library is embedded, look for a file in the same directory with the same name as the assembly but with a .tlb extension.
Only when all of these attempts fail will an in-memory type library be generated. Furthermore, this process of searching for a type library and possibly generating one on-the-fly only occurs when and if a client calls the methods of IDispatch on a .NET class that uses the compatible implementation. If not, no type library will be sought after or generated. Therefore, if your .NET object only exposes IUnknown-only interfaces then no type library would ever be generated on-the-fly. (.NET objects always expose a dual _Object interface, but if a COM client called its IDispatch methods then the existing type library for the mscorlib assembly would be loaded and used because it’s registered for the _Object interface.)
The Internal IDispatch
Because the internal IDispatch implementation is based on reflection, no type library is required for most of its functionality. The internal IDispatch implementation is consistent with the IDispatch specification, but what follows is a brief description of the implementation. You might want to refer back to the definition of IDispatch displayed in the “About COM” section of Chapter 2.
The GetIDsOfNames method gives back one or more Dispatch IDs (DISPIDs) via the rgdispid out parameter that correspond to the member name and potentially the parameter names passed in the rgszNames parameter. When an array of names is passed, the first element corresponds to the member name. As the GetIDsOfNames contract requires, the name lookup is case-insensitive. For consistency with exported type libraries (and therefore the compatible IDispatch implementation), the names passed to GetIDsOfNames must match COM’s view of the .NET member. This means using suffixes such as _2, _3, and so on for overloaded methods, or using InterfaceName_MemberName for methods on a class interface when multiple implemented interfaces have the same member name.
For member DISPIDs, the CLR returns the values it internally assigns to each member, unless the definition is marked with DispIdAttribute on the interface the implementation is based on. (For class interfaces, the attribute would need to be on the class’s member definition.) These same DISPID values can be seen when exporting a type library. The DISPIDs returned for named parameters are simply 0, 1, 2, and so on.
The Invoke method invokes the method that corresponds to the DISPID passed as the dispidMember parameter. The parameters can be passed as a mixture of positional arguments and named arguments (if GetIDsOfNames were called with parameter names as well). Any error information from a .NET exception is accessible via the pExcepInfo parameter rather than having to obtain error information via the GetErrorInfo API.
GetTypeInfo returns an ITypeInfo interface pointer for the interface, and GetTypeInfoCount returns the number of type information interfaces that an object provides (always one for .NET objects). Both of these methods require a type library to be present to return the expected type information. Therefore, if either of these are called by a COM client, the same type library generation process used for the compatible IDispatch implementation is invoked.
Differences Between the Implementations
The compatible implementation gives the most backward-compatibility for existing COM clients, because most COM clients are designed to work with the OLE Automation IDispatch implementation. There are only a few noticeable differences between the two implementations, but these differences can be important depending on your class’s members.
The internal implementation supports the following which the compatible implementation does not:
• Mixing signed and unsigned parameter types. For example, you can pass a signed integer (VT_I4) to a method expecting an unsigned integer (VT_U4) and vice-versa. In general, the internal implementation is more flexible with data types. For example, it accepts a VT_ERROR type for a parameter defined as an integer. The compatible implementation would give a type mismatch HRESULT for all of these situations (0x80020005).
• Invoking methods with COM-invisible enum parameters. The internal implementation treats enum parameters as their underlying type. Because the type library exporter omits methods containing any COM-invisible value types (including enums), the compatible IDispatch implementation cannot do this.
The compatible implementation supports the following which the internal implementation does not:
• Invoking members with user-defined value type parameters (VT_RECORD). Note that the parameter type itself must be a value type. If it’s typed as a System.Object and the instance happens to be a user-defined value type, it is not supported.
• Invoking members with parameters that are pointer types. The internal implementation supports by-reference parameters, but not pointers. Public .NET signatures that use pointers should be avoided, however, for the reasons discussed in Chapter 11.
Tip
The fact that the compatible implementation supports VT_RECORD to some degree can come in handy for working around the significant limitation of COM clients not being able to late bind to a .NET member with user-defined value type parameters. If you have members with user-defined value type parameters and are concerned about COM’s ability to late bind to these members, you should definitely use the compatible IDispatch implementation. Also, when a COM component exposes a source dispinterface with UDT parameters, marking the importer-generated event sink helper class with the compatible IDispatch implementation (using the techniques of Chapter 7) can make such events get properly raised to .NET sinks. If you aren’t affected by either of these scenarios, it’s usually best to accept the default behavior of using the internal IDispatch implementation.
Besides these differences, there are several discrepancies in HRESULTs that are returned for error conditions. For example, the internal implementation might return an HRESULT meaning “Type Mismatch” rather than “Parameter Not Optional”; or “Catastrophic Failure” rather than “Bad Variable Type.” If you have COM clients that are sensitive to the HRESULTs returned by IDispatch, then the compatible implementation is better suited for them.
In some cases the internal implementation even conforms to the OLE Automation documentation more than the OLE Automation implementation does! One example of this is the behavior of IDispatch.GetIDsOfNames when passing an array of names (the member name plus parameter names). The OLE Automation documentation states that in the returned array of DISPIDs, each element corresponding to an unknown name is given the value -1. Yet the OLE Automation implementation returns -1 for the element corresponding to the first unknown name and every element thereafter, even if it corresponds to a known name. The internal implementation, on the other hand, complies with the documentation.
Writing Your Own IDispatch Implementation
In the rare case that neither IDispatch implementation is appropriate for your needs, you can implement System.Reflection.IReflect to plug in your own custom implementation. Why IReflect? It’s the .NET interface that provides the same sort of dynamic invocation as IDispatch. Because the CLR bridges an IReflect implementation to an IDispatch implementation from COM’s perspective, .NET classes only need to worry about implementing one common interface when they need to customize their dynamic invocation behavior. Unfortunately, an implementer of IReflect often needs to handle calls routed from IDispatch specially in many ways, so the benefits of a single interface implementation are diminished.
Caution
The IReflect implementation you provide is only exposed as an IDispatch implementation when a COM client calls QueryInterface for IDispatch (or IDispatchEx) directly and uses the methods of the returned interface pointer. If a COM client simply uses the IDispatch methods inherited by dual interfaces (including auto-dual class interfaces), the standard internal or compatible implementation is used, based on the IDispatchImplAttribute custom attribute.
Although IReflect is not a well-known interface, its methods certainly are. That’s because System.Type implements IReflect to provide much of its reflection services. IReflect has 12 members, shown in the upcoming Listing 14.2, but only four of them are used by the CLR when exposing an implementation as IDispatch—GetProperties, GetFields, GetMethods, and InvokeMember. The GetProperties, GetFields, and GetMethods methods are invoked by the CLR at some unspecified point before the first call to IDispatch.GetIDsOfNames or IDispatch.Invoke. When these calls are made, the CLR is able to retrieve all the information (names and DISPIDs) from the returned PropertyInfo, FieldInfo, and MethodInfo instances. The value passed for the BindingFlags parameter for all three methods is:
BindingFlags.Instance | BindingFlags.Static | BindingFlags.Public
This means that by default, an IReflect implementation exposes static members to COM clients via IDispatch, which neither of the built-in IDispatch implementations do. A custom IReflect implementation could choose to not expose static members or even expose non-public members by using different binding flags inside these members and inside InvokeMember.
Caution
Implementing IReflect as a custom IDispatch has a glitch in Version 1.0 of the .NET Framework. The DISPIDs presented to COM (obtained from the calls to GetProperties, GetFields, and GetMethods) do not respect explicit DISPIDs marked on a class’s members with DispIdAttribute. Instead, the DISPIDs are the values that the members would have had if they weren’t marked with the custom attribute. This problem does not affect the internal or compatible implementations. The implications of this and a workaround are discussed in the analysis of Listing 14.2.
When the CLR calls IReflect.InvokeMember in response to an IDispatch.Invoke call, its parameters have the following values:
• name—The name of the member as defined by its MemberInfo previously obtained from GetFields, GetProperties, or GetMethods. If the COM client called IDispatch.Invoke with an unknown DISPID, the name would appear as “[DISPID=value]”, where value represents the DISPID value.
• invokeAttr—BindingFlags.InvokeMethod | BindingFlags.OptionalParamBinding if the user is invoking a method. If getting or setting a field or property, BindingFlags. InvokeMethod is replaced with BindingFlags.GetField or BindingFlags.SetField; or BindingFlags.GetProperty or BindingFlags.SetProperty, respectively. BindingFlags. SetProperty only appears, however, if the COM client passes DISPATCH_PROPERTYPUT | DISPATCH_PROPERTYPUTREF to IDispatch.Invoke. If the COM client passes just DISPATCH_PROPERTYPUT, BindingFlags.PutDispProperty is passed to InvokeMember. If the COM client passes just DISPATCH_PROPERTYPUTREF, BindingFlags.PutRefDispProperty is passed to InvokeMember.
• binder—A System.OleAutBinder instance, a type internal to the mscorlib assembly that’s used for performing argument coercion in a similar fashion as OLE Automation. This is the binder used by the internal IDispatch implementation, so it doesn’t exactly match OLE Automation behavior.
• target—a reference to the current instance (this in C# or C++ or Me in VB .NET).
• args—the array of arguments passed to IDispatch.Invoke, with the leftmost argument in element zero.
• modifiers—a null reference.
• culture—a CultureInfo instance that corresponds to the LCID being used by IDispatch.Invoke.
• namedParameters—Filled with some named parameters if IDispatch.Invoke was called with named parameters.
Tip
Notice that the name given to InvokeMember is not necessarily the same string that the user passed to IDispatch.GetIDsOfNames. This means that you can count on the string being in the correct case assuming that the MemberInfo types returned in GetFields, GetProperties, and GetMethods had the correct case. The CLR handles the case-insensitive request from COM so you don’t have to. Case sensitivity is all that is handled automatically, however. If the exported names of any members are different than their .NET names (as with overloaded methods), the implementer of IReflect must do the work of mapping COM member names to .NET member names.
Listing 14.2 shows a sample implementation of IReflect that delegates to System.Type to do most of the work. One reason you might decide to implement IReflect is to handle special DISPIDs that may not be a part of your interface definition. This listing maps any request for a special DISPID called DISPID_EVALUATE (with the value -5) to a member called Evaluate, regardless of its real DISPID. Other differences between this custom implementation and the internal IDispatch implementation are:
• This implementation exposes static members to COM.
• InvokeMember returns an HRESULT that COM expects when attempting to invoke a member that doesn’t exist—DISP_E_MEMBERNOTFOUND. Of course, .NET clients using the IReflect implementation wouldn’t appreciate a COMException being thrown, but this is just done for illustrative purposes.
• This implementation pays no attention to COM-visibility rules.
• If a COM client tries to set a property passing only one of the DISPATCH_PROPERTYPUT or DISPATCH_PROPERTYPUTREF flags (which is often done implicitly, as with a VBScript client), InvokeMember will fail because attempting to invoke a .NET property setter using BindingFlags.PutDispProperty or BindingFlags.PutRefDispProperty throws an exception.
• This implementation doesn’t properly handle GetIDsOfNames calls if the exported member name doesn’t match the .NET member name (as with overloaded methods).
To mimic the work of the internal IDispatch implementation, this custom implementation would have to handle the last three items in the list. For the last item, it would have to return PropertyInfo, FieldInfo, and MethodInfo instances from GetProperties, GetFields, and GetMethods with names that match what would be seen in an exported type library.
Listing 14.2. Implementing System.Reflection.IReflect to Control the Class’s Exposed IDispatch Implementation

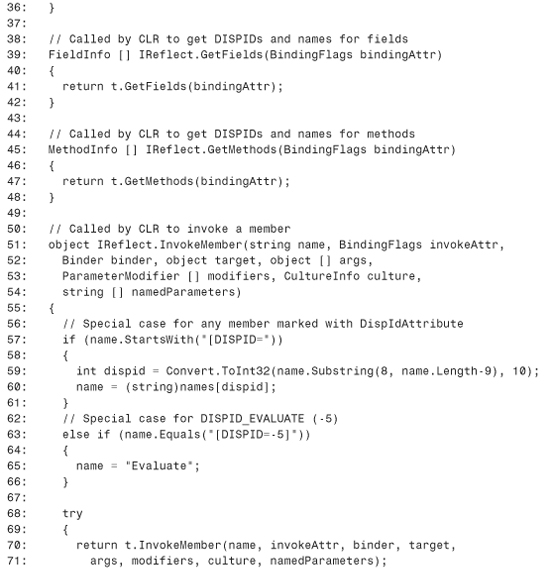
Lines 1–3 list the necessary namespaces for IReflect and its parameter types. Line 4 lists System.Collections for Hashtable and Line 5 lists System.Runtime.InteropServices for DispIdAttribute and COMException. Notice that this CustomDispatch uses explicit interface implementation, indicated by the “IReflect.” preceding each member name. We’ll come back to the constructor in Lines 16–30 in a moment. First, the GetProperties, GetFields, and GetMethods methods in Lines 32–48 simply call the same methods on the System.Type member created in the class’s constructor on Line 18.
The implementation of InvokeMember in Lines 51–77 calls Type.InvokeMember in Lines 70–71, but first it does a few things to support incoming names of the form “[DISPID=value]”. As mentioned earlier, IReflect.InvokeMember receives such a string whenever IDispatch.Invoke is called with a DISPID that the CLR doesn’t recognize from the calls to GetProperties, GetFields, and GetMethods. Ordinarily, receiving such a string would be a rare occurrence. But because the CLR ignores the use of DispIdAttribute in this scenario, this happens whenever a COM client directly calls IDispatch.Invoke with an explicitly-marked DISPID rather than using the different DISPID that would be returned from IDispatch.GetIDsOfNames. For example, a COM client that obtains DISPIDs from an exported type library rather than from IDispatch.GetIDsOfNames, which is often done implicitly by Visual Basic 6, would fall into this trap because the two sets of DISPIDs don’t match; the type library exporter respects DispIdAttribute. (This technique of calling IDispatch.Invoke without IDispatch.GetIDsOfNames is sometimes called early binding to distinguish it from v-table binding or late binding. In this book, however, everything other than v-table binding is labeled as late binding.)
Type.InvokeMember doesn’t accept strings of the form “[DISPID=value]” when invoking members of .NET objects (although it does when invoking members of COM objects), so the implementer of IReflect.InvokeMember must map the incoming DISPIDs to the appropriate member names. Therefore, the constructor contains code that examines every member in the current type (Lines 23–29) and adds a DISPID paired with its member name to a Hashtable for any members marked with DispIdAttribute. That way, InvokeMember can check for the special string format (Line 57), extract its DISPID (Line 59), and obtain the desired name from the Hashtable (Line 60).
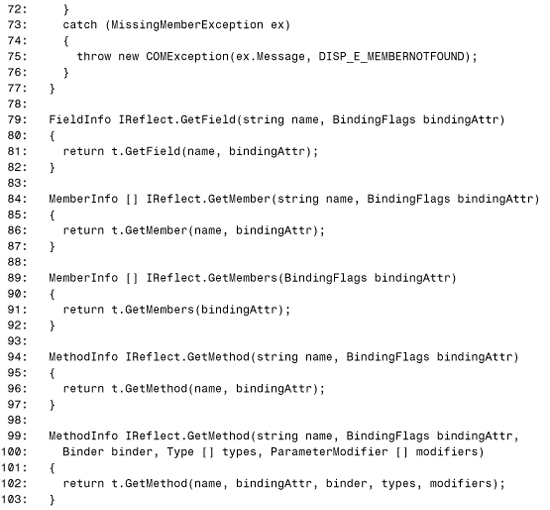
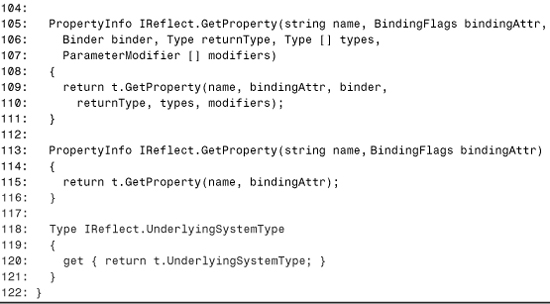
The other special thing done by this implementation is to treat any call for DISPID_EVALUATE as a request to invoke the class’s Evaluate method (if it has one) regardless of its real DISPID. Lines 73–76 catch a MissingMemberException and throw an exception with the DISP_E_MEMBERNOTFOUND HRESULT instead. Although the remaining methods are properly implemented in Lines 79–121, they are not used by COM when calling through IDispatch. A worthwhile, yet easy, improvement to this listing’s InvokeMember implementation would be to detect when the binding flags passed in contain the PutDispProperty or PutRefDispProperty flag and replace it with the SetProperty flag.
This class doesn’t have any members besides a constructor and the methods of IReflect, so it’s expected that classes that want the custom IDispatch implementation exposed to COM can simply inherit the CustomDispatch class:
// Class that exposes the custom IDispatch implementation
public class MyClass : CustomDispatch
{
...
}
IMarshal
The IMarshal interface enables COM-style custom marshaling. IMarshal is already implemented by a CCW for any .NET object but, unlike IUnknown and IDispatch, it could be directly implemented to override the default behavior. Because there is no managed definition of IMarshal in the .NET Framework or in a Primary Interop Assembly, implementing it means that you must generate your own definition. Listing 14.3 contains a C# definition of the IMarshal interface. This listing and the next few use the techniques covered in Chapter 21 to create the interface definitions.
Listing 14.3. A C# Definition of IMarshal

The default implementation of IMarshal essentially exposes all .NET objects as free-threaded objects. This behavior should suffice except in rare situations. Providing your own implementation of IMarshal could yield higher performance if you’re able to make optimizations for your specific scenario, but you really need to know what you’re doing!
IProvideClassInfo
The IProvideClassInfo interface enables a COM object to expose type information about itself. Without IProvideClassInfo, a client of a COM object has no standard way of knowing what the class type of the object is; only what interfaces it may or may not implement. When a COM object implements IProvideClassInfo, its class information can be discovered via its single GetClassInfo method that returns an ITypeInfo pointer. As discussed in Chapter 2, ITypeInfo is the COM equivalent to the .NET Framework’s System.Type class.
Because the class type of any .NET component is always exposed at run time, the CLR is always able to expose an IProvideClassInfo implementation for any .NET components exposed to COM. The CCW’s default implementation of IProvideClassInfo requires a type library in order to create and return an ITypeInfo instance, and generates one on-the-fly if it can’t find one (using the same algorithm discussed in the earlier “The Compatible IDispatch” section). There’s no need to provide your own implementation for this interface, but perhaps you’d like to implement it in a way that doesn’t rely on a type library. Listing 14.4 contains a definition for IProvideClassInfo written in Visual Basic .NET that could be implemented to override the CCW’s implementation.
Listing 14.4. Visual Basic .NET Definition of IProvideClassInfo

ISupportErrorInfo
The ISupportErrorInfo interface is used by COM objects to indicate whether or not they support rich error information via the IErrorInfo interface. The interface’s single method—InterfaceSupportsErrorInfo—takes an IID as input and returns S_OK if the interface with that IID supports rich error information or S_FALSE if the interface does not support rich error information.
Because all .NET exception objects expose an IErrorInfo interface to COM, the CLR implements this for every .NET object and always returns S_OK from InterfaceSupportsErrorInfo. It’s possible to implement ISupportErrorInfo yourself in a .NET class to return S_FALSE instead, but this should never be done because it deprives your clients of helpful error information. Nevertheless, Listing 14.5 contains a managed definition of ISupportErrorInfo in Visual C++ .NET. Notice that the PreserveSigAttribute is used so either S_OK or S_FALSE can be returned by the implementer.
Listing 14.5. A C++ Managed Definition of ISupportErrorInfo

Because the standard CCW implementation of ISupportErrorInfo. InterfaceSupportsErrorInfo always returns S_OK—even for interfaces that the object doesn’t implement—one potential customization is to return S_FALSE for interfaces that the object doesn’t implement, in the rare chance that a COM client is adversely affected by the default behavior.
IConnectionPointContainer
As discussed in Chapter 5, “Responding to COM Events,” the IConnectionPointContainer interface is implemented by a COM object to make it connectable. As with the other three standard connection point interfaces (IConnectionPoint, IEnumConnectionPoints, and IEnumConnections), IConnectionPointContainer already has an official managed definition in the System.Runtime.InteropServices namespace. The important thing to realize is that the managed interface is called UCOMIConnectionPointContainer.
Listing 14.6 displays the definition of UCOMIConnectionPointContainer in C# syntax.
Listing 14.6. System.Runtime.InteropServices.UCOMIConnectionPointContainer, Shown Here in C# Syntax

With the standard CCW implementation, COM clients can call EnumConnectionPoints to obtain an enumeration of all the connection points supported by the .NET object—one per interface listed in the ComSourceInterfacesAttribute custom attribute. If the .NET class specifies no source interfaces, then this method returns an empty enumeration.
COM clients can call FindConnectionPoint with a specific IID to ask the object if it supports a connection point for the IID. Again, this implementation is based on the ComSourceInterfacesAttribute that may be marked on the class in question.
If a .NET class implements UCOMIConnectionPointContainer explicitly, then it can plug in its own behavior rather than using the standard implementation. One motivation for doing this would be to use your own scheme of returning connection points that doesn’t rely on ComSourceInterfacesAttribute.
IObjectSafety
The IObjectSafety interface is interesting because it’s the only standard COM interface that a CCW conditionally implements based on external factors. (IDispatch is also conditionally implemented, but based on the class’s COM-visibility.) The purpose of IObjectSafety is to be implemented by trusted COM objects to express that they are safe for initialization or scripting. Internet Explorer uses this interface in its “Safe For Scripting” and “Safe For Initialization” features. Only .NET objects that are believed to be secure should advertise themselves as safe via IObjectSafety, so a CCW only implements the interface if the .NET object resides in an application domain with sufficient security evidence.
When .NET objects are hosted in Internet Explorer, IObjectSafety is automatically implemented by CCWs when created with the new <object> tag syntax that doesn’t require assembly registration. This is fine because such controls can run in a semi-trusted state, unlike ActiveX controls. By default, .NET objects created via CLSID do not implement IObjectSafety.
This interface doesn’t have an official .NET definition, so Listing 14.7 defines it in Visual Basic .NET.
Listing 14.7. A Visual Basic .NET Definition of IObjectSafety

When a CCW implements IObjectSafety, its GetInterfaceSafetyOptions method returns
INTERFACESAFE_FOR_UNTRUSTED_DATA | INTERFACESAFE_FOR_UNTRUSTED_CALLER
in both pdwSupportedOptions and pdwEnabledOptions parameters for every interface implemented by a .NET object. Under this circumstance, all .NET interfaces implemented by the object are considered to be safe for scripting and initialization. The standard values for IObjectSafety options are:
// Caller of interface may be untrusted
#define INTERFACESAFE_FOR_UNTRUSTED_CALLER 0x00000001
// Data passed into interface may be untrusted
#define INTERFACESAFE_FOR_UNTRUSTED_DATA 0x00000002
// Object knows to use IDispatchEx
#define INTERFACE_USES_DISPEX 0x00000004
// Object knows to use IInternetHostSecurityManager
#define INTERFACE_USES_SECURITY_MANAGER 0x00000008
The CLR’s implementation of SetInterfaceSafetyOptions doesn’t allow clients to change these options to anything other than what they already are. If you don’t like this default behavior, or if you want IObjectSafety to be implemented at all times, you could simply implement it yourself using a definition like the one in Listing 14.7.
Caution
Be extremely careful about claiming that a component is safe for scripting or initialization within Internet Explorer. Because ActiveX controls can’t run in a semi-trusted state, it’s up to you to properly enforce security once you’ve convinced your clients to trust your control. Authors of objects (.NET or COM) that implement IObjectSafety to mark themselves as safe should ensure that no malicious scripts could take advantage of the exposed functionality to do harmful things.
COM Interfaces Bridged to Different .NET Types
In three special cases you should avoid implementing a COM interface because it has a corresponding newer .NET type that the CLR can already expose as the older COM interface. For these cases, the .NET type has the same sort of role in the .NET Framework as the COM interface has in COM. These three interfaces are:
• IDispatchEx, which can be exposed to COM by implementing System.Reflection.IReflect and/or System.Runtime.InteropServices. Expando.IExpando.
• IEnumVARIANT, which can be exposed to COM by implementing IEnumerator and using the type in the appropriate GetEnumerator method.
• ITypeInfo, which can be exposed on System.Type parameters, fields, and return values using a custom marshaler already defined in the .NET Framework — System.Runtime.InteropServices.CustomMarshalers.TypeToTypeInfoMarshaler in the CustomMarshalers assembly.
Tip
Besides using built-in custom marshalers, as in the ITypeInfo case, you should consider custom marshaling whenever you want to expose a certain interface to COM while at the same time exposing the functionality to .NET with a familiar .NET type. See Chapter 20 for more details.
ITypeInfo and IEnumVARIANT are mentioned throughout the book, but IDispatchEx is a little-known interface that extends IDispatch, adding capabilities for dynamic member addition and deletion plus case-sensitive member lookup. Scripting languages like JScript make use of IDispatchEx, whose definition can be found in dispex.idl in the Windows Platform SDK.
As mentioned at the beginning of this section, the CLR exposes an IDispatchEx implementation for a class that implements IReflect or IExpando (from the System.Runtime.InteropServices.Expando namespace), an interface that derives from IReflect. This means that an IDispatchEx pointer could be successfully obtained from COM for the CustomDispatch class in Listing 14.2. The CLR implementation for IDispatchEx is based on the object’s IReflect implementation much like the customized IDispatch implementation is. However, the IDispatchEx implementation exposed from IReflect alone is incomplete because IReflect doesn’t have any facilities for member addition and deletion. The main benefit of this half-implementation is case-sensitive member lookup.
To get the most functionality out of the IDispatchEx implementation that the CLR exposes, a class must implement IExpando, a simple interface that adds four methods to IReflect. Because there are limitations to the mapping between IExpando/IReflect and IDispatchEx, you still may wish to generate a managed definition of IDispatchEx and implement it directly.
Conclusion
The two main points discussed in this chapter are
• Implementing regular COM interfaces is no different than implementing a .NET interface once you have the interface definition described in metadata. However, you may occasionally want to implement a COM interface that can’t be expressed naturally in your .NET language and thus may require workarounds.
• Certain well-known COM interfaces can’t be directly implemented by a .NET class, might not need to be directly implemented by a .NET class (because they already are by its CCW), or shouldn’t be directly implemented by a .NET class because the CLR maps them to a new .NET way of exposing the same functionality.
Because many COM interfaces may not have a type library available, manually creating a managed interface definition is often needed. Therefore, Chapter 21 is a must-read for those needing to implement such COM interfaces.
Many COM interfaces were briefly discussed in this chapter. For more information about Smart Tag technology in Office XP, consult the Microsoft Office XP Smart Tag SDK, which can be downloaded at msdn.microsoft.com/office. For more information about the standard COM interfaces covered in this chapter, consult MSDN Online at msdn.microsoft.com.
This concludes Part IV, “Designing Great .NET Components for COM Clients.” The next three chapters look at the reverse scenario of designing COM components that work well in managed code.