
Chapter 23. Writing a .NET Arcade Game Using DirectX
In This Chapter
• The User’s Perspective
• The Programmer’s Perspective
• DirectX Interaction
• The Game Class
• Sounds and Pictures
• Layers
• Screens
• The Actors
• Using the Game Class
• E-mail Attack—The Advanced Version
In this chapter, we have some fun and write an arcade game in C# using Microsoft DirectX. DirectX is a technology consisting of low-level APIs for graphics, sound, music, and much more. Because DirectX exposes its functionality through COM objects, we can use it naturally in managed code. Although previous chapters have discussed DirectX, this chapter uses it in the context of a real application.
Tip
At the time of writing, .NET DirectX components have been announced in beta form that provide APIs designed for .NET languages. After these components are released, they will be the preferred way to take advantage of DirectX in managed code. In the meantime, COM Interoperability provides access to the same COM APIs that you use from unmanaged code today.
The DirectX SDK has two versions of type information—header files for C/C++ clients and a type library for Visual Basic 6 clients. The type library contains types with more VB-friendly features that wrap the raw C++ types. (For example, GUID parameters are replaced with String parameters.) Thus, the type library and associated extra functionality is called DirectX for VB. The application in this chapter uses the type library meant for Visual Basic 6, because it’s the easiest way to take advantage of DirectX’s functionality. At the end of the chapter, we’ll generate the type information manually to demonstrate removing the dependency on the DirectX for VB Interop Assembly.
Running the application in this chapter requires DirectX 7 or later, which can be downloaded from msdn.microsoft.com/directx/. The full source code and supporting files can be downloaded from this book’s Web site.
We begin by describing the game in “The User’s Perspective,” then giving an overview of how the code is organized in “The Programmer’s Perspective.” The remaining sections examine each part of the application in depth.
The User’s Perspective
The game in this chapter is called E-mail Attack. In it, the player takes on the role of a virus that tries to infect as many e-mail messages as possible. The messages (represented as envelopes) appear in various places on the screen and only last for a short time, constantly shrinking until they disappear. When envelopes become close to disappearing, they flash to alert the player. The virus (represented as a bug) can move up, down, left, and right, stepping from one envelope to another. Stepping on an envelope infects it, turning it to a sickly green color. If the player moves to a location without an envelope or stands on an envelope that disappears, the player loses a life. To make things harder, the screen scrolls forward, and if the player doesn’t keep up, the player loses a life when the bug goes off the left edge of the screen. Figure 23.1 shows a screen shot of the game being played. The screen consists of several layers that scroll at different speeds to provide the illusion of depth.
Figure 23.1. In the E-mail Attack game, you try to infect e-mail messages by stepping on them.
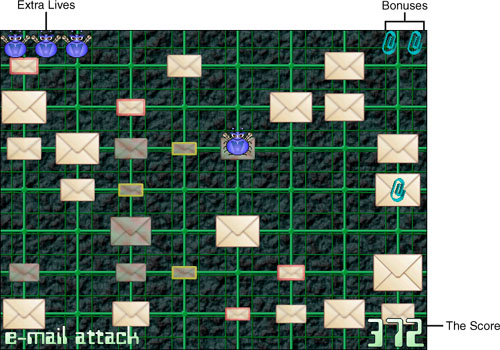
The e-mail messages sometimes contain attachments, represented as rotating paper clips. When stepping on an envelope with an attachment, the player gets a bonus that can be used later. Having a bonus means that the player can move to a location without an envelope, and an envelope will appear instantly underneath the player’s feet. Bonuses are stored in the top right corner of the screen, as shown in Figure 23.1. You can have at most 10 bonuses. When you get the 11th bonus, an extra life is awarded and the bonuses are reset to zero. Extra lives are stored in the top left corner of the screen.
One point is awarded for each envelope infected, 100 points for each bonus obtained, and 1000 points for each extra life obtained. The highest score obtained on the current computer is persisted in the Windows Registry. The player can never conquer the game; it continues until the player loses every life. The player starts each game with three extra lives and one bonus.
The Programmer’s Perspective
The game uses several pictures (saved as Windows bitmaps) and .wav sound files that can be found at the book’s Web site (in addition to the complete source code). For example, the layered game screen comprises the four individual bitmaps shown in Figure 23.2.
Figure 23.2. The four layers comprising the game’s main screen.

These layers scroll at different speeds, giving an illusion of depth known as parallax. The bitmaps shown in Figure 23.2, like many of the other bitmaps used for the game, need transparent areas so pictures underneath can be seen. (Otherwise, we’d only ever see the top layer.) Transparent areas are indicated with red, which is treated specially by the application. In graphics terms, the bitmaps use a red color key to mark transparent areas. The picture for the bottom layer has no transparent areas, whereas the picture for the top layer is almost completely transparent.
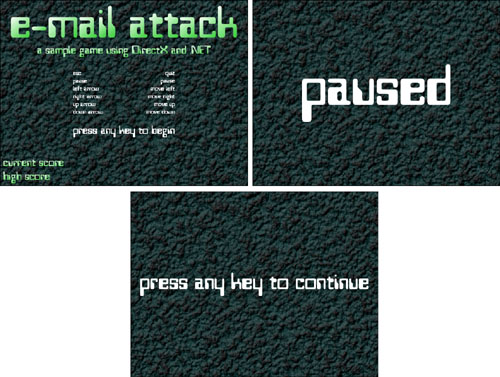
The game also uses a handful of bitmaps for screens shown at times other than normal game play. These screens, whose bitmaps are shown in Figure 23.3, are used when the application is first started, when the game is paused, and after the player loses a life.
Figure 23.3. The Title screen, Paused screen, and “Press Any Key” screen use full-screen bitmaps.
The application consists of 17 source files, listed below in Table 23.1. It is designed with simplicity in mind, so it could be changed to be more general or more efficient, if desired.
Table 23.1. E-mail Attack’s 17 Source Files, Grouped into Seven Areas


The pictures are all managed by the Game class and shared by the other classes because each one holds onto a system resource. For example, rather than each Envelope object containing its own AnimatedEnvelopePicture instance, the Game class has a static AnimatedEnvelopePicture instance shared by each Envelope object.
To compile the program, first run the type library importer on the DirectX 7 for VB type library, contained in DX7VB.DLL in your Windows system directory (such as C:Windowssystem32) once you have DirectX 7 or 8 installed. In the example, we give the output Interop Assembly the name and namespace DirectX:
TlbImp dx7vb.dll /out:DirectX.dll
When you have the Interop Assembly, place all the source files for this chapter from this book’s Web site in the same directory, excluding the files in the Advanced folder. (These are the 17 files listed in Table 23.1.) Then you can compile all the source files as follows:
csc /out:Game.exe /t:winexe *.cs /r:DirectX.dll /r:System.Windows.Forms.dll /r:System.dll
If compiling from within the Visual Studio .NET IDE, create a new C# Windows Application, add all the source files, and reference the DirectX for VB Interop Assembly using the Add Reference dialog.
After successfully compiling the application, make sure that all 11 bitmap files (.bmp) and all seven sound files (.wav) from the Web site are in the same directory as the output Game.exe executable.
Caution
If you fail to place all the picture and sound files in the same directory as the game executable, an unhandled exception will occur when the application starts.
DirectX Interaction
To begin examining the source code, let’s look at a portion of the code that directly uses the DirectX COM objects. As mentioned in Table 23.1, the Util class handles the interaction with DirectX, providing higher-level methods that can be used throughout the application. These methods are:
• Initialize. Initializes DirectX and the DirectX objects that we use. This must be called before using any of the other methods.
• CreateSoundBufferFromFile. Returns a DirectX sound buffer with the contents of a .wav sound file.
• CreateSurfaceFromFile. Returns a DirectX surface with the contents of a bitmap.
• DrawSurface. Draws the specified portion of the input surface on the back buffer. This must eventually be followed by a call to RenderComplete to display the contents on the screen.
• ResizeAndDrawSurface. Draws the specified portion of the input surface stretched or shrunken to the specified size on the back buffer. This must eventually be followed by a call to RenderComplete in order to display the contents on the screen.
• RenderComplete. Swaps the image on the back buffer onto the front buffer so it can be displayed on the screen.
• IsTimeToMove. This doesn’t involve DirectX, but encapsulates the commonly used functionality that signals when it’s time to move an object with a given frequency.
The Util class also has two public fields unrelated to DirectX but useful throughout the application:
• Counter. A number that is updated with every frame, used for timing animations.
• RandomNumber. A field of type System.Random, enabling the generation of pseudo-random numbers.
Listing 23.1. Util.cs. The Util Class Handles Interaction with DirectX So the Rest of the Application Doesn’t Have To
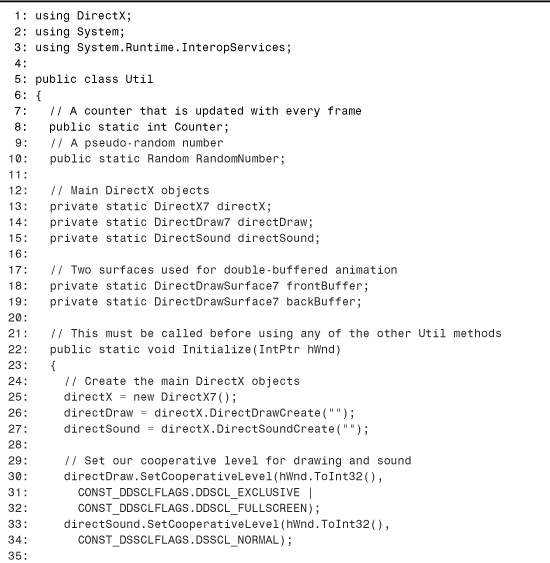


Lines 1–3 use three namespaces—DirectX for a variety of objects, System for IntPtr and Random, and System.Runtime.InteropServices for Marshal. Lines 13–15 declare the three main DirectX objects used. DirectX7 is the parent object from which we create the others. This object’s methods are also implemented as static entry points, and these are what are typically used from an unmanaged C++ application. DirectDraw7 is an interface used for graphics, and DirectSound is an interface used for sound, both obtained from methods of DirectX7.
Lines 18 and 19 define two surfaces known as a front buffer (also called the primary surface) and a back buffer. The front buffer is the area in memory containing the image displayed on the screen. The back buffer is the area in memory on which the game is rendered. This enables us to perform drawing in a temporary area that doesn’t affect the contents of the screen. When we’re finished drawing on the back buffer, the two buffers are swapped so the contents of the back buffer now reside on the front buffer, and on the screen. This process is known as page flipping, and is the key to smooth animation. DirectX supports many different page flipping schemes that can have many back buffers. In this application, we use the simplest double-buffered approach.
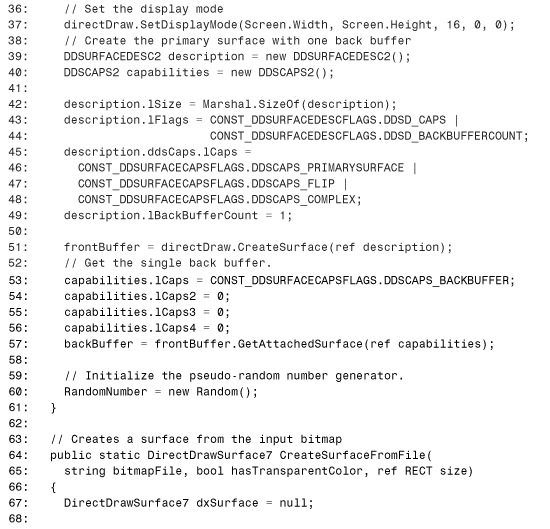
The Initialize method on Lines 22–61 creates the necessary objects, initializes the screen, and sets up the buffers. Lines 30–37 set the cooperative level and display mode, indicating that we’re taking over the entire screen and setting its resolution to Screen.Width by Screen.Height (defined as 640 by 480 in Listing 23.12). Lines 39–57 creates the front buffer and single back buffer, and Line 60 initializes the pseudo-random number generator.
The CreateSurfaceFromFile method is implemented in Lines 64–109. This method creates a new surface from the input bitmap file in Lines 72–80. If successful, it saves the dimensions of the surface in the by-reference RECT parameter in Lines 83–86. As in Windows programming, DirectX heavily relies on bounding rectangles when drawing objects. Because not everything we want to draw is rectangular, many of the bitmaps used in the application use a red color key to indicate transparent areas. Lines 91–100 tell DirectX to treat red as a color key if the caller of the method passed true for hasTransparentColor. This is done by getting the format of the surface, setting the color key to red using the lRBitMask bit mask, then calling SetColorKey on the surface object.
The IsTimeToMove method on Lines 113–119 returns true every time the Counter variable increases by the number of steps indicated by frequency. This is achieved with the modulo operator, because the result of Counter % frequency will equal zero at the appropriate intervals. This method is used throughout the game to assist with timing the animations. The Counter variable is updated on a regular basis by the EmailAttackForm class in Listing 23.17.
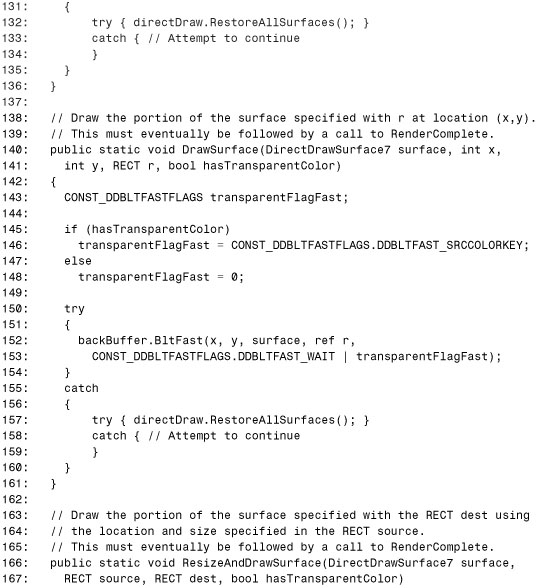
The RenderComplete method on Lines 124–136 implements the page flipping by swapping the front and back buffers when called. The DrawSurface method on Lines 140–161 draws on the back buffer. This is done using the BltFast method, performing a “fast bit block transfer”—copying of pixels from one surface to another. It’s fast because no resizing of images is done. The ResizeAndDrawSurface method in Lines 166–187, on the other hand, calls the Blt method which resizes the input surface if necessary. The CreateSoundBufferFromFile method in Lines 190–211 is analogous to the CreateSurfaceFromFile method, creating a DirectSoundBuffer object from the input .wav file. Finally, the PlayBuffer method in Lines 214–223 plays whatever DirectSoundBuffer instance is passed in.
This is all the interaction we need with DirectX to implement the E-mail Attack arcade game. If we wanted to update the application to use APIs specific to DirectX 8 or the new .NET APIs, this file is where almost all of the changes would go. For more information about DirectX and its multitude of APIs, consult the online reference at msdn.microsoft.com/directx.
The Game Class
The Game class is the largest portion of the application. The never-ending field of envelopes is managed by the Game class as a wrap-around array of Envelope objects. The width of the array is just enough so that once a column of envelopes disappears off the left side, they reappear as if they are new envelopes when coming into view on the right side. This is pictured in Figure 23.4.
Figure 23.4. The wrap-around envelope grid provides the illusion of a never-ending field of envelopes.

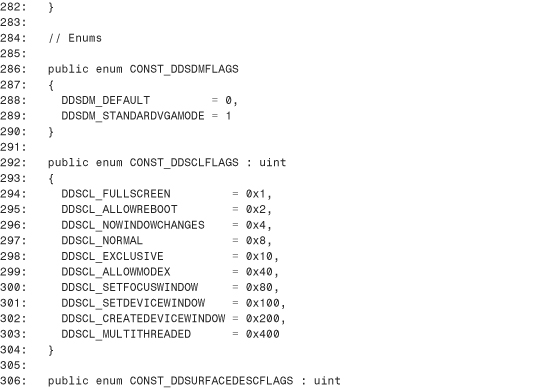
Whereas the user sees envelopes as being present or not, the code sees each envelope as always being present but either visible or invisible. Understanding this minor difference should make the rest of the code clearer. Before examining the Game class, let’s view Enums.cs in Listing 23.2, a file that contains two important enumerations.
Listing 23.2. Enums.cs. The GameStates and Moves Enumerations Used Throughout the Application
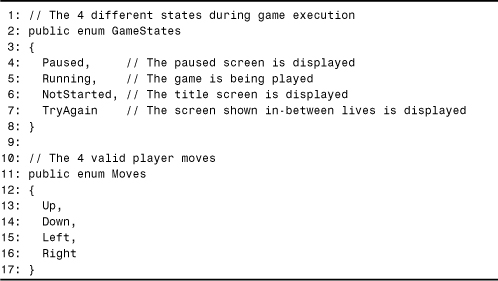
The game is always in one of four states, listed in the GameStates enumeration. It begins in the NotStarted state, then enters the Running state after the user presses any key (but Esc) to begin. The TryAgain state occurs after the loss of a life and before the user presses a key to begin the next life. Finally, when all lives are lost, the game once again enters the NotStarted state. As the name implies, the Paused state is entered whenever the user presses the Pause key during the Running state.
The player can move one of four ways—up, down, left, and right—and this is captured by the Moves enumeration.
Now we’re ready to see the Game class in Listing 23.3. All of Game’s members are static except for the constructor, finalizer, and Dispose method. Game has the following public fields:
• Player. The virus character that the player controls.
• EnvelopeGrid. The matrix of envelopes.
• BonusPicture. The rotating paperclip picture used for bonuses.
• EnvelopePicture. The animated picture used for each envelope.
• PlayerPicture. The animated picture used for the player.
• ScorePicture. The picture used to display the score.
Game also has the following public properties:
• State. The current state of game execution; one of the values of the GameStates enumeration.
• NumLives. The number of lives remaining.
• NumBonuses. The number of bonuses remaining.
• Score. The current score.
• HighScore. The highest score achieved on the current computer.
The class has the following methods:
• Game. The constructor which initializes the game and the objects it contains.
• MovePlayer. Moves the player and determines what to do afterwards, such as adjusting the score or killing the player if it was moved into a spot without a visible envelope.
• CheckForDeath. Check to see if the player died in a scenario that doesn’t involve moving—going off the left edge of the screen or staying on an envelope that disappears.
• Render. Draw the contents of the current frame.
• Dispose. The implementation of IDisposable.Dispose, which causes all resources to be released.
• KillPlayer. A private method that ends the current life, beginning a dying animation.
The Game class also has a bunch of private fields:
• titleScreen, pauseScreen, and tryAgainScreen. The screens shown in Figure 23.3.
• layers.An array of independently scrolling layers.
• state, highScore, numLives, numBonuses, and score. Fields that correspond to the public properties listed earlier.
• moveSound, infectSound, getBonusSound, useBonusSound, invalidMoveSound, lostLifeSound, and extraLifeSound. Sounds played when different activities occur.
Listing 23.3. Game.cs. The Game Class is the Glue That Holds Everything Together
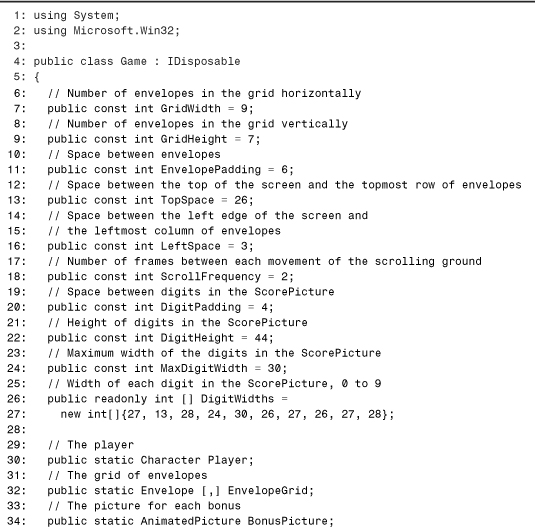
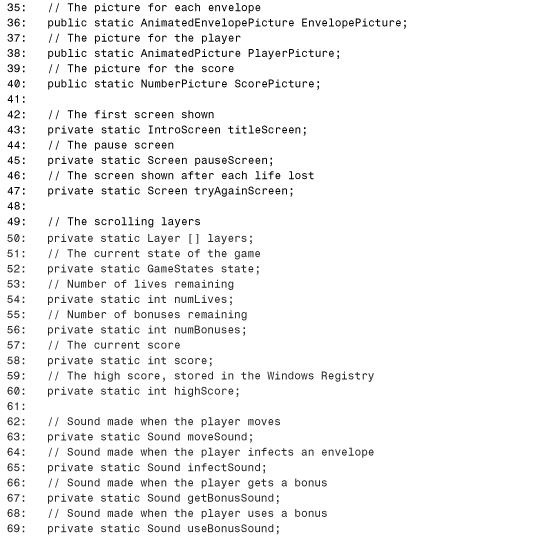
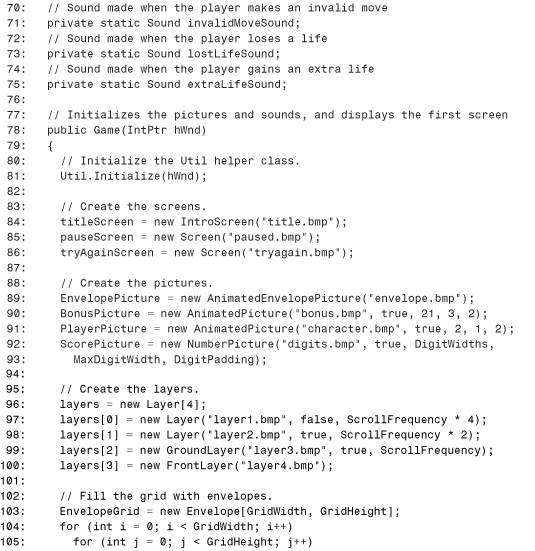


Lines 1 and 2 list two namespaces—System for IDisposable and IntPtr, and Microsoft.Win32 for RegistryKey. Lines 7–24 define many public constants used by this class and others. These constants specify the characteristics of the envelope grid, the ground’s scrolling speed, and characteristics of the digits used for the score display. The DigitWidths readonly field in Line 26 functions much like a constant; the const keyword couldn’t be used because an array is a complex type. Lines 30–75 define the many fields described earlier.
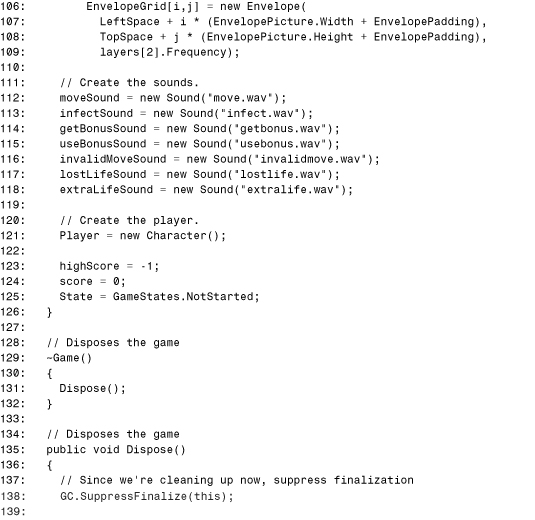
Lines 78–126 contain the constructor for Game, which must be called before using any of its static members. The constructor requires a Windows handle to the current window. This handle tells Windows which window to draw the game’s frames on. The constructor begins by calling Util.Initialize, the helper method that handles the details of setting up DirectX. Lines 84–86 create the full-screen Screen objects, Lines 89–93 create the pictures shared by the layers, grid, and player, and Lines 96–100 create the layers. The screens and pictures are initialized with bitmap files in the local directory. The last layer is a stationary FrontLayer, the next layer is a GroundLayer which scrolls at the speed given by the ScrollFrequency constant, and the first two are regular Layers that scroll twice as fast as the layer in front of it. This gives the parallax effect described earlier. Lines 103–109 create the grid of Envelope objects and initialize each one with its location. Lines 112–118 initialize Sound objects with .wav files in the local directory, and Line 121 initializes the player’s Character object. Finally, Lines 123–125 initialize highScore to a dummy value, set the current score to zero, and set the games state as NotStarted.
Lines 129–159 contain the class’s finalizer and the implementation of IDisposable.Dispose. These two methods do the same thing—release any resources. In this case, we call the Dispose method for each object belonging to Game that implements IDisposable.
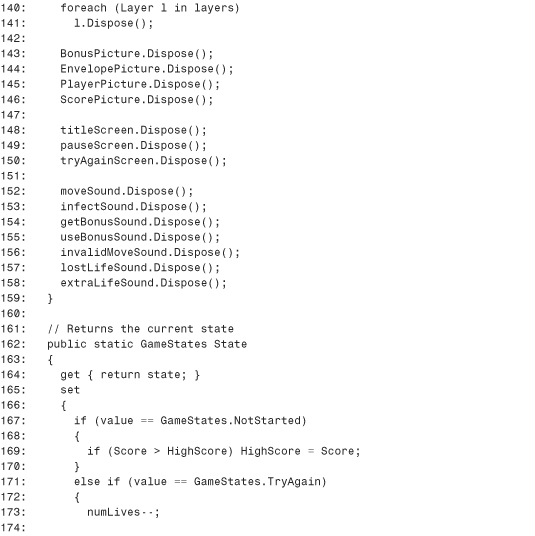
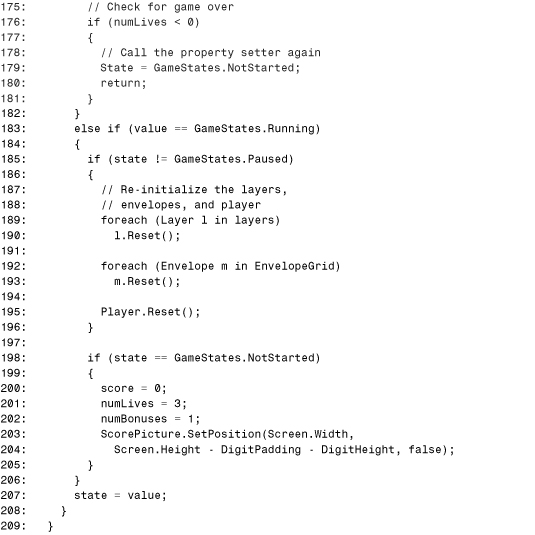
Lines 162–209 contain the implementation of the State property. The get accessor is simple, returning the value of the private state field. The set accessor sets the value of the state field in Line 207, but it also modifies the values of private members depending on which state we’re entering and which state we’re leaving. If the game is entering the NotStarted state, we check to see if the current score is better than the high score and update the high score if necessary. The update never happens when the game first starts because the current score is initialized to zero and the high score is initialized to –1, but this check is important for when this state is entered after the game has been played at least once. If the game is entering the TryAgain state (Lines 171–182), this means that the player has just died. Thus, the number of lives remaining is decremented and we check to see if the game is over. If it’s over, we set the State property to NotStarted which causes the setter to be invoked again. If the game is entering the Running state (Lines 183–205), we take a different action depending on the current state. If we’re leaving any state but Paused, the layers, envelopes, and player are reset to initial values that correspond to the beginning of a turn. If we’re in the NotStarted state, we do additional initialization of the current score, lives remaining, and bonuses remaining. The position of the ScorePicture is also set to the bottom right corner. If we’re leaving the Paused state, nothing special needs to be done; the fact that the private field is set to Paused is enough.
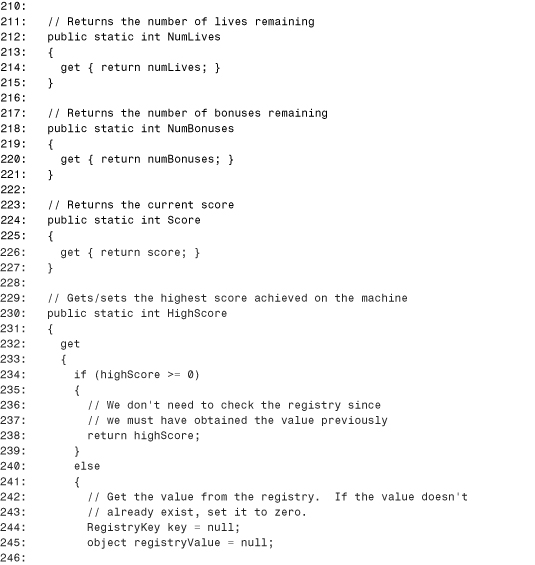
Lines 212–227 contain the NumLives, NumBonuses, and Score properties which simply return the value of the corresponding private field in a get accessor. This is done so other classes can view but can’t modify these values.
Tip
Use public read-only properties (properties with only get accessors) in conjunction with private fields when other classes shouldn’t be able to modify the values of the fields.
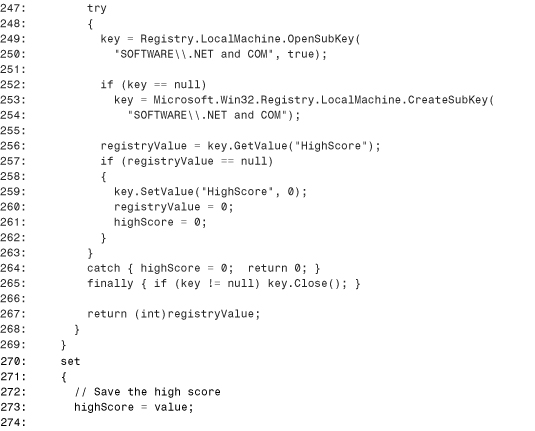
The HighScore property in Lines 230–292 gets and sets the value of the private highScore field and uses the Windows Registry to persist the high score value. The get accessor only checks the registry the first time it’s called and only if the set accessor hasn’t been called, because this is the only time the highScore field is less than zero. If highScore is greater than or equal to zero we return it, otherwise we get the value from the registry in Lines 244–267. This uses the Microsoft.Win32.RegistryKey class to open a key and get/set a HighScore value. If the HighScore value doesn’t already exist in the registry (as in the first time the game is run on a computer), the value is added and initialized to zero. If something goes wrong when trying to access the registry (such as insufficient user permissions), we swallow the exception and simply return a high score of zero. The set accessor works in a similar way, saving the high score in the private highScore field (so the get accessor always returns the up-to-date value) and persisting the value in the registry. If an error occurs with registry access, the score won’t be persisted. The result of doing this in the getter and setter is that a user without sufficient registry permissions can still play the game without errors, and the high score will simply apply to the currently running game instance only.
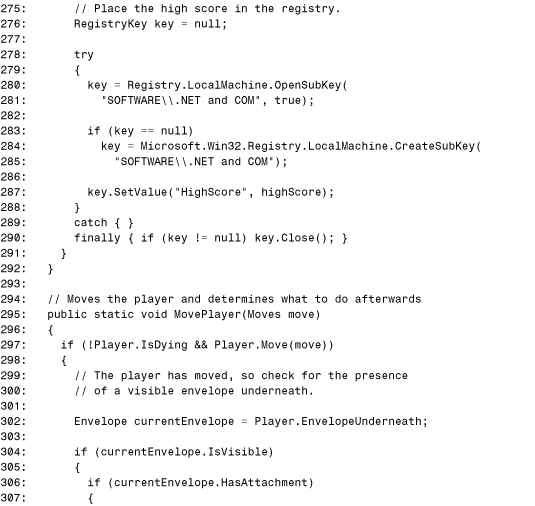
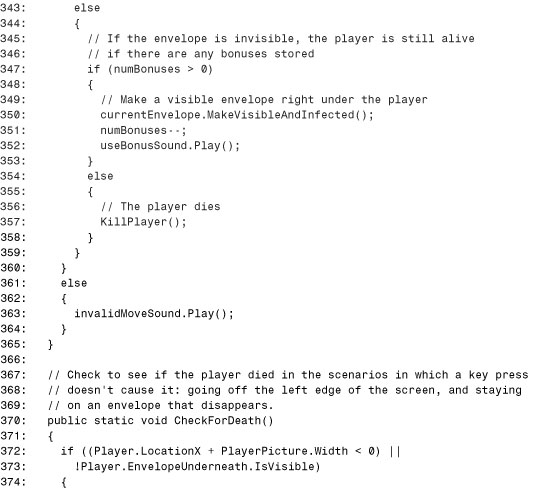
Lines 295–365 contain the first method—MovePlayer. In the if statement on Line 297, we first check to make sure that the player isn’t dying. If the player is currently dying, this means that a special animation is occurring and we don’t want the user to be able to move around. Thus, the second portion of the if statement moves the player only if the first part evaluated to true. The call to Player.Move returns true if the move was valid. If the player is dying or if the move is invalid, we play the sound corresponding to an invalid move in Line 363. Otherwise, we check the envelope that is now underneath the player in Line 302 to figure out how to proceed. If the envelope is visible, then the player hasn’t died. If the envelope has an attachment, we remove it from the envelope, mark it as infected, and increment the number of the bonuses. If the player already collected 10 bonuses, we clear them all and add an extra life. This causes the score to increment by 1000 and play a special sound (Lines 320 and 321). If the player doesn’t have that many bonuses, we increment the score by 100 and we play a different sound (Lines 326 and 327). Finally, if the envelope was already infected, we don’t add any points to the score and play the normal sound for movement. Lines 343–359 handle the case in which the player moved to an invisible envelope. If there are any bonuses remaining, an envelope is made visible under the player’s feet and the number of bonuses remaining is decremented. If there are no bonuses remaining, the player is killed.
Lines 370–377 contain the CheckForDeath method, which simply kills the player if one of two conditions are met—either the player has scrolled off the left edge of the screen or the envelope has vanished underneath the player. Both of these situations can occur without the player moving. Lines 380–384 contain the KillPlayer method, used by CheckForDeath and MovePlayer. This method simply plays the appropriate sound then calls the Kill method on the Character class which will take care of the rest.
The final method—Render—is on Lines 387–408. This method delegates to other Render methods depending on the current state. If the game is in the Running state, we render each layer in Lines 391 and 392, followed by a call to Util.RenderComplete. In any other state, we call the Render method on the appropriate Screen object. No call to RenderComplete is necessary because this is handled by each Screen’s Render method.
Sounds and Pictures
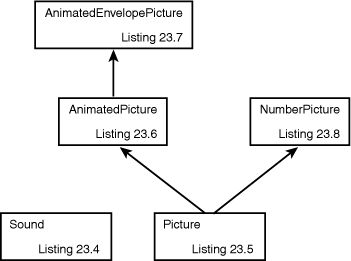
Let’s now look at the classes that represent sounds and pictures, represented in Figure 23.5. There’s only one kind of sound, but four kinds of pictures. The Picture base class represents a simple static picture, and is used by the Layer and Screen classes. The three classes deriving from Picture—AnimatedPicture, AnimatedEnvelopePicture, and NumberPicture each specialize the picture in a slightly different way, as you’ll see in the following listings. These five classes are dependent on DirectX because the pictures contain protected DirectDrawSurface7 and RECT types and Sound contains a private DirectSoundBuffer type.
Figure 23.5. Five classes used for sounds and pictures.
Listing 23.4 contains the Sound class. This is a simple class with three public methods:
• Sound. The constructor, which creates the object from a .wav sound file.
• Play. Plays the sound.
• Dispose. The implementation of IDisposable.Dispose, which releases the DirectSoundBuffer COM object.
Listing 23.4. Sound.cs. The Sound Class Encapsulates a Sound File

Lines 1–3 list three namespaces—DirectX for DirectSoundBuffer, System for IDisposable and GC, and System.Runtime.InteropServices for Marshal. Line 7 declares the private buffer that is passed to the Util class from Listing 23.1.
The constructor in Lines 10–18 attempts to initialize buffer by calling Util.CreateSoundBufferFromFile. This method could throw an exception, but we silently fail because the inability to create a sound should not be a fatal error. Instead, the game can continue and emit no sound when it normally should be occurring. (A debug assertion would be a nice thing to add here, however.) Lines 21–24 contain the Dispose method, which has a raw resource to dispose, held by the COM object represented by buffer. To release the resource immediately we need to release the COM object using Marshal.ReleaseComObject.
Lines 27–31 contain the Play method, which either plays the sound or silently exits if buffer isn’t initialized. Util.PlayBuffer does the dirty work of making the sound play.
Listing 23.5 contains the Picture class. Picture has the following protected fields:
• dxSurface. The “raw” surface used by DirectX.
• size. The size of the picture, stored as the RECT type used by DirectX.
• hasTransparentColor. True if the picture uses red for a color key, false otherwise.
Picture has the following public properties:
• Width. The width of the picture, in pixels.
• Height. The height of the picture, in pixels.
The class also contains the following methods:
• Picture. The constructor, which creates the object from a bitmap file.
• DrawAt. Draws the picture at the given location.
• ResizeAndDrawAt. Draws the picture at the given location, stretched or shrunken to the given size.
• Dispose. The implementation of IDisposable.Dispose, which releases the DirectX surface.
• ClippedRectangle. A protected method that chops off the necessary portion of the picture if part of it is off the left or right side of the screen.
Listing 23.5. Picture.cs. The Picture Class Represents a Simple Picture, and Is Also Used as a Base Class for More Complex Pictures
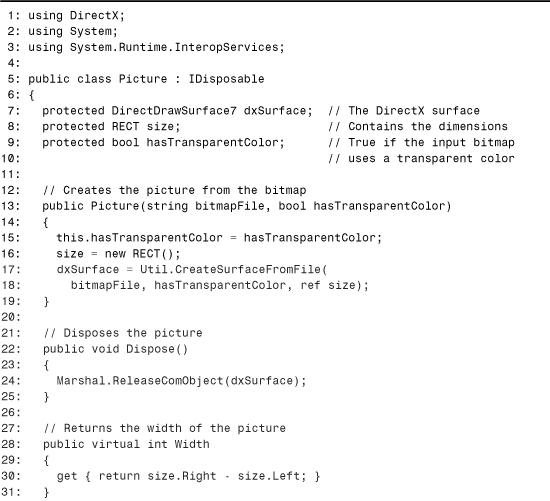
Lines 1–3 list three namespaces—DirectX for DirectDrawSurface7 and RECT, System for IDisposable and GC, and System.Runtime.InteropServices for Marshal. Line 7 declares the protected dxSurface that is passed to the Util class, Line 8 defines the RECT structure that contains the size of the surface (and thus the size of the picture), and Line 15 defines the hasTransparentColor flag that indicates if the picture uses a red color key.
The constructor in Lines 13–19 attempts to initialize the surface by calling Util.CreateSurfaceFromFile. If creating the surface fails, we let the exception be thrown because this is a fatal error that would affect game play. Lines 22–25 contain Dispose method that works just like in the previous listing. The Width and Height properties in Lines 28–37 calculate the returned values using the values of the stored RECT.
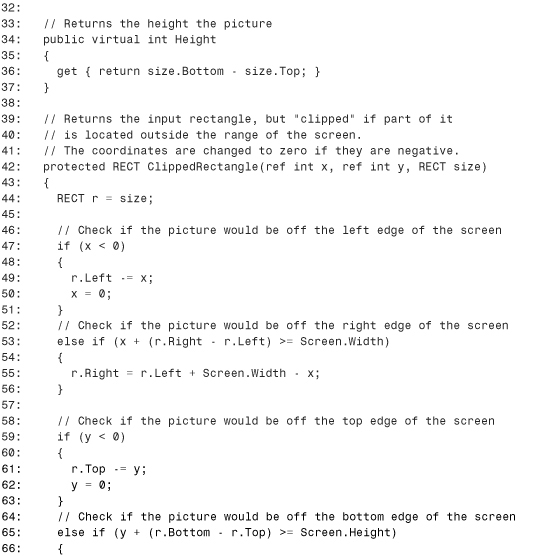
The ClippedRectangle method in Lines 42–71 is used by the remaining two methods to check that we don’t try to draw outside the boundaries of the screen, which would cause an exception originating from DirectX. If the area is off the left or top edge of the screen, we not only need to adjust the size of the rectangle but also its location, thus the x and y parameters are passed by-reference.
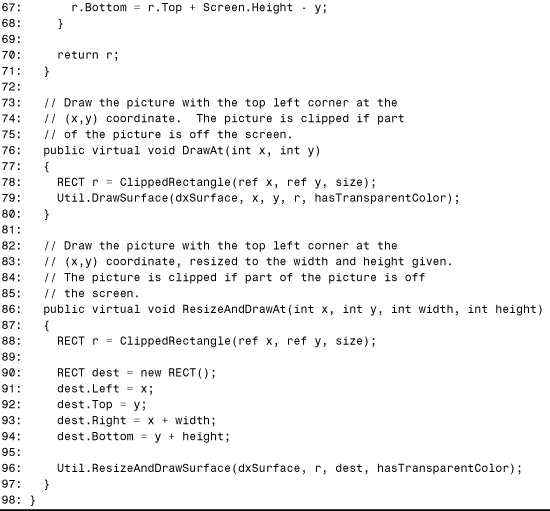
The DrawAt method in Lines 76–80 simply calls ClippedRectangle then the Util class’s DrawSurface method. The ResizeAndDrawAt method in Lines 86–97 calls ClippedRectangle and Util.ResizeAndDrawSurface. This requires a little more work because Util.ResizeAndDrawSurface requires a RECT for both the input picture and the buffer we’re drawing on.
The AnimatedPicture class adds the element of animation to a picture. Rather than a bitmap representing the entire picture, the input bitmap for AnimatedPicture contains several frames of animation that are used when appropriate. This class is used for the picture of the virus character and the picture of the bonus item, both shown in Figure 23.6.
Figure 23.6. Animations for the character and bonus items.
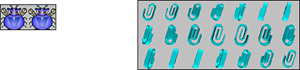
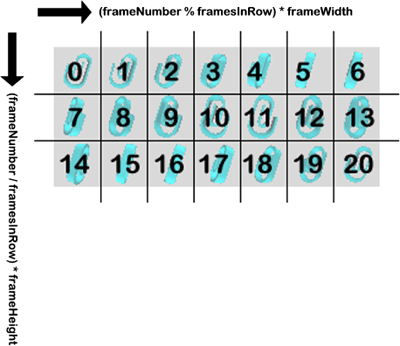
The bitmap is “sliced” into smaller frames based on its dimensions and additional information given in the AnimatedPicture constructor. Only one frame is displayed at a time, chosen based on the time that has elapsed. Figure 23.7 demonstrates how the bitmap containing the bonus item is sliced into individual frames numbered from zero. Each time the picture is rendered, the calculations for the left and top edges are performed as shown in the figure.
Figure 23.7. Slicing an input bitmap into animated frames.
AnimatedPicture, shown in Listing 23.6, adds the following protected fields to the ones inherited from the base class:
• frames. Number of frames in the animation.
• framesInRow. Number of frames in one row of the input bitmap.
• frameWidth. The width of each frame, in pixels.
• frameHeight. The height of each frame, in pixels.
• frequency. Number of times the picture is drawn before switching to the next frame. The higher this number, the slower the animation.
AnimatedPicture overrides both of Picture’s properties:
• Width. The width of one frame, in pixels.
• Height. The height of one frame, in pixels.
The class also contains the following methods:
• AnimatedPicture. The constructor, which creates the object from a bitmap file and figures out the frame information from additional parameters.
• DrawAt. Overrides the base method and draws the current frame at the given location.
• ResizeAndDrawAt. Overrides the base method and draws the current frame at the given location, stretched or shrunken to the given size.
Listing 23.6. AnimatedPicture.cs. The AnimatedPicture Class Represents a Picture That Changes at a Regular Interval
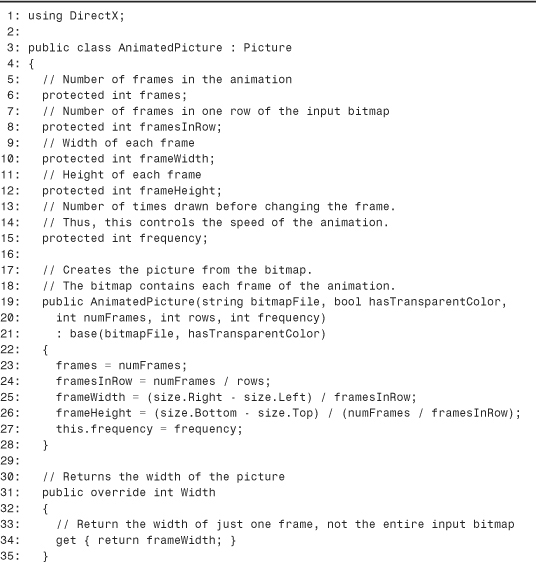
Line 1 lists the DirectX namespace, used for RECT. Inside the constructor in Lines 19–28, the protected fields are calculated and set. Lines 31–42 contain the overriding Width and Height properties which simply return frameWidth and frameHeight, respectively.
Caution
The implementation of AnimatedPicture requires that the number of frames is always a multiple of the number of rows in the input bitmap. If you plan on using this with different pictures, be aware of this limitation or update the code to not require it.
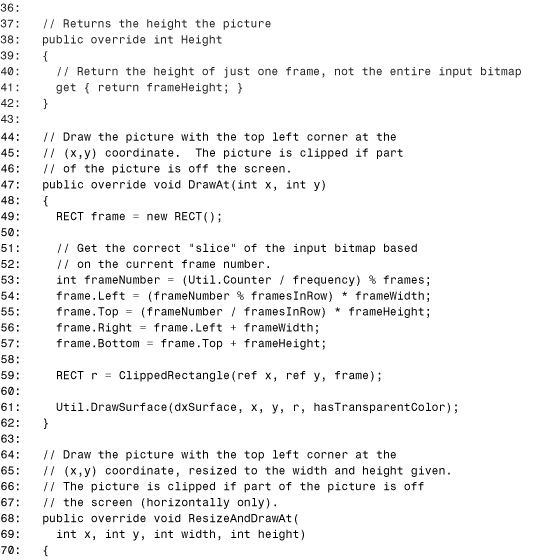
The DrawAt method on Lines 47–62 calls ClippedRectangle and Util.DrawSurface just like the base method, but first figures out the current frame and selects the appropriate slice of the picture to draw. This is the implementation of the calculation shown in Figure 23.7. The ResizeAndDrawAt method does the exact same thing except for the call to Util.ResizeAndDrawSurface.
The AnimatedEnvelopePicture class is another class that expects a bitmap containing several frames of animation. Unlike the more general AnimatedPicture, however, AnimatedEnvelopePicture is tailored specifically to the envelope picture shown in Figure 23.8.
Figure 23.8. The envelope picture, containing all possible frames of animation.
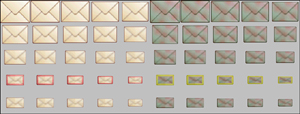
The reason a different class is required is that the smaller pictures in Figure 23.8 don’t represent a single sequence of animation. Instead, there are two separate sets of animations—one for a regular envelope and one for an infected envelope. Furthermore, each smaller size of envelope pictures has two versions—one with a colored border and one without. These sub-pictures are used to provide the blinking effect when the envelopes are small.
The AnimatedEnvelopePicture, shown in Listing 23.7, has a public NumFrames constant set to 20. This value serves the same function as the protected frames field inherited from AnimatedPicture, but made public so the Envelope class can use it. The class contains the following methods:
• AnimatedEnvelopePicture. The constructor, which creates the object from a bitmap file and sets the frame information.
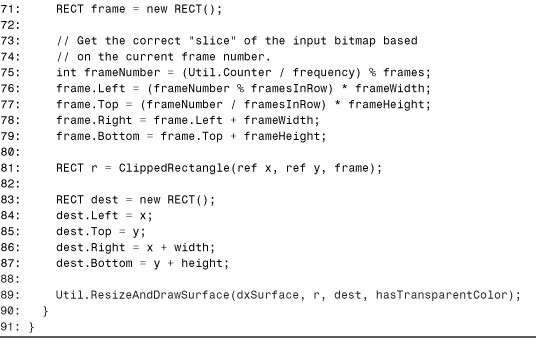
• DrawAt. There are two versions of this method. The one that overrides the base method throws a NotSupportedException because it doesn’t apply. The overload of this method has additional parameters needed to display the picture.
• ResizeAndDrawAt. Overrides the base method and throws a NotSupportedException because it doesn’t apply.
Listing 23.7. AnimatedEnvelopePicture.cs. The AnimatedEnvelopePicture Class Represents an Animated Envelope Picture, Which Is More Complex Than a Typical Animated Picture

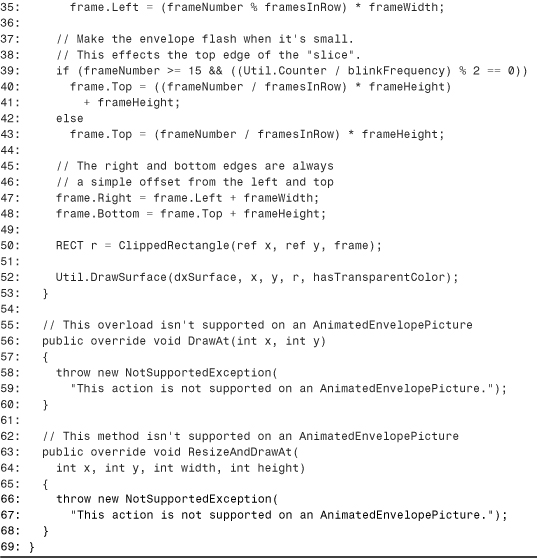
Lines 1 and 2 list two namespaces—System for NotSupportedException, and DirectX for RECT. Inside the constructor in Lines 13–19, the frameWidth and frameHeight fields are set to custom values specific to the layout of the envelope bitmap. Line 18 sets the value of a private blinkFrequency to 4, a number chosen arbitrarily for the speed of the envelope blinking effect.
Notice that the overriding DrawAt and ResizeAndDrawAt methods in Lines 56–68 throw a NotSupportedException. This is done because the AnimatedEnvelopePicture has its own DrawAt overload with special requirements, so calling either of these virtual methods would be an error.
This special DrawAt method is contained in Lines 25–53, and has two additional parameters: the frame number and a boolean value indicating whether the envelope is infected or not. Unlike the AnimatedPicture, which manages its own animation, the AnimatedEnvelopePicture class lets its client decide what frame to draw and in what state the envelope is in. We’ll see in Listing 23.15 that the controlling client is each Envelope object. This enables each envelope to be drawn in a different state simultaneously, unlike the bonus items or bugs which all move in sync.
To interpret the contents of the overloaded DrawAt method, refer back to the picture of envelopes in Figure 23.8. In Lines 31–35, the left edge of the slice is determined based on whether we’re told to draw an infected envelope, because all the infected envelopes are further to the right than the normal ones. In Lines 39–43, the top edge is chosen based on the blinking frequency if the frame corresponds to one of the smaller sub-pictures that can blink. Once these two points are chosen, the right and bottom edges of the slice are always at the same offset, so the code in Lines 47–52 is straightforward.
The NumberPicture class, shown in Listing 23.8, can display any number once initialized with a bitmap containing each digit. We use this class to display the score and high score. The input bitmap used in the game is shown in Figure 23.9.
Figure 23.9. Numbers used for the game’s score display.
![]()
When describing this class, the “input picture” refers to the bitmap shown in Figure 23.9 and the “output picture” refers to the number picture displayed on the screen. NumberPicture contains the following private fields:
• sideEdge. The position on the screen (in pixels) of either the left edge or the right edge of the output picture, depending on the value of leftAligned.
• topEdge. The position on the screen (in pixels) of the top edge of the output picture.
• leftAligned. True if sideEdge marks the left side of the output picture, or false otherwise.
• digitWidths. An array containing the width (in pixels) for each digit. Element 0 contains the width of 0, element 1 contains the width of 1, and so on.
• digitSpacing. The amount of space between the left edges of each digit in the input picture. Although each digit may have a different width, they must be spaced apart such that a multiple of digitSpacing points to the beginning of a digit.
• padding. Space between digits in the output picture.
The class also contains the following public methods:
• NumberPicture. The constructor, which creates the object from a bitmap file and sets the frame information.
• SetPosition. Sets the location of the output picture.
• Draw. Draws the number passed as an argument at the location set by the last call to SetPosition.
Listing 23.8. NumberPicture.cs. The NumberPicture Class Can Transform Any Number Into a Picture
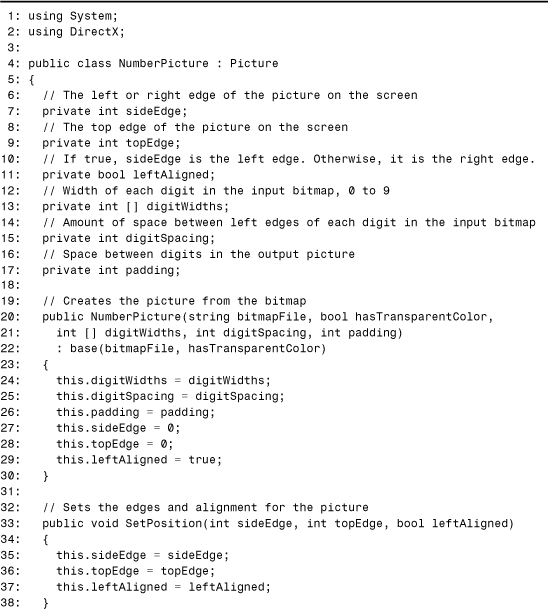
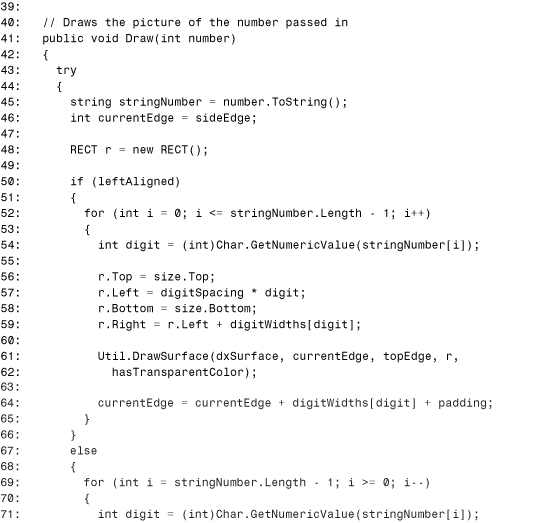

Lines 1 and 2 list two namespaces—System for Char and DirectX for RECT. The constructor in Lines 20–26 initializes its private fields, and the SetPosition method in Lines 35–37 sets the score location, used to display the score in the lower right corner during game play and the lower left corner during the title screen.
Lines 41–89 contain the Draw method, which begins by converting the input number into a string. We then go through one of the two for loops, depending on whether the number should be rendered along the left edge or right edge. If we’re rendering along the left edge, each character is examined from left to right in the loop on Lines 52–65. The current digit is obtained from the current character by calling the static Char.GetNumericValue. The slice of the input bitmap is then selected based on the digit. Because the digits appear in order from 0 to 9 (as seen in Figure 23.9) and are spaced apart evenly, finding the appropriate left edge can be done by multiplying the digit’s value by digitSpacing. Every digit reaches from top to bottom of the input bitmap, so size.Top and size.Bottom are used for the upper and lower edges.
Finally, because each digit has its own width, the corresponding value of the digitWidths array is added to the left edge to set the right edge. The selected slice is then drawn on the background in Lines 61–62 at the left edge indicated by currentEdge. On Line 64, currentEdge is updated to place the next digit to the right of the current one, plus the value of padding so the digits aren’t touching. The for loop in Lines 69–82 functions much like the previous one, except the digits are processed from right to left. If some sort of error occurs, we swallow it because failure to render the number is not considered a fatal error.
Layers
The classes that represent the main screen’s layers are represented in Figure 23.10. The base Layer class contains a background Picture that scrolls repeatedly across the screen. The background is tiled horizontally to give the appearance of one never-ending surface. The two derived classes add some objects that are drawn on top of the background.
Figure 23.10. Three classes are used for the game’s layers.
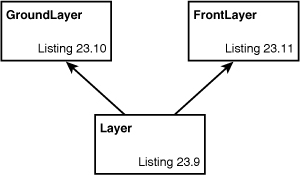
Listing 23.9 contains the Layer class. It contains the following fields:
• Frequency. A public readonly field that specifies how many frames occur before the layer scrolls left by one pixel.
• pixelsOffscreen. A protected field that specifies how many pixels have been scrolled off the screen. This value resets to zero each time the entire background has left the screen.
• background. A private field that is the background Picture object.
The class also contains the following public methods:
• Layer. The constructor, which creates the layer with the input bitmap and sets its scrolling frequency.
• Reset. Reinitializes the layer to the state when it was constructed. This is used by the Game class whenever a new turn begins so we don’t have to create new objects each time. Instead, the existing objects are reset to be as good as new.
• Render. Draws the layer. In the game’s multilayered screen, each layer contributes to the rendering. Thus, the call to Util.RenderComplete is done by the Game class after calling each of its layers’ Render method.
• Dispose. The implementation of IDisposable.Dispose, which calls Dispose on the class’s Picture object.
Listing 23.9. Layer.cs. The Layer Class Represents a Simple Scrolling Layer, and Is Also Used as a Base Class for More Complex Layers

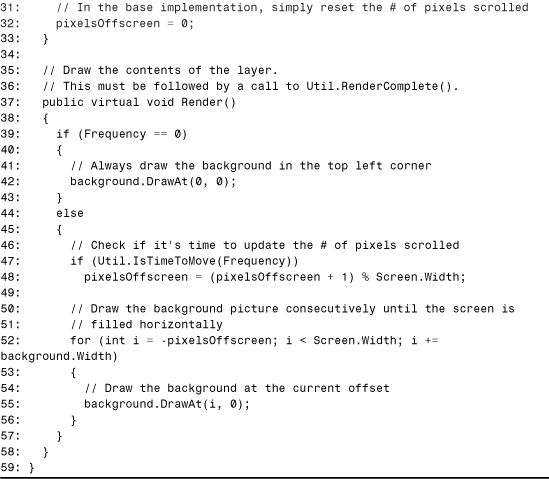
Line 1 lists the System namespace, used for IDisposable. The constructor initializes the three fields in Lines 15–20, including the creation of the background picture. The Dispose method in Lines 23–26 should look familiar, calling dispose on the Picture object. The Reset method in Lines 29–33 only needs to reset pixelsOffscreen to zero to reinitialize the object because frequency and background are never changed.
The Render method in Lines 37–58 either draws the background with the top left corner at (0,0) if its stationary, or handles the scrolling and tiling of the picture if Frequency is set to a non-zero value. Line 47 uses Util.IsTimeToMove to determine when to update pixelsOffscreen, causing the image to shift to the left by one pixel. The loop in Lines 52–56 handles the tiling of the image, repeatedly drawing the background picture until hitting the right edge of the screen.
The GroundLayer class in Listing 23.10 simply overrides Layer’s Render method. This is done to draw the envelopes and character in addition to the background.
Listing 23.10. GroundLayer.cs. The GroundLayer Class Represents the Layer on Which the Character and Envelopes Move

The Render method in Lines 10–30 begins by calling the base Render method to draw the background picture. After this, it must draw each envelope and the bug character. The for loop in Lines 20–26 calls each of the envelope’s Render method. Line 29 renders the bug by simply calling another Render method. The implementation of these Render methods is shown in Listings 23.14 and 23.15.
The FrontLayer class in Listing 23.11, like GroundLayer, simply overrides Layer’s Render method. This is done in order to draw the lives remaining, bonuses remaining, and score (in addition to the background).
Listing 23.11. FrontLayer.cs. The FrontLayer Class Represents the Stationary Top-Most Layer Containing the Lives Remaining, Bonuses Remaining, and the Score

The Render method in Lines 11–32 also begins by calling the base Render method to draw the background picture. After this, it uses three pictures exposed by the Game class—BonusPicture, PlayerPicture, and ScorePicture to draw the bonuses remaining, lives remaining, and score.
Screens
Two classes represent screens besides the layers: Screen and IntroScreen. The Screen class is very similar to the Layer class, but nothing can be drawn on top of a Screen without it being done inside its Render method. IntroScreen is a derived class used to show the current score and high score.
Listing 23.12 contains the Screen class. This class defines two public constants—Width and Height—that define the size of the screen in pixels. These are set to 640 and 480, respectively, and control the screen’s resolution when the game is running.
Like Layer, Screen has a protected Picture object that represents the background, and the following public methods:
• Screen. The constructor, which creates the background picture from the input bitmap.
• Render. Draws the contents of the screen. It calls Util.RenderComplete, so no additional rendering can be done outside of this method.
• Dispose. The implementation of IDisposable.Dispose, which calls Dispose on the class’s Picture object.
Listing 23.12. Screen.cs. The Screen Class Represents a Static Image That Is Displayed Without Additional Items Drawn on Top of It
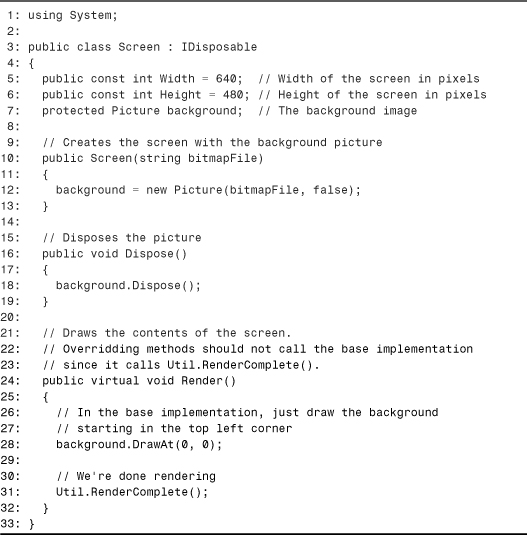
Line 1 lists the System namespace, used for IDisposable. The constructor in Lines 21–24 simply initializes the screen’s picture. The Dispose method in Lines 16–19 is no different from the one in the Layer class. Finally, the Render method in Lines 24–32 simply draws the background picture starting from the top left corner of the screen, and calls Util.RenderComplete to flip the back buffer to the screen. The call to Util.RenderComplete means that nothing can be rendered on top of a Screen.
The IntroScreen class in Listing 23.13 overrides Screen’s Render method. This is done to draw the current score and high score on top of the background.
Listing 23.13. IntroScreen.cs. The IntroScreen Class Represents a Stationary Screen with a Background Picture, Current Score, and High Score
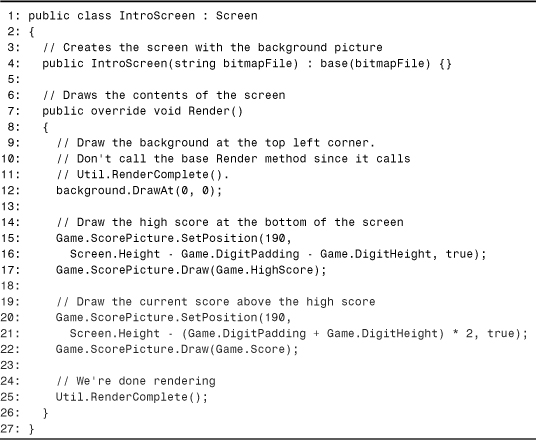
This listing is just like the previous one except for Lines 14–22, between the calls to DrawAt and RenderComplete. These lines draw the two scores—the current score and high score.
The screen that results from Listing 23.13 is displayed in Figure 23.11.
Figure 23.11. The first screen of the game, with the current score and high score drawn on top of the background.

The Actors
The actors in the game are the character and the envelopes. These are represented by the Character and Envelope classes. The Character class, shown in Listing 23.14, has the following public fields:
• LocationX. The current horizontal location of the character, in pixels.
• LocationY. The current vertical location of the character, in pixels.
• IsDying. True if the character is currently dying (and shrinking); false otherwise.
The class has the following private fields:
• framesSinceDeath. The number of frames passed because the character died, used to control the shrinking animation.
• envelopeX. The horizontal index of the envelope currently under the character.
• envelopeY. The vertical index of the envelope currently under the character.
Character has the following public methods:
• Character. The constructor, which initializes the character and its position.
• Reset. Reinitializes the character to the state when it was constructed. This is used by the Game class whenever a new turn begins so we don’t have to create a new object each time.
• Render. Draws the character at its current location. If the character is dying, it shrinks and then ends the current turn.
• Move. Moves the character and returns true if the move is valid. Examples of invalid moves are trying to move above or below the edges of the screen.
• Kill. Puts the character in a dying state, kicking off the shrinking animation.
Character also has one public property, EnvelopeUnderneath, which returns the envelope currently underneath the character.
Listing 23.14. Character.cs. The Character Class Represents the Creature Controlled by the User

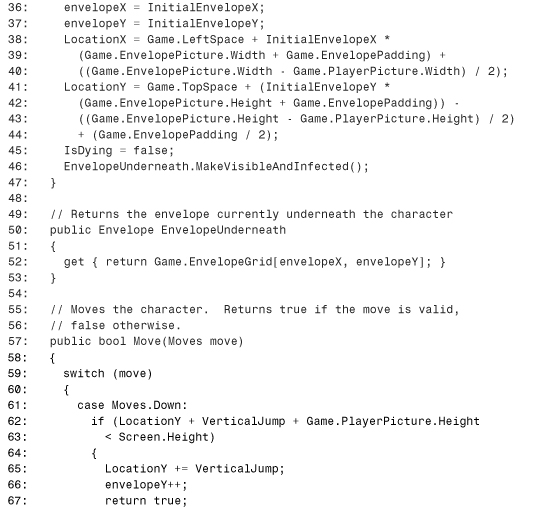

The constructor for Character simply calls Reset, because the same actions are done at initialization and reinitialization. Reset, in Lines 34–47, initializes the character’s position to a certain location dictated by the InitialEnvelopeX and InitialEnvelopeY constants. The location of the character in terms of indices in the envelope grid is mathematically related to its position in pixels, and this relationship is used in Lines 38–44 to initialize LocationX and LocationY. The last work that Reset does is make the character alive and ensure that there’s an envelope under its feet.
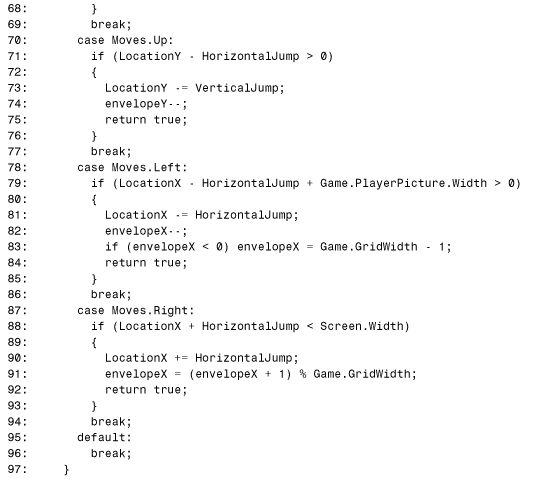
The EnvelopeUnderneath property is defined in Lines 50–53, and simply returns the appropriate element of Game.EnvelopeGrid. This can be done in one simple step because we keep track of the current envelope indices at all times. The Move method in Lines 57–99 updates the location of the character appropriately. Whereas the envelopeX and envelopeY variables are incremented and decremented by one (except at the edges of the wrap-around grid), the LocationX and LocationY variables are incremented by the HorizontalJump and VerticalJump constant values because they are measured in terms of pixels.
The Render method in Lines 103–126 has a simple task if the character isn’t dying—draw the picture at (LocationX, LocationY). If it is dying, it increments the counter that stores how many times the character has been rendered since death, then draws a shrunken picture. The higher framesSinceDeath gets, the smaller the picture becomes. Finally, once the shrunken picture gets small enough, the state of the game is changed to TryAgain in Line 120. The Kill method is defined in Lines 129–133, kicking off the dying process by setting IsDying to true.
The Envelope class, shown in Listing 23.15, contains many private fields to keep track of its internal state. Most important are its three Boolean public fields:
• IsVisible. True if the envelope is visible.
• IsInfected. True if the envelope has been stepped on because it has last become visible.
• HasAttachment. True if the envelope contains an attachment.
Envelope also contains the following public methods:
• Envelope. The constructor, which initializes the envelope at the given position.
• Reset. Reinitializes the envelope to the state when it was constructed. This is used by the Game class whenever so we don’t have to continually create new objects.
• MakeVisibleAndInfected. Ensures that the envelope is visible, infected, slow-shrinking, and has no attachment. This is used at the beginning of each turn because the character must start on top of an envelope. It’s also used whenever the player uses a bonus to create an envelope underneath the character’s feet.
• Render. Draws the envelope in the appropriate state and at the appropriate location. This method handles the screen wrap-around for each envelope.
Envelope also has a private method, ChooseNewCharacteristics, which is used whenever an envelope needs to be reborn with different properties.
Listing 23.15. Envelope.cs. The Envelope Class Represents an Envelope That Appears, Shrinks, Then Disappears on the Ground Layer


The Envelope class’s constructor in Lines 32–39 sets the location of the envelope and the frequency of the ground layer it sits on. This is needed so the envelope scrolls in sync with its background. The initial horizontal location is saved, but the vertical location doesn’t need to be saved in a separate variable because its value never changes. The constructor also calls ChooseNewCharacteristics to give its additional fields initial values.
Reset, in Lines 42–46, simply resets the horizontal position stored during construction and calls ChooseNewCharacteristics, containing the common resetting code. ChooseNewCharacteristics is defined in Lines 50–59. In it, the pseudo-random attributes are initialized: visibility, shrinking speed, and presence of an attachment. The remaining three attributes are always reset the same way. The number of frames because becoming visible is set to zero, the size is set to the largest (represented by zero), and it is not infected.
The MakeVisibleAndInfected method in Lines 63–70 calls ChooseNewCharacteristics, but sets some fields afterward to guarantee that the envelope has the slowest shrinking speed, is infected and visible, and does not contain an attachment.
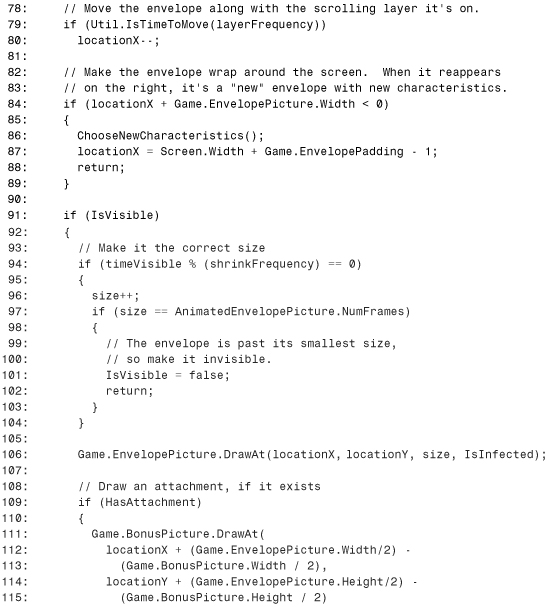
Finally, the Render method in Lines 74–129 is the most complicated Render method in the application. It begins by incrementing the timeVisible counter and scrolling the envelope along with the ground layer if it’s time to do so (Lines 76–80). Next, we check to see if the envelope is completely off the left side of the screen. If so, we turn it into a new envelope by calling ChooseNewCharacteristics and update its location to now appear just past the right edge of the screen. Because it’s still offscreen, there’s nothing to draw and we return in Line 88.
If the envelope is visible, it is drawn on Line 106. Before doing this, however, we must check to see if it’s time for it to shrink. If so, we increment the size variable in Line 96, because zero represents the largest size. If the envelope was already the smallest size (AnimatedEnvelopePicture.NumFrames-1), we make it invisible and return in Line 102.
After drawing the envelope, Lines 109–117 check if an attachment needs to be drawn on top of it. If so, it is centered on the envelope. If the envelope isn’t visible and the player isn’t dying, Line 126 chooses new characteristics for the envelope. Otherwise, invisible envelopes would never become visible again. Because this action occurs every frame for each invisible envelope, Line 127 decreases the likelihood that the envelope becomes visible (to a 1 in 600 chance). If this were not done, the playing field would almost always be completely filled with envelopes and the game wouldn’t be challenging.
Using the Game Class
Now that we’ve seen the Game class and all the supporting classes, it’s time to view the part of the application that drives the entire process. This is handled with the EmailAttackForm class, a Windows Form that serves as the canvas on which the game is drawn. EmailAttackForm uses PInvoke to call a few Win32 APIs, and these are defined in the Win32 namespace shown in Listing 23.16.
Listing 23.16. Win32.cs. The Win32 Namespace Contains Two Classes That Represent Win32 DLLs

The methods in Listing 23.16 have been grouped into classes based on the DLLs exposing them. The Kernel32 class contains two methods used for high-performance timing: QueryPerformanceCounter and QueryPerformanceFrequency. These functions should look familiar from Chapter 18, “The Essentials of PInvoke.”
Because not all computer systems may contain hardware that supports performance counters, we also define timeGetTime from WINMM.DLL. Although this function exposes a less-precise timer, we can count on it being useable on any PC.
Listing 23.17 contains the EmailAttackForm class, as well as the GameStates and Moves enumerations seen earlier. The EmailAttackForm class has the following public methods:
• EmailAttackForm. Initializes the game and runs it indefinitely (until the user hits the Esc key).
• OnKeyDown. Overrides the base method to handle key presses.
• Dispose. Overrides the base method to dispose the Game when finished.
• Main. The game’s entry point.
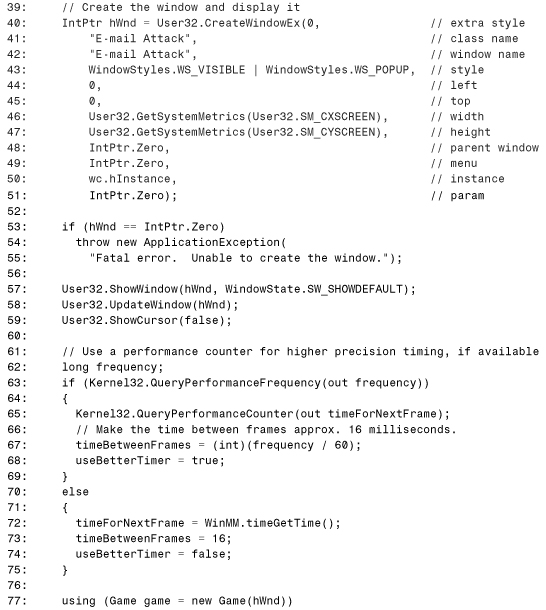
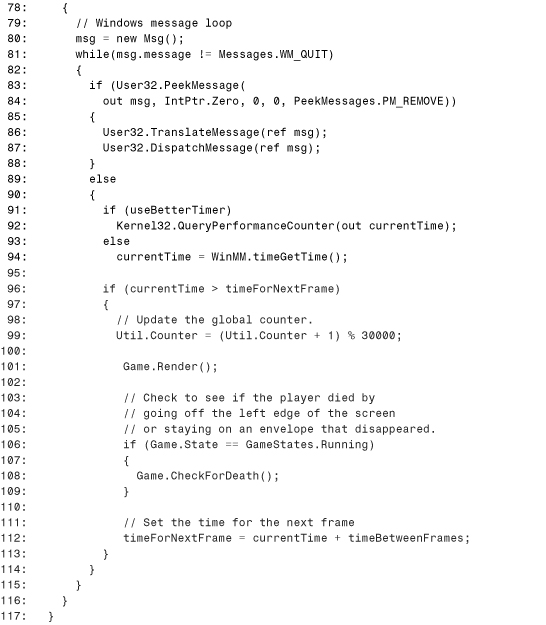
Listing 23.17. EmailAttack.cs. The EmailAttackForm Class Contains the Game Loop Which Renders the Game at a Regular Interval


Lines 1–3 list three namespaces—System for the Environment class, System.Windows.Forms for the Form class, and Win32 for the methods defined in Listing 23.16. The form’s constructor in Lines 10–62 contain the game loop—a loop that continually renders the game at a regular interval. It begins by hiding the cursor in Line 17, because we don’t want the mouse pointer floating around the screen. Lines 20–33 set up our timing mechanism. If the system supports performance counters, we set useBetterTimer to true and set the desired rendering frequency to approximately 16 milliseconds. If it doesn’t support them (indicated by QueryPerformanceFrequency returning false), we set useBetterTimer to false and set the desired rendering frequency to exactly 16 milliseconds.
Line 35 creates the Game object, initializing it with the form’s Handle property. The loop in Lines 37–61 continues indefinitely, so only the user pressing the Esc key will end the application. Inside the loop, we get the current value of whichever timer we’re using (Lines 39–42) then determine if it’s time to render the frame. If it is, Util.Counter is incremented and the Game.Render method is called. The value of the counter resets to zero after 29,999 just so the number doesn’t overflow. After the current scene has been rendered, the code checks to see if the player has died by calling CheckForDeath in Line 55. Line 58 updates the time that the next frame should be rendered, and Line 60 calls Application.DoEvents so the window can process any messages (such as key presses).
Form’s virtual Dispose method, which has a Boolean parameter, is overridden in Lines 65–71 in order to dispose of the game object. The OnKeyDown method in Lines 75–121 overrides the base implementation in order to handle the player’s key presses. If the game is in the Running state, pressing the down, up, left, or right arrow keys calls Game.MovePlayer with the corresponding value from the Moves enumeration. Pressing the Esc key ends the game, and pressing Pause pauses it. All of this is handled in Lines 77–105. In any other state, however, pressing the Esc ends the game and pressing any other key puts the game in the Running state. This is handled in Lines 106–119. Last but not least, the Main method in Lines 152–155 creates the EmailAttackForm object.
This completes the walk-through of the E-mail Attack application. The next section looks at an alternative way to provide some of the exact same functionality without using any additional assembly except for mscorlib.
E-mail Attack—The Advanced Version
The advanced version of E-mail Attack removes dependencies on all assemblies except for mscorlib. Rather than relying on System.Windows.Forms, it uses PInvoke to achieve the same results with classic Win32 programming. To eliminate the dependency on the DirectX for VB Interop Assembly, the advanced version defines its own DirectX type information in C# source code, following the techniques of Chapter 21, “Manually Defining COM Types in Source Code.”
The advanced version offers no additional functionality and is not the recommended way of writing new programs in managed code, but it’s a useful exercise to see how it’s done. If you’re porting a Win32 application to C# or Visual Basic .NET, it can be handy to use the techniques shown here to quickly get your program running “as is.” This version of the application does use less memory, but most people find that the significant amount of extra work involved usually doesn’t justify the difference.
The advanced version uses the same code listings examined throughout the chapter, but replaces Listings 23.16 and 23.17 with 23.18 and 23.19, respectively. There is also a new file—DirectX.cs— (Listing 23.20) that replaces the assembly imported from the DX7VB.DLL type library.
To compile the advanced version, place all the necessary files in the same directory and invoke the C# compiler as follows:
csc /out:Game.exe /t:winexe *.cs
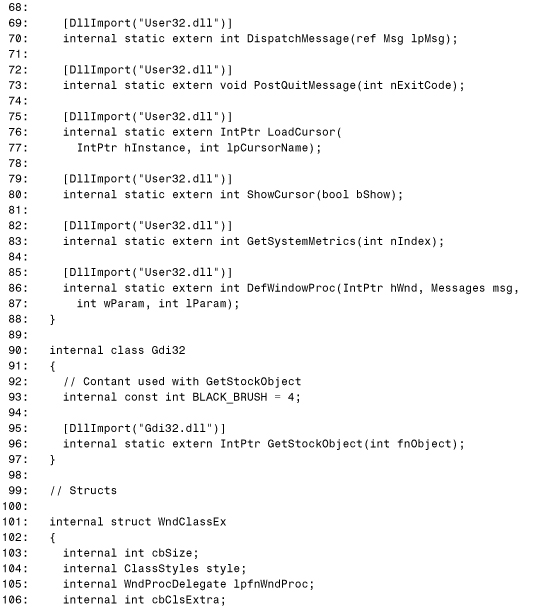
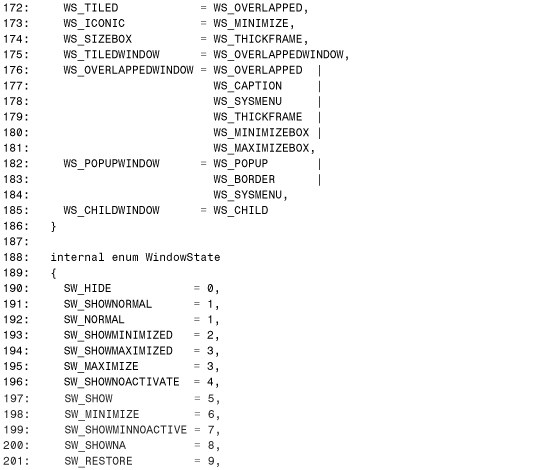
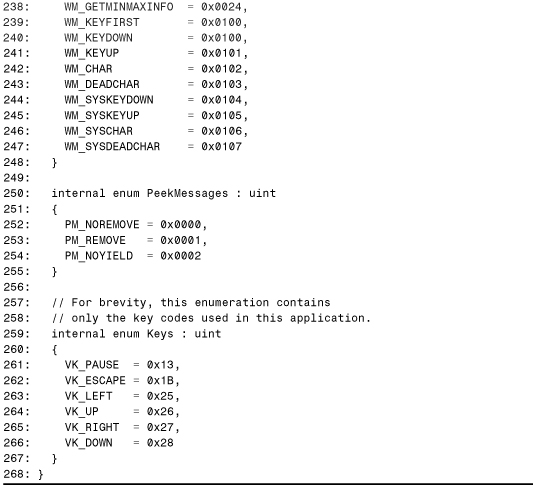
The new Win32.cs file is shown in Listing 23.18. It has the three methods of Listing 23.16, but adds significantly more methods as well as structs and enums used as parameters in the new methods. Also notice the delegate defined in Lines 13 and 14. The use of a delegate enables us to define a window procedure that receives callbacks.
Listing 23.18. Win32.cs. The Win32 Namespace Contains Several Classes, Structs, enums, and a Delegate Used by the Advanced Version of the Game


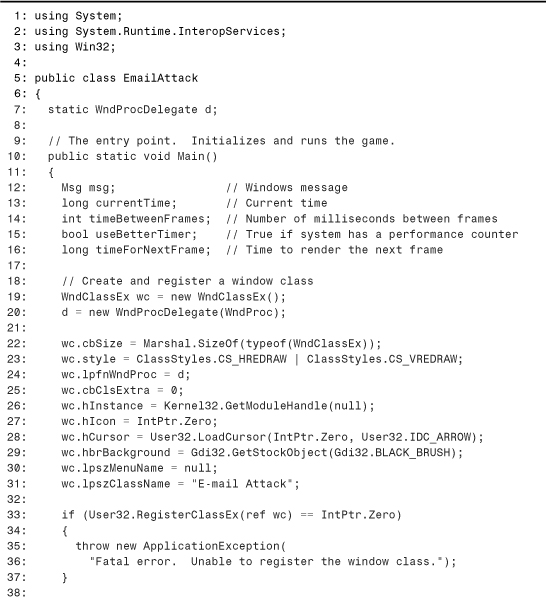
Listing 23.19 contains the updated EmailAttack.cs that should look familiar to Win32 programmers. The EmailAttack class is the replacement for the EmailAttackForm class that uses the convenience of .NET Windows Forms. The code does essentially the same thing as Listing 23.17, only the raw platform-specific details are exposed directly.
Listing 23.19. EmailAttack.cs. The EmailAttack Class Is the Advanced Version of the EmailAttackForm Class from Listing 23.17


The final listing contains the manually defined type information for the DirectX types used in the application. For consistency with the previous version, Listing 23.20 defines the same types as in the DirectX for VB type library. The C++ versions of the types could be defined in the same manner, however.
Listing 23.20. DirectX.cs. The DirectX Namespace Defines a Minimal Amount of Type Information—Just Enough for the E-mail Attack Application to Work


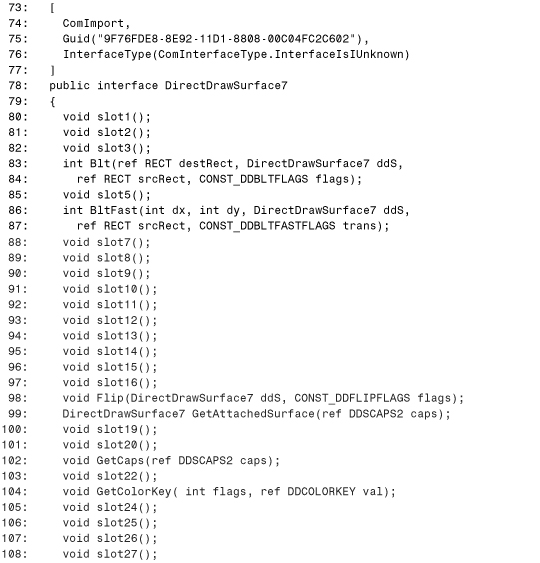
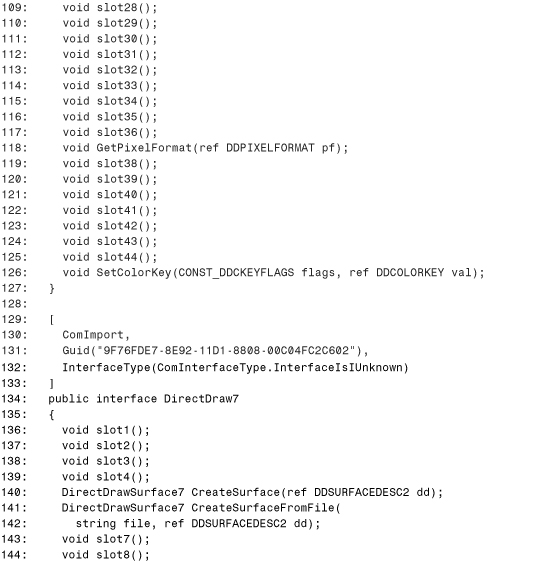
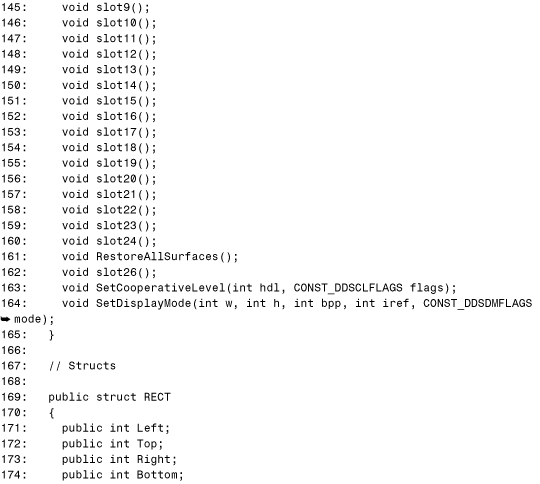
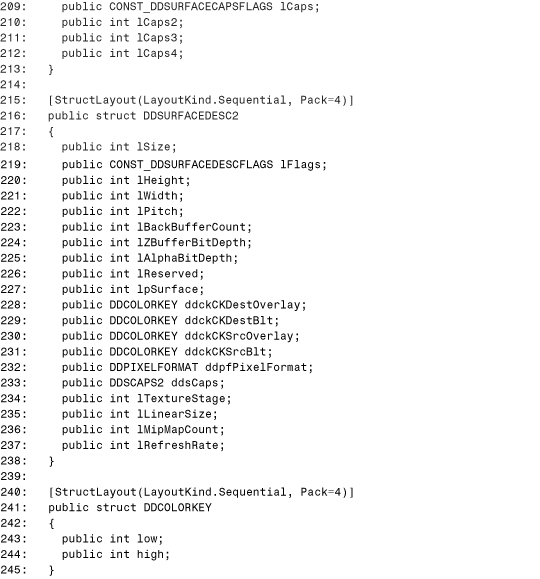
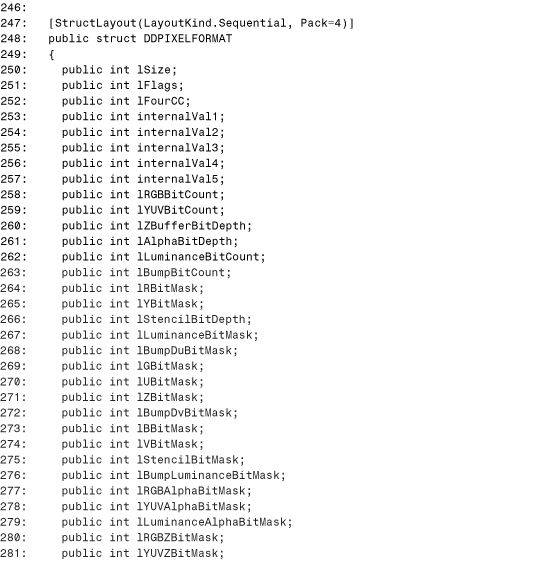


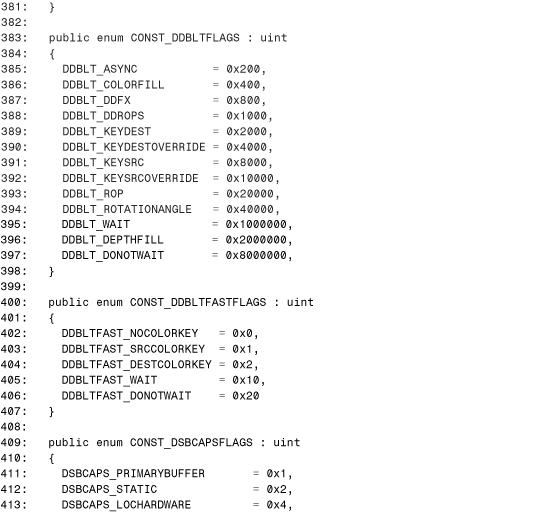

There are a few things to note about the previous listing. Only the methods used in the application are defined in the various DirectX interfaces; the rest are filled with placeholders or omitted altogether if occurring at the end of an interface. Also, in a couple of places the underlying type of an enumeration is used for a struct field instead of the enum type. All of this cuts down the amount of type information that needs to be supplied. If these shortcuts weren’t performed, the entire DirectX type library would need to be defined manually. This “balloon effect” was discussed in Chapter 21.
Tip
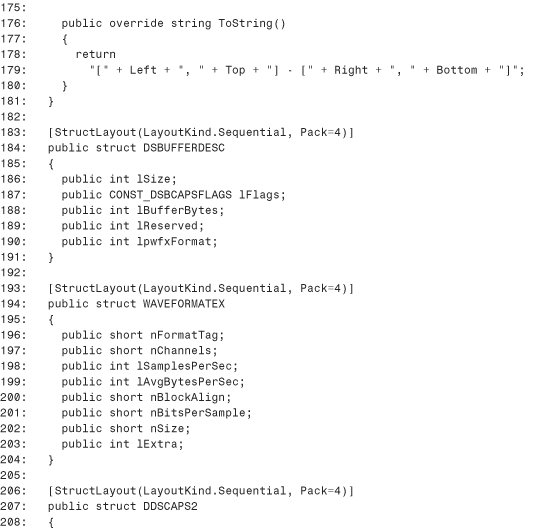
In the definition of RECT in Lines 174–185, a ToString overload has been added to return a nicely formatted string with the RECT’s contents. Adding a ToString overload to structs can be a handy debugging technique that can be added harmlessly; COM still sees the “original” struct without methods.
Because the DirectX type information is manually defined in C#, we need to make two minor changes to the beginning of Util.cs to get the advanced version to compile, highlighted here in a code snippet from Listing 23.1:
...
12: // Main DirectX objects
13: private static IDirectX7 directX;
14: private static DirectDraw7 directDraw;
15: private static DirectSound directSound;
16:
17: // Two surfaces used for double-buffered animation
18: private static DirectDrawSurface7 frontBuffer;
19: private static DirectDrawSurface7 backBuffer;
20:
21: // This must be called before using any of the other Util methods
22: public static void Initialize(IntPtr hWnd)
23: {
24: // Create the main DirectX objects
25: directX = (IDirectX)new DirectX7();
...
The members of the IDirectX interface must be called on the interface instead of the class directly, resulting in the changes in Lines 13 and 25. See Chapter 21 for details about how you could define methods on the DirectX7 class directly using the extern keyword.
Conclusion
Something that should strike you about this chapter is that the bulk of it has nothing to do with COM Interoperability or PInvoke. Once a handful of calls to unmanaged code are tucked away inside a .NET class, .NET application development involving unmanaged code may not seem any different from .NET application development that doesn’t rely on unmanaged code (besides the unmanaged code used internally by the .NET Framework). The advanced version of the game demonstrates that whether you write a graphics-intensive application in a .NET style or in a COM style (using plenty of PInvoke), the resulting applications can barely be differentiated from the user’s perspective.
If you’re interested in improving this sample game, there are plenty of improvements to be made. For example, you could make it properly recover when a user switches to another application and back (using Alt+Tab, for instance). Another good change would be to store high scores in a more secure fashion, and in a way that doesn’t involve the Windows Registry. Have fun enhancing this application to learn more about .NET, COM interoperability, and PInvoke.