Appendix B. SDK Tools Reference
In This Appendix
• TLBIMP.EXE
• TLBEXP.EXE
• REGASM.EXE
• AXIMP.EXE
• REGSVCS.EXE
This reference covers five command-line tools that ship with the .NET Framework SDK:
Core COM Interoperability Tools:
• TLBIMP.EXE
• TLBEXP.EXE
• REGASM.EXE
Extended Tools Based on COM Interoperability:
• AXIMP.EXE
• REGSVCS.EXE
TLBIMP.EXE
The .NET Framework Type Library to Assembly Converter (TLBIMP.EXE) imports a type library to create an Interop Assembly describing its types. Visual Studio .NET exposes the functionality of TLBIMP.EXE when you add a reference to a type library that doesn’t already have a registered Primary Interop Assembly (PIA). You can also programmatically import type libraries using the System.Runtime.InteropServices.TypeLibConverter class, as covered in Chapter 22, “Using APIs Instead of SDK Tools.”
The syntax of TLBIMP.EXE is:
tlbimp TypeLibFileName [Options]
The TypeLibFileName should specify the filename (and the path, if applicable) of the type library or file containing a type library that you want to import. For a filename given without a path, TLBIMP.EXE searches the command window’s path if it can’t find the file in the current directory. By default, the output assembly is named LibraryName.dll and placed in the current directory, not necessarily the same directory as the assembly. LibraryName is an identifier internal to the type library that can be viewed using tools like OLEVIEW.EXE. If the input type library uses types defined in other type libraries without registered PIAs, Interop Assemblies for the dependent type libraries are generated alongside the main Interop Assembly and referenced by it.
For files with multiple embedded type libraries, the filename given can end with a n suffix, where n is the value of a resource ID specifying which type library you want to import. For example:
tlbimp MSVBVM60.dll3
You cannot generate an Interop Assembly from an exported type library, but there should be no need to because the assembly from which the type library was exported already exists.
When using any of TLBIMP.EXE’s options, you can shorten the names as long as the choice is unambiguous—for example, /pr instead of /primary. You can also use them in any order. All options can be used with a dash prefix (-) or a slash prefix (/). TLBIMP.EXE’s options are described in the following sections.
To mimic the behavior of Visual Studio. NET when referencing a type library that doesn’t have a registered Primary Interop Assembly using TLBIMP.EXE, you can invoke:
tlbimp FullPathTypeLibFileName /sysarray /out:Interop.LibraryName.dll /namespace:LibraryName
/asmversion
This option can be used to customize the version number of the output Interop Assembly. Without this option, the version number matches the major and minor version numbers specified in the input type library, such as Major.Minor.0.0. With this option, you must specify a valid version string with 2, 3, or 4 parts. For example:
/asmversion:9.23
/asmversion=9.23.6
/asmversion:9.23.6.30
/delaysign
This option can be used with either the /keyfile or /keycontainer option to extract just the public key from a cryptographic key pair. The public key is used to give the Interop Assembly a strong name, but the assembly is only partially signed because the private key is ignored. This is similar to using the /publickey option, but used when both the public and private keys are available in the specified file or container.
/keycontainer
This option can be used to digitally sign the Interop Assembly and give it a strong name using a cryptographic key pair contained in a key container. This option is used with a container name that is used by your computer’s cryptographic service provider (CSP) to locate and use the key pair. For example:
/keycontainer:MyContainer
or
/keycontainer=MyContainer
Depending on the CSP, this option can be safer than the /keyfile option because the key data doesn’t have to be stored as an unencrypted file in the file system. For example, a CSP may store keys in hardware, minimizing the possibility of them being compromised. A key container can be created using the Windows CryptAcquireContext API. See MSDN Online (msdn.microsoft.com) for more information. When using the /keycontainer option, the resultant strong-named assembly is fully-signed and ready for deployment. This option cannot be used at the same time as /keyfile or /publickey.
/keyfile
This option can be used to digitally sign the Interop Assembly and give it a strong name using a cryptographic key pair contained in a binary file. This option is used with the filename of the key file, for example:
/keyfile:KeyFile.snk
or
/keyfile=KeyFile.snk
As with the /keycontainer option, the resultant strong-named assembly is fully-signed and ready for deployment. This option cannot be used at the same time as /keycontainer or /publickey.
/out
This option can be used to choose the name and location of the output Interop Assembly. For example:
/out:MyAssembly.dll
or
/out=MyAssembly.dll
The filename can be specified with a partial or complete path if you want it placed in a directory other than the current directory. Changing the name of the output assembly also changes the name of the output namespace to match the filename (minus the .dll extension), unless you also use the /namespace option.
Giving the output assembly a different name than the default is recommended, especially if the output filename might conflict with an existing unmanaged DLL.
/namespace
This option can be used to choose a namespace containing all the types in the Interop Assembly. For example:
/namespace:MyCompany.MyTechnology
or
/namespace=MyCompany.MyTechnology
This overrides the string that would be chosen for the output namespace from either the library name or the filename used with the /out option. .NET-aware type libraries can contain a special IDL custom attribute, however, to choose a namespace that cannot be overridden with the /namespace option. See Chapter 15, “Creating and Deploying Useful Primary Interop Assemblies,” for more information.
/primary
This option can be used to create a Primary Interop Assembly (PIA). A PIA must have a strong name, so this option must be used with the /publickey, /keyfile, or /keycontainer option. Any dependent type libraries must have registered PIAs or be referenced with the /reference option when using /primary. See Chapter 15 for more information about creating a PIA.
/publickey
This option can be used to give the Interop Assembly a strong name using a binary file that contains only a public key. This option is used with the filename of the public key file, for example:
/publickey:PublicKeyFile.snk
or
/publickey=PublicKeyFile.snk
The resulting strong-named assembly is considered partially signed. Partially-signed assemblies don’t have the same protection as fully-signed assemblies. For example, someone could tamper with your assembly after you distribute it without being detected by the CLR, since the assembly’s original contents were not hashed with your private key and stored in the assembly’s manifest. Therefore, partially-signed assemblies should only be used for testing purposes, unless they are fully-signed later by using the Assembly Linker SDK utility (AL.EXE) or the Strong Name Utility (SN.EXE). The two-step process of creating a partially-signed assembly and fully signing it later is a common practice since developers often don’t have direct access to the company’s private key.
This option cannot be used at the same time as /keycontainer or /keyfile.
/reference
This option can be used to list existing Interop Assemblies that can be used to satisfy references for the current Interop Assembly being imported. For a type library C.TLB that references type libraries A.TLB and B.TLB, the following can be done if Interop Assemblies for A.TLB and B.TLB already exist:
tlbimp C.tlb /reference:Interop.A.dll /reference:Interop.B.dll
or
tlbimp C.tlb /reference=Interop.A.dll /reference=Interop.B.dll
If you don’t specify any references, TLBIMP.EXE attempts to locate PIAs. If no PIA for a dependent type library is registered, TLBIMP.EXE attempts to locate the dependent type library via the Windows Registry and imports a new Interop Assembly to be referenced by the main Interop Assembly. An Interop Assembly listed with /reference is only used if the type library being processed references another type library whose LIBID matches the one found in its assembly-level GuidAttribute custom attribute.
/strictref
This option turns off the automatic import of dependent type libraries. This means that any dependent type libraries must either:
• have a Primary Interop Assembly registered
• have an Interop Assembly listed with the /reference option
If TLBIMP.EXE requires an assembly for a dependent type library that isn’t available through one of these two mechanisms, it gives the following error:
System.ApplicationException - Type library '...' is not in the list of references
/sysarray
Using this option causes any SAFEARRAY parameters to be imported as generic System.Array types rather than single-dimensional zero-lower bound arrays. Visual Studio .NET always uses the /sysarray option when importing a referenced type library.
/unsafe
Using this option marks all imported types with System.Security. SuppressUnmanagedCodeSecurityAttribute. This suppresses the full stack walk for unmanaged code permission whenever members on these types are called, which improves performance but opens up the possibility of a luring attack. When types or members are marked with this custom attribute, the CLR requires that the immediate caller has unmanaged code permission (via a link demand) but it does not check who has called the immediate caller.
Therefore, as the name implies, this option is not safe to use. Any trusted users of such an Interop Assembly must be careful to use it in such a way that it can’t enable untrusted code to run unmanaged code and cause damage. Another side affect of using an interface marked with SuppressUnmanagedCodeSecurityAttribute is that if a .NET class implements the interface, a link demand for unmanaged code permission is still required, even if no unmanaged code is involved.
/nologo
This option suppresses the two lines of copyright information printed every time the utility is run.
/silent
This option hides the two lines of copyright information just like /nologo, but also suppresses any success messages and warnings. If an error occurs, then the copyright information and error information are printed to the console.
/verbose
This option provides more details about the actions performed by the utility. This includes a message for every type that gets imported, plus notifications when dependent assemblies are imported and/or referenced.
If /silent and /verbose are used simultaneously, only verbose messages and errors are printed to the console.
/help and /?
These options list a summary of the options, as follows:

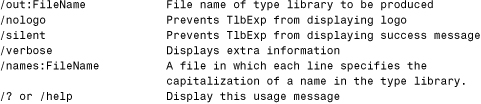
TLBEXP.EXE
The .NET Framework Assembly to Type Library Converter (TLBEXP.EXE) exports a type library with type definitions from an assembly. Visual Studio .NET exposes the exporting functionality in its Register for COM Interop option in the settings for a Visual C# or Visual Basic project. Type library exporting can also be done programmatically using the System.Runtime.InteropServices.TypeLibConverter class, as covered in Chapter 22.
The syntax of TLBEXP.EXE is:
tlbexp AssemblyFileName [Options]
The AssemblyFileName should specify the filename (and possibly the path) of the assembly for which you want to export a type library. For multi-file assemblies, the filename must be the one containing the assembly’s manifest. (For such an assembly, a single type library containing the types in all the .NET modules is produced.) For a filename given without a path, TLBEXP.EXE searches the command window’s path if it can’t find the file in the current directory. By default, the output type library is named AssemblyName.tlb (where AssemblyName is the assembly’s simple name found in its manifest) and placed in the current directory, not necessarily the same directory as the assembly. If the input assembly exposes public signatures that use types defined in other assemblies, type libraries for the dependent assemblies are generated alongside the main type library and referenced by it.
Although it’s not a common occurrence (due to lack of tool support), assemblies can contain type libraries embedded as resources just like any other file. If TLBEXP.EXE encounters an assembly with an embedded type library, a warning is shown but a new type library is generated based on the assembly’s metadata rather than extracting the embedded type library. (For any dependent assemblies with embedded type libraries, however, the exported type library references the embedded type libraries.) You cannot generate a type library for an Interop Assembly, but there should be no need to since Interop Assemblies are normally created from type libraries.
When using any of TLBEXP.EXE’s options, you can shorten the names as long as the choice is unambiguous—for example, /v instead of /verbose. You can also use them in any order. All options can be used with a dash prefix (-) or a slash prefix (/). TLBEXP.EXE’s options are described in the following sections.
/names
This option can be used to choose a capitalization for any identifiers exported to the type library. Type libraries store identifiers in a case-insensitive table, so identifiers that have multiple cases in an assembly end up with a single case in the exported type library. This can cause undesirable results, such as a .NET member named Target being exported as a COM member named target due to some other member’s parameter named target being exported first. Even worse, the behavior can change each time you re-compile your assembly and re-export a type library due to subtle changes in the order that a .NET compiler may emit types into metadata.
With the /names option, you can choose the “correct” case for any identifiers appearing in conflicting cases to avoid these problems. It must be used with a filename, for example:
/names:MyNamesFile.txt
or
/names=MyNamesFile.txt
The filename can be specified with a partial or complete path if it isn’t in the current directory.
The referenced file (a names file) is a simple text file containing one identifier per line, for example:
Source
Target
Value
Zone
This file can be encoded as ANSI, UTF-8, Unicode, or even Unicode big-endian. Invalid files are simply ignored without reporting an error. Any identifiers listed that aren’t used by the input assembly have no effect, and if one appears multiple times in the names file, all but the first instance are ignored. In addition, spaces are ignored and # can be used like a comment character, for example:
#
# Names File for MyAssembly.dll
#
Source # Appears as an uppercase property and lowercase parameter name
Target # Appears as an uppercase class name and lowercase parameter name
Value # ...
Zone # ...
/out
This option can be used to choose the name and location of the output type library. For example:
/out:MyAssembly.tlb
or
/out=MyAssembly.tlb
The filename can be specified with a partial or complete path if you want it placed in a directory other than the current directory. Unlike with TLBIMP.EXE, the chosen filename has no effect on the contents of the output type library (such as its library name).
/nologo
This option suppresses the two lines of copyright information printed every time the utility is run.
/silent
This option hides the two lines of copyright information just like /nologo, but also suppresses any success messages and warnings. Only errors are printed to the console when /silent is used.
/verbose
This option provides more details about the actions performed by the utility. This includes a message for every type that gets exported, plus notifications when dependent type libraries are exported and/or referenced.
If /silent and /verbose are used simultaneously, only verbose messages and errors are printed to the console.
/help and /?
These options list a summary of the options, as follows:
REGASM.EXE
The .NET Framework Assembly Registration Utility (REGASM.EXE) registers and unregisters assemblies in the Windows Registry for use by COM. It optionally exports and registers a type library for the input assembly. Usually assemblies authored in a .NET language are registered for COM clients, but Interop Assemblies can also be registered for .NET clients to enable certain features. For example, REGASM.EXE detects when it’s used with a Primary Interop Assembly and registers additional entries used by Visual Studio .NET when referencing type libraries.
Visual Studio .NET exposes the registration functionality in its Register for COM Interop option in the settings for a Visual C# or Visual Basic project. This functionality can also be used programmatically via the System.Runtime.InteropServices.RegistrationServices class, as covered in Chapter 22.
The syntax of REGASM.EXE is:
regasm AssemblyFileName [Options]
The AssemblyFileName should specify the filename (and the path, if applicable) of the assembly you want to (un)register. For multi-file assemblies, the filename must be the one containing the assembly’s manifest. For a filename given without a path, REGASM.EXE searches the command window’s path if it can’t find the file in the current directory.
When used with no options, REGASM.EXE adds the following registry entries for each coclass:
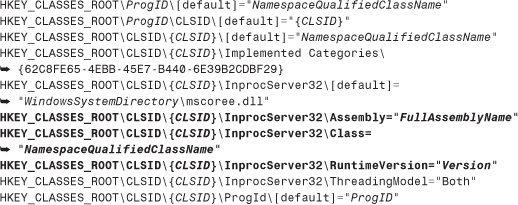
When run on an Interop Assembly, only the bold entries are added and the rest are left to whatever their original settings are. When run on a Primary Interop Assembly, one additional entry is registered by default:
HKEY_CLASSES_ROOTTypeLib{LIBID}MajorVersion.MinorVersionPrimaryInteropAssemblyName="FullAssemblyName"
When using any of REGASM.EXE’s options, you can shorten the names as long as the choice is unambiguous—for example, /regf instead of /regfile. You can also use them in any order. All options can be used with a dash prefix (-) or a slash prefix (/). REGASM.EXE’s options are described in the following sections.
To mimic the behavior of Visual Studio .NET’s Register for COM Interop setting using REGASM.EXE, you can invoke:
regasm FullPathAssemblyFileName /codebase /tlb
/codebase
This option registers the location of the assembly file under every CLSID with a CodeBase value, for example:
HKEY_CLASSES_ROOTCLSID{CLSID}InprocServer32CodeBase= file:///C:/.../MyAssembly.dll
With this value registered, the CLR can locate assemblies anywhere in the file system, even if they aren’t in the Global Assembly Cache or in the application directory. This is a fallback mechanism, so if the registered assembly is found in the GAC or in the local directory, the CodeBase value is not used.
This option should only be used with strong-named assemblies, because simply-named assemblies that rely on a codebase can be negatively impacted by other simply-named assemblies that rely on a codebase. REGASM.EXE doesn’t prevent you from registering simply-named assemblies with /codebase, but issues the following warning:
RegAsm warning: Registering an unsigned assembly with /codebase can cause
your assembly to interfere with other applications that may be installed on
the same computer. The /codebase switch is intended to be used only with
signed assemblies. Please give your assembly a strong name and re-register it.
When using the /codebase option with a Primary Interop Assembly, REGASM.EXE also adds the following registry entry, enabling Visual Studio .NET to use it without being installed in the Global Assembly Cache:
HKEY_CLASSES_ROOTTypeLib{LIBID}MajorVersion.MinorVersionPrimaryInteropAssemblyCodeBase=file:///C:/.../MyAssembly.dll
/regfile
This option creates a registry file instead of performing the registration. This registry file is a simple text file that lists the keys and values in a format recognized by programs such as REGEDIT.EXE for registration at a later time.
This option is meant for strictly informational purposes, as a way to see for yourself what registration entries REGASM.EXE would have placed in the registry. The information placed in the output registration file is not necessarily complete, since it doesn’t include any registration that’s done by custom registration functions (marked with the ComRegisterFunctionAttribute custom attribute). Additionally, in version 1.0 of REGASM.EXE, the InProcServer32 entries in any generated registry file do not properly escape the backslashes in the path to MSCOREE.DLL. If you attempted to register these entries as-is, none of the .NET classes would be able to be instantiated via CoCreateInstance. Using a REGASM.EXE-generated registration file is an acceptable way to register PIAs, however, because Interop Assemblies do not contain custom registration functions, and the registration files produced do not contain InProcServer32 entries.
This option can be used with the desired filename of the output registration file. For example,
/regfile:MyAssembly.reg
or
/regfile=MyAssembly.reg
If no filename is specified, the input filename is used but with the .reg extension instead of .dll or .exe. By default, the file is placed in the same directory as the assembly, not necessarily the current directory. The filename can be specified with a partial or complete path if you want it placed in a different directory.
The /regfile option cannot be used at the same time that the /unregister or /tlb options are used.
/registered
This option tells REGASM.EXE to only reference dependent type libraries that are registered when exporting a type library. Without this option, type libraries in the current directory are used to satisfy references if the desired type libraries are not registered.
This option only makes sense when used with /tlb, since it only applies to exporting a type library. If used without /tlb, it is ignored.
/tlb
The /tlb option causes a type library to be exported and registered. The type library produced is the same that would be produced by TLBEXP.EXE, but it’s also registered. Registering a type library adds the following registry entries:
HKEY_CLASSES_ROOTTypeLib{LIBID}Major.Minor[default]="LibraryName"
HKEY_CLASSES_ROOTTypeLib{LIBID}Major.MinorLCIDwin32[default]= "TypeLibPathAndFileName"
HKEY_CLASSES_ROOTTypeLib{LIBID}Major.MinorFLAGS[default]="Flags"
HKEY_CLASSES_ROOTTypeLib{LIBID}Major.MinorHELPDIR[default]="TypeLibPath"
For exported type libraries, the Flags value, representing binary-ORed values from the LIBFLAGS enumeration, is always 0.
In addition, any exported interfaces are registered with the OLE Automation type library marshaler unless the corresponding .NET interface is marked with AutomationProxyAttribute with its value set to false. These registry entries look like the following:
HKEY_CLASSES_ROOTInterface{IID}[default]="InterfaceName"
HKEY_CLASSES_ROOTInterface{IID}ProxyStubClsid="{ProxyStubCLSID}"
HKEY_CLASSES_ROOTInterface{IID}ProxyStubClsid32="{ProxyStubCLSID}"
HKEY_CLASSES_ROOTInterface{IID}TypeLib[default]="{LIBID}"
HKEY_CLASSES_ROOTInterface{IID}TypeLibVersion="Major.Minor"
ProxyStubCLSID represents the OLE Automation marshaler class that handles the COM marshaling of the interface. The type library information enables the marshaler to obtain the type information for the interface.
Type library registration is not specific to .NET components; all COM type libraries are registered the same way, and there are a variety of tools that register type libraries (such as OLEVIEW.EXE). The registry entries are necessary for COM marshaling across context boundaries. The entries under the TypeLib branch can also be useful for Visual Basic 6 clients expecting to find the type library in the list of available references without having to browse for the file.
This option can be used with the desired filename of the output type library. For example:
/tlb:MyAssembly.tlb
or
/tlb=MyAssembly.tlb
If no filename is specified, the input assembly name is used with a .tlb extension. By default, the file is placed in the same directory as the assembly, not necessarily the current directory. The filename can be specified with a partial or complete path if you want it placed in a different directory. All the exported type libraries (including any dependent ones) are registered. As with TLBEXP.EXE, type libraries for the dependent assemblies are generated alongside the main type library.
A little known fact about the /tlb option is that it supports registering the input assembly as the type library file if it contains one embedded as a resource. In fact, using /tlb with a filename raises an error if the input assembly contains an embedded type library. If you really want to export a new type library from such an assembly, you’d have to use TLBEXP.EXE.
Just as running TLBEXP.EXE on an Interop Assembly is illegal, using the /tlb option with an Interop Assembly causes the following error to be reported:
CLR assembly C:...ABC.dll was imported from a type library and can not be re-exported to a type library. Make sure the type library from which the assembly was imported is registered.
The second sentence only applies when exporting non-Interop assemblies that publicly reference types in an Interop Assembly. If the Interop Assembly’s corresponding type library isn’t registered, automatic export of the Interop Assembly is attempted, causing the failure since this is not allowed.
The /tlb option cannot be used at the same time that the /regfile option is used.
/unregister
This option unregisters the assembly rather than the default action of registering it. Besides removing any registry entries it would have added, it invokes any custom unregistration functions in the input assembly (marked with ComUnregisterFunctionAttribute).
In addition to unregistering the assembly, the corresponding type library can be unregistered, too, when /unregister is used with the /tlb option. If no filename is given with /tlb, then the appropriately-named type library (AssemblyName.tlb) must exist in the current directory. Otherwise, the path and filename of the type library to unregister can be specified with the /tlb option.
If you attempt to use /unregister with /tlb on an Interop Assembly, the /tlb option is ignored and the following warning is issued:
Type library not unregistered since the assembly was imported from COM.
Since REGASM.EXE only unregisters the entries it adds for an Interop Assembly and not any original registration done by the installer of the COM component, it would not be appropriate for REGASM.EXE to unregister the COM component’s type library.
The /unregister option cannot be used at the same time that the /regfile option is used.
/nologo
This option suppresses the two lines of copyright information printed every time the utility is run.
/silent
This option hides the two lines of copyright information just like /nologo, but also suppresses any success messages and warnings. Only errors are printed to the console when /silent is used.
/verbose
This option provides more details about the actions performed by the utility. This only makes a difference when /tlb is used, because the actions of assembly registration and unregistration don’t report anything additional in verbose mode. The messages displayed when using /verbose and /tlb are the same ones displayed when using /verbose with TLBEXP.EXE—for example, listing every type that gets exported.
Unlike TLBEXP.EXE, if /silent and /verbose are used simultaneously, /verbose is ignored.
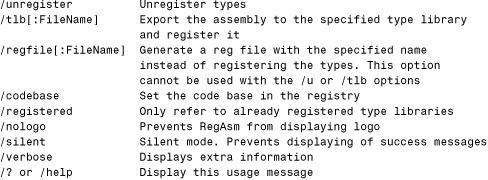
/help and /?
These options list a summary of the options, as follows:
AXIMP.EXE
The .NET ActiveX Control to Windows Forms Assembly Generator (AXIMP.EXE) takes a type library containing at least one registered ActiveX control as input, and usually creates at least two assemblies—an Interop Assembly (and any dependent Interop Assemblies) just like TLBIMP.EXE does, and an ActiveX Assembly with the types needed to host ActiveX controls on Windows Forms as if they are Windows Forms controls. If a Primary Interop Assembly for the input type library is registered on the current computer, AXIMP.EXE references that assembly rather than generating a new one. AXIMP.EXE optionally produces C# source code for easy customization of the ActiveX Assembly.
Visual Studio .NET exposes the functionality of AXIMP.EXE in the Customize Toolbox dialog when selecting a COM component to drag onto a Windows Form. You can programmatically do the same thing using the System.Windows.Forms.Design.AxImporter class, as covered in Chapter 22.
The syntax of AXIMP.EXE is:
aximp TypeLibFileName [Options]
The TypeLibFileName should specify the filename (and the path, if applicable) of the type library or file containing a type library that you want to import. Unlike TLBIMP.EXE, AXIMP.EXE does not search the path for the input file. If no path is given at the command line, the file must be in the current directory. By default, the output assembly is named AxLibraryName.dll and placed in the current directory, not necessarily the same directory as the assembly. The dependent assemblies are generated alongside the ActiveX Assembly and referenced by it.
Be aware that any coclasses representing ActiveX controls must be registered on the current computer with the following registry value in order for AXIMP.EXE to recognize it as an ActiveX control:
HKEY_CLASSES_ROOTCLSID{CLSID}Control
Being marked in the type library with the [control] attribute is irrelevant.
When using any of AXIMP.EXE’s options, you can shorten the names as long as the choice is unambiguous—for example, /keyf instead of /keyfile. You can also use them in any order. All options can be used with a dash prefix (-) or a slash prefix (/). AXIMP.EXE’s options are described in the following sections.
/delaysign
This option works just like TLBIMP.EXE’s /delaysign option. It only works with either the /keyfile or /keycontainer option to extract just the public key from a cryptographic key pair. The key data is used for the ActiveX Assembly plus the Interop Assembly if AXIMP.EXE generates one.
/keycontainer
This option works just like TLBIMP.EXE’s /keycontainer option. It expects a filename containing a cryptographic key container name. For example:
/keycontainer:MyContainer
or
/keycontainer=MyContainer
The key data is used for the ActiveX Assembly plus the Interop Assembly if AXIMP.EXE generates one.
/keyfile
This option works just like TLBIMP.EXE’s /keyfile option. It expects a filename containing a cryptographic key pair. For example:
/keyfile:KeyFile.snk
or
/keyfile=KeyFile.snk
The key data is used for the ActiveX Assembly plus the Interop Assembly if AXIMP.EXE generates one.
/out
This option can be used to choose the name and location of the output ActiveX Assembly. For example,
/out:AxComponent.dll
or
/out=AxComponent.dll
The filename can be specified with a partial or complete path if you want it placed in a directory other than the current directory. There’s no way to choose the name of the referenced Interop Assembly, but if one is generated it will always be placed in whatever directory you choose for the ActiveX Assembly.
Unlike TLBIMP.EXE, using this option does not affect the namespace in the output ActiveX Assembly.
/publickey
This option works just like TLBIMP.EXE’s /publickey option. It expects a filename containing just a public key. For example:
/publickey:PublicKeyFile.snk
or
/publickey=PublicKeyFile.snk
The key data is used for the ActiveX Assembly plus the Interop Assembly if AXIMP.EXE generates one.
/source
This option can be used to generate C# source code for the ActiveX Assembly. This makes the assembly much easier to customize than an Interop Assembly. Also, this option can be used to make up for AXIMP.EXE’s lack of a /reference option. By generating source code then compiling it, you can reference whichever Interop Assembly you’d like.
The C# source file generated has the same name as the output assembly, but with a .cs extension rather than a .dll extension. It is always generated in the same location as the output ActiveX Assembly.
/nologo
This option suppresses the three lines of copyright information that are sometimes printed when the utility is run.
/silent
This option hides the three lines of copyright information just like /nologo, but also suppresses any success messages and warnings. If an error occurs, then the copyright information and error information are printed to the console.
/verbose
This option is meant to provide more details about the actions performed by the utility. However, in version 1.0 of this utility, this option makes no difference in AXIMP.EXE’s output.
/help and /?
These options list a summary of the options, as follows:

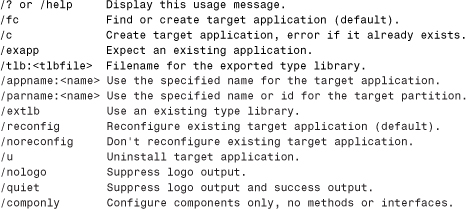
REGSVCS.EXE
.NET Framework Services Installation Utility (REGSVCS.EXE) installs and uninstalls assemblies with serviced components into the Component Services (COM+) catalog. This can also involve registering the assembly, exporting a type library, registering the type library, installing the type library for the specified application, and configuration of any serviced component types in the assembly. This same work can be done with dynamic registration, but manually using REGSVCS.EXE gives you the benefit of detailed error reporting.
This functionality can also be used programmatically via the System.EnterpriseServices. RegistrationHelper class, as covered in Chapter 22.
The syntax of REGSVCS.EXE is:
regsvcs [options] AssemblyFileName
The AssemblyFileName should specify the filename (and path, if applicable) of the assembly you want to (un)install. For multi-file assemblies, the filename must be the one containing the assembly’s manifest. For a filename given without a path, REGSVCS.EXE searches the command window’s path if it can’t find the file in the current directory.
The input assembly must have a strong name and must contain at least one serviced component (a class that derives from System.EnterpriseServices.ServicedComponent).
Unlike the previous tools, REGSVCS.EXE’s options cannot be shortened but must be fully specified (such as /quiet instead of /q). You can use them in any order, but they must be used before the filename. All options can be used with a dash prefix (-) or a slash prefix (/). Options with values, however, can only be specified with a colon and not with an equals sign. REGSVCS.EXE’s options are described in the following sections.
Warning
Unlike the previous tools, all options must precede the assembly’s filename when using REGSVCS.EXE. Any options listed after the name are silently ignored!
/appname
This option can be used to customize the installed application name. An application with this name will either be created or searched for, depending on the other options. The /appname option enables you to customize the name as follows:
/appname:MyApplication
If no application name is specified, the string contained in the serviced component’s System.EnterpriseServices.ApplicationNameAttribute custom attribute is used. If it isn’t marked with the custom attribute, the assembly name is used.
/c
This option, short for “create,” forces the creation of a new application rather than attempting to find an existing one. If an application with the same name is already installed, an error is reported.
Only one of the /c, /fc, and /u options can be used at a time.
/componly
This option, short for “components only,” configures only components, and not any interfaces or methods.
/exapp
This option, short for “existing application,” tells the utility to use an existing application rather than creating a new one.
/extlb
This option, short for “existing type library,” tells the utility to use an existing type library rather than exporting a new one.
/fc
This option, short for “find or create,” is implied when neither /c nor /u options are used. This means that an existing application should be used if found, otherwise a new application should be created.
Only one of the /c, /fc, and /u options can be used at a time.
/noreconfig
This option, the opposite of /reconfig, instructs the utility not to reconfigure an existing target application. This option doesn’t apply when a new application is being created.
/parname
On a version of Windows that supports COM+ application partitions (such as Windows XP), this option can be used to choose the partition name or ID to use or create. For example:
/parname:MyPartition
COM+ application partitions enable multiple versions of the same application to run on the same computer, with each one individually configurable.
/reconfig
This option, the opposite of /noreconfig, is implied when neither /c nor /u options are used. This instructs the tool to reconfigure an existing target application when appropriate. This option doesn’t apply when a new application is being created.
/tlb
This option works like REGASM.EXE’s /tlb option, enabling the user to choose a name and location for the exported type library. For example:
/tlb:MyAssembly.tlb
When this option isn’t used, REGSVCS.EXE produces a type library in the same directory as the assembly (not necessarily the current directory) and names it with the assembly name plus a .tlb extension.
/u
This option, short for “uninstall,” is used to uninstall the target application.
Only one of the /c, /fc, and /u options can be used at a time.
/nologo
This option suppresses the two lines of copyright information printed every time the utility is run.
/quiet
This option hides the two lines of copyright information just like /nologo, but also suppresses any success messages and warnings. Only errors are printed to the console when /quiet is used.
/help and /?
These options list a summary of the options, as follows: