8
ANIMATION: IT’S ALIVE!
Artists have been trying to make pictures look like they are moving ever since early humans drew on the walls of their caves. The very idea of moving art was, and still is, magical. And though many digital artists enjoy creating still images using 3D applications, this barely taps into the power of the technology. It takes thousands of still images to produce animation. Whether for cartoons or to fit undetected into live-action movies, the purpose of 3D digital art technology is to animate objects that don’t exist in the real world. 3D artists today use several ways to create animated pictures such as keyframing, motion capture, and simulations (where the computer calculates the movement of objects, usually based on physics).
The Twelve Basic Principles of Animation
The purpose of animation is to serve the story – to capture images of life, and in the process communicate to others, even if it just means giving them a thrill ride. To this end, you need to make your animation believable. This doesn’t just mean realism. There are cues that pull people into the action. Animators at Walt Disney Studio wanted to create a kind of animation that felt real and let the audience respond to the character and story. As they observed and practiced what was at the time a new art, they developed a set of guidelines for animating. Two of these pioneers, Frank Thomas and Ollie Johnston, set them out in 1981 in their book The Illusion of Life: Disney Animation. These guidelines have become standard for the animation industry.
Most of them are not hard and fast rules. Lots of great animation has been done without specifically referencing them. But they do remove the abstract idea of “good animation” and replace it with solid terms to understand and explain why something works for the audience or does not.
Though they were developed before computer animation, they still apply with some modification.
Squash and stretch
Of all the principles, this is the most important one. The simplest example is the bouncing ball. As it hits the ground, it squashes. Its volume, however, must stay the same. So it also stretches. Squashing and stretching are ways to give weight to your objects (Figure 8.1). This isn’t just limited to things like bouncing balls or tummies, and collision with a floor or another object is not required. These kinds of movements happen in facial expressions and with just about any kind of motion. When the upper cheeks bulge up, you should see stretching around the mouth. What you always need to remember is this: bodies (organic or not) have weight and respond to gravity, and they must retain their volume.

Figure 8.1 Squash and stretch.
Anticipation
Iron Man crouches and places his hand on the ground. You know what’s going to happen next: he’ll spring up into action. This is an example of anticipation. It helps your audience to clue in that something is going to happen next. Any kind of thing that invites the audience to watch what happens next is anticipation. If there is no anticipation, this can be a way of surprising the audience. If nothing happens after you’ve set up anticipation, this can be anticlimax. Understanding how this works can help you to move the story forward, set up comedic effects, or startle your audience (Figure 8.2).
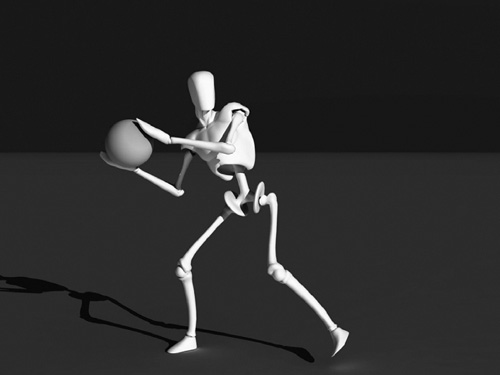
Figure 8.2 Anticipation.
Staging
This is the art of communicating an idea clearly through imagery, whether it be a personality, a clue, a mood, foreshadowing, etc.(Figure 8.3). You will do this with how you present the character, objects, and surroundings. You must make sure not to have anything unnecessary in your scenes, or the scene would lose focus. What if the idea is chaos and confusion, a character lost in a city? Well, then, a cluttered scene might be appropriate, but you would want to avoid sunny skies or friendly faces until the hero who comes in to help your character appears. This is not real life we’re trying to portray; it’s life through a filter. It is emotion, conflict, resolution. With computer animation, you have complete control over the scene, and over every aspect of your character’s appearance, gestures, and expressions. Take advantage of this. Staging can also be set in postproduction, with lighting and color adjustments.
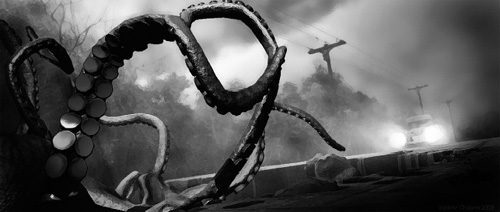
Figure 8.3 Staging.
Straight-Ahead Action and Pose to Pose
These are styles of drawing your animation. Straight ahead means you draw or change poses through the scene, from beginning to end. This is good for dynamic action and spontaneity. However, often when characters are hand drawn, things such as proportions and volume are lost. With pure straight ahead posing of a model, you may find yourself in a dead end, unable to get your character to the next part of the storyboard. With pose to pose, the animator would carefully plan the animation, draw in key poses, and then fill in all the movement between those. In computer animation pose to pose is very natural. The computer fills in the movement between key poses for which you set the keyframes (see Keyframing, later in this chapter). But you can consider things such as motion capture and dynamic simulations as straight-ahead action.
Follow Through and Overlapping Action
If a person in a cape is running, and then stops, that cape will catch up and then continue to move before it also comes to a standstill. This is called follow through, when things such as hair, clothing, limbs, and loose flesh continue moving after the core part of the character stops. A corollary to this is “drag”, when a character starts to move, and other things must catch up with it. Another part of follow through is the expressive reaction of the character to their action. Overlapping action is when things are moving at different rates, such as a head turning while an arm is moving.
Slow In and Slow Out
Action never begins or stops instantly. As it begins, it starts slowly and then speeds up. As it ends, it slows down. This is exaggerated a little in animation, in order to pull the audience’s awareness through all the action. This used to be accomplished by manipulating the images through frames, maybe doubling up a pose into two frames. In computer animation, this can be achieved by using curves in the animation graph to control speed (see Animating With Graphs, later in this chapter). If using motion capture, you may need to coach the performers to do slow in and slow out. For more surprising action or comedy gags, you can omit slow ins and slow outs.
Arcs
The actions of people and creatures, and often even objects, tend to move in an arc (Figure 8.4). Wiggle your hand and move your fingers. You’ll be able to trace their paths as curves. Imagine the hooves of a galloping horse or the swaying of a tree in the wind. Linear movements are seen as mechanical, working well for robots or characters that you want to make disturbing.

Figure 8.4 Arcs.
Secondary Action
As well as the main action on the screen, there will be secondary action. For instance, hair, clothes, and background leaves blowing in the wind are secondary actions to the main action of a character’s attempt to change a tire on her car. Notice how this can be part of setting the stage. This can also show personality, in the way a person moves their arms while walking, or their expressions. Secondary action should always serve the main action. If it distracts from the main action, you will need to eliminate or rethink it.
Timing
This has to do with both the timing of story action and the timing of physical action. Physical action is a bit easier to grasp technically. This is just making sure the right actions occur at the right pace, in a manner consistent with the laws of physics. For instance, you would want to keep in mind that a cruise ship is going to take a lot longer to get underway than a small yacht. Story timing occurs at every scale of your animation: each shot, scene, and act. It is part of both acting and storytelling, and is something that takes experience to get right.
Exaggeration
Exaggeration is taking reality and making it a bit more extreme. In animated cartoons, exaggeration is important to keep the visual interest up (Figure 8.5). Realistic action and visuals tend to fall flat when illustrated. How much and in what way you exaggerate depend on the feeling you’re trying to project. It can be used for comedy, superheroes, to portray a mood, etc. Anything can be exaggerated: body and head shape, expressions, action, aspects of the setting, the storyline, and many of the principles here. Keep staging in mind though: what you exaggerate is what will draw attention.
Solid Drawing
Technical knowledge is just as important to cartoon animation as it is to scenes meant for live-action films. For instance, the artist creating an exaggeration of muscles for a superhero needs to know exactly where each muscle is to be placed before they can be bulged out. Solid drawing is part of the good workflow discussed in Chapter 2. Reference real life. Even if you are just interested in doing 3D art on the computer, take a few drawing classes, where you will learn things such as proportion, composition, and perspective.
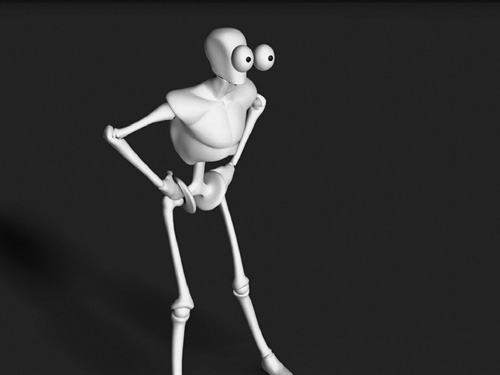
Figure 8.5 Exaggeration.
Appeal
This is the other most important principle of animation. The character must appeal to the audience. Even characters not meant to be sympathetic can appeal. Villains often look cool, and we enjoy rooting against them. Character appeal has to do with the features you give them, the clothing they wear, their facial expressions, and the way they act toward others. There are good studies on how appearance affects our reaction to people and things. Symmetry is considered beautiful by people. Also, features that tend to parallel those of the young, such as a large head in proportion to the body and large eyes, tend to gain more sympathy (Figure 8.6). For less sympathy, you can go in the opposite direction, with small beady eyes and a narrow head.
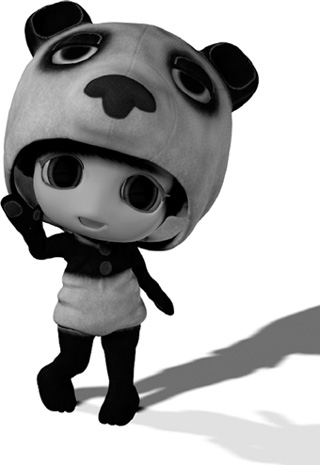
Figure 8.6 Character appeal.
These principles encompass three main things you must do to keep your audience interested. It must be believable. It must be clear. The audience must care about the characters. These days, animation may not be in the form of a narrative story; it could be part of an advertisement or a music video. But your work must still make the audience want to watch more.
Keyframing
The still images that make up a motion picture when sequenced together are called frames. These days, typical frame rates vary from 24 to 30 frames per second (fps) depending on the format. For video, these are often doubled and smoothed together to have 50i–60i fps (the i standing for interpolated). In film, a camera takes a sequence of photographs. In traditional animation, someone draws movements of the characters onto transparent cels for each frame. The backgrounds are static images that are set behind the cels. In computer-generated animation, the computer renders each frame based on what you create for models, lighting, background, and so on, and how you direct their movement.
You direct the movement of your scene through time using keyframing. This is the most fundamental tool in digital animation. With keyframing, you define key starting, middle, and ending positions and attributes of objects. Just about anything can be keyframed, including position, rotation, size, deformation color, and texture.
As an example, let’s use a character named Susan throwing a ball underhand. Our starting keyframe would be when she is holding the ball with her hand cocked behind her back, ready to toss up. You would put her and the ball in this pose and assign the keyframe. Once you start keyframing, assigning keyframes is often done automatically as you move a slider along a timeline. The ending keyframe of this sequence is when her arm is stretched forward at the end of the throw, with the ball leaving her hand. You alter the pose and assign that next keyframe. If such an action were to be filmed, this quarter of a second action would take more than two frames. The frames that come between these keyframes are called inbetweens. The computer figures out or interpolates what Susan’s movement should be between those keyframes. You can see how inverse kinematics can be a lot of help here. So far, the ending keyframe is when the ball leaves Susan’s hand. But this would not necessarily be the end of the animation. The camera could follow the arc of the ball. In this case, a new keyframe or several new keyframes can be added: one for the top of the ball’s arc, another for when it hits the ground, and more if it continues to bounce and roll (Figure 8.7).

Figure 8.7 Keyframing.
Animating with Graphs
Keyframes are placed on a timeline. The timeline may not exactly be a graph, since it’s just a line, but it is one of the most important displays for your animation and it’s the foundation of the animation graphs (Figure 8.8). Time is sometimes considered the fourth dimension. Well, then the timeline would be the axis of the fourth dimension. An object’s change in location, speed, size, or anything else is plotted against time here.
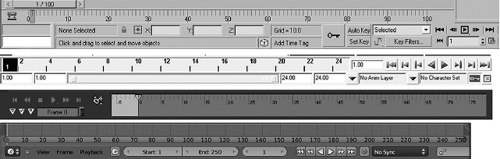
Figure 8.8 Animation timelines from several different applications.
All of your animation graphs will follow this one line. It shows how long your animation is and contains a pointer or highlighted portion which is the current time indicator. You can move this forward and back. A common technique for adding a keyframe is to move the current time indicator forward in the timeline, change the pose or position of your object, and then key the change. You can see the motion playback by either moving the pointer again or pressing a play button. This simple, real-time view of the animation (with textures and lighting turned off) allows you to fix any obvious problems you might see.
When you place a keyframe, this will become a point on an animation graph. For the x axis of this graph (not to be confused with your 3D axes), you have the timeline. For the y axis, the numeric value of your object’s attributes and position is shown. A keyframe is not necessarily set for each frame. So the computer interpolates between the frames, and the animation graph is where you can see the values of this interpolation, drawn as lines or curves (Figure 8.9).
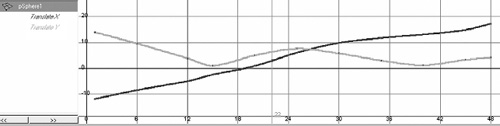
Figure 8.9 The animation graph of the translation curves of a bouncing ball. Since it did not move back and forth, only up and down and side to side, only the X and Y translation values changed and so only those were keyframed.
There are three main types of interpolation (Figures 8.9 and 8.10). The most basic is sometimes called stepped mode or key. In stepped interpolation, values do not change until the next keyframe, resulting in an instant change from one keyframe to the next. This looks like stair steps, hence the name “stepped”. In linear interpolation, each keyframe point is connected by a line. The movement is much smoother, but still jerky. With curved interpolation, the points are connected by curves. Changes in speed or direction, or any other trait, are eased into and eased out of. A ball curves up, over, then down. A car takes several seconds to reach its cruising speed. A chameleon gradually changes color. With a finished animation, your graph should be using curves to smooth everything out.
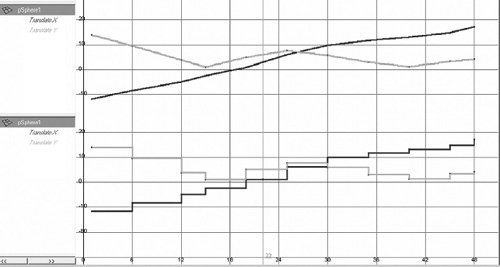
Figure 8.10 This animation graph shows the linear and stepped interpolation curves of a bouncing ball. Figure 8.9 shows curved interpolation.
Like the curves we’ve already learned about, you can control them using tangent lines at keyframe points and any others you may want to add on. This allows you to fine-tune the animation between keyframes. Manipulating the curves on graphs is great when you want to be more exact as far as what the numbers say. It also helps with repeating actions such as shaking and revolving. But it does not let you see right off hand the changes to the animation, and it is limited to adjustment of what is between the keyframes. To really see how you are changing your animation, you need to work directly in the 3D views to change the poses. A good animator will use both methods, going back and forth to perfect the motion.
Motion Capture
Motion capture is a way of letting the performer drive the animation of a character (Figure 8.11). A performer generally wears a skintight suit that has markers on it. The computer can easily pick up the markers as the actor is being filmed. If expressions are wanted, the actor may also have green dots all over her face. On the soundstage, several cameras film the actor from different angles as she goes through the performance, maybe scrabbling across a tumble of rocks, or at least rock-shaped foam. Often, the director can see a low-polygon image of a figure copying her actions exactly in real time. All throughout, the motion of the markers is being recorded as motion data.

Figure 8.11 An animation curve showing motion-captured walking. Every single frame has been keyed.
In the animator’s studio, they’ll take this motion data and use it to animate a computer-generated character. Care must be taken that the rig matches the data well enough to match the performance to the model. Though this is a much faster way than manually keyframing the whole thing, the character’s animation is not complete. Limitations of the technology include the problem of limbs interacting with the virtual environment, body, and facial structures which are very different from the actor’s, and plain errors in capture. All of this means that the animator needs to clean up the motion-capture data. They may also do things to exaggerate or enhance the poses. This makes the performance on screen a true collaboration between actors and animators.
Technology is moving forward quickly with motion capture. We are beginning to see the use of it more and more in movies not meant to be special effects extravaganzas, as computer graphics have become realistic enough to age actors or make them much younger. Recent technological developments are moving toward being able to achieve motion capture without the need for markers. There is even a low-level system for home console games on the market. The implications of these technologies for film making are exciting both for large products and for bringing the ability to produce high-quality work in the hobbyist’s home studio..
Facial Animation
The Facial Action Coding System, or FACS, was developed in 1978 by Paul Eckman, a psychologist studying emotion and facial expressions. It describes 64 distinct facial action units (AUs). These are not a list of expressions like “raised eyebrows”; rather, they describe what the muscles can do, such as brow lowerer and cheek raiser. The extremes of these movements can be created as morph targets, and then added into an expression using a slider. This kind of technique was used for Gollum, using Andy Serkis as the model for the AUs and then using his performances on camera for reference.
It is important to understand universal emotional expressions. These are involuntary when emotion is felt and so are recognized by people across the globe. There are six universal expressions: happiness, surprise, disgust, fear, sadness, and anger (Figure 8.12). Some also classify contempt as universal.
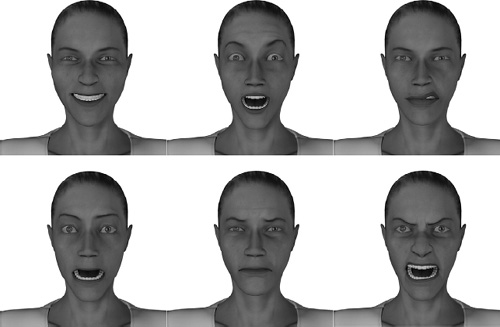
Figure 8.12 The six universal expressions: happiness, surprise, disgust, fear, sadness, and anger.
Universal Expressions
Study expressions and get them right. One of the stumbling blocks of both 2D and 3D animation is that of the uncanny valley. This is a problem where, because an expression is close to but not quite realistic, the audience may be unable to relate to the emotions of the character and may actually feel revulsion toward it. The uncanny valley can be used to give the audience a sense of discomfort, as it was in Harry Potter: The Deathly Hallows Part 1.
It is one thing to carefully craft a facial expression for a single shot; it is quite a bit more to animate expression. It starts out with creating a well-done rig. This involves not only deformation, but also a skeleton rig with the jaw. As discussed before, natural-looking deformations require a good underlying topology. A facial rig may also be a full musculoskeletal simulation.
You will need to use the facial rig to create several expressions, called morph targets. You can use sliders to move back and forth between two morphs, and/or key in each of these targets or combination of targets to create a series of expressions leading to facial animation. Motion capture can also be used, but in order to tweak things you may still want a good set of morph targets.
As well as having emotions, you will want your character to talk. A well-rigged character will include a joint that controls the jaw, as well as deformers. The sounds of speech can be broken up into phonemes. The shapes that the jaw, tongue, and mouth must make for those phonemes are sometimes called visemes (Figure 8.13). The problem with only the use of visemes is that during speech, these shapes tend to blend together. Using sliders between morph targets, and keying the blended viseme in, you can achieve more realistic speech movements. It’s very important to make sure that the character’s mouth animation syncs with the recorded speech. As well as listening to a speech track, you’ll have each sound plotted out according to what frame that sound will fall on. There are automated ways to synch speech animation to sound. Motion capture can work fairly well with speech and there are also automated systems using algorithms to match sound to the shape of the mouth. Though it may not lead to revulsion, getting speech movements wrong will take the audience right out of the story.
Automation
Lots of the motion in your animation can be automated. You have already seen this a bit, using graphs to add vibrating or spin motions and with hierarchical animation. Another way to have the attributes of an object animated is to connect them to the attributes of other objects. You can link any kinds of characteristics of objects to each other. The position of a switch can determine whether a light in the scene is on. As a cart moves forward, its wheels can be made to turn at a rate that matches the distance traveled to the circumference of the wheel, thus controlling the rotation of the wheel. Other ways to add animation without needing to keyframe it in manually are through dynamics (see Chapter 9) and through scripting (see Chapter 18).

Figure 8.13 An example set of visemes.
Fence-Post Errors
One last thing to look out for in animation is how time is handled. When filming at 24 frames per second, a frame is an image captured over 1/24th of a second. Computer-generated frames, however, are an image that is rendered, so that they only represent a point in time with 1/24th of a second between each frame. This can create something called fence-post errors. Things like motion blur that would occur over a period of time on an exposed image may be rendered incorrectly because after the last frame, time is no longer moving forward and so the computer does not add the motion blur; or it adds only half of it, depending on how the application handles fence posts. It is usually up to the animator to correct such problems. Frames should be thought of as periods of time, not points in time, even if your application handles them differently.
Animation Workflow
Sitting at the computer and animating is one of the later steps in bringing your character to life, but it is a big process that takes its own workflow. Of course, everyone works a little differently, but there are some important steps that need to be part of that. The first few steps of a good workflow happen away from the computer.
At this point, you should already have a script, and you may have a storyboard. If there is voice acting, you should have a recording of that as well. With these in hand, it’s time to brainstorm. During the brainstorming, gather references in video and pictures. Listen to the dialog track. Then, act out the motion yourself, sometimes while listening. A good animator is also an actor, who is just using the computer for their performance. So act out the shot and get a feel in your body for how it should go. Then draw it. You should draw quick thumbnail sketches of the ideas for poses that you get from acting out. The emphasis is on quick because they are disposable. This is still brainstorming, which is the time for quantity, not quality. They should be simple stick figures or the lines the body makes in its pose. Draw a pose: if it doesn’t work, throw it out. Quality will come from doing a lot of work here, and then only picking out the best.
What you’re getting here are the key poses, not every single pose. Sometimes these sketches can make up a kind of thumbnail storyboard (Figure 8.14).
Next, you need to consider the timing of the poses. Timing and pose are both very important. You can arrange your poses on something like an exposure (X) sheet, also called a dope sheet. An X sheet is where you write instructions for each frame. They are especially useful if you have dialog. You will have a rough idea of the timing going on in this, and you will be able to apply it to the sequence of frames. For instance, you can write down what sounds of each word are happening on what frame. Then you can easily match the pose to the sound. Even if you choose not to use an X sheet (bad idea with dialog), you will want to make sure you know what frame each key pose belongs in. It’s also a good idea to have a draft X sheet with lots of scratching out and then from that create a more refined one. You might also do the sorting of which poses are good, as you are working out your timing here.
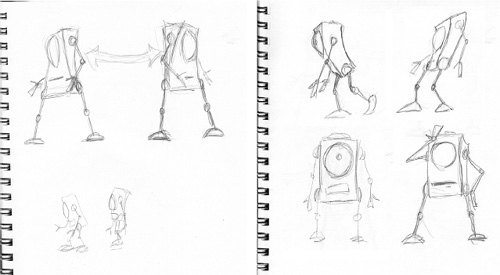
Figure 8.14 Storyboard of sketches.
Once you’ve got this done, it’s time to get back to your computer, take your rigged model, and keyframe all the poses. You’ll want to work with heavy things first: legs if walking, or torso. Work your way from main body parts and big motions to tiny motions and facial expressions. Many leave facial expressions and speech for after refinement of body motions. You may have noticed that this is pose to pose, where all of your key poses are now present in the shot. Once you’ve got these all keyed in, you’ll want to take a quick preview render while using stepped mode. Linear interpolation is often the default mode, so you need to switch to step before rendering. At this point, all of your keyframes should be in the same place for everything on the model you’re animating. They will be very organized and easy to change.
Then you (and your director) will be able to see all of the key poses with their timing. You will see any problems, receive feedback, and then it will be time to go in and refine this. Make sure you take notes here. You may want to get feedback at each point in your workflow.
With timing down well, you can now fill in between the key poses. Keep in mind that your character now moves into key poses all at the same time. This ends up looking robotic. There are two schools of thought for fixing things. One is that you go in here and create more poses. This more traditional method gives you more visual control, and in the end may save time with trying to fidget with each bit. Keying in more poses between the others also keeps your keyframes organized. Plus, while you are filling in these new poses, you are now free to use straight-ahead action. The timing is already down and you are unlikely to hit a dead end. This frees you up to make the animation overall more dynamic. You may also want to modify your key poses just a little. The other method is to modify poses using the animation graph, moving this or that part so that you offset parts of the model so they do not all fall into the pose at the same time.
You will want to take another look at it with these refinements, in stepped mode or linear mode. However, don’t try to render each section as you progress. You do not want to take up too much time waiting for render, watching, then fixing. Refine the whole shot, then do another test render. You may go through two or more cycles of this. Most of the time spent on working may be on that last fifteen percent of the job: refinement. However, if others cannot see what is wrong with it, then that might be a clue that it’s time to call that thing done. Another consideration is some production houses have a high quantity output. They might not be looking for your most excellent work, but the best work you can produce within a certain time frame or budget. In this case, you need to learn when a project is good enough for them, even if it isn’t good enough for you.
Things to do when you are animating and refining: watch for weight (squash and stretch), arcs, follow through and overlapping action, etc., as well as your timing. If you left your facial expressions for later, this is probably the time you want to work on them.
When you are happy with things in linear mode, you’ll want to switch to curved interpolation. This will facilitate slow in and slow out, but the computer’s literally thoughtless calculations to create the animation curves may mess things up a little. You may do a quick play through to see what it looks like at that point. Once you have seen the full animation with curves in it, you can go in and refine it some more.
You may be doing most of the animation with a low-polygon version of the model for a couple of reasons: if you’re the animator then you probably are not the modeler. The modeler and texturer are still working on the model while you are animating. The second is that it can save time rendering. So you might get your whole animation keyframed and refined, and then replace the rough model with the finished one. Once again, you will need to see if any refinements are necessary after this step.
Animating these days is very technology driven, and a lot of exciting things are happening because of the advancements in computing technology and 3D algorithms. We can do more than we’ve ever been able to do before. However, don’t lose sight of the art. Even if the computer can do a task for you, you might want to do it yourself. After all, the computer has no heart or even a brain.
Juggling Robot

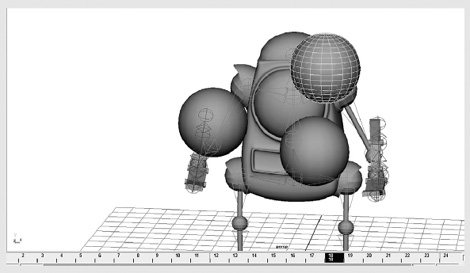
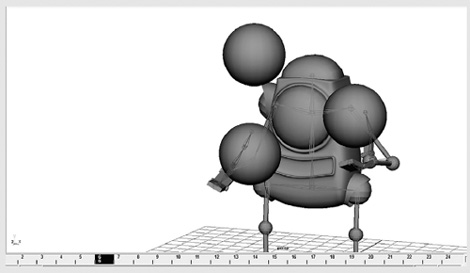
Step 1
This is going to be a looping animation that is similar to The Juggler, created by Eric Graham. Start by posing your robot so that its hands are in front of it and the clamps and thumbs are in a position as if they were holding something large. Then create three spheres. Place one in each hand and another up above them, at the top of a triangle.
Step 2
Your timeline should be below the views. Set the timeline so there are 24 frames and you will be looking at all of them. Select the ball in the left hand. Your timeline indicator should be at frame 1. Add a key to the frame. This will put a key only on that ball. Move the time indicator to frame 24. Move the left hand ball up to exactly where the top of the triangle ball is. Add a key to the frame. Move the timeline indicator back to frame 1; select the top ball. Add a key to the frame. Move the frame to 24, move the top ball exactly to where the right hand ball is, and add a key. Now with the timeline back at 1, add a key to the right hand ball. Move the indicator again to 24, and move the right hand ball to exactly where the left hand ball is at frame 1. Now if you hit playback, you will see a looping animation of the balls moving. However, there are two problems.
First, the movement of the balls is not natural: they should be arcing up, but instead are moving in a straight line. To correct this, for each ball you need to add more keyframes. Draw the arcs using curves. Add three more keyframes to each ball, at quarter increments of time. Use the curves to guide your adjustments. Remember that a ball thrown up doesn’t move at the same speed through its whole arc. A ball going up should travel a bit farther between frames 1 and 6 than between 7 and 12. The ball moving from side to side should be in the middle at frame 13. The ball going down should gain speed.
Second, the hands are not moving.
Step 3
With the balls moving pretty well, now keyframe the hands so it looks like they’re catching and throwing the balls. For the right hand, it should be tossing a ball to the side, toward the left hand. You will want the right wrist to rotate, so the clamp is pushing to ball to the left. Then it must move back to catch the next ball. The left hand should be tossing a ball up in an arc toward the right, and then moving back to catch. You'll want to make sure the hands are in sync with the balls as they throw and catch them.

Step 4
It can be both fun and a bit nerve-wracking to juggle. To have the robot look nervous as he tries to catch the balls and smile as he succeeds, use the morph target controls to change its expression. The shape information will be within the morph target, rather than the robot’s base body, so you will probably have to add a key using the morph target controls, rather than with the shape of the main body.