13
LIGHTING THE WAY
Lighting a scene isn’t just about being able to see things. It serves to create mood. Imagine a setting with a crooked house, gnarled trees, and a strange little bunny holding a sharp object. If the scene is dark with clouds and a full moon casting long shadows, it looks creepy. Put the exact same scene in daylight, and you can see the green grass, puffy clouds, and that the pointy object is a carrot. Though it is still quirky, it’s no longer threatening. Both lighting setups are natural. There are lots of tools to recreate natural lighting, but we will also need the lighting tools that can be found in a studio (Figure 13.1).
When using artificial lighting, a standard approach is the three-point lighting rig (Figure 13.2). This is made up of a key light, a fill light, and a backlight. The key light is the main player here, lighting up the object from the front. Using just one light can result in harsh shadows, so to get rid of these we add a fill light. This softens shadows and fills them with enough light to see otherwise obscured details. A backlight is set behind the object and gives it a strong outline. There are other ways to light up a scene, but knowing this fundamental lighting system can get you well on your way.
Light Properties
Once you add a light into your scene, you’ll be able to control its color, intensity, and decay.
It’s very rare that a light source gives pure white light. Sunlight at full noon, for instance, is just a little bit yellow since its blue has been leached from it and scattered across the sky. There is more than one way to have colored light. One accurate method is to use color temperature, which is a way to measure the hue of a specific kind of light in kelvin. But how can color be a temperature? British physicist William Kelvin heated a block of carbon, which is black, and measured what color it became at what temperature. At first it was red, but as it became hotter it became more blue–white. More commonly you’ll select a color from a color map. You can still use charts to match the color to a type of light source by finding out its temperature, then using the matching color from the color map.

Figure 13.1 The three images in this figure are all of the exact same scene, but rendered with different lighting.
Intensity is how bright the light is, and can be measured in real-life units, such as lumen, candela, and lux, or it is measured through units set in the application. The brightness of the light decreases with distance. This is called decay. In the real world, light dims because it becomes spread out the farther away you are from the source. There are three kinds of decay: linear, quadratic, and cubic (Figure 13.3). With linear decay, the light gets dimmer in direct proportion to how far away it is from the source. So if you’ve set your light intensity at 4, then at a distance of four (meters) its intensity is down to zero. Also called inverse decay, this is slower than decay actually occurs in real life. Quadratic or inverse cubed decay is the same as with real-world light, and decays in proportion to the square of the distance. This makes it much brighter closer to the source, but quicker to dim. Cubic decay is in proportion to the cube of the distance, or 1/distance3. This means the light gets dimmer faster than in reality. For realism, you should stick with quadratic.
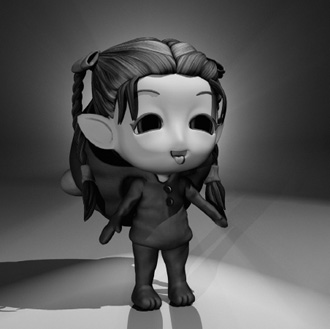
Figure 13.2 This figure was lit using a three-point lighting rig. The back light was exaggerated for effect.

Figure 13.3 From left to right are examples of linear, quadratic, and cubic decay.
There are a couple of settings that don’t follow the way things happen naturally. Light may not automatically cast a shadow in some applications. In that case, you will have to turn the shadows on. The light settings are one place where you can choose what kind of shadowing will occur, such as ray tracing or shadow maps. Another atypical thing you can do is is to make light shine on only one object, and not affect any of the others. Both of these abilities, to choose whether or not to have shadows or light on a particular object, can be very useful tricks.
Types of Light
Point Light
The point light is one of the most simple in your 3D light kit. It is just a point that emits light in all directions (Figure 13.4). It’s also called an omni, but in that case you may have more control over the shape, such as emitting from a curve. No matter the shape, it still emits in all directions.

Figure 13.4 Point light.
Spotlight
Spotlights emit light in the shape of a cone from a point. This causes the light to mostly hit the object at a similar angle, making it very bright where the light hits (Figure 13.5). That is why you get a spot on the surface the light is pointed at. You can increase the size of that spot by increasing the angle of the spotlight. There is also the question of how rapidly the light dims at the edges of that spot. Is the boundary of the spot hard or soft? This is called the falloff. Because a spotlight light is mostly from the same direction, it causes very distinct shadows.

Figure 13.5 Spotlight.
Area Light
An area light is one where light is emitted from a surface, usually a rectangular plane (Figure 13.6). Here, light is being emitted across a whole surface rather than a point and all the rays are moving in one direction parallel to each other. This creates high-quality soft lighting without harsh shadows. As a result, this type of lighting costs more at render time than the others. You can also turn an object into an area light, so that light is emitted from the model’s surface.

Figure 13.6 Area light.
Directional Light
Though the sun is a light source, it is so far away and bright that it would be impractical to truly simulate. Directional lights are the answer (Figure 13.7). Light rays all move parallel to each other in a single direction. They are like area lights in this way, except that if there were a plane emitting light, it would be an infinite plane. The theoretical light source is infinitely far away. The light does not decay. This means that it doesn’t matter where in the scene you place them; it only matters where you point the light. Sometimes such as light will be called a sun light.

Figure 13.7 Directional light.
Volumetric Light
The stage is dark, except for the spotlight with dust swirling inside revealing a magician and his wand, which cast dark streaks of shadow in the cone of light. This is an example of volumetric lighting. You can see the light before it hits the surface. Figures 13.4 and 13.5 used volumetric lights to illustrate their shape. This is caused by light being scattered across dust particles in the air, and you can often also see the swirl of dust and specks of fiber. In the big world of the sky, clouds and atmosphere can combine to give a similar effect called godrays. In some packages this is handled as a specific type of light, while in others it is an effect that you can turn on for lights (Figure 13.8).
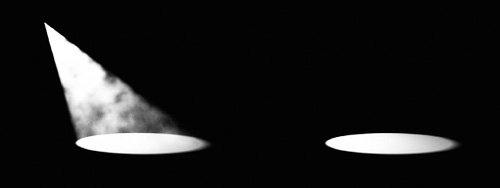
Figure 13.8 In the figure on the left, an extra effect of smoke was turned on. On the right is the same light with all volumetric effects turned off.
Objects as Light Sources
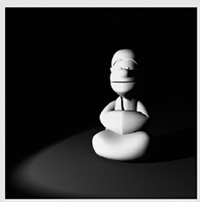
As well as turning objects into area lights, you can set the material on an object so that it luminesces or glows. This effect will not put a lot of light into the scene, but may cast a bit of light on the objects right around it (Figure 13.9).

Figure 13.9 Using objects as light sources.
Renderer Lights
Many rendering applications have their own lights which can give better results and may offer more control. These lights can be accessed either by changing the regular lights to the renderer’s lights or by choosing the renderer’s light when you are creating a light.
Image-Based Lighting
Let’s say we need to have a computer-generated 3D object appear in some live action footage. How do we get the lighting on it to match the footage? The answer is to bring the lighting with us (Figure 13.10). We do this by taking a high dynamic range image (HDRI) at the location where the footage was shot, preferably at the same time if it is outdoors. An HDRI contains not only color information, but also information about the luminosity or intensity of light. To use the image to project light into your whole scene, it will need to be spherical. There are cameras that can take panoramic and spherical images. If one of those is not available, you can use an HDRI capable camera with a reflective sphere. Once acquired, an HDRI can be projected as a sky dome in a scene and set as image-based lighting. Light is emitted from the image which matches the intensity of light shown in the image. For example, if the sun is visible, the place in the picture where the sun is will shine with bright light which is the same color as in the image. If the sky is cloudy, the object will be lit with the same ambient light. This is especially useful if there is complicated lighting on location, such as an interior setting with a wall of windows, lots of ducts on the ceiling, and lights. Not all image-based lighting has to be spherical and light up the whole scene. For instance, it could be used to create the view from windows which not only have detail but light up a room as well.

Figure 13.10 This specially rendered image will project light. The light’s intensity depends on how dark or light the image is.
Gobos
One effect you can achieve is to make cool light shapes and multiple colors by using “GO Between Optics” or gobos (Figure 13.11). Their name indicates how they work. In real life, a plate (to make shapes) or gel (for color) is put between the light and the surface, usually right near the light source. They are often used in dance clubs or at concerts. Achieving the effect is easy in your 3D application. In your light settings, you can enable their use and set up an image map that you’ve created for the effect that you want.

Figure 13.11 A gobo.
Enlightened Monk

Step 1
Start with a simple humanoid or animal object, though it should have enough detail in the face to see how the light and shadows change. For the key light, create a spotlight. Place it a bit to the side and aim it at the character. One nice thing about some virtual spotlights is that you can look through them and aim them like a camera, though the image may be upside down. Try rendering the image with one light. You will have harsh shadows on one side. This is also a common difficulty with natural lighting of the sun.
Step 2
To counter the harsh shadows, create a second light, preferably an area light – an object such as a plane that is a light source or whatever equivalent in your application. This will be the fill light. Place it off to the side as well and aim it at the figure. The size and shape of the lights in the illustrations are exaggerated to see them easily. You really can use any kind of light as long as it is soft and coming from a wide angle. A fill light can solve the problems in natural lighting as well. It’s common to create a fully simulated outdoor scene and then add a fill light for each object of focus to reduce the shadows.

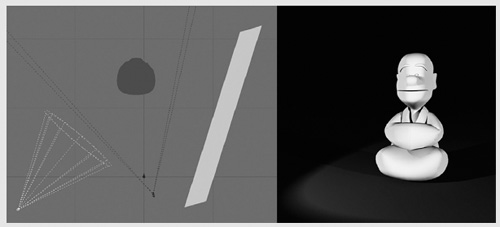
Step 3
Create one more spotlight and set it behind the character. You can place backlights up above and pointing down. This will create the three shadows as seen in Figure 12.2. Or you can place the backlight near the ground and pointing up, as in this illustration. Backlights might not be useful for a bald guy such as this, but if the object has realistic hair or fur then it will add a nice framing effect that can increase visual interest.