15
ENVIRONMENTS
Sometimes the hero of a scene is the setting. Think of the movie Avatar, with those incredible floating mountains on Pandora. With the rocks draped with jungle and nurturing mists, we came to care for the planet and we saw that not only was there power there, but also a natural bounty for those who respected it. This pulled audiences into the movie while at the same time giving important information that moved the story forward. This was where the last stand was going to happen between the evil corporate sappers and Pandora.
Even if your setting is not quite so powerful, it is important to the whole atmosphere of your scene and animation. Nothing ruins a great character design more than having it romp around in a poor setting. A setting grounds the character and gives it the foundation of a story. It provides atmosphere through its appearance and also through its lighting.
Terrain
Most of the 3D modeling packages out there are ill equipped to create terrains with much complexity. However, there are several standalone applications and plugin tools that can generate terrains, and other natural and urban scenery elements, very well.
Terrains are usually polygon or NURBS planes modified to have elevations like land. There are a couple of ways to apply elevation. One is to use a specialized displacement map called a heightfield map (Figure 15.1). This is a grayscale map where black is the lowest elevation and white the highest. Heightfield maps can be created randomly, from geographical data, or by sculpting them yourself. Terrains generated from heightfield maps can also be sculpted, letting you include features such as overhangs and caves, so that the deformation of the plane is along all axes. Other ways to work with a heightfield terrain map include modifying the randomizing equation or using a filter which changes the values (see Chapter 17).
Another method is to use fractal equations. These modify the terrain plane directly, without the use of a map. A fractal is a shape created by starting with a geometric shape and adding a smaller version of that shape onto the edges. This can be done over and over again, with smaller and smaller shapes. This type of geometry is common throughout nature. There are some strong advantages to using fractal equations: they can be made to simulate common land formations (Figure 15.2) better than a randomizer of heightfield terrains, there is a larger variety of equations that can be used, they can be recalculated as the camera moves to get smaller detail close to the camera and larger detail farther away, and you can make fractal terrains that go on to infinity.

Figure 15.1 A heightfield terrain generated from a 2D image. Without proper formatting, artifacts may occur. 3D application generated heightfields tend to look better.
Water
These same types of equations work just as well for lakes and seas as they do for land (Figure 15.3). Because of the nature of the equations, they are easily animated, so that you can have open water waves. Lakes and oceans have other features as well: foam, and waves breaking on the land. Foam is usually just a feature of the material settings. But waves breaking on land cannot be handled by the same fractal equations as the less dynamic waves in open water. This is sometimes handled by wave objects. It is also a task that can be accomplished in postproduction.
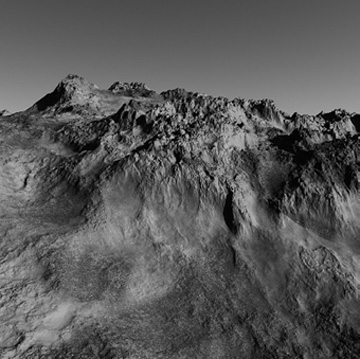
Figure 15.2 A terrain generated using fractals.
This is why you rarely see rough rivers or waves in 3D animation. Their dynamics are difficult to achieve since they require using fluid dynamics that are very chaotic, meaning they take a lot of calculating. Another common feature well loved by artists is waterfalls. Since they are usually seen from a distance the solution is often to use animated alpha planes. You’ll recall that alpha planes can be transparent, allowing the features behind the waterfall to peek through the water as it falls.
Underwater scenes are simulated using lighting and slow wind type movements of such things as water plants or hair. Creating this effect can also include volumetric lights in a god-ray type of effect and, if the water is shallow enough and the bottom can be seen, caustics which follow the rays of light piercing through.

Figure 15.3 As you can see, the water looks fine in the open sea, but without advanced techniques, it lacks realism where it meets land.
Plants
Unless you are creating a moonscape or a wasteland, part of your landscape is going to be plants. How you handle these plants depends on where they are in the background and what your requirements are for the production. For game play, the requirements for low polygon count will rule. For animations meant to be part of live-action footage, realism is paramount.
The most primitive way to show greenery in the scene is to texture your land with materials that have green color variations. Even for higher level requirements, this works well for distant backgrounds. Another option that works for distance is bitmap images of ground-hugging plants.
But for anything that has some height, something more is needed. Plants can be modeled just like any other object (Figure 15.4). Trunks and stems are created in three dimensions, but leaves are usually just alpha planes, since in real life they have little thickness. These alpha planes do not have to remain flat; they can be curved a little bit. Bump maps and normal maps can also be applied to these alpha planes. This combination gives the leaves body and depth. Leaves are attached onto the 3D trunk with hook points. These are in the places where the leaves need to be on the trunk, and on the leaf map, where it needs to attach to the trunk. Since there can be hundreds of thousands of leaves on a tree, often instead of single leaves, the alpha plane depicts branches of leaves to be hooked on at the point where all the branches converge into a single branch. Sometimes plants like grasses are made up of specially arranged planes with images of grasses on them. Even some ground plants with stems can be shown in this way and often are in games or backgrounds.

Figure 15.4 A collection of several plant models.
While it is perfectly possible to hand model a trunk, it takes time. This makes it difficult to put more than a handful of unique plants in a scene. One solution is to scale and rotate single models. Though it is possible to quickly fill up a forest like this, the repetition is almost always visible to the audience’s eye. Another solution is to use a program that specializes in generating plants. Several algorithms are available, including fractal equations and applications that use them to create plants.
Sky
Sky is the natural background to everything outdoors, and it varies a lot. From a placid blue sky to roiling clouds, it’s a feature worth spending time on. The earliest skies were simple 2D color maps. Often, they are applied to a sky dome. These still work well for animations that are more cartoonish, and are fast to render.
However, this simple map doesn’t solve the problem that the sky is also a light source. The solution to this is to use an HDRI map, which was described in Chapter 13. This image-based lighting not only provides a beautiful, photorealistic sky (after all, it is a photograph of the sky), but also lights the scene. The problem is that it’s not as practical to animate and is difficult to modify. This is a good solution for combining live footage with 3D objects but not so much for pure animation.
For animation, it is best to simulate the ambient light that comes from the sky. This can be done separately from the sky, using an ambient light as well as a sky map (Figure 15.5), or it can become part of the sky simulation. Light from the sun is scattered across the sky. Because of the size of air molecules, the light that gets reflected off these is primarily blue. Other particles in the air also change the light color, including water (fog) and particles of pollution. All of these effects, sky color, fog, and pollution, can be simulated using algorithms that will change the sky color, the light color, and how quickly things tend to fade with distance. For instance, in the clear blue sky of a desert, there is little water or pollution. This allows for objects to be seen in the distance. In a very thick fog, we might not be able to see just a few feet in front of us (Figure 15.6).

Figure 15.5 Sky map and simulated atmosphere.
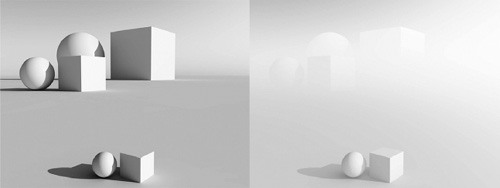
Figure 15.6 Fog.
Sun
Another part of the sky is the sun. As a lighting source, the sun is handled as a directional light. But this doesn’t give us a visible sun. The solution is to create a sun object, usually just a very bright disk. However, you must also take care with its color. The closer it gets to the horizon, the more light gets scattered because of the air, water, and pollution. This makes its color decay, so that it becomes more orange and red while near the horizon.
Clouds
The way clouds are handled depends in part on what kind of a sky is being used: a mapped sky or a sky being controlled by algorithms. To add clouds to a sky map, one can use a similar alpha map layer with images of clouds on it. These 2D images can be generated using equations and can be animated. But they are just two dimensional and do not affect the light.
A better method is to have 3D clouds. They can be modeled in the typical way, using volumetric materials. Modeling a custom cloud is often done for a hero cloud featured in the scene. However, it is more practical to let the application generate volumetric clouds using 3D algorithms. These can sometimes become very specialized in how they interact with light, letting you achieve images of clouds impossible to distinguish from real ones (Figure 15.7). Another way to create clouds is to use particles. This allows clouds to be simulated using fluid dynamics, creating very realistic cloud shapes. Both types of clouds can easily be animated.
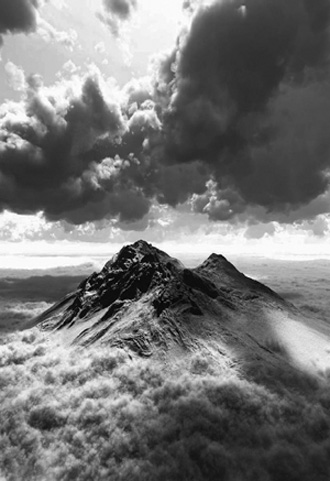
Figure 15.7 Clouds created in a 3D application.
Indoors
Though modeling indoor scenery is easy enough, it is the lighting that gets complicated. Indirect lighting is a very strong influence on the overall lighting. Light from windows and artificial sources bounce from walls, tables, chairs, and anything else in the room. If you are creating architectural rendering where the indoor setting is paramount, you will want to use global illumination for the best results. But if your indoor setting is part of an animation, you may want to consider something less render intensive. You could use something like ambient occlusion, where the soft shadows of ambient lighting are achieved by casting rays out from the surface of an object and only lighting the surface if they hit the background or sky (Figure 15.8).
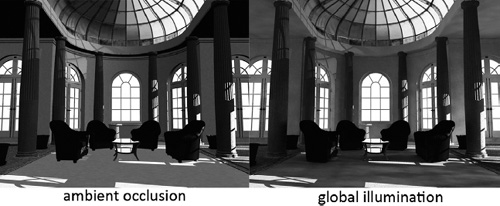
Figure 15.8 Ambient occlusion and global illumination of an indoor environment.
Raising the Ground
Step 1
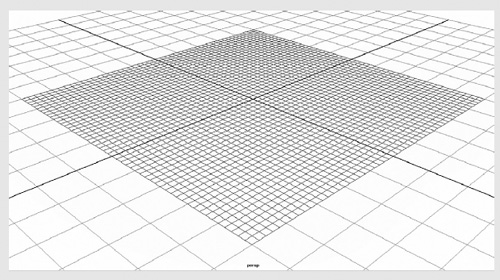
In a new scene, create either a polygon plane with at least 50 divisions on each side or a NURBS plane. Make sure it has 50 spans in each direction. The higher the resolution of your surface, the more detail you can add.

Step 2
You will want to connect the height deformation of the plane to a grayscale image, with black being the lowest elevations and white being the highest. You can even get grayscale images that represent real geographies at several map services. Government mapping sites are a good free resource. You may need to fix them for use as a heightfield map. There are several ways to connect the image to the mesh’s shape. These could involve a displacement tool, a specific heightfield capability (though this can act differently in different applications), connecting it through a noise attribute of the mesh, or an attribute tab in the mesh sculpting tool. Once you have the image connected in, you may need to lower its height or alter how much influence it has on the mesh.
Your heightfield map should be of a sufficient resolution to match the size of the mesh you need to make. However, one of the advantages of a NURBS plane is that its curves can smooth out low-resolution artifacts unless they have enough spans to follow the pixelization.

Step 3
You can also use an image map to add some color. For instance, there could be a little snow on the peaks.