Chapter 1
Methods of 3D Printing
There are four basic types of 3D printing methods at this time: Fused Deposition Modeling (FDM), Stereolithography (SLA), Granular Materials Binding (GMB), and Selective Deposition Lamination (SDL). All of these processes take a virtual model and build it – bit by bit – into a physical object. The way this happens is what determines the name of the method. Which one you choose largely depends on personal preference, your access to the technology, and the needs of the object you intend to create.
Printing Techniques
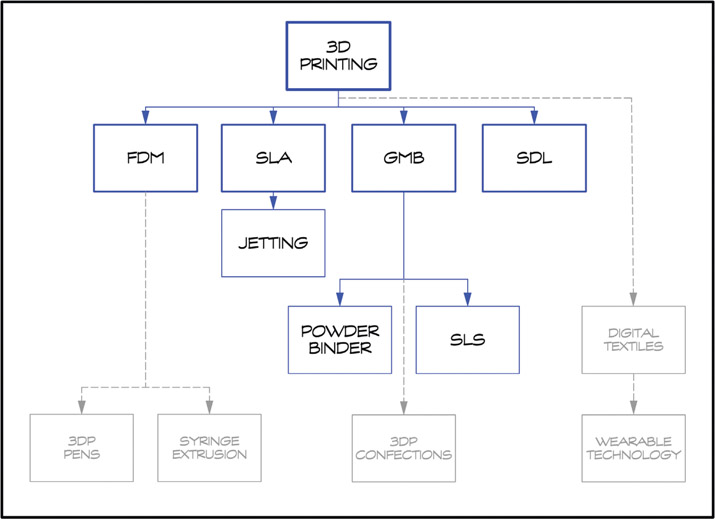
Figure 1.1
Flowchart showing the relationship between popular forms of 3D printing.
Fused Deposition Modeling (FDM)

Fused Deposition Modeling (FDM) is a 3D printing process by which thermoplastic filament (or plastic that is malleable when heated) is extruded through a small nozzle into fine layers that stack upon each other to create an object (see Figure 1.2). FDM is the most common type of consumer-level 3D printer at this time and can use a variety of types of thermoplastic filament (consider this the “ink” for FDM printers); the most popular being ABS and PLA. (More on filament in Chapter 2.)
Other Names Used for Fused Deposition Modeling (FDM)
- Fused Filament Fabrication (FFF)
- Molten Polymer Deposition (MPD)
- Thermoplastic Extrusion
- Fused Filament Method (FFM)
- Plastic Jet Printing (PJP)
Think of FDM like a really smart hot-glue gun. In the same way a glue stick is inserted into the back of a glue gun, thermoplastic filament is fed into the 3D printer. The printer heats up the plastic to a molten state and extrudes (or squeezes) it through a small nozzle – much like a hot-glue gun oozes molten glue when the trigger is pulled. A computer controls the 3D printer’s movement (based on your 3D model) and tells it to selectively deposit the molten plastic in the shape of the first layer of your object, which solidifies almost immediately as it cools. Then the next layer is extruded on top of the first layer, and so on (see Figure 1.3). As the layers build on top of themselves – tiny layer by tiny layer – the physical object begins to take shape.

Figure 1.3
Fused Deposition Modeling (FDM) process.
Image courtesy of: Mark Jaster, www.printspace3d.com
The FDM process was trademarked in 1988 by S. Scott Crump (co-founder of Stratasys). Crump filed for a patent in 1989 which was issued to Stratasys in 1992. He also patented and trademarked the term “fused deposition modeling.”
For more than a decade, this technology was only available at an industrial level – out of reach for the standard consumer. All that changed when Dr. Adrian Bowyer at Bath University invented a desktop 3D printer he named the RepRap (short for Replicating Rapid Prototyper), which was relatively inexpensive and capable of replicating most of its own parts. In 2005, he released the RepRap as an open-source printer and began the RepRap Project – encouraging others to create their own. The RepRap Project spawned a massive outcropping of innovative FDM printers on the market, including the first-ever commercially available 3D printer – the BfB RepMan (January 2009) and the extremely popular MakerBot Cupcake CNC (March 2009).
Stereolithography (SLA)
Stereolithography (SLA) 3D printers, the second most common consumer-level 3D printer, use a process called photopolymerization. This process uses a high-intensity energy or light source to cure a liquid photopolymeric resin into solid layers (see Figure 1.4); a photopolymer is any material that can transform from a liquid to a solid almost instantaneously when stimulated by light. Depending on the energy source (a UV laser or a projector), SLA printers are divided into two categories: Spectrum Laser (SL) or Digital Light Processing (DLP), respectively.

As each layer is “drawn” in the pool of resin by the light source, it solidifies. The object is shifted slightly from its surrounding resin bath and the process repeats (see Figure 1.5).

After the print is complete, the excess resin must be rinsed off with isopropyl alcohol (IPA). To completely dry, the object may also need to be post-cured in the sun or under a UV light source before safely handling. Resin comes in limited color choices.
Other Names Used for Stereolithography
- Optical Fabrication
- Photo-Solidification
- Solid Free-Form Fabrication
- Solid Imaging
In 1983, SLA (“Stereolithography Apparatus”) was the first-ever method of 3D printing invented. It was invented (and later patented in 1986) by Charles “Chuck” Hull, who went on to found 3D Systems and is widely considered the father of 3D printing. He also coined the term “stereolithography,” which is derived from the Greek words stereo (solid body), litho (stone), and graphien (to write). “Stereolithography” is still used today to refer to the file type read by most 3D printers and 3D modeling programs – abbreviated as an STL file. The first commercially available desktop SLA machines appeared on the market in 2012 – the B9Creator (DLP) and Formlab’s Form 1 (SL).
SLA printers typically print more quickly than FDM printers, especially the DLP variety. DLP machines print in seconds per layer (instead of minutes) by printing a full layer at once (almost like stamping out each layer), instead of drawing it out line by line. SLA also produces higher-resolution objects with exceptionally smooth surfaces (see Figure 1.6). This level of detail can be ideal for scenic model pieces in 1/4” scale – a scale with which the average FDM printer can struggle. The surface of an SLA-printed object may be slightly slick, semi-gloss, or rubbery and can be fragile and brittle overall, but highly detailed.

When printing with SLA, avoid skin-contact – handling the resin material can be messy and unsafe. Check the material’s Safety Data Sheets (SDS) to see which gloves are recommended for handling. Full ventilation or fume extraction is recommended at all times. Resin expires within a year from its production and can degrade in storage over time, which will cause final prints to be a bit sticky.
Photopolymer Jetting
Originally patented by Stratasys, Photopolymer Jetting, also called PolyJet, is an industrial-level derivative of SLA. It also uses the process of photopolymerization but there is one big difference – the resin is stored in cartridges, much like ink in traditional 2D printers.
Other Names Used for Photopolymer Jetting
- Poly-Jetting or PolyJet
- Jetting
- Multi-Jet Modeling (MJM)
- Multi-Jet Printing (MJP)
Jetting printers selectively deposit tiny droplets of photopolymer material onto the build surface. Immediately following, a UV lamp moves over the print bed causing the droplets to instantly cure into a solid material. The printer repeats this process layer by layer until finished. The resulting objects are precise, smooth, intricately detailed, and printed in a very fine resolution with the possibility of full color. Unlike standard SLA, objects are ready for handling as soon as printing is complete.
Notably, jetting technology allows for a wide range of materials to be printed simultaneously within a single object. These can vary anywhere from rigid to flexible and from opaque to transparent. For example, a prosthetic leg can be printed as all one piece – combining both a rubbery, flexible joint with rigid frame and body components. Or an entire model ship can be built inside a transparent bottle within a single print. Manufacturers other than Stratasys have begun to produce similar technologies, such as 3D Systems’ Multi-Jet Modeling (MJM).
Continuous Liquid Interface Production (CLIP)
Another close industrial-level relative to SLA, CLIP printing, created in 2015 by Carbon (then Carbon3D), prints in a fraction of the time without sacrificing the high-resolution surface finish. In fact, the finish is so smooth that resulting prints appear to have no distinguishable layers of any kind. Professor Joseph DeSimone (Chancellor’s Eminent Professor of Chemistry at UNC), Professor Edward Samulski (Cary C. Boshamer Professor of Chemistry at UNC), and Dr. Alex Ermoshki (CTO and Co-founder) were key in its development.
During printing, CLIP projects light through a reservoir of UV-curable material, but it uses an oxygen-permeable window beneath it called “the dead zone,” which allows for continuous printing – not single layers at a time (see Figure 1.7). Materials range from rigid to flexible, including silicone, rubber, polyester, and engineering-grade parts.
According to Carbon, the CLIP printing technique was inspired by the film Terminator 2: Judgment Day (1991). “They wanted to have the 3D-printed part rise out of a pool of liquid resin, just like the robot T-1000 rises out of pool of liquid metal, to assume the form of any person or object.”1 It is only fitting that practical effects giant Legacy Effects used the first CLIP machine for Terminator Genisys (2015).
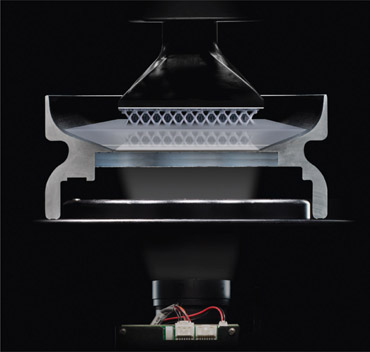
Figure 1.7
An object being printed using CLIP. Light from projector below passes through “the dead zone” to cure the resin above.
Photo courtesy of: Carbon
Speed is an impressive distinction for the breakthrough CLIP printing – “printing 25 to 100 times faster”2 than other types of printing. Jason Lopes, Lead Systems Engineer of 3D Print & Scan Technologies for Legacy Effects, conducted a shootout – printing identical objects simultaneously on both a Carbon M1 CLIP printer and an industrial SLA (DLP) competitor. The object took one hour and seventeen minutes to print on the CLIP machine and 28 hours on the SLA. “And the level of detail is incredible,” he adds. When the experiment was repeated with a second object the results were similar: one hour and eleven minutes for a perfect print on the CLIP and 38 hours on the other (with flaws).
Granular Materials Binding (GMB)
Granular Materials Binding (GMB) uses a binding material (like a glue, for example) or an energy source (such as a laser or hot air) to selectively fuse layers of loose powder into a solid object (see Figure 1.8). The powder naturally acts as a support for the print, which is ideal for objects with complex geometries.

Many different materials can be used as the powder base for GMB printers: among them are nylon, plaster, gypsum, ceramic, porcelain, resin, plastic, glass (although it turns out opaque), silica, sand, sugar, cement, concrete, and metals, such as aluminum, titanium, tungsten, stainless steel, cobalt-chrome, nickel alloys, iron, copper, silver, and gold. Composite materials are also available, such as alumide – a mix of powdered nylon and aluminum. Almost any material that can be made into a fine powder or a granular state can be used.
Interesting Fact!
Renewable resources can also be printed with GMB. Oakland, California-based research and design firm Emerging Objects (spearheaded by professors Ronald Rael and Virginia San Fratello of U.C. Berkeley and San Jose State University) has been a leader in the development of 3D printing with sustainable resources. Materials such as naturally occurring sea salt, tea, sawdust waste from lumber yards, recycled newspaper, pulverized concrete, fly ash (a waste material that results from burning coal), bone, sand, and clay have all been fodder for experimentation. These materials have been used to print bricks, architectural components, and furniture (see Figures 1.9a–b).

Figure 1.9a “Saltygloo” by Emerging Objects – an igloo-like dome made from 336 individual, translucent, 3D printed bricks using salt from the San Francisco Bay, woven together with lightweight aluminum rods.
Photo courtesy of: Emerging Objects, www.emergingobjects.com
Renewable materials can cost up to 90 percent less than most traditional GMB printing materials. For example, resins and plasters can cost up to $3,000 USD for 100 pounds, while locally harvested sea salt costs an incomparably low $16 USD for the same weight. The San Francisco Bay Area produces over 500,000 tons of naturally occurring sea salt each year.

Figure 1.9b
Saltygloo individually printed brick made from salt.
Photo courtesy of: Emerging Objects
The low cost and accessibility of these materials show promise for revolutionizing concepts like housing construction. In the future, 3D printing may enable abundant, low-cost housing structures for underdeveloped or impoverished areas – especially those with large stores of renewable resources. For example, Markus Kayser, a researcher at MIT, has developed a process he calls solar sintering. It uses the sand of the Sahara, a large fresnel lens with solar tracking, and the sun (instead of a laser) to 3D print structural objects directly from the land (see Figure 1.10). The focused sunlight reaches temperatures up to 2912°F (1600°C) to melt the sand into 3D printed objects.

Figure 1.10 Solar Sintering printer. Photographer: Amos Field Reid.
Photo courtesy of: Markus Kayser
Powder Binder 3D Printing
Powder Binder 3D Printing, sometimes called Binder Jetting, uses ink-jet style sprayers to selectively deposit a rapidly solidifying binder (glue-like material) onto a bed of powder. Each area that is sprayed with the binder forms into a solid. A new layer of loose powder is reset after each pass of the binder. This process repeats layer after layer until the object is formed.
After printing, excess powder still sticking to the print can be removed with pressurized air. The remaining loose powder in the print bed can be recycled for the next use. Initially the prints may be fragile, but with the addition of reinforced binders the resulting objects can be remarkably strong, lightweight, and even waterproof. Furthermore, dipping the finished object in cyanoacrylate resin (Super Glue) can also enhance the strength of the print.
Powder binder printers can also print in full color by incorporating standard 2D ink-jet color cartridges or dyed binders. Adding UV protectants to the finished print can also help to improve strength and reduce the risk of fading colors.
Selective Laser Sintering (SLS)
Selective Laser Sintering (SLS) is a technique developed and patented by Dr. Carl Deckard and Dr. Joseph Beaman at the University of Texas in 1987. Similar to the powder binder technique, it uses a high-powered laser – instead of a binder – to fuse each layer of powder into a solid (see Figure 1.11). Although made from granules, SLS produces surprisingly sturdy items. Once the layers are fused, they form a very strong bond. Even functional hand tools can be printed.
One SLS technique which uses fine metal and metal alloy powders is called Direct Metal Laser Sintering (DMLS). DMLS is popular among jewelry designers and can be a good choice for some costume accessories.
SLS is one of the most popular forms of GMB, so much so that the abbreviation SLS is sometimes used generically (and somewhat incorrectly) to represent the entire category of GMB.

Figure 1.11
Selective Laser Sintering (SLS) Process.
Image courtesy of: Mark Jaster, www.printspace3d.com
Selective Deposition Lamination (SDL)
In 2005, Mcor Technologies developed a method called Selective Deposition Lamination (SDL) which uses a computer-controlled tungsten carbide blade to cut out a three-dimensional object from a ream of standard office paper (see Figure 1.12). As each layer is cut, water-based adhesives are selectively deposited on the paper. Once the print is complete, the excess layers of paper can be pulled (or “weeded”) away from the printed object by hand or by using tweezers (see Figure 1.13).


Surprisingly for being made out of paper, SDL prints are extremely strong and durable – especially after applying thin layers of Super Glue to the object. Functional tools can even be printed – such as a 3D printed hammer capable of driving an actual nail into real wood (see Figure 1.14).
Full-color, photorealistic models can also be created – great for props! (see Figure 1.15). And if the SDL print is being used near water or in areas of high-moisture, waterproof sealant can be used to coat and seal the print.


Variations on 3D Printing
In addition to the main 3D printing techniques, many variations have also begun to surface that can be useful for entertainment design.
3D Printing Pens


Figure 1.17
Tiffany-style LED candleholders made with a 3D printing pen.3
Photo courtesy of: 3Doodler
3D printing pens, sometimes called manual 3D drawing tools, use FDM technology – pushing short sticks of filament through an internal extruder (see Figure 1.16). Instead of receiving instructions from a computer, the user simply “draws” with the printing pen as if using a standard pen or paint brush. Printing pens can be useful alone or for adding embellishments and decorations to existing props, set pieces, and costumes (see Figures 1.17–1.20).

Figure 1.18 Multi-media artwork using a 3D printing pen for texture enhancements, from the series Willow Dream by Barbara Taylor-Harris.
Photo courtesy of: Barbara Taylor-Harris
Furthermore, 3D printing pens can be used to repair 3D printed items. If an object warps or gaps form during the assembly of oversized objects, 3D printing pens can be used to fill in the gaps (see Figure 1.21).

Figure 1.19 Wearable sculpture created using a 3D printing pen.
Garment Credit: CRYSTAL MATRIX, Erica Gray, Australia.
Photo: © World of WearableArt Ltd

Figure 1.21
Close-up of gaps in 3D printed over-sized bust being filled by 3D printing pen.
Photo courtesy of: Michael J. Horejsi
Syringe-Style Extrusion

Syringe-style extrusion is essentially FDM printing except that the traditional extruder has been replaced with a pressurized syringe (see Figure 1.22) which allows for the extrusion of pliable materials – anything from soft foods to clay. Due to this innovation, novelty items such as 3D printed pasta, breakfast cereal, candies, and chocolates have grown in popularity. And many of these items can even be printed made-to-order such as gluten-free pasta or vegan-friendly gummies! (see Figure 1.23).
Other popular adaptations include customizable printed pancakes (see Figure 1.24), burritos, and frosted cakes, as well as inedible materials like air-dry and Plasticine modeling clay, ceramics, Play-Doh!, and even tattoo ink (which uses a tattoo gun in place of the extruder).
3D Printing Confections
In addition to syringe-style printing, edible products can also be printed with GMB technology. Ingredients such as sugar, salt, milk chocolate powder, and added flavorings can be used as a medium. This technique produces ornately architectural, edible shapes ranging from intricate cake toppers to customized sugar cubes for your coffee (see Figures 1.25–1.26).

Figure 1.23 3D printed gummy octopus using syringe-style extrusion.
Photo courtesy of: Katjes Magic Candy Factory

Figure 1.24
PancakeBot, invented by Miguel Valenzuela, creating a pancake in the shape of the Eiffel Tower. It uses a proprietary system to dispense the batter onto a hot griddle.
Photo courtesy of: StoreBound, LLC
Full-color products with CMYK mixing abilities can even be created, or ones with moving parts and multiple flavors can be added into every bite for a truly Willy Wonka-like experience (see Figure 1.27).


For food, the powder binder method with a water-based flavor binder (like sugar water) is used most often (instead of SLS). Although sintering sugar granules also works, the heat applied during this process caramelizes most sugars and may create an undesired color shift in the object.
These printing techniques are quickly changing the way professional bakers, pastry chefs, restaurateurs, mixologists, and event planners think about artful, sweet treats. And why not entertainment design? Edible, otherworldly props can help to complete a uniquely conceptual table setting.
Digital Textiles
Digital textiles, also referred to as Digital Knitting or 3D Cloth Printing, is an experimental field still in its infancy at this time of print. Several methods are being developed as well as various styles of printers.
Some of the techniques employed by these machines echo traditional knitting; companies such as Ministry Apparel and OpenKnit use traditional yarn materials to produce seamless garments – fabric woven in the round to produce one finished piece rather than several flat pieces which need to be sewn together (see Figures 1.28–1.29). Others print fabric-like plastic structures that look like delicate interwoven lace or chainmail (see Figures 1.30a–b).
Even desktop printers are getting in the game. In 2013 at the Printshow in New York, XYZ Workshop debuted the longest 3D printed dress created at that time using a desktop printer. The inBloom dress was 100% 3D printed on a desktop Ultimaker 3D printer and was “made of 191 panels, took 450 hours to print, and used 1.7 kg of 2.85 mm Fexible PLA, the equivalent to approximately $103.50 USD worth of filament”4 (see Figure 1.31).


Figure 1.30a 3D printed chainmail-like dress, designed by Janne Kyttanen.
Photo by: Adrian Woods & Gidi van Maarseveen
Photo courtesy of: Janne Kyttanen

Figure 1.30b
Close-up of 3D printed dress designed by Janne Kyttanen.
Photo courtesy of: Janne Kyttanen

Figure 1.31 inBloom 3D printed dress made with Flexible PLA.
Dress design: XYZ Workshop.
3D printed on Ultimaker 2 and Ultimaker Original.
Makeup and hair: Danielle Trilsbeek. Model: Awisa.
Photo courtesy of: Fanny van Poppel
Other companies are exploring the development of non-woven digitally designed textiles that move and flow like traditional cloth. For example, fashion brand Pringle of Scotland embellished ready-to-wear garments for its Autumn/Winter 2014 collection using laser-sintered nylon fabric developed by materials specialist Richard Beckett. The nylon accouterments were created with tiny moveable parts so that the garment moves and fits like traditional material.
In the future, 3D printed clothing is forecast to be a virtual file that can be downloaded and printed at home – which is exactly what fashion designer Danit Peleg did (see Figure 1.32), using a TPE-blend called FilaFlex by Recreus and a BQ Witbox home printer. This development may permanently alter the future of personal shopping and of costume design. “Just imagine the potential,” she says. “If you are cold, print your own jacket. Traveling with no luggage? Just print your clothes in the hotel room!”5

Figure 1.32
From Danit Peleg’s ready-to-wear collection made on a desktop 3D printer.
Photo courtesy of: Daria Ratiner. Model: May Zonshain
Wearable Technology
In addition to digital textiles, wearable technology is also being developed. Wearable technology is defined as 3D printed fabrics woven with integral 3D printed circuitry using conductive filament. This may put an end to carry-on technology such as cell phones. The goal is to create clothing that incorporates Wi-Fi, GPS, Bluetooth, and the like – making each individual his or her own personal hotspot. For entertainment design, this may be the future of illuminated costumes with integral remote control and interactive projections (see Figure 1.33).
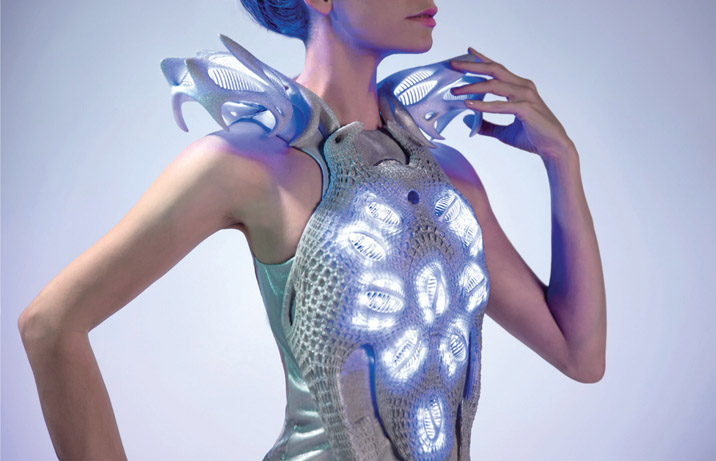
Figure 1.33
The Synapse Dress – a 3D printed wearable body response dress by Anouk Wipprecht.
Photo courtesy of: Martijn Cruyff