
Time to begin adding some details to the tentacles and give the model some personality.
Before moving ahead, let's take a look at another powerful tool for editing meshes called loop cut or loop subdivide, which will be used when bending the tentacles. Loop cut adds points in the middle of an edge and all around a portion of the geometry. These points can then be transformed. Loop cut only works with edge or Vertex Select mode and will automatically switch modes when being used.
For our project, we'll be using loop cuts to bend the tentacles. Follow these steps:
- While still in Edit mode, switch to Vertex Edit mode (Ctrl + Tab).
- Begin the loop cut operation by selecting Loop Subdivide under Mesh | Edges from the 3D View menu or pressing Ctrl + R.
- Move the mouse over the edge of one of the tentacles. Notice the preview line showing where the loop cut will be:

- When the loop cut is where desired, click the select mouse button or press Enter. At this point, the loop isn't set and can still be slid back and forth by moving the mouse.
- Try to keep this loop cut near the middle of the tentacle.
- When it is where desired, press Enter or the select mouse button again to finish the operation.
- After setting the loop cut, change the operator settings at the bottom of the Tool Box and change Number of Cuts to
2:
- Deselect all points (A).
- Select the points at the tip of the tentacle using either box (B) or circle (C) select.
- Rotate (R) the points around the
Zaxis (Z). - Move (G) them along the
XandYaxes (Shift + Z) to bend the tentacle a bit:
- Expand the selection (Ctrl + Numpad +).
- Again, rotate (R) the selection around the
Zaxis (Z) and move (G) it along theXandYaxes (Shift + Z) to bend the tentacle a bit more:
- Expand the selection again. Rotate (R) and move (G) the tentacle, being careful to constrain the movement as before:

- Adjust your view to check your tentacle. Make sure that from the front or side views, the twisty tentacle is still on the same level as the other tentacles and not twisted up and down. If it is twisted, then your movements weren't constrained properly:
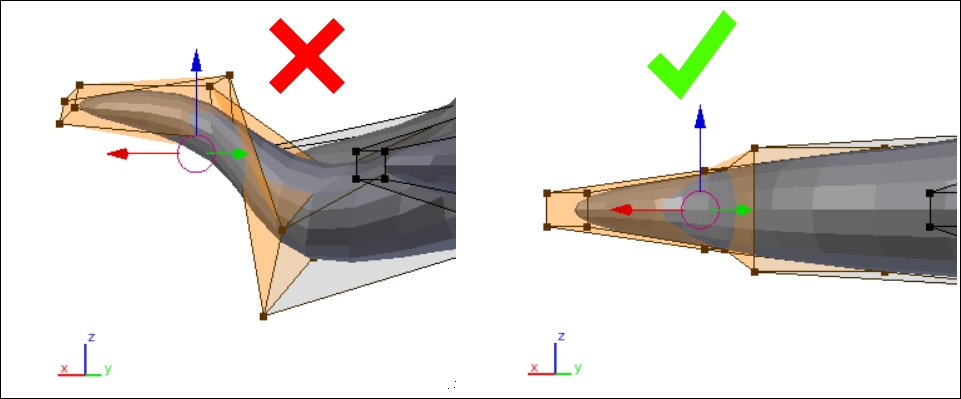
- If it is not correct, then undo (Ctrl + Z) your movements and try again.
- Another way to ensure that the movements are constrained properly is by performing all your transformations while in the top view (Numpad 7). The trick to this method is to select points in Wireframe view (
Z) to get all the points, not just the ones on top. - Move to the next tentacle and loop cut it. This time, while the loop location is being display, before clicking the mouse or pressing Enter the first time, try pressing the 2 key to quickly change the number of cuts to
2. This is a shortcut method that can optionally be used instead of changing the parameters after the cut:
Work around the body, cutting, selecting, moving, and rotating each tentacle. Give each one a different twist, being careful not to overlap them. If the tentacles overlap, the model won't print properly when exported.
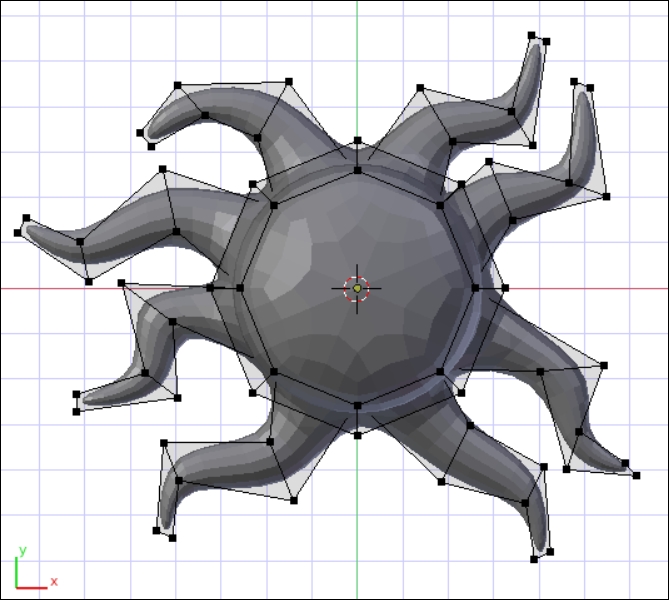
Your octopus doesn't need to look exactly like this. Make it your own. When all the tentacles have been given details, it should look much more like an octopus.
Tip
Some 3D printers won't be able to print this model if it's too big, so keep those tentacles tucked in and don't let them fly too far. The smaller 3D printers' build areas are about 150 mm or 6 inches squared. If the total area of your model is more than this, you'll need to think about the printer you're designing this for.