
Now it's time to mount an SD card holder on the ring. The first step is to make a virtual SD card in Blender.
When working on a project with multiple parts in Blender, it's possible to organize things by using layers. While the idea of layers may not make as much sense in 3D as in a 2D graphics editor, the idea is similar. Shapes in different layers may share the same space, and they can be looked at and edited separately and independently. Layers are found in the menu at the bottom of the 3D View, as shown here:

By default, the ring was created in the first layer, and there is a dot in the first layer to indicate that there is an object in it. To switch to an Empty layer, simply click on a square on the layer icons at the bottom of the 3D View or type a number from the top row of the keyboard.
The number keys across the top of the keyboard (unless you're emulating the number pad) from 1 to 0 will switch to the corresponding layer in the top row. Holding Alt while pressing a number key will correspond to the rows in the bottom, for a total of 20 layers:
Now the scene looks empty, but checking the outliner panel, you can see that the ring and Finger objects clearly aren't gone. To see them again, simply click on the first layer with the object icon, or press the number key 1 at the top of the keyboard.
Now that you know the things you've created aren't gone, go back to the second layer.
To create an SD card, perform the following steps:
- Add (Shift + A) a cube to the scene.

We will be employing a trick to keep the cube above the XY plane as we change its size. Instead of moving the cube object up, we'll enter Edit mode and move all the points of the cube up. By doing this, the origin of the cube remains where it is and resizing the object will resize it around that origin. This will make more sense when seen practiced.
- Enter Edit mode (Tab) and select all (A) points.
- Then, grab (G) and move them
1unit in theZaxis (Z + 1). Press Enter to end the grab operation:
- Now exit Edit mode (Tab).
The cube now sits nicely on the XY plane, but more than that, its origin hasn't moved. So now, the bottom face of the cube is resting on the XY plane. Experimentally scale (S) the cube and move the mouse. Notice that with the cube's origin where it is, the scale operation is only scaling the cube above the XY plane. Undo (
Ctrl+ Z) any experimental scaling before continuing. - Now, resize the cube to the size of a SD card. To do this, in the Properties panel (N), locate the Dimensions area and change the dimensions to
X:2.2,Y:24, andZ:32:
- In the Properties pane on the right-hand side, in the Object tab (orange cube), rename this cube to
SD Card. - Add (Shift + A) a new cube. Repeat the procedure of entering Edit mode (Tab) and moving (G) its vertices
1unit along theZaxis (Z), and then exit Edit mode (Tab). - Now, in the 3D View's Properties panel, change this cube's dimensions to
X:6.2,Y:28, andZ:12. - Rename this cube
SD Holder:
This makes the holder
2mm thicker than the SD card all around, short enough to easily remove the SD card, while tall enough to hold it securely. - Add a Boolean modifier to the SDHolder object and Difference SDCard from it. Hide (H) the
SD Cardobject and rotate the view to check the SD Holder object.
A hole all the way through was not the desired effect. The SD card might fall out! The Boolean operation has not been applied yet, so changes can still be made.
- Unhide (Alt + H) the
SDCardobject. Select it and move (G) it along theZaxis (Z)2units. Then, hide it again and check theSDHolderobject.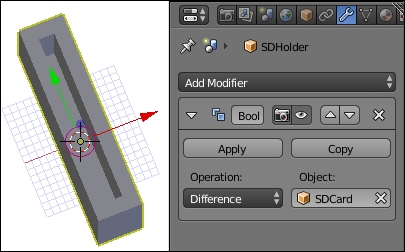
Much better!