Templates allow you to save settings in your model and quickly access them later. Styles in SketchUp affect how your model looks on the screen, and are included in templates. With styles, you can add shadows, different color backgrounds, and line weights. While the settings are useful for presenting architectural models, they don't really help while modeling for 3D printing. Even worse, they make SketchUp run slower because the computer has to work harder displaying those extra visuals.
Style settings can be found by navigating to Window | Styles. Play around with different styles to see how they change the look of the model. The 3D Printing template that we chose when starting SketchUp has good settings such as a plain background and shadows turned off, but let's tweak it to help with troubleshooting. In the Styles dialog box, choose Default Styles, then 3D Printing Style.
Click on the Edit tab in the Styles dialog box, then click on the Face Settings tab, then click on the box beside Back color as shown in the following screenshot:
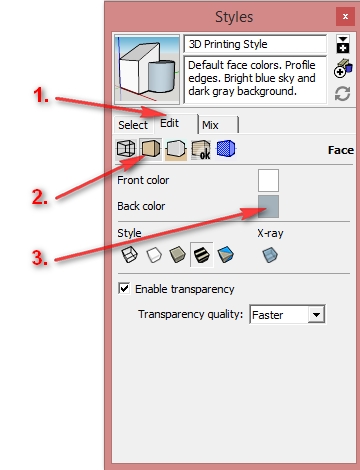
In the window that pops up, choose a nice bright color, say, orange. What this does is make it easy to differentiate front and back faces while modeling. This is important because all faces in SketchUp have a front side and a back side. The faces need to be oriented with the front faces pointing out, and all the back faces pointing inside, or the model will not print correctly.
Click on the Update Style with changes button at the top right of the Styles dialog box, and then close the Styles window.
The 3D printer build volume model included with the 3D printing templates in SketchUp 2014 gives you a visual representation of the 3D printer's build platform so that you can ensure that your model will fit in the printer properly. The build volume model is a dynamic component—a special model whose measurements you can define via the Component Options (or Component Attributes if you're using SketchUp Pro) dialog box.
This model will be especially useful if you have a desktop printer. If you're using a print service, you may wish to delete this component.
To set the size of the build volume to your printer, select the build volume component, then go to Window | Component Options. You'll see something like the following image.

The drop-down menu lists about 20 of the most popular desktop 3D printers. Choosing a printer from the list and clicking on Apply at the bottom automatically resizes the build volume component to the precise size for that printer. My printer, the Solidoodle 2, was not listed. This was not surprising to me, because there are so many desktop printers on the market. In my case, the Printrbot Jr. printer listed is very close in size so I simply used that one.
If your printer is not listed and the available sizes are not close enough, you can easily make a similar component by drawing a box of the size of your printer's build volume, and deleting all faces of the box except the bottom, leaving all edges intact. Make the geometry into a component and delete the original 3D printer build volume component when you're done.
You can use SketchUp in either imperial (feet and inches) or metric units. To change the model units, navigate to Window | Model Info | Units. You can also switch back and forth between units in the middle of a modeling session with no negative consequences. This is useful when you are modeling in inches, but the 3D printing specs, such as wall thickness, are in metric units. You can design in inches, and then switch to metric units to check measurements and add details.
Many desktop printers are setup to work with mm as default. For this reason, I recommend you use mm for now, and change back to inches later if necessary. Using metric units now will likely save you having to convert units later in your work. If you mostly work with imperial measurements, you may find it easier to go ahead and switch to inches at this point.
Now that you've gone through all the work of customizing this template, you'll want to save it so you don't have to perform the same steps every time. Before saving, delete all the geometry from the file except the 3D printer build volume component if you want it and perform the following step:
- Navigate to Model Info | Statistics, and click on Purge Unused. This clears out any unused styles, components, or other settings that increase the file size.
Later, as you develop a personalized workflow, you can modify this template to open with nearly any setting or geometry that you wish to begin modeling with. For example, if you model custom Arduino cases, you could start out with a base Arduino model already in your window so that you can start building on top of it right away.
Most of the time, your customized style is the best option, but some of the other styles will be useful as well. The Architectural Design Style has thicker lines with tick marks on each line end. This makes the lines easier to see in cases where you may need that option. The other styles are mostly for presentation, and may be useful if you're sharing images of your model with others.