The following screenshot shows the printed cradle in use:

After printing the model and testing how it works in practice, I noted the following changes that would improve the design:
- Increasing the height and width of the tabs on the jet's tail fins to keep the phone more stable while in the landscape mode
- Increasing the height of the base so that the charger cord doesn't bend sharply on the table
- Making the jet exhaust clouds more realistic
- Making the plane wings bigger so it's easier to tell what it is
Back to SketchUp we go! We'll make the changes and print an improved model. This process of refining the design through a series of iterations is discussed in Chapter 3, From 2D Drawing to 3D Model.
Going back in the historical timeline, copy one of the mirrored half groups to rework into the improved design. Use the Push/Pull tool and the Line tool to make the tabs that hold the phone in place taller and wider. Use the Push/Pull tool to pull the bottom face down by another 6 mm, raising the phone up so the charging cord doesn't kink.
For changing the wing shape, push the wing back flush with the plane body, and use the Bezier tool to create a new, larger wing profile. Erase the old curve, and use Push/Pull to set the new wing back out to 1.5 mm. The larger tabs and the new wing are shown in the following figure:

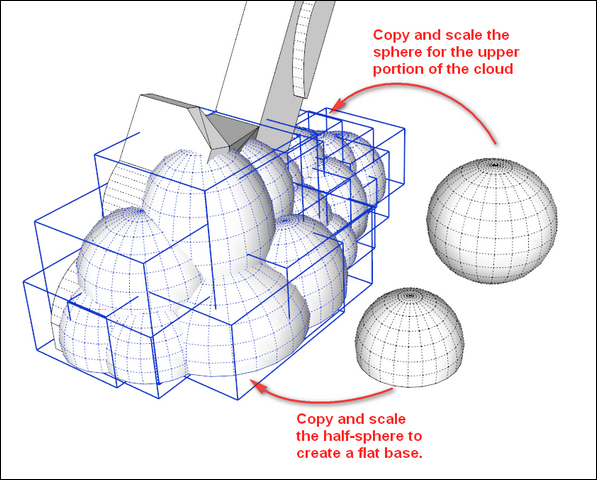
For creating more realistic puffy smoke clouds, simply create a sphere and a half-sphere and copy them around the base. You'll want to make sure both the sphere and half-sphere are grouped and solid before making copies of them The half-sphere will create a nice flat base, and the sphere will fill in the top. Use the Scale tool to stretch, resize, and deform the copies so that it looks more realistic. Try to keep the 45 degree rule in mind so that the spheres are self-supporting as shown in the following figure. In this figure, all of the spheres and half-spheres are selected so that you can see how many of them make up the new base:
Finally, make a copy of the groups that form your new base. To prevent holes in the model when creating tiny faces in the next step, scale the model up by 100 times using the Tape Measure technique described in Chapter 3, From 2D Drawing to 3D Model. Use the Outer Shell tool to combine everything into one solid group. I found Outer Shell to work best when used on only two to three groups at a time. Selecting everything and running the tool often results in a group that s not solid.
Once you have a solid group, make a copy for the historical timeline. Mirror the group, align the 3D text, and combine everything with Outer Shell. Cut a slot using the same methods we used in the first iteration of the model. Once that is complete, you should have a model that looks like the following figure:

Export the part, and you're ready to print the updated version!
The new part worked much better, comfortably holding the phone and even a small tablet. The increased height prevents the charging cord from kinking, and the larger base looks much better, as shown in the next images. Printing with a red filament enhances the appearance as well!

In the following figure, we see that the same stand can be used for a larger device:

The following figure shows the difference between the two printed designs:
