It takes a special machine to 3D print in full color, and at this point there are only commercial printers to do the job. This means that unless you're part of a large organization, you'll likely use a print service for printing in color, providing them your model in a format they can use.
Let's discuss how SketchUp processes color data.
You can color SketchUp models in two different ways—with textures or with plain colors (or a mixture of both). Textures are image files such as .jpg, .png, or .tif. The satellite imagery from the terrain we imported in the previous example is a .jpg texture.
Colors are simply solid colors based on RGB values or color names that cover an entire face. Colors are easier to apply than textures in SketchUp, but need more model detail to provide a similar appearance.
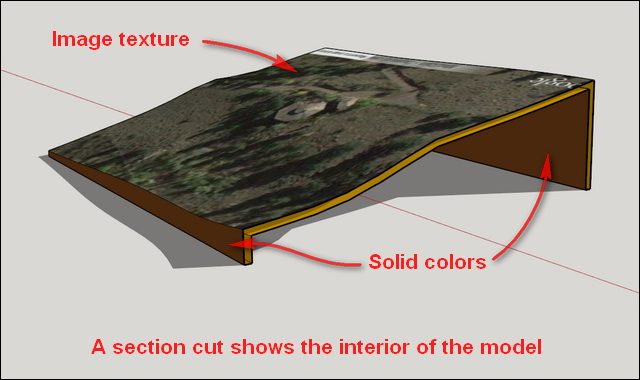
In the following screenshot, a satellite image texture is applied to the top face, while the bottom and side faces have a solid color applied:
The typical file formats used when 3D printing a color model from SketchUp are .dae and .wrl. SketchUp Pro exports both of these formats. SketchUp Make can only export .dae.
In models using image textures, SketchUp exports the image files separately from the 3D model file. Both image and 3D model files are placed in a ZIP folder to upload to a print service. In models with only colors applied in SketchUp, the 3D model file is all that is required as the color data is stored in the 3D model file.
Be sure to check the print service of your choice before preparing your model, as the file requirements may vary wildly. Some services, such as i.materialise (http://i.materialise.com/) and Sculpteo (http://www.sculpteo.com/) take SketchUp files directly, which may save you a significant amount of work when preparing the model. Other print services require a ZIP file containing a specific 3D format, such as .wrl, and specific image type, such as .png. Converting files can be a time-consuming process.
Note
If you need to convert your files to a format SketchUp does not support, check out the free program, Meshlab (http://meshlab.sourceforge.net). With its many import and export options, you will find that it can likely provide a solution for you.
To 3D print models with solid colors, be sure all faces have a color applied—do not leave any faces with the default material. Likewise, check to make sure that there are no colors applied to the back of the faces, as this may cause unwanted conflict with the printer. To remove color from a back face, simply paint the back face with the default material.
View the model in monochrome (View | Face Style | Monochrome), which turns the colors off and allows you to ensure that all faces are oriented correctly. If any faces are reversed, right-click on that face and click on Reverse Faces to correct the problem. For more about face orientation, refer to Chapter 2, Setting Up SketchUp for 3D Printing.
That's pretty much it. Now simply export the model in a format compatible with the printer, and you're ready to roll.
The basic rules for working with solid colors apply to textured SketchUp models as well; avoid conflict with front and back face materials, and use Monochrome to check for correct face orientation.
Sometimes you may need to scale and rotate textures for precise placement. In this case, you use the texturing tools by right-clicking on the screen and navigating to Texture | Position, which will only work when clicking on a face with an image texture applied.
If your print provider doesn't take SketchUp files directly for printing, the final step is to export the model. In my experience, the file type that seems to work best with most service providers is .dae.
Using the Tape Measure tool, make sure the model is at the correct scale. Delete your historical timeline and everything else in the SketchUp file except for the model to be printed.
You may want to create a folder specifically for this export so that the 3D model and corresponding image file can be found easily. Finally, to export the model, go to File | Export | 3D Model..., and then click on COLLADA file (*.dae) from the drop-down menu at the bottom of the screen.
When uploading to your print provider, make a ZIP file containing the DAE and JPG files as shown in the following screenshot. Upload the ZIP file to your print provider, and you'll be holding a color print shortly.
