The security structure in 802.11, including WEP and WEP-based authentication, is not designed to scale to handle large, public networks. The shared key design in WEP requires the network administrator to trust many users with the same authentication credentials for the same set of access points. A standard 802.11 installation also allows anyone within reach to have full access to the layer 2 environments on either side of the access point, regardless of the presence of a portal at the network gateway.
802.1x, a ratified IEEE standard, solves some but not all of these problems. 802.1x is a port based, extensible authentication protocol. “Port based,” in this sense, means a physical port. 802.1x was designed to solve security problems on a campus network. On a typical university campus, there are thousands of Ethernet jacks waiting for someone to plug in and use them. 802.1x was designed to prevent an attacker from walking up to a jack, plugging in, and begin using the network. The protocol is designed to limit the use of the port until the client machine is authenticated.
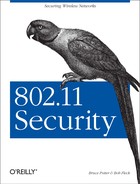
There are three players in the 802.1x protocol. The supplicant is the client machine attempting to gain access to the network. The authenticator is the layer 2 device that is providing the port (such as an Ethernet switch or an 802.11b access point). The authentication server is the device that actually verifies the authentication data provided by the supplicant.The relationship of these players is illustrated in Figure 14-1.

The actual authentication protocol used by entities in an 802.1x transaction is called the Extensible Authentication Protocol (EAP). EAP was originally designed as an authentication mechanism for PPP-based connections. However, when the designers of 802.1x were looking for an authentication mechanism, they discovered EAP generally fit their criteria and used it as part of the standard.
EAP is effectively a challenge-response authentication protocol that can be extended to run over any transport mechanism and use any crypto system to handle verification. In the case of wireless networks, the transport is provided by the EAP over LAN protocol (EAPOL). As far as the authentication service, there are many options that can be used, including Remote Authentication Dial In User Service (RADIUS) via Lightweight EAP (LEAP) or Transport Layer Security (TLS) via EAP-TLS. By allowing for different authentication mechanisms, EAP is a future-proof protocol. If, for instance, a weakness is discovered in TLS, then a new authentication mechanism can be fit into EAP without having to abandon the entire protocol. In particular, as long as the authenticator is 802.1x compliant, it should never have to be upgraded when the underlying cryptography changes.
When an unauthenticated supplicant connects to an 802.1x-controlled port, the authenticator has the port in a restricted traffic mode. The only traffic allowed across the port is traffic to and from the authentication server. The device is not even allowed to talk to other devices on the same layer 2 network. The supplicant starts the authentication process by sending an EAP-Start message. The authenticator (which, since we are talking about wireless networks, will henceforth be called an access point) sends an EAP request to the supplicant. The supplicant replies with the requested authentication credentials. The access point then forwards the credentials on to the authentication server.
The authentication server attempts to verify the credentials of the supplicant. The authentication may request more information from the supplicant, in which case the EAP-request/response cycle happens again. Once the authentication server is satisfied with the supplicant’s credentials, it will send an accept or reject message to the access point. The access point will then either allow traffic from the supplicant or reject the supplicant based on the answer from the authentication server. This process is shown in Figure 14-2.
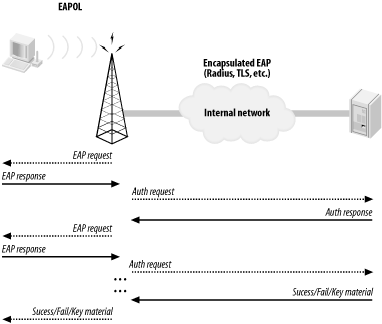
What makes 802.1x so powerful in a wireless network is the fact that data can be shipped from the authentication server to the supplicant along with the accept message. For wireless networks, WEP keys can be sent to the supplicant upon successful authentication. 802.1x also allows for periodic reauthentication of the client machine. Every time the supplicant is forced to reverify itself, the authentication server can send it new WEP keys. This allows for a rapid rotation of WEP keys. Therefore, even if an attacker is attempting to crack the currently used WEP key, there is a very limited amount of traffic that is encrypted using that key.
Through the entire discussion of 802.1x you just read through, there was no mention of a new data integrity protocol. 802.1x is strictly an authentication protocol: nothing more, nothing less. It allows wireless users to work around weaknesses in WEP by providing a scalable mechanism to rotate quickly through WEP keys. However, it does not actually fix WEP, it is only a workaround that can reduce the risk of using a WEP-based network.
A paper released by Bill Arbaugh et al. from the University of Maryland (available at http://www.missl.cs.umd.edu/wireless/1x.pdf) provides great detail on several security holes present in 802.1x when used in wireless networks. Neither 802.1x nor EAP were designed for use in wireless networks. The protocols were not designed to address the particular threat model wireless networks present. Due to this, various vulnerabilities in 802.1x arise when used in a wireless environment. An attacker can perform any number of attacks on an 802.1x-authenticated client including man-in-the-middle and session hijacking.
802.1x was designed to protect the network infrastructure from attack, not the client machines. A rogue access point or malicious user within radio range of a client can undo much of the security offered by 802.1x.
802.1x is not a silver bullet to solve all wireless security threats. However, it is a great way to raise the bar for potential attackers, especially ones targeting the network infrastructure.
At the time of writing, support for 802.1x is still not widespread. The first widely deployed supplicants and authentication servers were from Microsoft. Windows XP was released with 802.1x supplicant support in its wireless subsystem. By default, it can perform EAP-TLS authentication. Microsoft has since released supplicant drivers for Windows 2000 and Windows 98SE. Microsoft also provided the first widely available authentication server. The Windows 2000 Internet Authentication Service contains a RADIUS server and certificate authority that supports 802.1x. For information on these drivers and how they can be configured, see Microsoft’s web site at http://www.microsoft.com/.
Several vendors have firmware-based access points with 802.1x support, including Cisco, Enterasys, and Orinoco Wireless. See http://www.enterasys.com/, http://www.cisco.com/, andhttp://www.orinocowireless.com/ for more information on the 802.1x-capable products from these vendors.
Thankfully, there are also some open source 802.1x implementations starting to arrive. Researchers at the University of Maryland have written an 802.1x supplicant and authenticator for use with several operating systems including Linux. The supplicant and authenticator can be downloaded from http://open1x.sourceforge.net/.
Even though there are many different methods of possible authentication using EAP, there are very few available implementations. Currently, the best implementation is from the FreeRADIUS project, which has EAP-TLS built into their RADIUS server. In the future, there may be more options. Check out this book’s web site for new developments.
Tip
The machine running the authentication server does not need to be a very high-powered machine due to the relatively few requests the machine needs to service. For the sake of simplicity, the authentication server could be your firewall. For larger networks, it is recommended that it be a stand-alone machine. Ideally, you will have two hosts for redundancy. Remember, if you are requiring 802.1x of your clients and your authentication server goes down, no one can join the network.
In order to use EAP-TLS with FreeRADIUS, you will need to download
and install OpenSSL from http://www.openssl.org/. Perform a standard
install per the documentation with the distribution. You will need at
least Version 0.9.7 for FreeRADIUS to work properly. Be sure to
modify your openssl.conf to reflect your
organization and contact information.
OpenSSL supplies the crypto libraries used by the RADIUS server. It also will serve as a Certificate Authority for your wireless network. You will need to create a self-signed certificate to act as the root certificate for your PKI infrastructure. Then you will need to generate a certificate for the RADIUS server as well as certificates for supplicants. The easiest way to do this is running the script located at http://www.missl.cs.umd.edu/wireless/eaptls/doc/CA.all. This script will take care of all your initial certificate generation needs as well as serve as a template for future client certificates.
Warning
The downside of running a EAP-TLS based infrastructure is the fact that you have to run your own certificate authority. For an organization of any size, this is not an issue to be undertaken lightly. There are many issues, technical and otherwise, involved in running a CA. These issues are well outside the scope of this book. If you would like more information on OpenSSL and running a CA, we recommend Network Security with OpenSSL by John Viega, et al (O’Reilly).
Once you have OpenSSL installed and configured, download and install
the FreeRADIUS server from http://www.freeradius.org/. Before you
compile the RADIUS server, you will need to modify
/usr/src/modules/rlm_eap/types/rlm_eap_tls/Makefile
with your OpenSSL location. Be sure TARGET = rlm_eap_tls is specified in the makefile.
Compile and install the RADIUS server per the instructions in the
README file. Once the installation is complete, you will need to
modify /etc/raddb/radius.conf to enable EAP-TLS
and specify the location of your certificates. Read through the file
and edit where necessary. Also, when creating users in the RADIUS
server, be sure they have an Auth-Type of EAP. At
this point, you should be able to start the RADIUS server and have a
fully functional 802.1x authentication server.
RADIUS is a complicated but robust protocol. It is a flexible platform for triple-A services. A complete discussion of the features and implementation of various RADIUS servers is outside the scope of this book. For an analysis of RADIUS as well as practical examples, we recommend RADIUS by Jonathan Hassell (O’Reilly).
At the time of this writing, the Open1x authenticator is still very beta. Download and install the authenticator per the instructions on the Open1x web site. The authenticator must be running on your wireless access point. The access point should be configured per the instructions provided in Chapter 9.
Once the authenticator is installed, it is started with the
auth command. auth takes
the following arguments:
-
por--serverip <IP> This is the IP address of the authentication server.
-
sor--serverdevice <device> This is the interface that traffic destined for the authentication server will traverse. This is typically the wired interface, such as
eth0.-
tor--suppdevice <device> This parameter specified the interface that the authenticator will receive supplicant traffic on. This is typically the wireless interface, such as
wlan0.-
oor--serverport <port> This is the port the authentication server is listening on. For RADIUS, this would be 1812.
Be sure to launch the authenticator in the startup location of your choice.
Once you download the supplicant, compile and install it per the instructions included in the README file. Included in the supplicant distribution are startup scripts for various operating systems including FreeBSD and Linux. Make sure they are installed in the correct location to ensure the supplicant starts at boot time.
There are two major configuration activities. First, you must obtain an x.509 certificate for use with your authentication server. This is a requirement since the only EAP method the supplicant understands is EAP-TLS. The certificate must be in ANS1 DER format and the private key must be in PEM format. You must obtain this certificate from a Certificate Authority trusted by your authentication server.
The configuration file for the supplicant is stored in
/etc/1x/1x.conf by default. The file has the
following structure:
<network id1>:id = <username>
<network id1>:cert = <user certificate file>
<network id1>:key = <user private key file>
<network id1>:root = <trusted root store>
<network id1>:auth = EAP | none
The <network id> field is your ESSID. This
group of parameters can be repeated for multiple ESSIDs so you can
roam from one 802.1x-based network to another.
The fields in the configuration file are as follows:
-
id This is the user ID specified in the certificate, which is typically your email address.
-
cert This it the absolute path to your certificate stored in DER format.
-
key This is the absolute path to your private key stored in PEM format.
-
root This is the absolute path to a PEM encoded file containing your trusted root certificates.
-
auth This can be set to either
EAPornone. A setting ofEAPmeans that the supplicant will attempt to authenticate to the specified network. A setting ofnonewill cause the supplicant to treat the network as a non-802.1x network and not attempt EAP authentication.
Now that you have your supplicant configured, you can associate to your network and authenticate via 802.1x through your access point to your FreeRADIUS authentication server.