
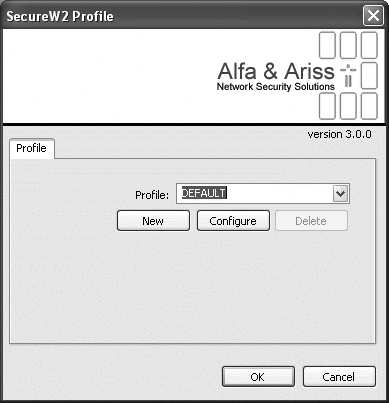
Chapter 17. Using 802.11 on Windows
Whether you’ve made it to this point by skipping Chapter 3-16, or whether you’ve read all the theory, we’re now going to get our hands dirty and start installing equipment.
Development of 802.11 management interfaces has followed the familiar progression of Windows applications. In the beginning, there was a great deal of variation between individual vendors. As popularity grew, Microsoft integrated 802.11 configuration into the operating system, subsuming vendor-specific management tools into an overall framework.
From the standpoint of practical system and network administration, working with 802.11 is similar to working with Ethernet. Installing 802.11 drivers is nearly identical to installing Ethernet drivers, and the network interfaces behave almost exactly like Ethernet interfaces. 802.11 interfaces cause an ARP cache to be brought into existence, and other software may even perceive the wireless interface as an Ethernet interface. Unlike many Ethernet drivers, however, 802.11 drivers can have a number of advanced knobs and features that reflect the additional management features presented in Chapter 8.
This chapter discusses Windows configuration of wireless cards on both Windows XP and Windows 2000. I strongly advise using Windows XP for wireless-enabled machines because it is generally easier to use and has substantial additional support for new protocols. Third-party supplicants generally disable the built-in supplicant. Occasionally, however, a driver will refuse to work with a security system other than Microsoft security stack.
Windows XP
Windows XP continues the long-time Windows practice of incorporating functionality that was previously only supplied by third parties into the operating system itself. Rather than relying on each 802.11 card manufacturer to supply a configuration utility, Microsoft has built a standard configuration utility, called Windows Zero Configuration (also called ZeroConfig, ZeroConf, or WZC), which works with most cards. Card manufacturers must still provide driver software, but the configuration can be handled through Windows screens rather than card-specific programs. This section discusses ZeroConfig because it presents a card-independent view of configuration, which makes it popular with network administrators and help desks.
Card Installation
Before starting the process, it generally pays to get the latest drivers for your card from the manufacturer’s web site. Other network technologies are far more mature than 802.11, and do not require frequent driver updates. Unfortunately, rapid innovation in wireless is accompanied by rapid driver changes.
For major vendors, this is usually found in a “support” or “downloads” section. Many smaller vendors are rebadging reference designs, and may not have drivers available. In such cases, it is often possible to use the reference driver from the chipset vendor.
Many drivers ship with an installer, which I generally prefer not to run. Several cards have licensed third-party 802.1X stacks, which can interfere with the operation of ZeroConf. It is usually best to obtain the latest drivers from the card vendor’s web site before installing the card.
Third-party 802.1X stacks and the driver update process
Several third-party 802.1X stacks exist. On Windows, they are generally implemented as a shim in the network stack that intercepts EAPOL frames between the hardware and the network protocol. Many card vendors, frustrated with the progress of the built-in Microsoft supplicant, have turned to third-party stacks to enable 802.1X. Many third-party stacks are incompatible with ZeroConfig. Rather than use the ZeroConfig screens to set parameters, third-party stacks often require an additional software configuration tool. They may also require additional supplicant software to support advanced protocols.
To avoid using the bundled 802.1X stack, update the driver without running the installer from the vendor. The best practice is to get the driver from the vendor web site, unzip it, and then use the update driver panel of the device manager to roll the new version of the driver into your operating system configuration. Figure 17-1 illustrates how to upgrade only the driver. By going to the Driver tab of the hardware properties, you can access the Update Driver button.

Two tricks may be used to avoid installing the third-party 802.1X stacks. Many executable driver installation files are self-extracting ZIP packages, and can be opened by an unzip program. Extract the drivers to a temporary location, and update from a file. An alternative is to run the software installer, and immediately run the uninstaller. Most uninstallers will remove configuration tools and third-party shims while leaving the new driver in place.
Cisco client software
Cisco cards have one additional pitfall. Protected EAP (PEAP) is still a developing standard. Although written by representatives from both Cisco and Microsoft, the two companies’ implementations are not compatible. Most of the industry has shipped PEAP implementations that will autodetect which version is in use.[72] Even Cisco’s authentication server, CiscoSecure ACS, has a configuration option to be compatible with the Microsoft PEAP implementation.
Microsoft’s PEAP implementation supports the use of EAP-MS-CHAP-V2 and EAP-TLS as inner authentication protocols; Cisco’s PEAP implementation supports EAP-SIM and EAP-GTC. Most Windows shops will be seeking to use an existing user database, such as an Active Directory, which is possible only with EAP-MS-CHAP-V2.
As part of the bundled software set, Cisco ships replacement (Cisco) PEAP software that overwrites the standard (Microsoft) PEAP implementation on the system. To use Microsoft PEAP, you must remove the Cisco PEAP drivers and replace them with Microsoft PEAP. There is only one set of PEAP software for the entire system, so installing Cisco PEAP will affect all cards on the system, not just Cisco cards. See Table 17-1.
EAP method | Cisco or Microsoft PEAP? | Authentication credentials | Notes |
EAP-MS-CHAP-V2 | Microsoft | Shared password (or MD4 hash of the password) | Used with Windows domain authentication; easy to plug in to Active Directory |
EAP-TLS | Microsoft | User certificate | Generally not used |
EAP-SIM | Cisco | Subscriber Identity Module (SIM) card | Based on GSM mobile telephone authentication; not yet widely used |
EAP-GTC (Generic Token Card) | Cisco | Cleartext authentication string passed through encrypted tunnels | Can be used for token cards as well as a generic method for static passwords |
Many laptop vendors offer 802.11 cards preinstalled into the system, with software preloaded and configured. When the card in question is a Cisco card, chances are that the laptop vendor has installed Cisco PEAP and your organization will need to adjust its system build process to restore Microsoft PEAP. To restore Microsoft PEAP, you must reinstall the latest service pack to overwrite the Cisco PEAP drivers with the Microsoft PEAP drivers.
Choosing a Network
When Windows starts up, the ZeroConfig system will attempt to find any networks in the area. ZeroConfig may automatically connect to networks which it already has a configuration for. If no networks have yet been configured, the wireless interface will produce the bubble shown in Figure 17-2.

By clicking on the box, or by right clicking on the wireless interface and choosing “View Available Wireless Networks”, you can get to the list of detected networks (Figure 17-3). By choosing to Connect to any one of them, Windows will attempt to automatically configure the appropriate settings. However, it has no way of selecting the appropriate EAP method, and therefore is often unable to automatically configure encrypted networks. Attaching to an unencrypted network is easy, but you will be prompted to confirm connecting to a network that provides no security.

Configuring Security Parameters and 802.1X
In many cases, it is necessary to manually configure the security properties of a network. Windows can automatically default settings for encryption and authentication type, but may still be wrong. 802.1X settings are always defaulted to using EAP-TLS, even though EAP-TLS is not commonly used. To change security parameters, go to “Change Advanced Setttings” to get the interface properties, and hit the Wireless Networks tab (Figure 17-4).
To add a network, you can select it from the Preferred Networks pane and choose Properties, or you may add it manually by specifying a network name, as in Figure 17-5. If you are manually adding a network, you must configure the correct properties from scratch. If Windows has automatically configured the network, it will pick the strongest protocols available.
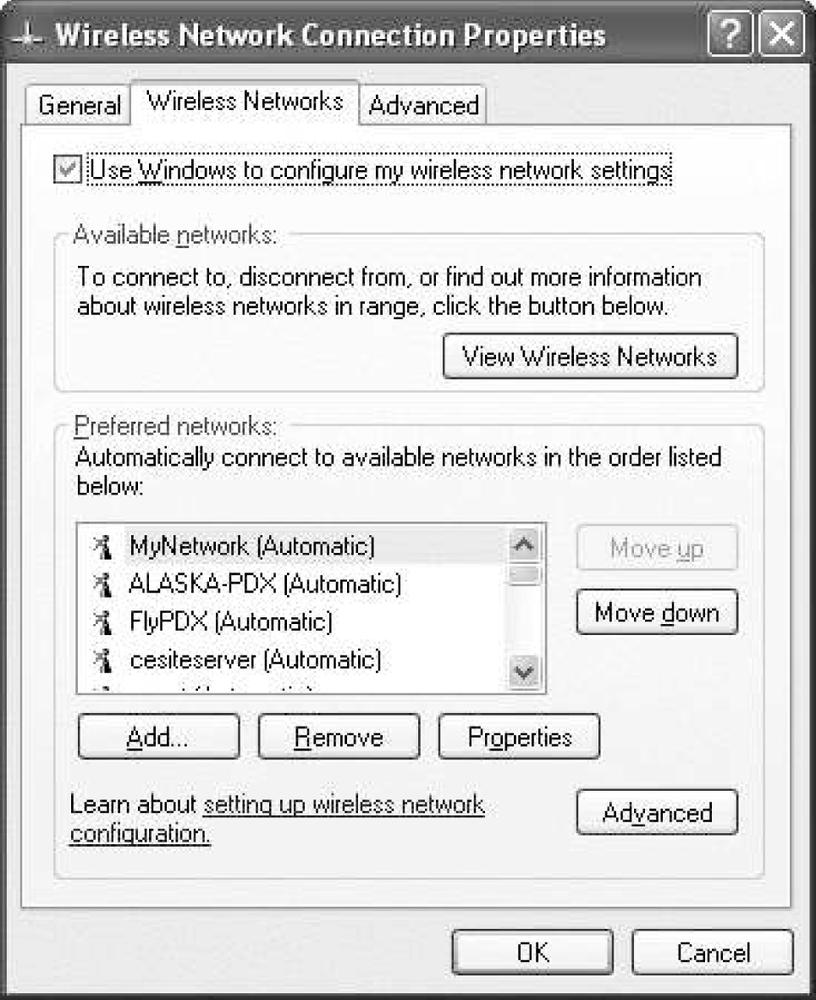
One of the positive attributes of ZeroConf is that it can maintain properties for several different wireless LANs, and connect to networks for which you have defined settings appropriately.
The first major choice to make is the type of network authentication you will use. In the figure, I show WPA. However, there are four options:
- Open authentication.
This is used for networks that perform no authentication, as well as networks that are using legacy dynamic WEP solutions. Selecting it means that the initial link layer authentication takes place using the open authentication method described in Chapter 8. Any network implementing open authentication may require 802.1X on top of it, though it does not have to.
- Shared authentication.
This option is used for networks that do shared-key WEP authentication. It will require you to enter a key in the “Network Key” fields. Shared-key WEP authentication is not very strong, and does not offer serious protection. The only reason to use this option is to connect to a network of APs that requires it.
- WPA authentication.
This is short for WPA Enterprise. It uses 802.1X for user authentication, and uses the authenticated keying mode defined in 802.11i. This option is only available if WPA software is installed and the driver has support for WPA.
- WPA-PSK authentication.
This is short for WPA Personal. Rather than derive the master secret, this method uses a preshared master key. Link encryption keys are derived from the preshared key and random values exchanged by both the client and the AP.
After choosing the authentication type, you will need to select the encryption used on the link.
- Disabled.
This is used on open networks that do not apply link layer encryption. Many 802.11 hot spots currently fall into this category, although most should offer stronger encryption in the future.
- WEP.
This includes WEP using both manual and dynamic keys. To use dynamic WEP, check the box that says “The key is provided to me automatically”. Manual WEP keys can be configured by unchecking the box and entering the key.
- TKIP.
This option is used for TKIP, which is the default value for WPA networks.
- AES.
Windows does not refer to CCMP, but instead labels it AES in the ZeroConf configuration.[73] This is believed to be the strongest encryption available for use on wireless networks.

The dialog box offers the option to enter a key, or use automatically provided keys. If 802.1X is in use, the key will be provided automatically and the checkbox will be cleared. Networks that use WPA authentication must use automatic keys; networks built on WPA-PSK must have the preshared key entered for them. Table 17-2 summarizes the encryption and authentication options that are supported.
Authentication framework | Supported encryption | Authentication methods |
Open | Disabled (no WEP) WEP (key specified) WEP (automatic key) | 802.1X optional |
WPA | WEP (automatic key) TKIP AES (supported cards only) | 802.1X required |
WPA-PSK | WEP (automatic key) TKIP AES (supported cards only) | 802.1X not used |
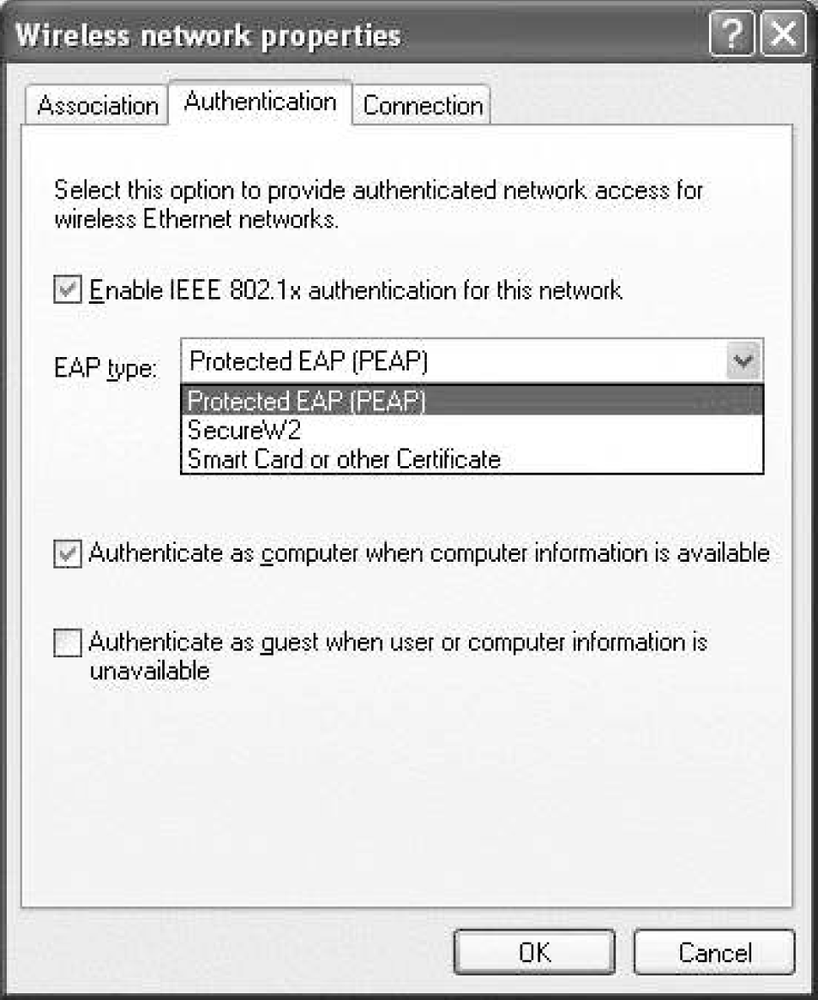
After configuring the association properties, configure the authentication properties. The association properties tab, shown in Figure 17-6, is the screen on which the EAP method is selected. The figure shows a machine which has three options: PEAP, EAP-TLS (“Smart card or other Certificate”), and TTLS (“SecureW2”). Clicking on the properties button will configure the selected EAP method.
After the EAP method, there is a checkbox to “Authenticate as computer when computer information is available”. Checking this box allows a system to authenticate to the network using machine credentials, which allows Windows domain housekeeping to occur before user authentication. Operation of this process is discussed in a later section of this chapter.
Configuring EAP Methods
On the authentication tab, you select an EAP method, but configuration is handled by clicking on the Properties button. Not all the methods displayed in the authentication properties tab are supplied by Microsoft. Third-party software can add EAP types to the drop-down list. Text in the EAP method box is one of the ways that you can determine whether Microsoft or Cisco PEAP is in use. Microsoft PEAP, which is technically PEAP version 0, displays as “Protected EAP (PEAP)”, while Cisco PEAP displays simply as “PEAP”.
EAP-TLS
Figure 17-7 shows the configuration screen that is displayed when EAP-TLS is selected. The top box specifies whether the client certificate used to authenticate the user is stored on a smart card, or in the certificate stores that Windows maintains. Large organizations issue smart cards to employees, sometimes embedded in employee identification card. Most midsized and smaller companies will opt instead to issue certificates stored on each machine.
Server validation is a key to building a secure network. The Microsoft supplicant allows two different levels of authentication. When the authentication server presents a certificate to the client, the client can validate that against the list of trusted certification authorities. If a self-signed certificate is in use, you must uncheck the validation box. The supplicant will trust any certificate it received, which opens a huge potential route of attack because the supplicant will trust any AP with any certificate. As an optional additional safeguard, the name listed in the server certificate can be validated to ensure that it comes from a known DNS domain.

PEAP version 0
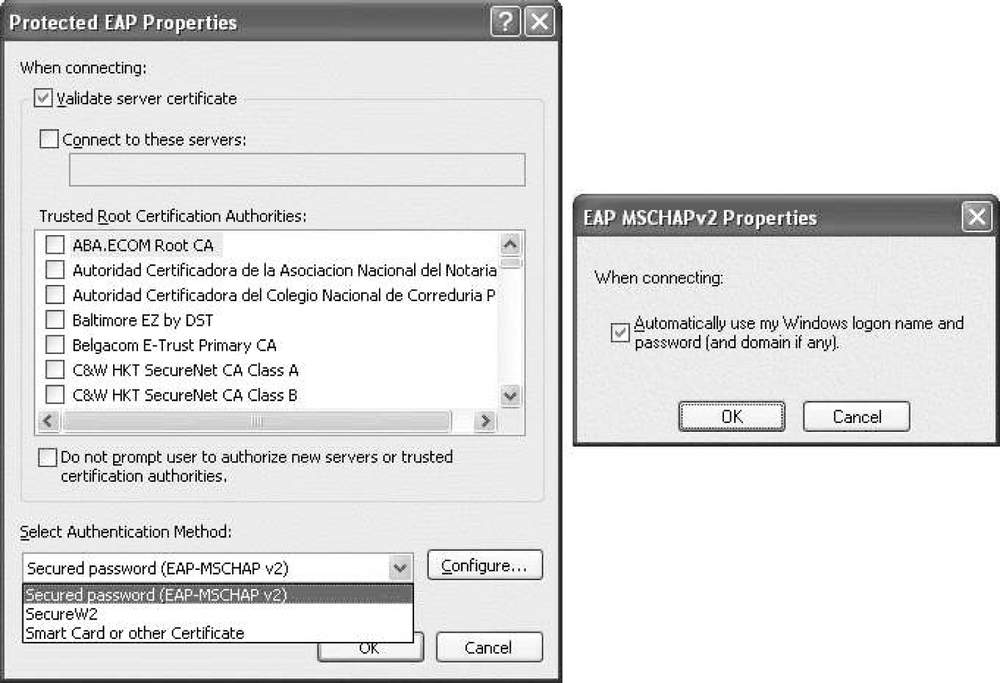
Microsoft PEAP configuration, shown in Figure 17-8, is similar to EAP-TLS. Server validation is identical, and should be enabled. The major configuration is the inner authentication method to be used inside the protected tunnel; see Table 17-1 for a brief discussion of the various options.
Microsoft’s implementation allows the list to contain any EAP authentication plug-in. By default, the list contains EAP-TLS and EAP-MSCHAP-V2. The latter is more common because it enables easy integration with Active Directory or NT Domain user accounts. Each inner authentication method can have its own subconfiguration. With EAP-MSCHAP-V2, the inner method configuration has only one option. When the box is checked, the Windows logon credentials are automatically submitted to the network. The checkbox is sometimes called the PEAP single sign-on because the supplicant automatically submits logon credentials without prompting the end user.
Clearing credentials from the registry
When single sign-on is not enabled, user passwords will be saved to the registry. When a user connects to a particular network name for the first time, the system will prompt the user for a username, password, and Windows domain. If authentication is successful, the credentials are saved to the Registry for future use. Whenever the user chooses to connect to the same network in the future, Windows will automatically submit the previously successful credentials.
As a user-friendly feature, credential caching leaves something to be desired, in large part because there is not a convenient way to clear out user credentials that are no longer useful. Many wireless networks plug in to existing authentication sources, and most large-scale networks enforce regular password change policies. When an enforced password change invalidates the cached credentials in the Registry, the user must clear out the registry to change the password.
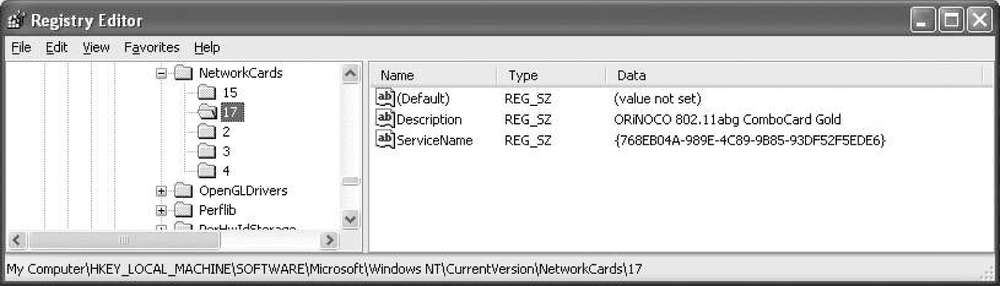
User credentials are stored in the Registry under HKCUSoftwareMicrosoftEAPOLUserEapInfo, as shown in Figure 17-9. Each network interface configured to do PEAP authentication without single-sign on will be represented by a long identifier consisting of a big string of letters and numbers.

Each network card is given an identifier. In Figure 17-9, the interface with the
identifier {768EB04A-989E-4C89-9B85-93DF52F5EDE6} has
three cached network passwords. To remove the cached password for
the network, delete its corresponding registry key.
To find out which network interface the string corresponds to, go to HKLMSoftwareMicrosoftWindowsNTCurrentVersionNetworkCards and check out keys below that value. Figure 17-10 shows the mapping of the registry string to an “ORiNOCO 802.11abg ComboCard Gold.”
Storing the user password in the registry decreases the usability of the Windows supplicant with a user-entered password. Microsoft representatives have defended password caching as a user convenience feature that prevents the need to repeatedly re-enter the password, and pointed out the benefit of using an existing Active Directory user account with automatic use of Windows credentials. Other supplicants, however, store the user password in a more easily accessible place.
The Microsoft supplicant on Windows CE does not cache credentials. Users are prompted for credentials every time the supplicant reauthenticates. Most Windows CE devices do not have keyboards, and entering credentials quickly can be quite difficult.
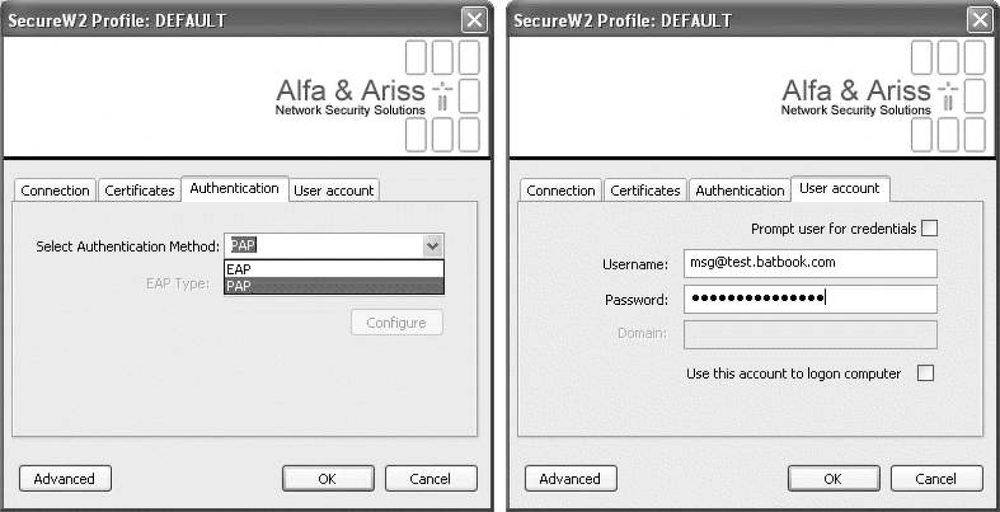
SecureW2: TTLS with ZeroConfig
Third-party supplicants present network administrators with a difficult choice. Users are often comfortable with the Windows GUI for configuring wireless interfaces, but TTLS support is generally only available by using a third-party client that disables ZeroConfig. Fortunately, there is a solution. ZeroConfig has a programming interface that enables additional EAP support through “plug-ins” that implement a particular authentication method. SecureW2 is a TTLS plug-in for Windows ZeroConfig. It is an open source project, released under the GPL. Source code and binary packages are available from http://www.securew2.com.
As a plug-in, SecureW2 configuration is accessed through the same screens as EAP-TLS and PEAP. When the Properties button is first clicked, SecureW2 displays its main configuration screen (Figure 17-11). SecureW2 configuration data is bundled into a profile. Each wireless network stored by ZeroConfig is associated with a SecureW2 profile. Different networks may each be associated with a single SecureW2 profile. SecureW2 installers can be built with an administrative packaging tool that allows profiles to be included in the installer.
Four tabs are used to define the profile. The Connection tab, shown in Figure 17-12, is used to specify the first-stage identity used by TTLS. By unchecking the box, the user account specified on the fourth tab will be used in the first stage. By default, the outer identity is anonymous.

Server authentication is configured with the second tab, the Certificates tab shown in Figure 17-13. Rather than presenting a long list of certificate checkboxes to accept, you must add each certificate authority manually. By clicking the Add CA button, the list will pop up. In XP Service Pack 2, the list presented is pulled from the computer’s certificate store. Just as with the Microsoft supplicant, it is possible to validate the server name in the certificate.
With the outer username and network authentication configured, it is possible to finally configure the user account for the inner authentication. Authentication type is configured with the “Select Authentication” tab drop-down (see Figure 17-14). Much of the impetus for using TTLS is that cleartext password authentication is required; in such cases, the Authentication Method will be set to PAP. The user account is configured on the fourth tab.

WPA Configuration and Installation
Wi-Fi Protected Access (WPA) is the typical security baseline used in most organizations. WPA is built into Windows XP Service Pack 2, and available as a patch for XP Service Pack 1. Enabling WPA is a matter of selecting either WPA or WPA-PSK as the authentication method in the association properties of the card. Microsoft does not implement WPA for other operating systems; use of WPA on other operating systems requires a third-party supplicant.
To use WPA, the entire system must support it. In addition to OS-level support, the hardware and its driver must be capable of WPA support. Drivers will prevent unsupported options from being displayed. On a Dell TrueMobile 1150 card, the option for AES does not appear because that device only has RC4 encryption built-in. If WPA is not working as expected, ensure that the latest driver is installed before contacting your vendor’s support organization.
Windows 2000
Windows 2000 is still widely used. Many older machines have not been upgraded to Windows XP to save money, and Windows 2000 remains a serviceable operating system. Wireless configuration on Windows 2000 is significantly more complex than on Windows XP, in large part because it lacks solid integration between the selection of a wireless network and the corresponding security configuration.
Windows 2000 did not ship with 802.1X support from the start. It was initially added as a patch on top of Service Pack 3,[74] and was later integrated into Service Pack 4. Microsoft has not ported WPA functionality to Windows 2000, although a WPA client is available from the Wireless Security Corporation (http://www.wirelesssecuritycorp.com). Many observers feel that 802.1X support on Windows 2000 is not a priority for Microsoft, and its inclusion into recent service packs is an illustration of increased difficulty in persuading users to upgrade.
Although 802.1X configuration has been integrated into the driver layer, Windows 2000 still depends on a card utility to configure which network the system will attach to. The separation can be particularly problematic for users who travel between an encrypted networks and unencrypted networks. Although using the card utility to switch networks is straightforward, it is usually necessary to manually enable or disable security. Windows 2000 may present network administrators with a difficult choice. If the software configuration tool bundles a third-party 802.1X stack, extra administration work must be done to separate the two.
Dynamic WEP Configuration
The Wireless Configuration Service on Windows 2000 only supports dynamic WEP for encryption. TKIP support is only possible by using a third-party supplicant. To configure dynamic WEP, set up the card’s utility for use with manual WEP key. As far as the card utility is concerned, a manual WEP key is in use. Frames are dispatched by the driver to the card, to be encrypted by one of the keys stored in the card’s key cache. The Wireless Configuration process, however, will push new keys into the card as required by the network’s security policy.
The manual WEP key need not be configured anywhere else on the network. It must only be the correct length. For networks using 128-bit WEP, the key should be entered as 26 hexadecimal digits, such as 12345678901234567890123456. This dummy key is never used, since it is replaced by the dynamically derived key after a successful 802.1X authentication.
In my experience, the Wireless Configuration Service on Windows 2000 is not as reliable as the process on Windows XP. Several bugs have caused the service to fail after a successful authentication. Interestingly enough, the symptom of this type of failure is that the connection will be keyed successfully, but traffic will be disrupted at the first reauthentication period. With no software running to process 802.1X frames, any attempted reauthentications or re-key operations will fail.
Windows Computer Authentication
When the Windows authentication subsystem was designed, it used a network connection to send user credentials to the domain controller for validation. When the network subsystem started, it would obtain a network address, if necessary for the protocol in use, and contact the domain controller. Besides validating user credentials, the domain offered several other services. Network administrators could define domain policies to control the behavior of any system in the domain, or login scripts to customize the user environment as part of the login process.
In the wired world, domain services are not a problem. Users attach to the network, and the system itself starts sending packets. When the Windows startup process was designed, there was no way of authenticating wired network connections. In the wireless world, though, where users must authenticate to active a wireless connection, network authentication can be a bit of a chicken and egg problem. Users can certainly authenticate to the wireless network once they supply credentials to the login box, but how can those credentials be validated without a network connection to send packets to the domain controller? Windows NT, 2000, and XP provide a partial solution in terms of credential caching. Once a user has successfully logged in to a computer that is a member of a Windows domain, credentials are cached for the future.
Credential caching is only part of the solution because it depends on logging in to the computer on a wired connection first. Microsoft has developed a much better solution called computer authentication or machine authentication. When the system first starts up, the computer authenticates to the wireless network as itself. With the wireless network up and operational, the computer can then download any required information from the domain and validate the credentials of any user against the domain controller. Users who have never logged in to the system and have no cached credentials can log in as well.
A fair amount of functionality depends on having a network connection early in the boot process. In addition to domain services, drive mappings are attempted early enough that they may fail if the computer is not authenticated. In most cases, Windows computer authentication should be considered mandatory for a smooth-functioning network.
To set up Windows computer authentication, you must have an Active Directory back end. Computers must have accounts defined in the Active Directory, and they must be granted Dial-In permission.
How It Works
Computer authentication adds an extra 802.1X authentication process to the boot process. First the computer authenticates as itself. After obtaining user credentials from the login box, a second 802.1X transaction is run to authenticate as the user. The process is shown in Figure 17-15.
The figure identifies several steps in the process. It starts when the computer comes up and starts its networking system. It begins an 802.1X authentication as the computer in parallel to other system start-up tasks.
The machine authentication is started. It may be started by an EAPOL-Start from the supplicant, or by a Request/Identity frame from the authenticator.
The network collects the identity of the machine. In the first authentication, the “user” identity is of the form
host/ComputerName.ActiveDirectoryDomain, where both theComputerNameand theActiveDirectoryDomainare available from the system properties.The computer authenticates against its computer account on the RADIUS server, or in the back-end database behind the RADIUS server. This process may take several round-trips because of the need to exchange certificates, establish cryptographic keys, and so forth.
Computer authentication uses the same EAP method as user authentication. If EAP-TLS is employed for user authentication, the computer must also have its own certificate. When PEAP is configured for user authentication, the computer uses EAP-MSCHAP-V2 as its inner method. The “password” used in the inner authentication is generated when the computer joins the domain, and is not available to any other software.
When the authentication succeeds, the computer is attached to the network. It receives an EAP-Success frame from the authenticator, and on wireless LANs, EAPOL-Key frames to provide keys for the connection.
When authentication completes, the computer will be attached to the network, and can send and receive traffic. By sending a DHCP request, the computer can join the network and locate a nearby domain controller by using NetBIOS over
TCP/IP. Before user authentication, the computer can establish a relationship with the domain controller. The user presses Control-Alt-Delete to begin the login process. The system uses its connection to the domain controller to load the user login script, configure Windows domain policies, and perform other login tasks.
When the user desktop is about to start, the second authentication starts. The end user authentication must be triggered by the operating system. Typically, the machine authentication established at the start of the session is only used for a few minutes until the user authentication begins.
The network requests the identity of the end user. On Windows networks, this is typically of the form DOMAINuser, where the two components are the Windows NT-style domain name, and the user account.
The supplicant authenticates to the network with credentials from the user. With the Windows supplicant, the same EAP plug-in must be used for both the computer authentication and the user authentication. Like the previous step, it may require multiple round-trips to establish a secure cryptographic channel.
The user authentication succeeds, and keys are provided for the connection. These keys will be different from the computer keys because they are derived from a different TLS session.

Computer authentications can be treated separately from user authentications. Authorization of the two authentications may occur separately. For example, in a network that performs dynamic VLAN assignment, it may be possible to assign the computer account to a different VLAN from the user account. Early versions of the Microsoft supplicant did not trigger DHCP requests upon successful authentication, which prevented the user from sending and receiving traffic. Patches are available to fix this problem.
[72] Both the Funk and Meetinghouse clients do this, as does the Radiator RADIUS server.
[73] This is probably due to intellectual property concerns that caused the AES-based encryption algorithm to be changed during the 802.11i draft process.
[74] See Microsoft knowledge base article 313664 for the patch.