
Chapter 19. Using 802.11 on Linux
When the first edition of this book was written, 802.11 was only just coming to Linux. Cards had to be selected carefully because very few cards were supported with full open source drivers that evolved at the same pace as the Linux kernel. Linux support has now moved into the mainstream, with many vendors actively sponsoring driver development projects, or at the very least supporting efforts to target their hardware. Broadcom is a notable exception.
Most 802.11 devices are supported by the PCMCIA system. As with Windows drivers, installing wireless cards on Linux creates Ethernet interfaces. Many Linux drivers expose an Ethernet interface through the kernel, and most drivers even name the resulting interfaces with the eth prefix. Programs can use the Ethernet interface to send and receive data at the link layer, and the driver handles Ethernet-to-802.11 conversions.[77] Many of the things you would expect to see with an Ethernet interface remain the same. ARP works identically, and the IP configuration is done with the same utilities provided by the operating-system distribution. ifconfig can even be used to monitor the interface status and see the data sent and received.
PCMCIA Support on Linux
Initially, most wireless networking adapters were add-on cards that were based on the PC Card specification.[78] PC Cards attach to the system bus through a 16-bit controller interface that operates at 8 MHz. Even though performance was limited by the bus to be roughly comparable to the 16-bit ISA bus, it was more than capable of supporting relatively slow 802.11b wireless LANs. Higher-performance 802.11a and 802.11g cards require the performance of the next-generation CardBus interface, which drives a 32-bit bus at 33 MHz. CardBus provides the dramatically improved performance required by higher-bandwidth network interfaces. CardBus cards look nearly identical to PC Cards, and are used in the same slots. Both CardBus and PC Cards are, not surprisingly, configured and managed through the Linux PCMCIA utilities.
Using external interfaces with antennas that protrude from the case of the laptop is not always desirable. Laptop vendors have adopted a different form factor for “built-in” wireless devices called Mini-PCI. Mini-PCI is a small version of the PCI interface that is only a few inches long. There no limit on what could be made into a Mini-PCI card, but by far the most popular use of the slot is to add wireless networking capabilties to laptops. Most Mini-PCI wireless cards consist of a PCI-to-Cardbus bridge combined with a CardBus wireless LAN interface, and are therefore configured and managed through the Linux PCMCIA system.
PCMCIA Card Services Overview
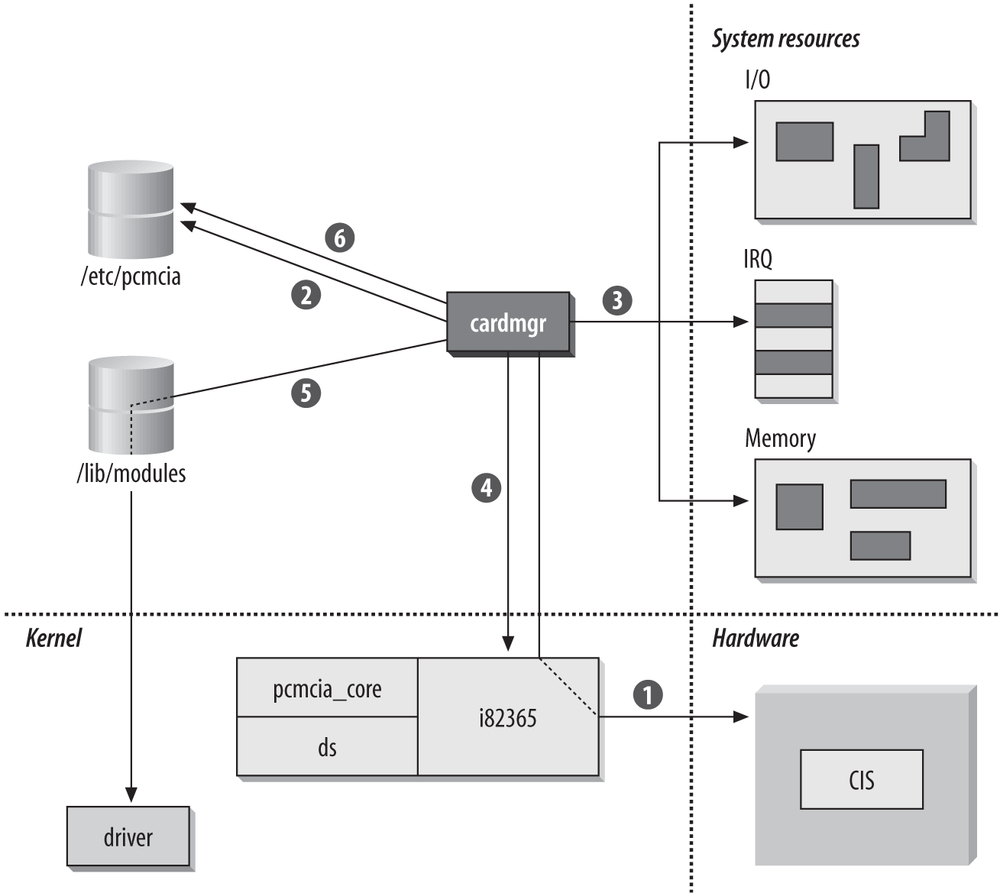
Card Services grew out of an attempt to simplify system configuration. Rather than dedicating system resources to individual devices, the host system maintained a pool of resources for PC Cards and allocated resources as necessary. Figure 19-1 shows the procedure by which cards are configured on Linux.
When a card is inserted, the cardmgr process orchestrates the configuration of the device, as shown in Figure 19-1. The orchestration pulls together system resources, kernel components, and kernel driver modules through the configuration files stored in /etc/pcmcia. Roughly speaking, the host takes the following steps:
A card is inserted into an empty PC Card socket, and cardmgr is notified of this event. In addition to any hardware operations (such as supplying power to the socket), cardmgr queries the card information structure (CIS) to determine the type of card inserted and the resources it needs. For more information on the CIS, see the sidebar "Card Information Structure" later in this chapter.
cardmgr attempts to identify the card and load the appropriate kernel modules for support. The PCMCIA card database stored in /etc/pcmcia/config is used to map the CIS database to drivers. Drivers can also be loaded automatically through a hardware identification list that is part of the module and stored in a module map (/lib/modules/(kernel version)/module.*map). The main task of the identification is to associate cards with a class. For the purposes of configuring network cards, the important point to note is that items in the network class have additional network configuration operations performed on them later. The card is identified by the CIS data from step 1, and the class setting is set in the main system configuration file. At this point, cardmgr beeps once. Successful identification results in a high-pitched beep; unsuccessful identifications are indicated by a beep of lower pitch.
cardmgr determines which resources are available to allocate to the card. Blocks of system resources are reserved for PCMCIA card use in the main configuration file, and cardmgr doles out resources as needed to cards. The number of I/O ports needed and the size of the required memory window are obtained from the CIS.
Resources allocated by cardmgr are programmed into the PCMCIA controller, which is depicted in Figure 19-1 as interaction with the PCMCIA device driver. The Intel i82365SL PCMCIA controller is the most common chip on the market, which is why the kernel module is shown as “i82365.” The new kernel-based PCMCIA system uses the yenta_socket driver instead of a chipset-specific driver. PCMCIA controllers implement resource steering to map resources required by the card onto available system resources. A card may ask for an interrupt, but the actual assigned interrupt is irrelevant. In operation, the card simply asks the PCMCIA controller to raise an interrupt, and the controller is responsible for looking up the interrupt assigned to the socket and firing the correct interrupt line.
Part of the configuration information obtained from the lookup in step 2 is the name of the device driver that should be loaded to use the newly inserted card. Drivers for PCMCIA cards are implemented as kernel modules. As part of the insertion process, the driver is informed of resources allocated in step 4. With proper module dependencies, module stacking can be used to load multiple modules.
Further user-space configuration is performed based on the class of the device. Network cards, for example, have further configuration done by the /etc/pcmcia/network script, which is configured by editing /etc/pcmcia/network.opts. Successful configuration in this step generates a second high beep, and failure is reported with a low beep. Additional configuration may also be performed by the Linux hotplug system.
Interface names in Linux
When a driver creates the network interface, it is given a name consisting of a prefix and a number. Many drivers will create additional network interface with a name of the form ethX, where X is the next number in sequence. Most laptops now have built-in Ethernet interfaces that come up on boot as eth0, which makes many wireless interfaces start as eth1. Older versions of the WaveLAN driver created interfaces beginning with the prefix wvlan, but current versions use eth. Atheros-based cards come up using the prefix ath.
Hotplug system for automatic configuration
To perform automatic configuration, Linux depends on the work of the hotplug configuration project, whose web site is found at http://linux-hotplug.sourceforge.net/. When a device is inserted, the hotplug system will call any needed PCI configuration commands before configuring the interface. Hotplug scripts can help to automatically configure systems with large numbers of network interfaces, or perform arbitrary configuration tasks. Many wireless devices implementing new standards are under continued development after the product is released. New firmware updates to cards can make new protocol features possible, or fix bugs in the released version. Hotplug can also be configured to automatically update firmware when particular cards are plugged in.
PCMCIA Card Services Installation
As of kernel 2.4, PCMCIA support has been integrated into the kernel, and was probably installed with your distribution. It is not necessary to upgrade the kernel PCMCIA support. It may be necessary to fetch drivers for your interface, but it is almost certain that the PCMCIA support is up-to-date enough to handle any wireless interface you throw at it. (Older distributions can update PCMCIA software through a distribution maintainer’s package, or by building from the source at http://pcmcia-cs.sourceforge.net/.)
Most configuration information is automatically detected from the environment without difficulty. Depending on the distribution and its installation, it may be necessary to inform the PCMCIA software which controller is running the PCMCIA slots by setting the PCIC variable in the system configuration file. Kernel PCMCIA software sets the value to yenta_socket. Systems that use the standalone PCMCIA support will set the variable to either tcic for Databook TCIC-2 chipsets, or i82365 for the Intel i82365SL chipset. Slackware features a “probe” option to load modules until one successfully loads.
Monitoring the Cards
The main tool used to control the PCMCIA subsystem is the cardctl command. It has several subcommands that can be used to view information or configuration status. Each argument can also take a slot number. Many laptop computers have two PCMCIA slots, in which case the slots are numbered 0 and 1. An increasing number of notebooks designed for portability have only a single slot, and therefore only have slot 0.
In addition to the hardware-based eject system, cardctl can be used to remove drivers by sending the “card is removed” notification. Once the software has removed all the associated drivers and powered the slot down, the card can be restarted by sending a software notification of the card insertion. Having software control over the card allows the “reboot” of a card without having to physically remove and reinsert it.
[root@bloodhound]# cardctl eject 0
[root@bloodhound]# cardctl insert 0
Drivers are selected based on the CIS data. To see the contents of the card’s CIS, insert it and wait for it to power up, then use the info or ident subcommands to cardctl to see the identification information. Here is the information from a Proxim 8480 Gold card. Like nearly all cards with 802.11a capabilities, it is based on the Atheros chipset. The card even reports itself as an Atheros reference design:
root@bloodhound:~# cardctl info 0
PRODID_1="Atheros Communications, Inc."
PRODID_2="AR5001-0000-0000"
PRODID_3="Wireless LAN Reference Card"
PRODID_4="00"
MANFID=0271,0012
FUNCID=6
root@bloodhound:~# cardctl ident 0
  product info: "Atheros Communications, Inc.", "AR5001-0000-0000", "Wireless LAN Reference Card", "00"
  manfid: 0x0271, 0x0012
  function: 6 (network)
In addition to extracting the CIS identification with cardctl, the complete structure can be printed out with cis_dump. In addition to identification information, the CIS includes information about the supported speeds. In the case of the Proxim 8480, it reports exclusively on the 802.11a speeds, even though it is capable of 802.11b-compatible operation:
root@bloodhound:~# dump_cis
Socket 0:
  manfid 0x0271, 0x0012
  config_cb base 0x0000 last_index 0x01
  cftable_entry_cb 0x01 [default]
    [master] [parity] [serr] [fast back]
    Vcc Vnom 3300mV Istatic 25mA Iavg 450mA Ipeak 500mA
    irq mask 0xffff [level]
    mem_base 1
  BAR 1 size 64kb [mem]
  vers_1 7.1, "Atheros Communications, Inc.", "AR5001-0000-0000",
    "Wireless LAN Reference Card", "00"
  funcid network_adapter [post]
  lan_speed 6 mb/sec
  lan_speed 9 mb/sec
  lan_speed 12 mb/sec
  lan_speed 18 mb/sec
  lan_speed 24 mb/sec
  lan_speed 36 mb/sec
  lan_speed 48 mb/sec
  lan_speed 54 mb/sec
  lan_speed 72 mb/sec
  lan_media 5.4_GHz
  lan_node_id 20 00 4d a6 d4 0a
  lan_connector Closed connector standard

Socket 1:
  no CIS present
Once the card has been inserted into the system, use the status subcommand to check on it. The config subcommand will also report the system interrupt assigned by the system. In my case, the laptop uses a PCI-to-Cardbus bridge, so the card inherits the IRQ assigned to the PCI bus.
root@bloodhound:~# cardctl status 0
  3.3V CardBus card
  function 0: [ready]
root@bloodhound:~# cardctl config 0
  Vcc 3.3V  Vpp1 3.3V  Vpp2 3.3V
  interface type is "cardbus"
  irq 11 [exclusive] [level]
  function 0:
The lights are not useful
Many drivers are intended to work with several different pieces of hardware, and each manufacturer may customize the number and purpose of the lights on the card. Usually, there is one light to indicate that the card is powered up, and a second light that will blink to indicate traffic from the card. It may or may not blink in response to traffic from other stations. A few cards may have a third light to indicate association status.
Linux drivers generally do not make an attempt to control the lights on each card in a vendor-specific way, and internal cards may not have any lights at all. If your card behaves differently, don’t panic. Check at the access point for an association; if an association exists, then the card is functioning normally but uses the lights in a different manner.
Troubleshooting Resource Conflicts
One of the revolutionary developments hyped by PCMCIA card vendors was that users were no longer directly responsible for maintaining low-level hardware configurations on IBM-compatible hardware. In many respects, this hype was overblown because users are still responsible for maintaining the resource pools used by PCMCIA Card Services to draw from for automatic configuration, and therefore they must still be familiar with the hardware configuration. Three major resources are managed by Card Services for users: IRQ lines, I/O ports, and direct memory access (DMA) channels. DMA channels are not required by network cards, however, and are not discussed in this section.
IRQs
IRQs are used by devices that must use the CPU periodically. Interfaces use IRQs so that when a buffer fills, the system CPU can be notified and drain the buffer. One limitation of the PC architecture is that it has only 15 available IRQs, and many are occupied by standard hardware. Table 19-1 shows common IRQ usage, which may help you determine which IRQs are available for PCMCIA cards. Disabling any extra components frees the IRQ. Table 19-1 also shows common IRQ settings on PC hardware. As a rule of thumb, IRQs 3, 5, and 10 are readily available on most machines.
IRQ number | Common usage | Purpose |
0 | System timer | Fires 18 times per second to maintain coarse clocking. |
1 | Keyboard | Allows operating system to monitor keyboard strokes by user. |
2 | Cascade | Two interrupt controller chips are used; the second controls IRQs 8-15 and is wired into IRQ 2 on the primary. |
3 | Second serial port | The second and fourth serial ports (COM2 and COM4 under Windows) both use IRQ 3. If only one serial port is present, IRQ 3 may be used by expansion devices. |
4 | First/third serial port | The first and third serial ports (COM1 and COM3 under Windows) both use IRQ 4. Generally, it is not a good idea to use IRQ 4 for expansion devices because loss of the serial port also means that terminal-emulation software cannot be used. |
5 | Second parallel port | Most systems have only one parallel port, but IRQ 5 is also commonly used for sound cards. |
6 | Floppy controller | All systems have floppy disks, which can be especially important on portable computers. |
7 | First parallel port | The first parallel port can frequently be disabled on laptops without an issue, unless the parallel port is used extensively for printing. |
8 | RTC | The Real-Time Clock maintains finer-grained timers |
9 | Video (older systems) | Older systems required an IRQ for the video controller, and it was typically assigned to IRQ 9. Most video controllers are now on the PCI bus and do not require a dedicated IRQ. |
10 | Usually available for expansion devices. | |
11 | Usually PCI bus or SCSI controller | Generally not available for expansion devices. |
12 | Usually PS/2 mouse port | Generally not available. |
13 | FPU | The floating-point unit IRQ is used by the math coprocessor, even on systems with a CPU with an integrated math coprocessor such as the Pentium series. |
14 | Primary IDE | The first IDE channel is used by the main system hard disk, and thus IRQ 14 is almost never available on a portable system. |
15 | Secondary IDE | Portable systems typically place the CD-ROM on IRQ 15, making this IRQ unavailable for use. |
I/O ports
I/O addresses are used for bidirectional communication between the system and a peripheral device. They tend to be somewhat poorly organized, and many devices have overlapping defaults. Each I/O port can be used to transfer a byte between the peripheral device and the CPU. Most devices require the ability to transfer multiple bytes at a time, so a block of ports is assigned to the device. The lowest port number is also called the base I/O address. A second parameter describes the size of the I/O window. Table 19-2 lists some of the common port assignments. Refer to your hardware vendor’s documentation for details on additional devices such as IR ports, USB controllers, the PCMCIA controller, and any resources that may be required by motherboard components.
Device name | I/O range (size) |
Communication ports | |
First parallel port | 0x3bc-0x3bf (4) |
First serial port | 0x3f8-0x3ff (8) |
Second serial port | 0x2f8-0x2ff (8) |
Disk drives | |
Primary IDE | master: 0x1f00x1f7 (8) slave: 0x3f60x3f7 (2) |
Secondary IDE | master: 0x1700x177 (8) slave: 0x376 (1) |
Floppy controller | 0x3f00x3f5 (6) |
Input devices | |
Keyboard | 0x060 (1) 0x064 (1) |
Multimedia/gaming | |
Sound card | 0x2200x22f (16) FM Synth: 0x3880x38b (4) MIDI: 0x3300x331 (2) |
Joystick/Game port | 0x2000x207 (8) |
System devices | |
Interrupt controllers | 0x0200x021 (2) 0x0a00x0a1 (2) |
DMA controllers | DMA channels 0-3: 0x0000x00f (16) Page registers: 0x0800x08f (16) DMA channels 4-7: 0x0c00x0df |
CMOS/real time clock | 0x0700x073 (4) |
Speaker | 0x061 |
Math coprocessor | 0x0f00x0ff (16) |
Linux Wireless Extensions and Tools
802.11 interfaces act like Ethernet interfaces once they are active, but they have many more configuration options than Ethernet interfaces because of the underlying radio technology. Rather than have each driver responsible for implementing its own configuration utility and reporting mechanisms, the Wireless Extension API was developed to allow all drivers to implement common functionality and use common configuration commands. Wireless extensions are also a great help to application developers needing to get details from the interface because they can do it in a device-independent way. For example, xsupplicant makes use of wireless extensions to set WEP keys on an interface without having to understand each driver’s operations for setting keys. (At press time, system calls for WPA keying were not yet part of the official wireless extensions release.)
Compiling and Installing
Wireless LAN extensions are enabled with the CONFIG_NET_RADIO kernel configuration option. CONFIG_NET_RADIO-enabled kernels collect wireless statistics and expose additional data structures used by most drivers. Most distributions that include kernels with wireless extensions also include the wireless tools. If more recent versions are required, you may download them from http://www.hpl.hp.com/personal/Jean_Tourrilhes/Linux, although it is probably easier to wait for your distribution’s kernel source to integrate the latest version and rebuild the kernel.
Interface Configuration with Wireless Tools and iwconfig
The main command-line tool for managing a wireless-extension-enabled driver is iwconfig, which is designed to be a “wireless ifconfig.” It can be used to set the radio interface parameters before using ifconfig to set traditional network parameters.
When run with no parameters, iwconfig displays a list of system interfaces. Interfaces that are not wireless will report that they have no wireless-specific data, while interfaces that do report wireless data will dump out the data that they have. Not all drivers implement all features. When iwconfig is run on a system with an old Orinoco card and an Atheros CardBus card, for example, the output will probably resemble this:
[root@bloodhound]# iwconfig
lo      no wireless extensions.

eth0    no wireless extensions.

eth1    IEEE 802.11-DS  ESSID:"11b-is-slow"  Nickname:"HERMES I"
        Mode:Managed  Frequency:2.457GHz  Access Point:00:E0:03:04:18:1C
        Bit Rate:2Mb/s   Tx-Power=15 dBm   Sensitivity:1/3
        RTS thr:off   Fragment thr:off
        Encryption key:off
        Power Management:off
        Link Quality:46/92 Signal level:-51 dBm  Noise level:-94 dBm
        Rx invalid nwid:0  invalid crypt:0  invalid misc:0

ath0    IEEE 802.11  ESSID:"11a-is-very-fast"
        Mode:Managed  Frequency:5.28GHz  Access Point: 00:0B:0E:00:F0:43
        Bit Rate:36Mb/s   Tx-Power:off   Sensitivity=0/3
        Retry:off   RTS thr:off   Fragment thr:off
        Encryption key:E452-94AC-09DB-2200-1256-6D7D-74  Security mode:open
        Power Management:off
        Link Quality:31/94  Signal level:-64 dBm  Noise level:-95 dBm
        Rx invalid nwid:0  Rx invalid crypt:0  Rx invalid frag:0
        Tx excessive retries:0  Invalid misc:0   Missed beacon:0
Both cards report the frequency of operation and some statistics about the quality of reception. The “nickname” reported by the Orinoco card is not reported by the Atheros card because it is a feature that is not implemented by the Atheros driver. (By default, the nickname is set to “HERMES I” after the name of the Lucent chipset used in the Orinoco card.)
Wireless Extensions reports information on the link quality in two ways. It reports a noise floor and signal level, and both are printed out by the driver. The signal to noise ratio is the difference between them. In the previous example, the SNR on eth1 was 43 dB, and the SNR on ath0 is 31 dB. The Link Quality statistic printed out by the driver reports the RSSI and the noise floor. In the previous example, the card is reporting an RSSI of 31 dB over a noise floor of -94 dBm.
Finding networks
Some drivers support the use of wireless extensions to build a list of networks in the area. Rather than configuration, use the iwlist command to get information from the card. As arguments, it takes the interface and a subcommand. scan will print out the list of information discovered in the area. Root privileges are required to retrieve scan data.
root@bloodhound:~# iwlist eth1 scan
eth1     Scan completed :
         Cell 01 - Address: 00:07:50:D5:CE:88
                   ESSID:"LuminiferousEther"
                   Mode:Master
                   Frequency:2.417GHz
                   Quality:0/10  Signal level:-70 dBm  Noise level:-256 dBm
                   Encryption key:on
                   Bit Rate:1Mb/s
                   Bit Rate:2Mb/s
                   Bit Rate:5.5Mb/s
                   Bit Rate:11Mb/s
         Cell 02 - Address: 00:09:5B:72:12:58
                   ESSID:"Mom's House"
                   Mode:Master
                   Frequency:2.467GHz
                   Quality:0/10  Signal level:-22 dBm  Noise level:-256 dBm
                   Encryption key:on
                   Bit Rate:1Mb/s
                   Bit Rate:2Mb/s
                   Bit Rate:5.5Mb/s
                   Bit Rate:11Mb/s
         Cell 03 - Address: 00:0D:72:9B:FE:69
                   ESSID:"2WIRE086"
                   Mode:Master
                   Frequency:2.442GHz
                   Quality:0/10  Signal level:-28 dBm  Noise level:-256 dBm
                   Encryption key:on
                   Bit Rate:1Mb/s
                   Bit Rate:2Mb/s
                   Bit Rate:5.5Mb/s
                   Bit Rate:11Mb/s
                   Bit Rate:22Mb/s
                   Bit Rate:6Mb/s
                   Bit Rate:9Mb/s
                   Bit Rate:12Mb/s
Setting the network name
To connect to a network, the first task is to select the network that will be joined. That is done by configuring the SSID with the essid [79] parameter. If the network name includes a space, it must be enclosed in quotation marks. The network interface probably will not become active and start searching for the network until you use ifconfig to activate it. Progress of the scan can be checked by repeatedly running iwconfig and looking at the frequency. For example, the scan searching out an AP on channel 56 might look something like this:
[root@bloodhound]# iwconfig ath0 essid "Space Cadet"
[root@bloodhound]# ifconfig ath0 up
[root@bloodhound]# iwconfig ath0
. . .
Mode:Managed  Frequency:2.412GHz  Access Point: 00:00:00:00:00:00
. . .
[root@bloodhound]# iwconfig ath0
. . .
Mode:Managed  Frequency:2.447Hz  Access Point: 00:00:00:00:00:00
. . .
[root@bloodhound]# iwconfig ath0
. . .
Mode:Managed  Frequency:5.17GHz  Access Point: 00:00:00:00:00:00
. . .
[root@bloodhound]# iwconfig ath0
. . .
Mode:Managed  Frequency:5.28GHz  Access Point: 00:0B:0E:00:F0:43
. . .
When the card discovers the network, it will associate with the AP and report the AP’s MAC address in the iwconfig output. Associating with the network is merely the first step. Other configuration may be necessary before the logical network connection.
Some drivers have problems if the channel is automatically configured. If the channel is hard set, the driver may not search. To get a driver stuck on a channel to search, disable the card with cardctl eject, reset the SSID, and then reenable the interface with ifconfig.
Setting the network channel
Different cards support different operating frequencies. On a modern Atheros-based card, the entire ISM band is supported up to channel 14, and all three of the 5 GHz bands are supported as well. With drivers that support the operation, it is possible to get a list of supported channels by using the iwlist command:
root@bloodhound:~# iwlist ath0 channel
ath0      255 channels in total; available frequencies :
          Channel 01 : 2.412 GHz
          Channel 02 : 2.417 GHz
          Channel 03 : 2.422 GHz
          Channel 04 : 2.427 GHz
          Channel 05 : 2.432 GHz
          Channel 06 : 2.437 GHz
          Channel 07 : 2.442 GHz
          Channel 08 : 2.447 GHz
          Channel 09 : 2.452 GHz
          Channel 10 : 2.457 GHz
          Channel 11 : 2.462 GHz
          Channel 12 : 2.467 GHz
          Channel 13 : 2.472 GHz
          Channel 14 : 2.484 GHz
          Channel 34 : 5.17 GHz
          Channel 36 : 5.18 GHz
          Channel 38 : 5.19 GHz
          Channel 40 : 5.2 GHz
          Channel 42 : 5.21 GHz
          Channel 44 : 5.22 GHz
          Channel 46 : 5.23 GHz
          Channel 48 : 5.24 GHz
          Channel 50 : 5.25 GHz
          Channel 52 : 5.26 GHz
          Channel 56 : 5.28 GHz
          Channel 58 : 5.29 GHz
          Channel 60 : 5.3 GHz
          Channel 64 : 5.32 GHz
          Channel 100 : 5.5 GHz
          Channel 104 : 5.52 GHz
          Channel 108 : 5.54 GHz
          Channel 112 : 5.56 GHz
          Current Frequency:5.28GHz (channel 56)
The operating frequency can be selected in three ways. Most cards will hunt for an SSID if it is given to them as described previously. For cards that do not support scanning, the freq parameter can take an operating frequency directly, or the channel parameter can be used with the appropriate channel number, and the driver will derive the frequency from the channel number. The following two commands are equivalent:
[root@bloodhound]# iwconfig ath0 freq 2.432G
[root@bloodhound]# iwconfig ath0 channel 4
Setting the network mode and associating with an access point
Most 802.11 stations are in either ad hoc networks or infrastructure networks. The iwconfig nomenclature for these two modes is Ad-hoc and Managed. Select between them by using the mode parameter:
[root@bloodhound]# iwconfig ath0 mode Ad-hoc
[root@bloodhound]# iwconfig ath0 mode Managed
For stations in an infrastructure network, the ap parameter may be used to request an association with the specified MAC address. However, the station is not required to remain associated with the specified access point and may choose to roam to a different access point if the signal strength drops too much:
[root@bloodhound]# iwconfig ath0 ap 01:02:03:04:05:06Setting the data rate
Most cards support multiple bit rates. iwconfig allows the administrator to choose between them by using the rate parameter. Bit rates can be specified after the rate parameter, or the keyword auto can be used to specify that the card should fall back to lower bit rates on poor-quality channels. If auto is combined with a bit rate, the driver may use any rate lower than the specified rate:
[root@bloodhound]# iwconfig ath0 rate autoConfiguring static WEP keys
The key parameter controls the WEP function of the driver. Keys can be entered as hexadecimal strings using the key subcommand. Enter the string without any delimiters, four digits at a time with dashes between the two-byte groups, or in the colon-separated byte form. The following commands are equivalent:
[root@bloodhound]# iwconfig ath0 key 0123456789
[root@bloodhound]# iwconfig ath0 key 0123-4567-89
[root@bloodhound]# iwconfig ath0 key 01:23:45:67:89
Many drivers support the use of 104-bit WEP keys as well. 104 bits is 13 bytes, or 26 hexadecimal characters:
[root@bloodhound]# iwconfig ath0 key 12345678901234567890123456
[root@bloodhound]# iwconfig ath0 key 1234-5678-9012-3456-7890-1234-56
[root@bloodhound]# iwconfig ath0 key 12:34:56:78:90:12:34:56:78:90:12:34:56
Although multiple keys can be entered using a bracketed index number, this capability is not used on many networks. Dynamic WEP key assignment through 802.1X is a much easier way to ensure the use of multiple keys, and is much more secure.
[root@bloodhound]# iwconfig ath0 key 0123-4567-89
[root@bloodhound]# iwconfig ath0 key 9876-5432-01 [2]
[root@bloodhound]# iwconfig ath0 key 5432-1678-90 [3]
Once multiple keys have been entered, select one by entering the index number without a key value:
[root@bloodhound]# iwconfig ath0 key [2]Activate WEP processing using key on and disable WEP using key off. These can be combined with an index number to select a new WEP key:
[root@bloodhound]# iwconfig ath0 key [3] on
[root@bloodhound]# iwconfig ath0 key off
Finally, two types of WEP processing can be done. An open system accepts data frames sent in the clear, and a restricted system discards cleartext data frames. Both of these parameters can be combined with an index number:
[root@bloodhound]# iwconfig ath0 key [4] open
[root@bloodhound]# iwconfig ath0 key [3] restricted
The key parameter may also be accessed with the encryption parameter, which may be abbreviated to as few characters as enc. I prefer to use key because it seems clearer to me, but you may choose whichever you like.
Tuning 802.11 parameters
iwconfig allows you to tune the RTS and fragmentation thresholds. The RTS threshold of most drivers is 2,347, which effectively disables RTS clearing. In an environment likely to have hidden nodes, it can be set using the rts_t hreshold parameter with iwconfig. rts_threshold can be abbreviated as rts.
[root@bloodhound]# iwconfig wvlan0 rts 500The default value of the fragmentation threshold is 2,346. In noisy environments, it may be worth lowering the fragmentation threshold to reduce the amount of data, which must be retransmitted when frames are lost to corruption on the wireless medium. Set the parameter by using the fragmentation_threshold argument to iwconfig. It may be set anywhere from 256 to 2,356, but it may take on only even values. fragmentation_threshold may be abbreviated as frag.
[root@bloodhound]# iwconfig ath0 frag 500802.11 stations maintain several retry counters. When frames are retransmitted “too many” times or wait for transmission for “too long,” they are discarded. Two retry counters are maintained. The long retry counter, set by the retry parameter, is the number of times transmission is attempted for a frame longer than the RTS threshold. The short retry counter, set by the retry min parameter, is the number of times transmission will be attempted for a frame shorter than the RTS threshold. Unlike many drivers, iwconfig also allows for configuration of the maximum frame lifetime with the retry lifetime parameter. To specify a value in milliseconds or microseconds, append “m” or “u” to the value:
[root@bloodhound]# iwconfig ath0 retry 4
[root@bloodhound]# iwconfig ath0 retry min 7
[root@bloodhound]# iwconfig ath0 retry lifetime 400m
Agere (Lucent) Orinoco
Wireless networking is far older than the 802.11 standard. Several proprietary approaches had been released and were gaining a foothold in the market in the early 1990s. One of the first notable products was the NCR WaveLAN, released when NCR was a division at AT&T.[80] When Lucent was spun off from AT&T in 1996, the WaveLAN division, like most communications product manufacturing at AT&T, was made a part of Lucent.
Early WaveLAN hardware was a completely proprietary system. After 802.11 was finally standardized in 1997, new hardware that complied with the standard was sold under the WaveLAN brand. To distinguish the standards-compliant cards from the proprietary cards, the former were called “WaveLAN IEEE” cards, while the latter were simply “WaveLAN” cards.
As the market for 802.11 hardware continued to develop, Lucent decided to rename the WaveLAN division under another brand name. The new name, Orinoco, comes from the third largest river system in the world. During the rainy season in South America, the Orinoco swells with fresh rainfall flowing in from over 200 tributaries. At its peak, the river grows to over 10 miles wide and more than 300 feet deep. Nearly 1,000 miles of the Orinoco’s 1,300 miles are navigable; it is no wonder that the river’s name is derived from the native words for “a place to paddle.”
Lucent’s initial strategy for support on open source platforms was to offer a choice of drivers. A closed-source proprietary binary driver, wavelan2_cs, provided full functionality, and a second, less functional open source driver, wvlan_cs, was made available under the GPL. wvlan_cs was based on a low-library provided with the closed source driver, and it was an evolutionary dead-end. Rather than continue along that path, wvlan_cs was rewritten with new low-level operations and became orinoco_cs in Linux kernel version 2.4. (orinoco_cs was originally known as dldwd_cs, which stood for David’s Less Dodgy WaveLAN Driver!)
In addition to the WaveLAN cards and any OEM versions of WaveLAN cards, orinoco_cs contains basic support for some PRISM-2-based cards and Symbol cards that use the same MAC chipset. orinoco_cs has been part of the Linux kernel distribution since kernel Version 2.4.3.
Compiling and Installing
All distributions based on the 2.4 and later kernels include orinoco_cs. In many cases, it will be possible to use the driver that shipped with your kernel. The major exception is if you plan to run xsupplicant and need to apply the key management patch, which will be discussed later.
PCMCIA configuration
Older distributions may ship with the wvlan_cs driver still enabled. To change the driver used by the distribution, it is sufficient to change the module binding the PCMCIA configuration. The author of orinoco_cs supplies a file, hermes.conf, which contains card definitions for the cards supported by orinoco_cs. Because hermes.conf ends in .conf, it is sourced by the line at the end of /etc/pcmcia/config that reads all .conf files. However, to avoid binding conflicts, you must comment out all the lines that bind the older wvlan_cs driver to newly inserted cards. Alternatively, it is sufficient to edit the definition of your wireless card to bind the orinoco_cs driver after grabbing identification information from the output of dump_cis:
# in hermes.conf
#
card "Lucent Technologies Wavelan/IEEE"
   version "Lucent Technologies", "WaveLAN/IEEE"
   bind "orinoco_cs"

# from standard /etc/pcmcia/config
#
# card "Lucent Technologies WaveLAN/IEEE"
#    version "Lucent Technologies", "WaveLAN/IEEE"
#    bind "wvlan_cs"
Doing it yourself
This is part of the kernel, so you generally don’t need to install it unless you’re looking for a particular bug fix or feature enhancement. The most common reason to recompile the driver is a requirement to support dynamic WEP with 802.1X authentication. xsupplicant distributes a patch to be applied for rekeying. Firmware updates may also be necessary to support dynamic keys. I have used firmware version 8.42. Later versions almost certainly work, but earlier versions may not.
Requirements are straightforward. The code itself is fetched from the distribution site at http://ozlabs.org/people/dgibson/dldwd/. Make sure that you have a copy of patch to apply the patches of interest (the rekey patch is not required in version 0.15rc2):
gast@bloodhound:~$ cd orinoco-0.13e
gast@bloodhound:~/orinoco-0.13e$ patch -p1 <
../rekey_patch_orinoco-0.13e
patching file orinoco.c
patching file orinoco.h
msg@bloodhound:~/orinoco-0.13e$ make
  (build messages snipped)
root@bloodhound:/home/msg/orinoco-0.13e# make install
if [ -d /etc/pcmcia ]; then install -m 644 -o 0 -g 0 hermes.conf /etc/pcmcia/hermes.conf; fi
mkdir -p /lib/modules/2.4.26/kernel/drivers/net/wireless
for f in hermes.o orinoco.o orinoco_cs.o orinoco_plx.o orinoco_tmd.o orinoco_pci.o; do
    if test -e /lib/modules/2.4.26/pcmcia/$f; then
        install -m 644 -o 0 -g 0 $f /lib/modules/2.4.26/pcmcia/$f;
    else
        install -m 644 -o 0 -g 0 $f /lib/modules/2.4.26/kernel/drivers/net/wireless/$f;
    fi;
done
depmod -a
At the end of the build process, the system has several kernel modules: orinoco_cs.o, the PCMCIA interface; orinoco.o, the hardware driver; and hermes.o, the driver for the MAC chip.
Configuring the orinoco_cs Interface
Configuration of orinoco_cs is identical to the configuration of wvlan_cs. When the card is inserted, the /etc/pcmcia/wireless script is run, using the configuration options in /etc/pcmcia/wireless.opts. The wireless script is a frontend to the iwconfig program. Editing fields in wireless.opts sets the arguments to iwconfig. For details on configuring the options to iwconfig, see the previous section on the wvlan_cs driver.
Atheros-Based cards and MADwifi
802.11a is the choice for high-speed, high-density 802.11 networks, and most 802.11a devices on the market use Atheros chipsets.[81] The driver project is called the “Multiband Atheros Driver for WiFi,” or MADwifi; the project’s home page is http://sourceforge.net/projects/madwifi/.
Although best known for 802.11a support, there are several Atheros chips available. There are three generations of chipset. The initial chipset, the 5210, only supported 802.11a. It was followed by the first dual-band chipset, the 5211, which added 802.11b support. Most devices now on the market use the 5212, which is a dual-band/tri-mode chipset that can support 802.11a, 802.11b, and 802.11g. In addition to the different radio support, later generations are capable of performing much more complex security operations. All chipsets are supported by MADwifi.
Driver Architecture and the Hardware Access Layer (HAL)
MADwifi is split into two parts: an open source driver, and a closed-source library called the Hardware Access Layer (HAL). Atheros chipsets are extremely flexible, and capable of tuning outside the unlicensed bands because they use a limited form of a software-defined radio.
Atheros has interpreted FCC regulations as requiring that the HAL be kept closed. (Broadcom interprets the rules in the same way, and they have a similar chipset on the market.) FCC rules require that software-defined radios must not be modifiable by the user to operate outside of their certified frequency bands. Devices that do not enforce the terms of their certification are potentially subject to sanctions. If devices sold for use in the unlicensed spectrum were suddenly able to disrupt licensed communications, vendors of such devices might also be penalized.[82]
For commercial products, ensuring that the software stays in the unlicensed spectrum is easy—just avoid compiling and distributing code that breaks the rules. Users cannot edit compiled code, so they are unable to break the rules. Open source software changes the game. Distributing code that follows the rules does not prevent modification that break the rules.
Atheros faced a choice: ship a driver with completely open source code and risk losing regulatory approval to sell chips, or find some way of protecting the radio spectrum. Obviously, a driver exists because they took the latter course. Rather than have the open source driver interface directly with the radio chipset, it accesses the radio through the HAL’s API. The HAL is generic enough that it is used unchanged by many other operating systems developing open source drivers; there are zero dependencies on the host system software, though it does depend on the host hardware’s instruction set. The HAL is available for x86 architectures (both 32- and 64-bit), ARM, MIPS, PowerPC, and XScale. Although closed-source code is often viewed with suspicion in the open source community, I consider it a sign of corporate commitment to the Linux platform that Atheros was willing to support the development of the driver.
Requirements
MADwifi makes extensive use of wireless extensions, and is consistently developed against the latest version. Either use a recent distribution with current wireless extensions support, or upgrade the kernel to a recent distribution.
Drivers often make use of other kernel functionality, and MADwifi is no different. Building MADwifi depends on having kernel headers and configuration files for the running kernel. If you have built a custom kernel for your hardware, by definition you have kernel source and configuration. Not all distributions will install the kernel source and configuration by default; you may have to find the right package.
UUCP tools will also be necessary to get the HAL. To safely transfer the binary HAL over arbitrary network paths, it is uuencoded. MADwifi’s make script calls uudecode. Depending on your distribution, uudecode may be part of the shell archive utilities package (sharutils), or it may be part of a UUCP tools package.
Building the Driver
MADwifi is still under active development, and it changes regularly. Rather than having periodic packaged releases, it is constantly maintained in CVS. Fetch the latest version from CVS:
root@bloodhound:~# cvs -z3 -d:pserver:[email protected]:/cvsroot/madwifi co madwifiWhen the command completes, the source code and (encoded HAL files) will be downloaded into a directory madwifi. To build the driver, use the standard open source command set:
root@bloodhound:~# cd madwifi
root@bloodhound:~/bloodhound# make
  (lots of build messages)
root@bloodhound:~/bloodhound# make install
The main modules are wlan.o, ath_pci.o, and ath_hal.o. Several other cryptographic modules are loaded on demand to support particular encryption schemes. If the MADwifi build system cannot detect the right place in the filesystem to install to, you may need to manually place the required modules in the correct location and run depmod -a to update modules.
Using the Driver
Current versions of the MADwifi driver publish a list of supported cards to the kernel, which is revealed when module dependencies are built. The MADwifi driver supported device list includes several devices with the manufacturer ID of 0x168c, which belongs to Atheros. Provided that module dependencies are built correctly, there is no need to modify the PCMCIA configuration scripts.
Loading the driver creates an interface prefaced with ath. Most likely, it will be ath0, since you will only have one Atheros card running in your system. Older versions of MADwifi used the prefix wlan. If you see wlan0, update the driver.
MADwifi is correctly integrated with the Linux hotplug system. When the module is inserted, the hotplug system will attempt to register the interface. It is almost certain that the start-up scripts in place on your distribution will need to be edited. Open wireless networks can probably have light editing; using 802.1X requires heavier editing because the interface must be authenticated before starting DHCP.
802.1X on Linux with xsupplicant
I have been fortunate enough to volunteer at the Interop Labs wireless security initiatives for the past few years, where I get to experience interoperability close up. In 2004, developers from the Open1X project participated in the interoperability test event, bringing open source code into an event that had previously been the preserve of product manufacturers. As the popularity of wireless networks has waxed, so has interest in solutions for connecting Linux systems to secure wireless LANs. xsupplicant is one of the leading implementations of 802.1X for Linux.
Requirements
Before even considering working with xsupplicant, the most important task is to ensure that 802.11 is already working! Many “wireless” problems are really PC Card problems. Obviously, you will not be able to attach to an authenticated network until building and configuring xsupplicant, but you should be able to insert your wireless card and have it recognized by the system. Card Services will generally sound a high-pitched beep when a card is inserted to indicate it is recognized, resources were successfully allocated, and the driver was loaded. (A second low-pitched beep may follow indicating a configuration failure, but that is okay. Chances are that you want your ultimate configuration to run xsupplicant, so it’s acceptable at the outset to not have configuration support immediately.) With the driver successfully loaded, you should be able to run iwconfig and obtain statistics from the driver.
Even if the driver for your chosen card is working, make sure it has support for dynamic WEP. Although there is some dispute over the absolute security level of dynamically keyed WEP systems, it is unquestionable that dynamic WEP has a significantly higher level of security than a single-key WEP system. It is a virtual certainty that any card you want to use with xsupplicant should support the use of dynamic keys. Most modern cards, those released in early 2003 and later, have driver support for dynamic WEP already, but a few older cards require patches. The popular Hermes-based Orinoco 802.11b cards fall into the latter category. Depending on the driver, you may also need to rebuild your kernel (or at least get a copy of your kernel’s configuration) in order to compile a driver.
Finally, xsupplicant needs one major library. As discussed previously, most EAP methods are based on TLS in one way or another. xsupplicant uses the OpenSSL TLS implementation. Install version 0.9.7 or later. Before fetching the source from http://www.openssl.orgopenssl.org, check to see if there is a package available for your distribution.
Compiling and Installing xsupplicant
Compiling and installing xsupplicant follows the same routine that any other open-source package. Released code can be fetched from http://sourceforge.net/projects/open1x/, and compiled in the standard Unix way:
root@bloodhound:~# tar -xzvf xsupplicant-1.0.1.tar.gz
root@bloodhound:~# cd xsupplicant
root@bloodhound:~/xsupplicant# ./configure
root@bloodhound:~/xsupplicant# make
root@bloodhound:~/xsupplicant# make install
As this book went to press, xsupplicant 1.0.1 was several months old, and massive development had occurred in the CVS version. (This section is written using a late 2004 CVS version.) Among many other improvements, the CVS version has preliminary WPA support. The CVS version can be fetched from an anonymous CVS server, and compiled in the standard Unix way:
root@bloodhound:~# cvs -z3 -d:pserver:[email protected]:/cvsroot/xsupplicant co xsupplicant
root@bloodhound:~# cd xsupplicant
root@bloodhound:~/xsupplicant# ./configure
root@bloodhound:~/xsupplicant# make
root@bloodhound:~/xsupplicant# make install
As a result of the build, you get three executables installed; the only one you are likely to use is /usr/local/sbin/xsupplicant.
Configuring xsupplicant
When run, xsupplicant searches for its configuration file in /etc. The config file, /etc/xsupplicant.conf, does not get installed by default, so copy it over to the expected location.
root@bloodhound:~/xsupplicant# cp etc/xsupplicant.conf /etc/Configuration files specify the authentication method, user identity, possibly the password, and a certificate location to validate the certificate from the network. Certificate authentication of the network may be disabled by setting the certificate location to NONE, but it is not recommended. When setting up the network, you may need to convert certificates between different forms. OpenSSL can easily convert between different formats by specifying the formats on the command line.
root@bloodhound:~# openssl x509 -inform
           DER
           -outform

              PEM

           -in

              MyCA.der

           -out

              MyCa.pem
Passwords are stored in the configuration file in a nonencrypted form, so you may wish to have the system prompt for the password to avoid putting sensitive information in configuration files. When no password is in the file for the network you are connecting to, xsupplicant will prompt the user.
In the configuration file, settings can be stored as part of a profile for an SSID. The following example is a simple configuration for a network using PEAP, with EAP-MSCHAP-V2 inner authentication on a network called batnet. xsupplicant can be configured to run a command after authentication completes, or that can be left to the configuration scripts on the operating system.
### GLOBAL SECTION

logfile = /var/log/xsupplicant.log
network_list = all
default_netname = batnet

first_auth_command = dhcpcd %i

###  NETWORK SECTION

batnet{
  # allow_types = eap_tls, eap_md5, eap_gtc, eap-otp
  allow_types = eap_peap

  # Phase 1 ("outer") identity
  identity = msg
  # Alternative, but common specification is to not reveal username
  # identity = anonymous

  eap-peap {
      # It is a good idea to validate the certificate and not do "none"
      # root_cert = NONE
      root_cert = rootCA.pem
      root_dir = /etc/xsupplicant.d
      chunk_size = 1398
      random_file = /dev/random

      # ** Inner method configuration
      allow_types = eap_mschapv2

      # Inner method configuration
      eap-mschapv2 {
        username = msg
        password = imnottelling
      }
  }
}
Pseudorandom number generation
Like many other security protocols, EAP methods require a “good” source of random numbers. Linux provides two random number devices, /dev/random and /dev/urandom. The former returns random bits that are within the system’s entropy pool. If insufficient entropy is available, the read will block until sufficient entropy is available, while the latter will return as much data is requested, perhaps at the cost of quality.
Connecting and Authenticating to a Network
The first step in gaining access to an 802.1X-protected network is to associate to it. xsupplicant depends on the system to perform the association. The initial configuration should also configure the card to use encrypted frames, although the key configured does not matter. Configure a dummy key to indicate to the driver that it should run in encrypted mode; xsupplicant will replace the key after successful authentication with a wireless extension library call. The most common way of configuring the connection is to use iwconfig to plumb a key and configure the network, and then use ifconfig to bring the interface up and start searching for the network. Naturally, these commands may be triggered by the configuration system scripts when a wireless card is inserted.
root@bloodhound:~# iwconfig ath0 key 12345678901234567890123456
root@bloodhound:~# iwconfig essid essid "batnet"
root@bloodhound:~# ifconfig ath0 up
After the system has associated with the network, run xsupplicant. The -i option indicates which interface it should run on. Debugging is activated with -d, with the following letters determining what information is printed out. Log messages are sent to the console with -f. The following example has cut the raw packet dumps.
root@bloodhound:~# /usr/local/sbin/xsupplicant -i ath0 -dasic -f
Using default config!
network_list: all
Default network: "default"
Startup command: "echo "some command""
First_Auth command: "dhclient %i"
Reauth command: "echo "authenticated user %i""
Logfile: "/var/log/xsupplicant.log"
Allow Types: ALL
ID: "msg"
peap root_cert: "NONE"
peap chunk: 1398
peap rand: "/dev/random"
PEAP Allow Types: ALL
mschapv2 username: "msg"
mschapv2 password: "imnottelling"
Interface ath0 initalized!
At this point, xsupplicant has read the configuration file, and checks to see if the wireless interface is associated to an AP. If it is, the authentication process can begin.
[INT] Interface ath0 is wireless!
[INT] The card reported that the destination MAC address is now 00 0B 0E 00 F0 40
[INT] Working with ESSID : batnet
[CONFIG] Working from config file /etc/xsupplicant.conf.
[STATE] (global) -> DISCONNECTED
[STATE] Processing DISCONNECTED state.
[STATE] DISCONNECTED -> CONNECTING
[STATE] CONNECTING -> ACQUIRED
[STATE] Processing ACQUIRED state.
Once the system has associated to an AP, it begins authenticating.
Connection established, authenticating...
[STATE] Sending EAPOL-Response-Identification
[STATE] ACQUIRED -> AUTHENTICATING)
[STATE] Processing AUTHENTICATING state.
[STATE] Sending EAPOL-Response-Authentication
****WARNING**** Turning off certificate verification is a *VERY* bad idea!  You should not use this mode outside of basic testing, as it will compromise the security of your connection!
[AUTH TYPE] Packet in (1) :
20
[AUTH TYPE] Setting Key Constant for PEAP v0!
[INT] Interface eth0 is NOT wireless!
Userdata is NULL!  We will probably have problems!
[STATE] (global) -> DISCONNECTED
[STATE] Processing DISCONNECTED state.
[STATE] DISCONNECTED -> CONNECTING
[STATE] Processing AUTHENTICATING state.
[STATE] Sending EAPOL-Response-Authentication
At this point, a great deal of debugging output will appear as certificates are exchanged back and forth and validated by both sides of the conversation. Once the TLS tunnel is established, the debug output shows the inner authentication. In the case of EAP-MSCHAP-V2, the RADIUS server sends a challenge. Based on the challenge value and the shared secret, a response is generated.
 [AUTH TYPE] (EAP-MSCHAPv2) Challenge
[AUTH TYPE] (EAP-MS-CHAPv2) ID : 2F
[AUTH TYPE] Authenticator Challenge : C6 02 26 BE C3 E0 44 03 13 6E 1F BA F0 B3 1D 5A
[AUTH TYPE] Generated PeerChallenge : 28 62 AA A2 8C 8E EB 82 D1 9B 2F 9A 54 67 93 2C
[AUTH TYPE] PeerChallenge : 28 62 AA A2 8C 8E EB 82
[AUTH TYPE] AuthenticatorChallenge : C6 02 26 BE C3 E0 44 03
[AUTH TYPE] Username : msg
[AUTH TYPE] Challenge : 48 E7 AA 53 54 52 98 62
[AUTH TYPE] PasswordHash : C5 A2 37 B7 E9 D8 E7 08 D8 43 6B 61 48 A2 5F A1
[AUTH TYPE] Response : 4D 96 51 8C 18 3A F7 C7 70 15 47 13 19 D8 D6 9B 36 00 AD E8 FA 9A 0F 28
[AUTH TYPE] myvars->NtResponse = 4D 96 51 8C 18 3A F7 C7 70 15 47 13 19 D8 D6 9B 36 00 AD E8 FA 9A 0F 28
[AUTH TYPE] response->NT_Response = 4D 96 51 8C 18 3A F7 C7 70 15 47 13 19 D8 D6 9B 36 00 AD E8 FA 9A 0F 28
[AUTH TYPE] (EAP-MSCHAPv2) Success!
[AUTH TYPE] Server authentication check success!  Sending phase 2 success!
Once the system has successfully authenticated, the AP will supply keys. Keys are both encrypted and authenticated, using keys derived from the shared cryptographic keys from the phase 1 TLS exchange. Two key messages are sent, one with the unique unicast key for the station, and one with the broadcast key shared by all stations. xsupplicant uses the wireless extensions API to set the keys in the driver, where they will be viewable with iwconfig.
Processing EAPoL-Key!
[INT] Key Descriptor   = 1
[INT] Key Length       = 13
[INT] Replay Counter   = 41 2F BB 2D 00 00 00 D5
[INT] Key IV           = 69 4C 45 D7 CF C3 DD CD 2A 3A F3 CB 04 7A F4 A3
[INT] Key Index (RAW)  = 01
[INT] Key Signature    = C2 05 6C 3A EB 25 E9 B9 8E FC 60 D6 77 44 57 22
[INT] EAPoL Key Processed: broadcast [2] 13 bytes.
[INT] Key before decryption : ED 5D 03 D2 7A DE B4 60 29 FD FD F5 42
[INT] Key after decryption : FB BB AC D3 6F 7D 0A 3F FF 2A CF 33 4E
[INT] Successfully set WEP key [2]
Processing EAPoL-Key!
[INT] Key Descriptor   = 1
[INT] Key Length       = 13
[INT] Replay Counter   = 41 2F BB 2D 00 00 00 D6
[INT] Key IV           = 66 15 69 E2 B2 8C 0E 89 7C D3 94 8C 93 25 43 1B
[INT] Key Index (RAW)  = 80
[INT] Key Signature    = 49 C1 15 B8 E9 D0 87 53 A6 FD 5D 76 CB 51 9D 65
[INT] EAPoL Key Processed: unicast [1] 13 bytes.
[INT] Using peer key!
[INT] Successfully set WEP key [1]
[INT] Successfully set the WEP transmit key [1]
Some drivers implement private system calls to report keys. Atheros cards using the MADwifi driver can list keys with iwlist ath0 key; many drivers will also report the unicast key in iwconfig.
WPA on Linux
WPA is not generally available on Linux because there is no standard way of obtaining the necessary information to perform the four-way handshake. xsupplicant runs in user space, but some of the data necessary to compute the four-way handshake must be obtained through the driver. Each driver has defined its own system calls for fetching this data, which requires supplicants to track the development of private system calls in every driver. A future release of the wireless extensions API will support the necessary system calls, and WPA will be made available in both open source and commercial products.
[77] There are two major encapsulation formats for data on 802.11. RFC 1042 is used for IP, and universally supported. Windows and MacOS support IPX and AppleTalk with 802.1H. Not all Linux drivers support 802.1H.
[78] The Personal Computer Memory Card International Association (PCMCIA) is the industry group that came up with the PC Card specification. Initially, the cards were known as “PCMCIA cards,” but the name was later shortened to “PC Card.” I use both interchangeably, especially since Linux support for these cards still goes by the longer PCMCIA. (In reference to the unwieldy nature of the acronym, one common joke expands it as “People who Can’t Manage Computer Industry Acronyms.”)
[79] I use the term SSID in this book to refer to a network name. Some drivers, including the WaveLAN drivers, use ESSID instead. The distinction is that an ESSID is a network name assigned to an extended service set, not any old service set.
[80] NCR, which was founded in 1884 as the National Cash Register Company, was acquired by AT&T in 1991. I can only assume that a cash register company was interested in wireless networking because it would enable cash registers to be placed anywhere without wiring.
[81] It is likely that any card with 802.11a support is based on an Atheros chipset. Rather than include a list that will quickly become outdated, I suggest you refer to the searchable list at http://customerproducts.atheros.com/customerproducts/.
[82] Christian Sandvig, a professor at the University of Illinois at Urbana-Champaign, takes exception to the SDR interpretation of FCC rules in a paper titled “Hidden Interfaces to ‘Ownerless’ Networks” (http://www.spcomm.uiuc.edu/users/csandvig/research/Hidden_Interfaces.pdf).