B. SQL Server Management Studio
Introduction
SQL Server Management Studio, SSMS for short, is a GUI application that is used by database administrators and developers alike to interact with SQL Server, Analysis Services, Integration Services, Reporting Services, SQL Server Mobile, and SQL Express. This appendix focuses on features used by developers working with SQL Server.
For developers, SSMS revolves around projects used to build queries and managing databases that will run those queries. The queries themselves may end up being run as stand-alone scripts or as commands executed by ADO.NET in client and middle-tier applications.
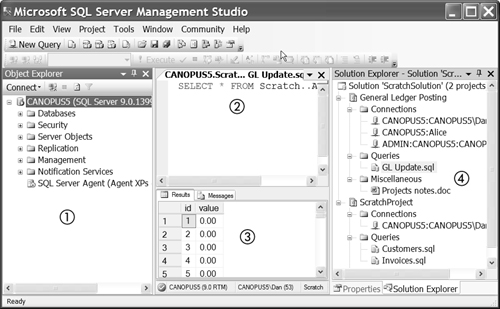
The main screen of SSMS, shown in Figure B-1, is configurable. Figure B-1 shows a typical configuration a developer might use. The Database Object Explorer (1) is on the left; it is used to explore and build the databases, tables, and other objects that make up an instance of SQL Server, and provides utility similar to that provided by Enterprise Manager in SQL Server 2000. The Query window (2) is in the center top; it is used to try out queries and shows their results in the Results (3) window at the center bottom. It serves the same purpose Query Analyzer did in previous versions of SQL Server. The Solution Explorer (4), at the right of the screen, holds projects that themselves hold connections to databases, SQL Scripts, and miscellaneous files.
Figure B-1. SSMS main screen
In this appendix, we will look at working with SSMS solutions and projects, ad hoc queries, creating and managing connections to databases, and using and creating script templates.
Solutions and Projects
The main development element of SSMS is the project. A project consists of a collection of connections, a collection of Transact-SQL (T-SQL) scripts, and a collection of miscellaneous files. Ad hoc queries are stand-alone queries that are not part of a project.
SSMS is based on the same framework as Visual Studio 2005 and incorporates a development idiom that has been part of Visual Studio since it first shipped. A developer works on a project, which is just a collection of files that the developer feels belong together. Projects are grouped into a solution so they can be worked on together.
The same project can belong to multiple solutions. The idea is that a solution represents a number of projects that are related in some ad hoc way. One project might contain scripts that manage an accounting application, for example; another project might contain scripts that set up the accounting application; and yet another project might contain scripts that test the accounting application. A different solution might have the project with the accounting application in it and an application that managed inventory. Projects are put into solutions for the convenience of the developer.
SSMS visually displays solutions and projects as a tree. Later in this appendix, we will be looking at building solutions. Figure B-2 shows a typical SSMS solution. At the top of the tree is the name (1) of the solution—in this case, ScratchSolution. It contains two projects below it: the General Ledger Posting project (2) and the ScratchProject. A project consists of Connections (3), Queries (4), and Miscellaneous files (5).
Figure B-2. SSMS solution

The connections are used to keep track of the instances of SQL Server you typically connect to. Queries are the SQL script files the developer is working on. Miscellaneous files keep track of the other odds and ends typically associated with a project.
Configuration
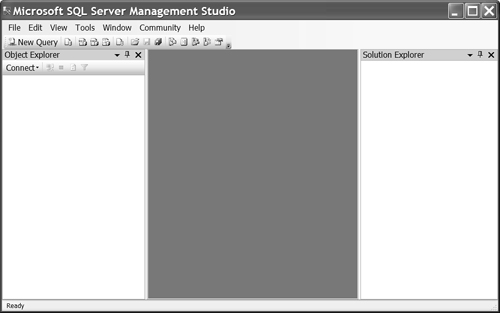
SSMS can be configured to suit your tastes. When it is first installed, it is configured to open a connection to the local instance of SQL Server and display summary information about it. Figure B-3 shows SSMS opened with a summary view.
Figure B-3. Summary of local instance of SQL Server

To change the configuration of SSMS, choose Tools > Options, as shown in Figure B-4.
Figure B-4. Configuration options

The Options command will bring up the Options dialog box, shown in Figure B-5. Use the tree (1) on the left side of the dialog box to select the options you want to configure. You can experiment with the various options to see what they do, but they let you control everything from enabling word wrap in editors to what phrase you want to use as a batch separator. If you want to keep the overhead associated with opening SSMS to a minimum, select Environment Layout/Open Empty Environment (2). Then SSMS will not try to connect to the local instance of SQL Server when it starts.
Figure B-5. Options dialog box

With Environment Layout set to Open Empty Environment, SSMS will open more quickly and look like Figure B-6.
Figure B-6. Empty environment
Making a Solution/Project
There is no way to make an empty solution as there is in Visual Studio 2005; you must create a project, and that will create a solution that contains it. To make a new project, choose File > New > Project, as shown in Figure B-7.
Figure B-7. Making new project and solution

The Project command will bring up the New Project dialog box, shown in Figure B-8. In this dialog box, select the SQL Server Scripts templates (1). Fill in a name for the project (2), a directory (3) to store it, and a name for the solution (4). Leave the Create Directory for Solution checkbox checked. This will create a new directory for the solution and make the project part of it.
Figure B-8. New project dialog box

Figure B-9 shows how the Solution Explorer tree looks for a new project.
Figure B-9. New project
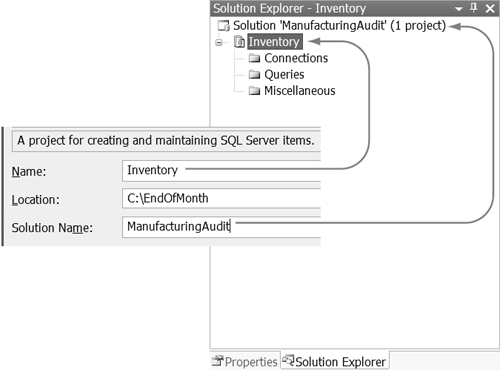
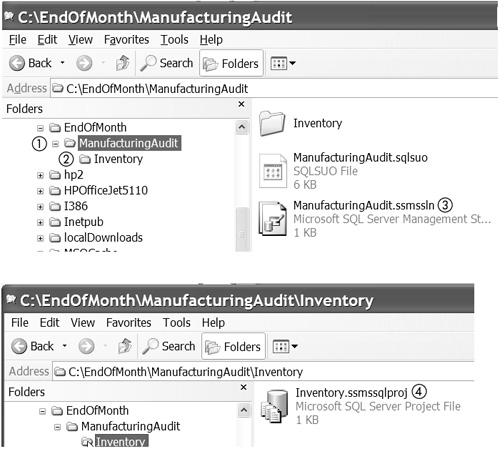
The New Project dialog box will create two new directories, as shown in Figure B-10. One will have the name of the solution (1), and the other will be its child and have the name of the project (2). The solution is in a file with an .ssmssln (short for SSMS Solution) extension (3). The project is in a file with a .ssmssqlproj extension (4).
Figure B-10. Directories and files for new project
Adding a Connection
When you have created a project, it’s probably best to add connections to it first. Connections allow you to create new queries without having to type connection information. You can make connections with a Windows identity or a SQL login. You add a connection by right-clicking the Connections folder in the Solution Explorer tree, as shown in Figure B-11.
Figure B-11. Making new connection

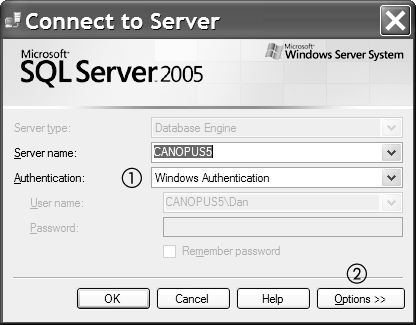
The New Connection command will bring up the Connect to Server dialog box, shown in Figure B-12. From this dialog box, you can select (1) Windows or SQL Server authentication. The Options button (2) allows you to pick the default database to use after the connection is made.
Figure B-12. Connect to server dialog box
Connections are displayed (1) in the Solution Explorer tree, as shown in Figure B-13. Note that connections that use Windows authentication will authenticate with the identity that is running SSMS, not necessarily the identity that created the connection for the project.
Figure B-13. Connection in tree.

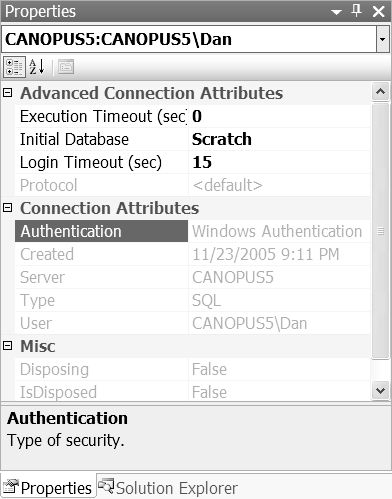
Connections have properties, some of which you can change, as shown in Figure B-14. You can access the properties of a connection by right-clicking the connection itself. Note that you cannot change the SQL Server instance for the connection, but you can change the execution and login timeouts, as well as the initial database for the connection.
Figure B-14. Connection properties
Adding a Query
Queries, or SQL scripts, are added to a project through the New Query command in a connection’s context menu, as shown in Figure B-15. Note that you bring up the context menu by right-clicking the connection.
Figure B-15. Adding query

Clicking the New Query command will add a query, as shown in Figure B-16. The query will be named automatically, but you can change the name after it has been added by right-clicking the query in the Solution Explorer tree.
Figure B-16. New query

Note the query was opened according to the connection properties, including the initial database.
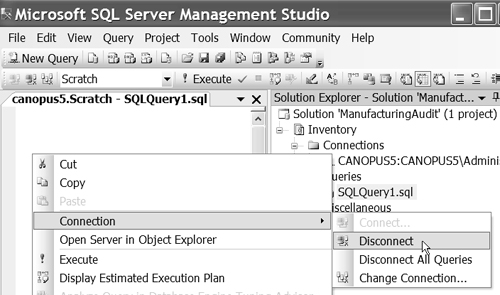
The connection a query is using can be disconnected or changed by right-clicking the background of the query, as shown in Figure B-17.
Figure B-17. Changing query connection
The query window acts the same way that a similar window in Query Profiler did; you can type a query and then execute it by pressing the F5 key. If nothing in the query window is highlighted, everything in the query window is executed; otherwise, only the text that is highlighted is executed. The results appear in the results window below the query window, as shown in Figure B-18. The results window can be toggled on and off by pressing Ctrl+R.
Figure B-18. Query results

The query window has a GUI query designer similar to one in Access and Visual Studio 2005. The query designer can be used to design a single SELECT, UPDATE, INSERT, or DELETE statement. You can access the query designer by right-clicking the query window, as shown in Figure B-19. Note that the menu that appears also gives access to other tools for queries.
Figure B-19. Selecting query designer
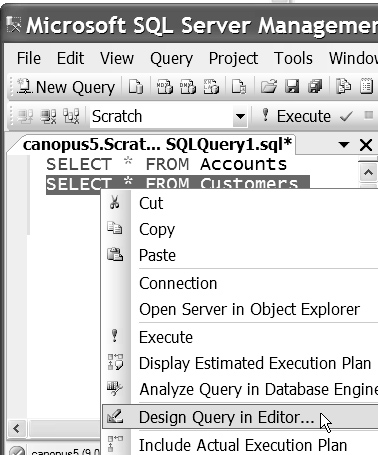
If something is selected in the query window, as it is in Figure B-19, the query designer will be initialized with that expression when it is opened. If nothing is selected, the query designer will open ready to design a query from scratch.
The Design Query in Editor command brings up the Query Designer dialog box, shown in Figure B-20. This designer is documented in Books Online; look for “Query Designer” in the index. We will look at a few features of it.
Figure B-20. Query designer

The Query Designer is divided into three parts. The tables (1) that will be used in the query appear in the top window. The criterion (2) for what columns are returned, sorting, and so on appear in the middle windows. The text form of the query (3) appears in the bottom window. These windows are synchronized—that is, a change in one window will be updated automatically in the others.
Several of the tools for making queries are available by right-clicking the background of the query windows, as shown in Figure B-21. Group By (1) can be added and the type query can be changed (2)—for example, to an INSERT. You can also add tables (3) to the query.
Figure B-21. Adding table
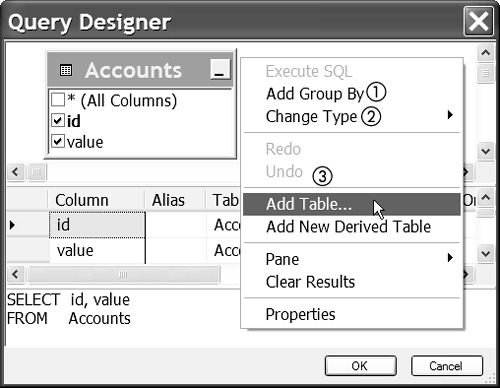
Choosing the Add Table command brings up the Add Table dialog box, shown in Figure B-22. From this dialog box, you can add tables, views, and so on to the query. Note that the objects shown in the list box come from the connection for the query.
Figure B-22. Add table dialog box

When a table is added to the query designer, as shown in Figure B-23, it is joined to the other tables in the query based on the same column names. The join itself (1) is shown as a line between the tables. Right-clicking this line brings up a dialog box that allows you to adjust the characteristics of the join or delete the join. Any columns selected (2) in the table will be shown in the center window. The table itself will appear in the text (3) form of the query.
Figure B-23. Table added to query designer

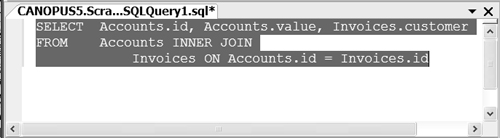
Clicking the OK button in the query designer inserts the query into the query window, as shown in Figure B-24, with the entire query selected.
Figure B-24. Selected query
The query window will allow you to edit queries and execute them, but it does not provide the debug capabilities that were available in Query Analyzer. You can debug queries, however—that is, single-step through the T-SQL—from Server Explorer in Visual Studio 2005.
Adding Miscellaneous Files
Miscellaneous files are added to a project by right-clicking the project name in the Solution Explorer tree and then selecting Add > Existing Item, as shown in Figure B-25.
Figure B-25. Adding miscellaneous file

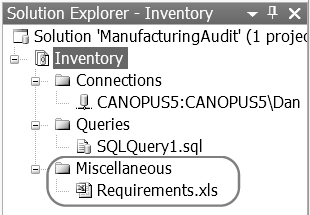
The file you select with the Existing Item command will appear in the Miscellaneous folder of the project, as shown in Figure B-26. Note that if the file you select to add has an .sql extension, it will be added to the Queries folder, not the Miscellaneous folder.
Figure B-26. Excel spreadsheet added to project
Templates
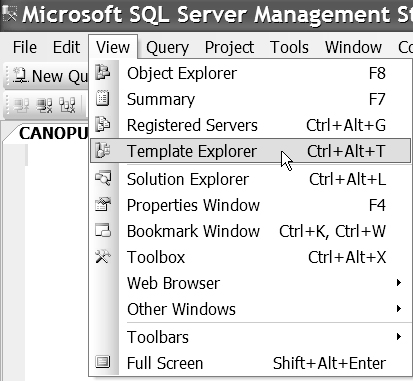
Many queries are similar except for a few object names or terms—for example creating the skeleton of a new Service Broker application. SSMS includes a large selection of templates that will do most of the “busywork” part of a query for you; you just fill in a few values in a dialog box, and it fills in the rest. You can also add your own templates. You use Template Explorer to select and manage templates. You bring up Template Explorer by choosing View > Template Explore, as shown in Figure B-27.
Figure B-27. Selecting template explorer
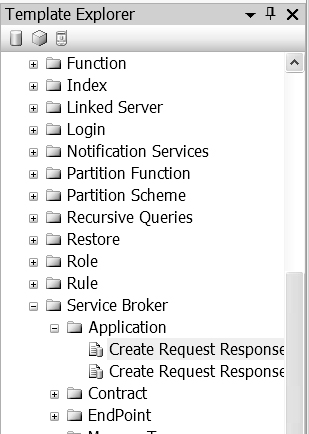
Template Explorer is a tree. Templates are kept track of in folders, and some of these folders contain folders themselves, as shown in Figure B-28.
Figure B-28. Template explorer
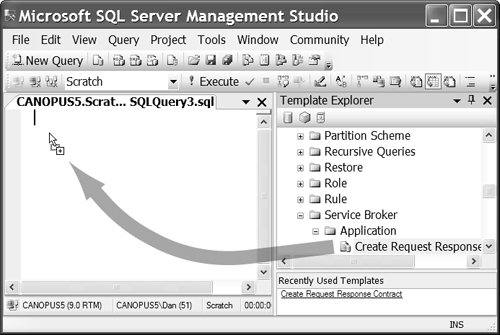
To use a template in a query, drag and drop it into a query window, as shown in Figure B-29.
Figure B-29. Dragging in template
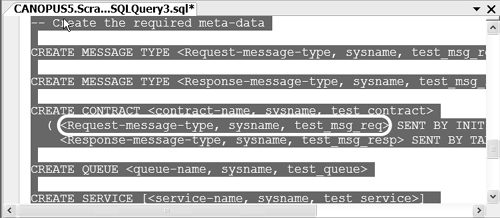
The template will be dropped into the window and selected, as shown in Figure B-30. Notice that some parts of it have a comma-separated list of names inside angle brackets (< >). Each of these is a template parameter that you will fill in through a dialog box.
Figure B-30. Dropped template
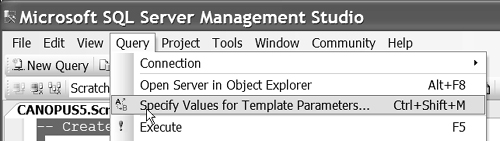
To fill in the template parameters, choose Query > Specify Values for Template Parameters, as shown in Figure B-31.
Figure B-31. Specify values for template parameters command
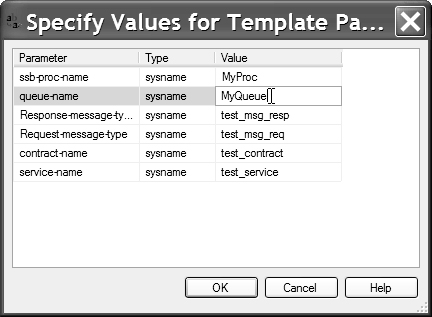
The Specify Values for Template Parameters command will bring up the Specify Values for Template Parameters dialog box, shown in Figure B-32. Each line in the dialog box contains the name of the parameter, what the type of the parameter is, and a default value for that parameter. You can type a new value over the default value to change it. Note that the type specified for the parameter is only a hint, in that it will not check whether what you type is in fact the type that was specified.
Figure B-32. Filling in template parameters
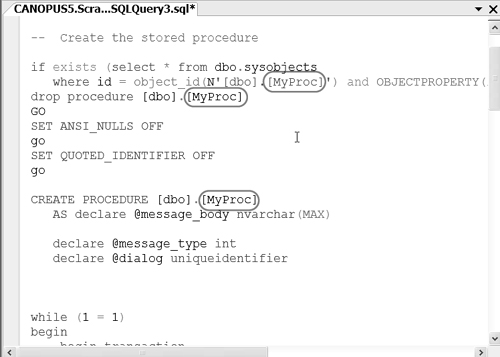
Clicking OK in the Specify Values for Template Parameters dialog box will fill in all the parameters in the template, as shown in Figure B-33. This template contains several items, including the stored procedure named MyProc. This stored procedure was filled in, in multiple places, from the input in Figure B-32. When you have inserted the values, in general, you cannot insert them again unless immediately after inserting the values, you use the undo feature, by pressing Ctrl+Z or choosing Edit > Undo. Note that the inserts are done individually, so it may take several undos to get the original template back.
Figure B-33. Script with parameters filled in
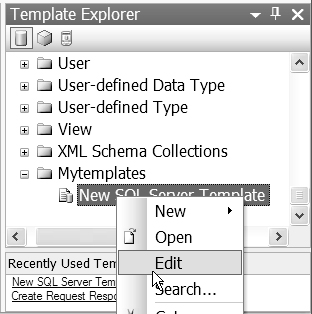
You can create your own templates. Right-clicking any folder in Template Explorer will allow you to add a folder or a template to Template Explorer, as shown in Figure B-34.
Figure B-34. Adding a new template

Choosing New > Template will add a new template to the folder, as shown in Figure B-35. The template will be named automatically, but you can change the name by right-clicking it.
Figure B-35. Template added to tree

A template is just text sprinkled with parameters in angle brackets, as we saw in Figure B-30. To edit the new query, right-click it and choose the Edit command, as shown in Figure B-36. This will open a query window in which you can type your template. Choosing File > Save or pressing Ctrl+S will save the template.
Figure B-36. Selecting a template to edit
Templates are fairly straightforward to create. The Specify Values for Template Parameters dialog box, shown in Figure B-32 earlier in this chapter, does a simple copy and replace. Figure B-37 shows a simple template. Everywhere, there are three comma-separated strings enclosed in angle brackets in the template; they are mapped to the three columns in the Template Parameters dialog box.
Figure B-37. Template parameter mapping

The same name can appear in more than one template parameter, as shown in Figure B-38. The parameter name “table” is used twice. The Type and Value columns of the Template Parameters dialog box will be filled out according to the first appearance of the parameter in the template. Note that the second table parameter has two commas in it; even though the Type and Value descriptions from this template parameter are ignored by the Template Parameters dialog box, empty values must be used, or the whole template parameter will be ignored.
Figure B-38. Parameter name used twice

The result of using the same parameter name more than once is shown in Figure B-39.
Figure B-39. Parameter name used twice
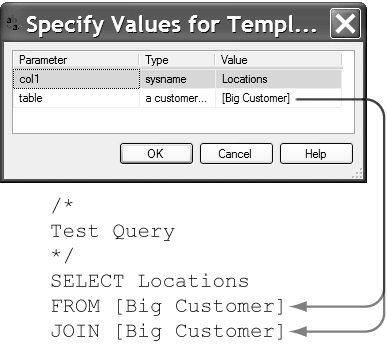
Templates are a very powerful and straightforward way to encapsulate coding techniques. It is important to keep in mind that they use a simple copy-and-replace mechanism and do no syntax or other checks. Note that the resulting query shown in Figure B-39 is syntactically incorrect. You cannot check the syntax of a template directly; the angle brackets in the template will always produce a syntax error. You must use your template to create a query and then check the results to be sure that they are syntactically correct. Even then, because a template is just a simple copy-and-replace mechanism, it is possible for users of a template to enter values that produce syntactically incorrect results.
Object Explorer
SSMS includes an Object Explorer that can be used to view and maintain the many objects used by SQL Server 2005. You access it by choosing View > Object Explorer, as shown in Figure B-40.
Figure B-40. Object explorer command

Object Explorer can be used to explore any of the services provided by SQL Server 2005. Choose Connect > Service Name to make a connection, as shown in Figure B-41. This will bring up a connection dialog box. You cannot explore any objects or services your identity or login does not have rights to access, of course.
Figure B-41. Service-Connection menu

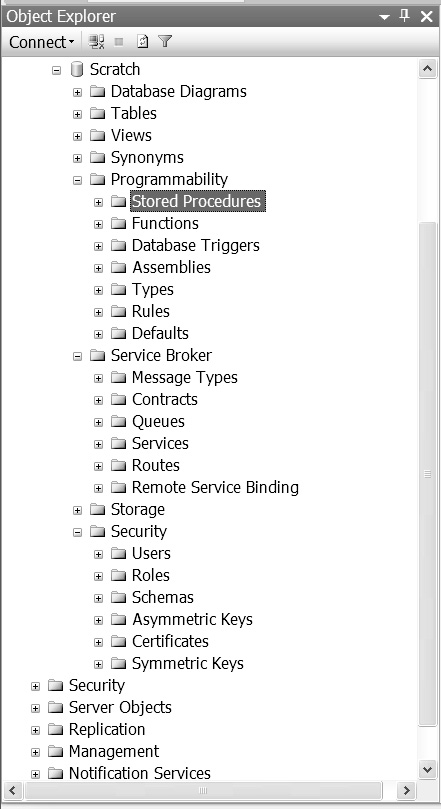
Object Explorer shows a tree for each SQL Server 2005 service it has a connection to. Figure B-42 shows a tree for a connection to a database engine. Note that the tree is just a hierarchy of all the objects in the SQL Sever 2005 instance that the connection has access rights to.
Figure B-42. Explorer tree
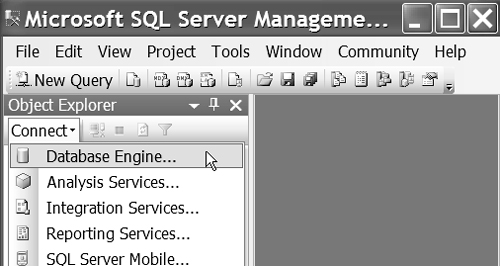
Figure B-43 shows some of the typical objects than can be explored. Notice that things such as stored procedures are in the Programmability folder.
Figure B-43. Typical objects
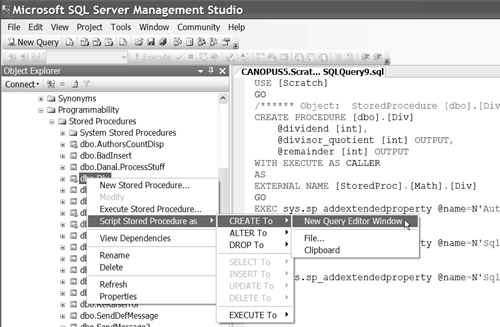
Objects can be scripted, created, and used from Object Explorer. These functions are available by right-clicking an object or a folder. Figure B-44 shows the menus that are accessed by right-clicking a stored procedure object. The right side of the figure shows the result of choosing Script Stored Procedure As > Create To > New Query Editor Window. You can edit this script and then execute it to change the definition of the stored procedure.
Figure B-44. Object menu
The Script Stored Procedure As command shown in Figure B-44 is used to execute a stored procedure and brings up the Execute Procedure dialog box, shown in Figure B-45. Clicking the OK button in this dialog box after entering the values for the parameters as appropriate will produce the results of executing the stored procedure in a query window similar to that shown in Figure B-18 earlier in this chapter.
Figure B-45. Executing a stored procedure

Object Explorer can be used in conjunction with the Summary window. You can bring up the Summary window by pressing the F7 key or choosing View > Summary. The Summary window will expand what you have selected in Object Explorer, as shown in Figure B-46. Object Explorer will allow you to select only a single object for scripting. The Summary window will let you select multiple objects for scripting.
Figure B-46. Summary window
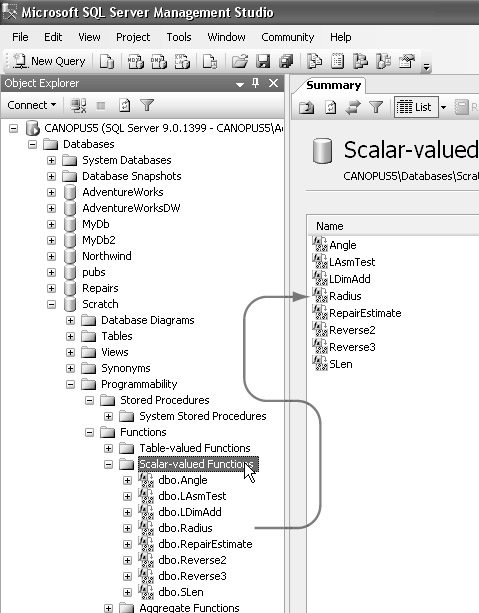
Figure B-47 shows multiple objects in the Summary window selected for scripting.
Figure B-47. Scripting multiple objects

Enterprise Manager in SQL Server 2000 had a similar capability and also allowed the stored procedure to be debugged—that is, executed one expression at a time. SSMS does not have this capability, but Visual Studio 2005 does.
SSMS provides different capabilities for different objects; you can right-click an object or folder to find these capabilities.