
5. More Editing in a Spreadsheet
In This Chapter
• Automatically filling a range with numbers
• Finding and replacing information
• Introduction to the Quattro Pro Experts
You’ll probably spend more time editing in a spreadsheet than anything else you’ll do. So, we need to cover a few more editing techniques that I think you’ll make use of on a regular basis. In this chapter, I’ll show you how to automatically fill a range with numbers and how to assign names to ranges so that you can refer to the range by its name instead of the cell addresses of the range’s upper-left and lower-right cell. Then, I’ll show you how to use the Find and Replace feature in Quattro Pro to help you quickly change all occurrences of information you specify.
Last, we’ll go over the spell-checking features available in Quattro Pro, and then I’ll provide a brief overview of the Quattro Pro Experts. When you finish this chapter, you’ll have completed the basics of using Quattro Pro.
Working with Ranges
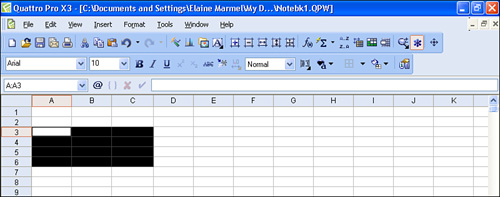
In Chapter 3, “Navigating in a Notebook,” I showed you how to select a range of cells and how to refer to a range of cells using the address of the cell in the upper-left corner of the range and the address of the cell in the lower-right corner of a range separated by a period. For example, A3.C6 refers to the cells selected in Figure 5.1.
Figure 5.1. The range A3.C6 is selected in this figure.
There is a lot more to ranges than just selecting them. I also showed you, in Chapter 3, how to fill a range with commonly used labels such as months. In this section, I’ll show you how to fill a range with numbers and then I’ll show you how to name a range so that you don’t have to refer to it by its upper-left and lower-right cell addresses.
Automatically Filling a Range with Numbers
As you saw in Chapter 3, you can fill a range of rows or columns with commonly used labels such as months or weekdays. You also can fill a range with numbers instead of labels. It’s possible that the numbers will serve as labels—for example, you may need to set up labels that represent 10 consecutive years, or you may want fill a range with only odd numbers. In either case, you use the Fill Series dialog box, which enables you to fill a range with either numbers or labels. Follow these steps:
- Select the range that you want to fill.
- Open the Edit menu, point to Fill, and click Fill Series. Quattro Pro displays the Fill Series dialog box shown in Figure 5.2.
Figure 5.2. Use this dialog box to fill a range with numbers or labels.
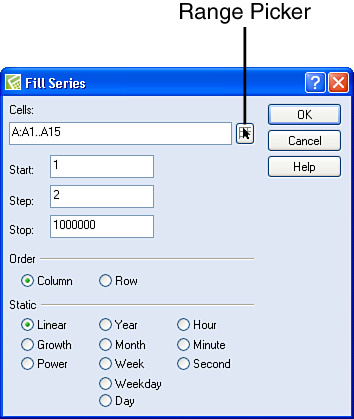
- In the Start box, type the first number you want in the range; for example, if you are filling the range with odd numbers, type
1or the first odd number you want to appear in the range. - In the Step box, type the interval you want Quattro Pro to use when filling the range. For example, if you are filling the range with odd numbers, type
2. - In the Static section, select an option; for example, if you are filling the range with odd numbers, click Linear.
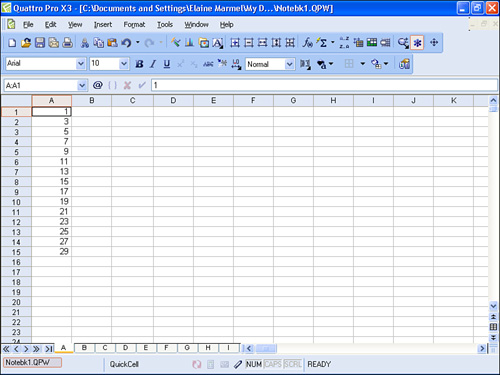
- Click OK. Quattro Pro fills the range as you specify (see Figure 5.3).
Figure 5.3. The range after Quattro Pro fills it.
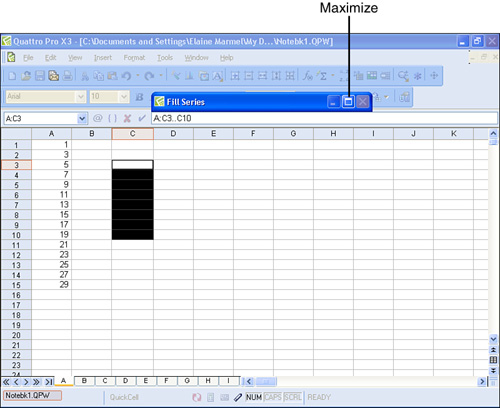
There are a couple of features worth understanding about the Fill Series dialog box. First, I told you to select the range you want to fill before you display the Fill Series dialog box; that step isn’t strictly necessary. I personally think it’s easier, but if you don’t select first, you can select the range from the Fill Series dialog box. Click the Range Picker button, and Quattro Pro compresses the Fill Series dialog box to nothing more than a title bar (see Figure 5.4). In this mode, you can select any range of cells in the spreadsheet to fill; after you make your selection, click the Maximize button on the Fill Series dialog box title bar, and Quattro Pro redisplays the Fill Series dialog box with the range you selected displayed in the Cells box.
Figure 5.4. When you click the Range Picker button in the Fill Series dialog box, Quattro Pro compresses the dialog box to only a title bar and the current cell selection, and enables you to select cells.
Second, the Static section of the Fill Series dialog box contains several options that are more complicated than they may seem at first glance. For example, all of the options in the second and third columns of the Static section rely on serial integer values; don’t get glassy-eyed, because the concept isn’t as difficult as its name implies. In the serial integer system, the date December 30, 1899 is represented by the number 0 and all other dates are calculations based on that beginning number. For example, December 31, 1899 is represented by the serial integer 1; January 2, 1900 by the serial integer 3 in Quattro Pro; and December 29, 1899 is represented by the serial integer -1 in Quattro Pro.
Tip

When you select Weekday, Quattro Pro skips dates associated with Saturdays and Sundays.
So, if you select, for example, Year, Month, Week, or Day in the Static section, Quattro Pro will fill the selected range with values in years, month names, or weekday names, assuming that the number in the Start box is a serial integer.
Last, the options in the first column of the Static section are rather interesting. As you saw in the example, if you click the Linear option, Quattro Pro fills the selected range with whole numbers beginning the with number in the Start box and using the interval you specify in the Step box. If you click the Growth option and step by any value other than 1, Quattro Pro fills the selected range in the following way:
• In the first selected cell, Quattro Pro stores the Start value.
• In the second selected cell, Quattro Pro stores the result of multiplying the Start value by the Step value.
• In the third selected cell, Quattro Pro stores the result of multiplying the value stored in the second selected cell by the Step value.
• In the fourth selected cell, Quattro Pro stores the result of multiplying the value stored in the third selected cell by the Step value.
As you can see in Figure 5.5, in which I set up the Start value as 1 and the Step value as 2, Quattro Pro continues the process for the entire selected range in Column B.
Figure 5.5. Column B shows how Quattro Pro fills a range when you select the Growth option in the Static section.

The Power option in the Static section works in a similar fashion to the Growth option, but the Power option uses the Step value only once. In Column C of Figure 5.6, you see the results of setting up the Fill Series dialog box so that the Start value is 3 and the Step value is 2. In Column D of the same figure, you see the results of setting up the Fill Series dialog box so that both the Start and Step values are 3. As you can see, Quattro Pro fills the range in the following way:
• In the first selected cell, Quattro Pro stores the Start value.
• In the second selected cell, Quattro Pro stores the result of multiplying the value stored in the first selected cell by itself the number of times specified in the Step box.
• In the third selected cell, Quattro Pro stores the result of multiplying the value stored in the second selected cell by itself the number of times specified in the Step box.
• In the fourth selected cell, Quattro Pro stores the result of multiplying the value stored in the third selected cell by itself the number of times specified in the Step box.
Figure 5.6. When you choose the Power option, Quattro Pro fills cells by multiplying values by themselves the number of times indicated in the Step box.
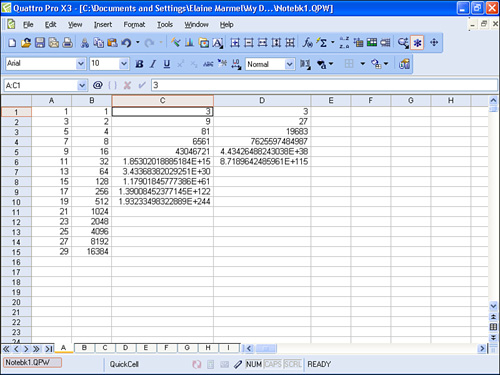
Those numbers in Cells C7, C8, C9, and C10 may look strange to you; they appear in scientific notation, which is a shorthand notation to express values with many decimal places. If you don’t know what the value means, you probably don’t need to know, so, don’t worry about it.
Naming a Range
Although you can refer to ranges using the cell addresses of the upper-left and lower-right cells in the range, sometimes, it’s easier to assign a name you can easily remember to a range. Then, in formulas, you can refer to the range name instead of the range address. And, if you move the contents of a named range to a different location in the spreadsheet, the name stays with the contents, not the original cells. This last fact plays an important role in making sure that formulas continue to work. If you don’t name a range and you move it, any formulas that refer to the original cell locations won’t work properly anymore, and you’ll need to correct the formulas. If, however, you name the range and use the range name in formulas, you can move the cells anywhere you want and formulas that use the contents of the named range will continue to work.
To assign a name to a range, follow these steps:
- Select the range you want to name.
- Open the Insert menu, point to Name, and click Name Cells. Quattro Pro displays the Cell Names dialog box shown in Figure 5.7.
Figure 5.7. Use this window to name a range of cells.
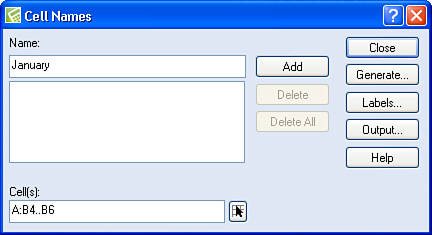
- If you supplied a label at the top or left edge of the selected range, Quattro Pro suggests that label as the name for the range. You can use a name up to 63 characters long, but try to be practical in the range names you assign—short, sweet, and to the point works best.
- Click Add. Quattro Pro adds the range name to the Name list.
- Click Close.
Remember the following notes about range names:
• Make it a practice to limit range names to include keyboard characters A through Z and 0 through 9. Although you can use some punctuation marks and special characters, you’re safer sticking to the alphabet and the numbers.
• Quattro Pro doesn’t distinguish between uppercase and lowercase letters and always displays alphabetic characters in uppercase.
• You can use alphabetic characters exclusively in a range name, but you cannot use numeric characters exclusively in a range name.
• You cannot use a valid cell address, such as C5 or F123, as a range name.
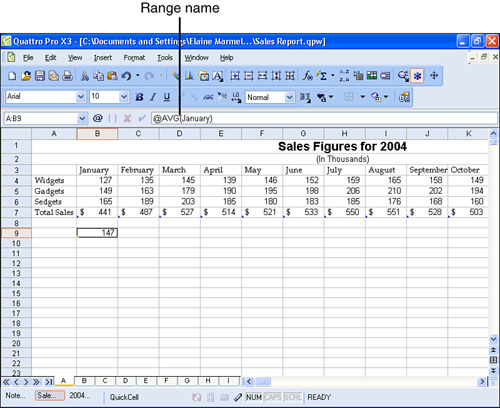
To make use of a range name, include it in a formula. In Figure 5.8, I’ve calculated the average value of the range named January, which consists cells B4.B6.
Figure 5.8. The formula in Cell B9 uses a range name.
A Shortcut for Naming Several Ranges
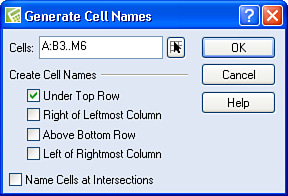
Suppose that you have a spreadsheet like the one shown in Figure 5.8 and you want to create a range name for each month of the year. You can quickly and easily create all of the range names using the Generate button in the Cell Names dialog box. First, select all of the cells you want to name, but make sure that you also include the headings you already placed in the spreadsheet. In this example, you select B3..M6. Then, open the Cell Names dialog box and click the Generate button. Quattro Pro displays the dialog box shown in the figure. Place a check in the Under Top Row box and click OK. Quattro Pro redisplays the Cell Names dialog box, showing range names for each month.
Identifying Named Ranges and the Cell Addresses
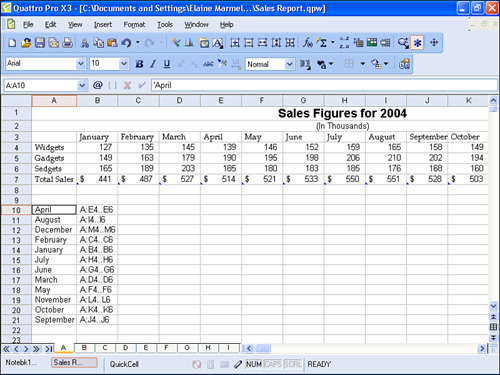
You can create a list of the range names in your spreadsheet along with their cell addresses to make it easy to determine which cells make up a range name. Find a blank place on the spreadsheet where there’s no chance of writing over any information in the spreadsheet—Quattro Pro needs two columns to create the list—and place the cell selector in the upper-left cell of the blank range. Then, open the Cell Names dialog box and click the Output button. Quattro Pro displays the Name Table dialog box; confirm that the location Quattro Pro suggests is a blank cell surrounded by other blank cells and click OK. Quattro Pro redisplays the Cell Names dialog box and places a table of range names and addresses in the specified location, as you can see from the figure. Click Close.
Finding and Replacing Information
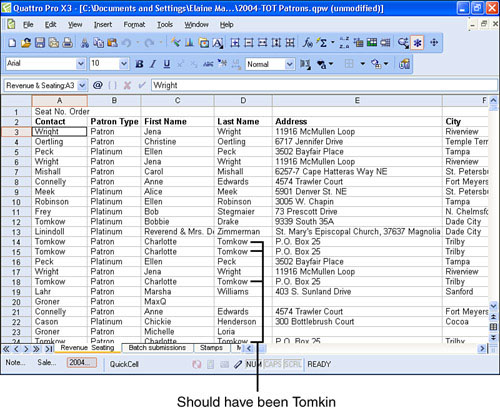
Using Quattro Pro’s Find and Replace feature, you can easily make adjustments to a spreadsheet. Suppose, for example, that somebody other than you set up a fairly lengthy spreadsheet for you using handwritten sheets. Now, I don’t know about you, but my handwriting skills have definitely deteriorated over the years because I use a keyboard so often. So, I would expect mistakes from some poor soul using handwritten sheets that I supplied. And, those mistakes might even be fairly consistent. Suppose, for example, that the data entry person typed the name “Tomkow,” as you see in Figure 5.9, when I actually wrote “Tomkin” on the handwritten sheets (not that you’d ever be able to prove it). In a case like this, the mistake is easily fixed.
Figure 5.9. You can easily change the spelling of a consistently misspelled word using the Find and Replace feature.
Open the Edit menu and click Find and Replace. Quattro Pro displays the Find and Replace window shown in Figure 5.10.
Figure 5.10. Use the Find and Replace window to correct spelling.
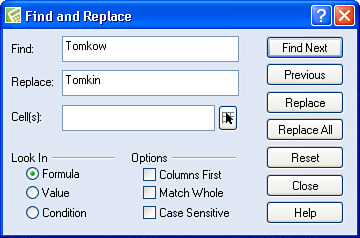
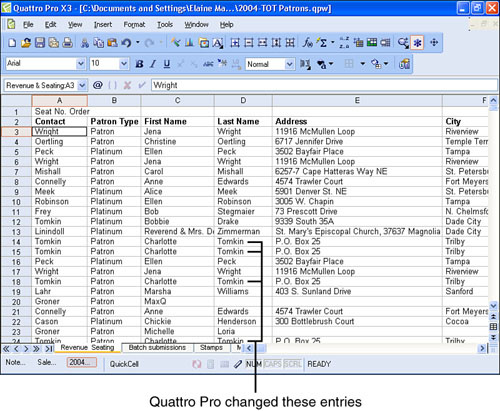
In the Find box, type the misspelled word. In the Replace box, type the correct spelling for the word. Then, click the Replace All button. When you click Close, you can see that Quattro Pro changed each occurrence of the word you typed in the Find box with the word you typed in the Replace box (see Figure 5.11).
Figure 5.11. Quattro Pro changes the spreadsheet based on the settings in the Find and Replace window.
Some interesting notes about finding and replacing:
• Quattro Pro finds and replaces from the position of the cell selector, so to search the entire spreadsheet, press the Home key to place the cell selector in Cell A1.
• You can limit the search to a selection of cells using the Range Picker button in the Cells box of the Find and Replace window.
• Using the options in the Look In section, you can tell Quattro Pro to find and replace information in formulas or values. In the context of finding and replacing information, “value” doesn’t mean “number;” it means “cell contents.”
• If you select the Condition option in the Look In section, you cannot replace but you can search based on a condition. For example, you can search for values greater than $500. To use the Condition option, type a question mark (?) followed by a condition in the Find box; in my example, you’d type ?>500.
• If you check the Columns First box, Quattro Pro searches down columns before searching across rows.
• If you check the Match Whole box, Quattro Pro finds only exact matches to the contents of the Find box.
• If you check the Case Sensitive box, Quattro Pro uses the capitalization in the Find box when searching. For example, if you check the Case Sensitive box and then search for Jones, Quattro Pro will not find jones during the search.
Tip
You might find it handy to copy the misspelled word before opening the Find and Replace box so that you can paste the exact misspelling into the box. You can use hotkey combinations like Ctrl+C to copy the misspelling and Ctrl+V to paste the misspelling into the Find box.
Checking Spelling
After laboring on a spreadsheet, you should probably check the spelling in it, particularly if you plan to show it to anyone. Checking spelling in Quattro Pro is simple; open the Tools menu and click Spell Checker. Quattro Pro begins checking the spelling of all text in your spreadsheet; when Quattro Pro encounters a word it suspects is misspelled, the Writing Tools window shown in Figure 5.12 appears. Words Quattro Pro can’t interpret appear at the bottom in the Not Found box.
Figure 5.12. Use this window to correct misspellings, look for alternative words with the same or similar meanings, or check the meaning of a word.
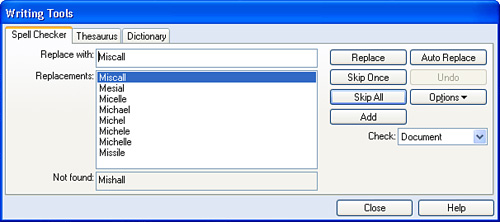
If Quattro Pro suspects a word you spelled correctly, click Skip Once or Skip All to stop viewing occurrences of that word. If the word is one you use often, you can click Add to add the word to the dictionary Quattro Pro uses of correctly spelled words. That way, Quattro Pro won’t view the word as misspelled.
If Quattro Pro finds an incorrectly spelled word, you can type a word into the Replace With box or select a word from the Replacements list and click Replace. If you commonly misspell the word, you can supply the replacement word either by typing it or by selecting it from the Replacements list and then clicking the Auto Replace button. Quattro Pro then automatically corrects all occurrences of the misspelling without prompting you.
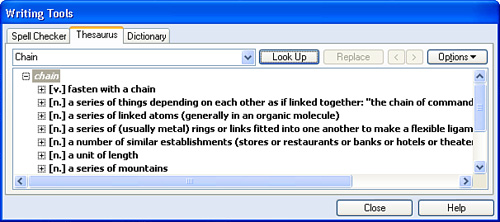
For any word that appears in the Replace With box on the Spell Checker tab, you can click the Thesaurus tab to view a brief definition and then alternative words you can use (see Figure 5.13).
Figure 5.13. On the Thesaurus tab, you can find alternative words with similar meanings that you can use as substitutes.
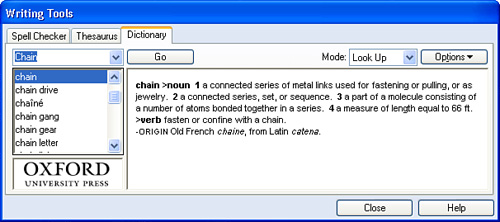
For a detailed definition of a word that appears in the Replace With box on the Spell Checker tab, click the Dictionary tab (see Figure 5.14).
Figure 5.14. The Dictionary tab provides a definition of the word that appears in the Replace With box on the Spell Checker tab.
Using QuickCorrect
In the preceding section, I told you that you could click the Add button to add a word to the list of common misspellings that Quattro Pro will automatically correct. QuickCorrect is the portion of the Spelling Checker feature that automatically corrects commonly misspelled words.
Tip
On the Tools menu, you’ll find the Dictionary and Thesaurus commands; these commands open the Writing Tools window directly to the appropriate tab, and Quattro Pro automatically shows the appropriate information for the content of the top left selected cell.
You can manage the list of commonly misspelled words. Suppose that you accidentally add a misspelled word using the Auto Correct button. From that point forward, Quattro Pro will view the misspelling as a correct spelling. However, you are not fated to live with that misspelling; you can make changes to the list QuickCorrect uses. Open the Tools menu and click QuickCorrect to display the QuickCorrect window. You can add an entry to the list by typing the wrong version in the Replace box and the correct version in the With box, as you see in Figure 5.15. Then, click the Add Entry button.
Figure 5.15. Use the QuickCorrect window to manage the list of commonly misspelled words that Quattro Pro automatically corrects.
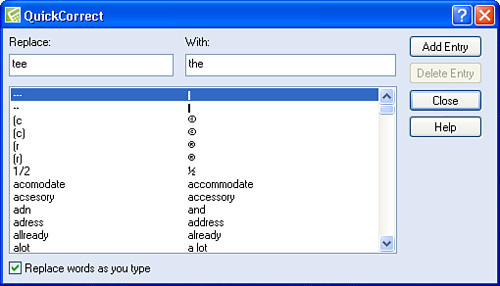
If you need to remove an entry you accidentally added to the list—a correctly spelled word that appears in the left column of the window—highlight the entry and click the Delete Entry button.
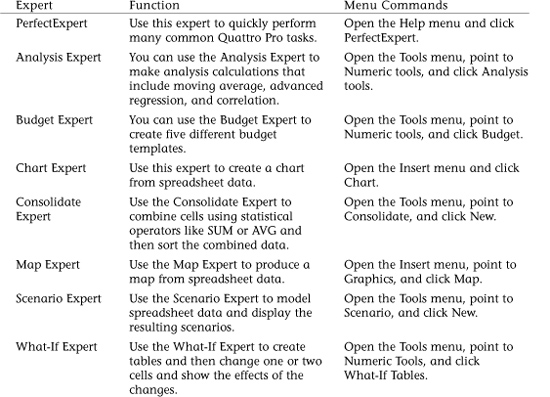
A Word About the Quattro Pro Experts
Quattro Pro contains eight wizards that guide you through performing certain tasks, and Quattro Pro refers to these wizards as experts. Table 5.1 describes what each expert can help you do. You can work with any of these experts by choosing the appropriate command using the menu commands listed in the table.
Table 5.1. Quattro Pro Experts
Tip
Most of the experts are on the Experts and Numeric Tools toolbar for easy access. To view this toolbar, open the View menu and click Toolbars. In the Options dialog box that appears, click Experts and Numeric Tools.