
10. Working with Calculations
In This Chapter
• Storing a calculation in a cell
• Understanding the order of calculations
• Creating calculations using Quick Math
• Entering common calculations using toolbar buttons
• Copying formulas and functions
Most people turn to spreadsheet programs when they need to calculate values because spreadsheet programs make short work of typical math—addition, subtraction, multiplication, and division—as well as more complicated calculations such as averaging values or determining the number of occurrences of a value in a specified range. In this chapter, we’ll explore using Quattro Pro to make calculations, creating formulas, and using Quattro Pro’s functions.
Calculating Within Cells
Within any cell in Quattro Pro, you can store a mathematical formula, and Quattro Pro will display the results of the formula in the cell. The cell can contain numbers or cell references.
Using Numbers
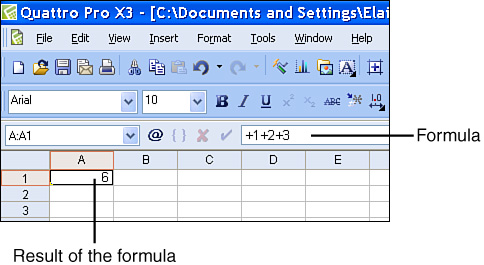
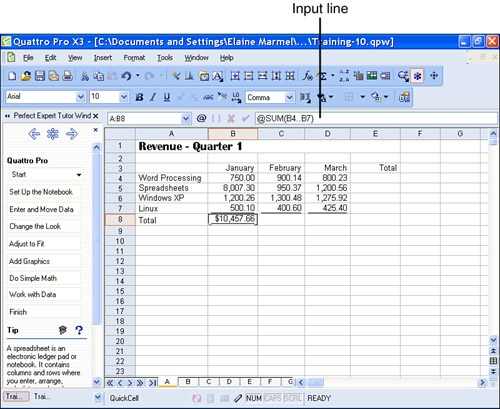
In Figure 10.1, I’ve stored a formula to add a series of numbers in cell A1; if you look at cell A1, you see the result of the formula, but if you look at the Input Line, you see the actual formula.
Figure 10.1. Although you store a formula in a cell, Quattro Pro displays the result of the formula.
Tip

If you want to display a mathematical formula—and not its result—in a cell, precede the formula with an apostrophe (’). Quattro Pro won’t calculate the value indicated by the numbers that follow; instead, Quattro Pro will display the formula (but not the apostrophe) in the cell.
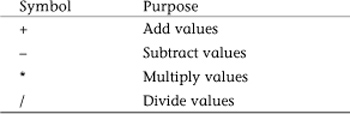
Notice that the formula in the Input Line begins with a plus sign (+). The plus sign signifies that Quattro Pro is using the numbers that follow in a calculation. Quattro Pro assumes that you want to calculate any values you enter into a cell that are separated by a mathematical operator, as shown in Table 10.1.
Table 10.1. Mathematical Operators
A plus sign will precede the formula even if you subtract values; the plus sign simply indicates that Quattro Pro will perform the math indicated by the numbers and mathematical operators that follow.
Using Cell References
Although you can use raw numbers in a calculation, the power of spreadsheet calculations comes from using cell references in calculations instead of raw numbers. When you use a cell reference instead of a raw number, you can change the contents of cells involved in the calculation and Quattro Pro will update the result of the calculation using the new information.
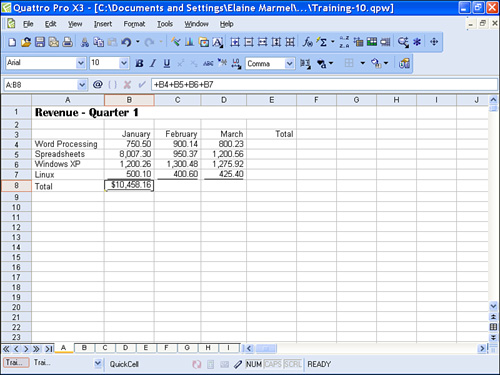
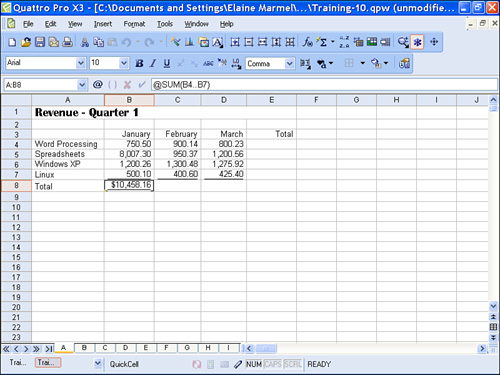
When you examine Figure 10.2, you notice from the Input Line that the calculation in cell B8 adds the contents of the cells in B4, B5, B6, and B7. Although I could have stored +750.50+8007.30+1200.26+500.10 in cell B8, I chose, instead to store +B4+B5+B6+B7.
Figure 10.2. Cell B8 contains a calculation that references other cells in the spreadsheet.
In Figure 10.3, I changed the value in cell B4 from $750.50 to $1500.00. Because cell B8 contains a calculation that adds the contents of cells B4.B7, Quattro Pro automatically updated the value displayed in cell B8. If I had stored the raw values—+750.50+800730+1200.26+500.10—in cell B8, Quattro Pro would not have recalculated the value displayed in B8 unless I also changed the calculation stored in B8.
Figure 10.3. Because the calculation in B8 refers to cell B4, B8 changes when B4 changes.

When you store a calculation that contains cell references, you effectively link the cell storing the calculation to the cells that the calculation references. When you make changes to one of the cells referenced by the calculation, the cell containing the calculation also changes.
When you store raw numbers in a cell, Quattro Pro displays the result of the calculation, but the cell containing the calculation in no way depends on any other cells. The cell containing the calculation will change only if you edit the cell and make a change to the calculation.
Using cell references when you create mathematical calculations makes it easy for you to ensure that all calculations in a spreadsheet update properly when you change a single number.
Understanding the Order of Calculation Operations
Because Quattro Pro applies the same principles regarding the order of operations when making calculations that you learned in high school, I want to review those standards. Please don’t break out into a cold sweat; I promise this won’t be hard and it will be useful. If you understand the principles surrounding the order of calculations, you can save yourself some embarrassment by coming up with right answers instead of wrong ones simply because of a misplaced parenthesis. What am I talking about? Read on, please.
When you make a calculation, you add, subtract, multiply, and divide two or more numbers. By definition, when you add or multiply numbers, the order of the numbers doesn’t matter and the answer will be the same; 2 times 5 and 5 times 2 are both 10. However, when you subtract or divide numbers, the order of the numbers does matter. For example, 10 divided by 2 is 5, but 2 divided by 10 is 1/5 or 0.2 as Quattro Pro or a calculator would show.
Okay, that seems simple enough. But, what happens when you mix operations within a calculation—that is, you add, subtract, multiply, and divide all within a single calculation? In these cases, the order in which you perform the operations (as well as the order of the numbers in the case of subtraction and division) will change the results.
When modern math was developed, two basic principles were put in place concerning the order of operations within a calculation. The first principle is as follows:
Work from left to right, multiplying and dividing before adding and subtracting.
Let’s look at a few examples and understand the math behind them. The following calculations all use the same numbers, but the order of the numbers and the mathematical operators changes from one calculation to the next. The answer to calculations 1, 2, and 3 is 6, and the answer to calculation 4 is 13.
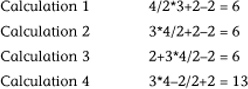
Breaking down calculation 1, 4 divided by 2 equals 2. Then, 2 (the result just obtained) times 3 equals 6. Then, 6 (the result just obtained) plus 2 equals 8. Finally, 8 (the result just obtained) minus 2 equals 6.
Breaking down calculation 2, 3 times 4 equals 12. Then 12 (the result just obtained) divided by 2 equals 6. Then, 6 (the result just obtained) plus 2 equals 8. Finally, 8 (the result just obtained) minus 2 equals 6.
To break down calculation 3, you need to start with multiplication and division, which don’t appear at the beginning of the calculation. You start evaluating this calculation with 3 times 4, and then calculation 3 breaks down just like calculation 2.
Breaking down calculation 4, you perform multiplication and division first, from left to right. 3 times 4 equals 12; 2 divided by 2 equals 1. Next, perform addition and subtraction from left to right, using the results from multiplication and division. Twelve (the result of multiplying 3 time 4) minus 1 (the result of dividing 2 by 2) equals 11. Finally, 11 (the result just obtained) plus 2 (the last value in the calculation) equals 13.
Okay, by now, fond (or not so fond) memories of that high school math should be coming back to you and the cobwebs should be clearing. And I’ll bet that you are vaguely (or maybe not so vaguely) remembering something about parentheses affecting the order of calculations. And, indeed, they do.
The second principle (remember, I promised only two principles) really adds to the first principle:
When a calculation contains parentheses, you perform the calculations within the parentheses first, and then you work left to right performing multiplication and division and then addition and subtraction to determine the result.
Let’s re-examine just calculation 4, placing parentheses in the calculation. The answer to this new version of calculation 4 is 5.
![]()
This time, when we break down calculation 4, we perform the calculation within the parentheses first: 4 minus 2 equals 2. We then go back to working left to right. Starting at the beginning, 3 times 2 (the result within the parentheses) equals 6. Then 6 divided by 2 equals 3. And finally 3 (the result just obtained) plus 2 equals 5.
When you record a formula in a cell, Quattro Pro does math the way I just described. So, the good news here is there’s nothing new to learn.
Creating Mathematical Calculations
You can create mathematical calculations in Quattro Pro using a number of different approaches. In this section, we’re going to explore a few of the ways available to you in Quattro Pro to do math.
On Your Own
Earlier in this chapter, in the section, “Understanding the Order of Calculation Operations,” I showed you how to use cell references to make a calculation. In the example, I added cells, but you can add, subtract, multiply, or divide using cell references.
Tip
Remember, if you change one of the values in a cell that the formula references, the value that appears in the cell containing the formula will change, too.
In Figure 10.4, I’m in the process of creating a formula that subtracts selling expenses from the sale price of a home, adds back buyer-paid closing costs, and subtracts the remaining mortgage balance to determine the amount with which the seller will walk at closing.
Figure 10.4. You can create a formula that performs more than one mathematical operation.
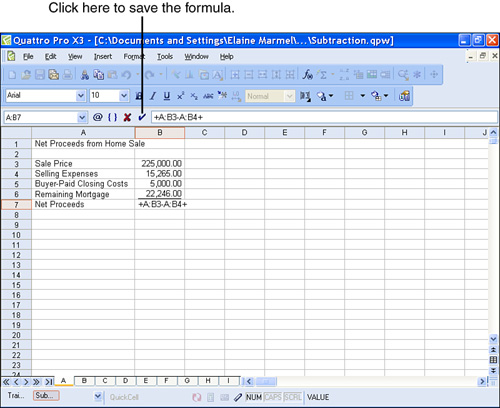
To create the formula, I followed these steps:
- Place the cell selector in the cell where Quattro Pro should store the formula; in my example, I placed the cell selector in B7.
- Press the plus sign (+) key on the keyboard and then click cell B3. This step tells Quattro Pro to expect a formula and include the contents of B3 in the formula.
- Press the minus sign (–) key on the keyboard and then click cell B4.
- Press the plus sign (+) key on the keyboard and then click cell B5.
- Press the minus sign (–) key on the keyboard and then click cell B6.
- Press the Enter key on the keyboard or click the check mark in the Input Line. Quattro Pro stores the formula and displays its result in the selected cell (see Figure 10.5).
Figure 10.5. The formula appears in the Input Line, whereas the result appears in the cell.


When dividing, select the cell containing the dividend (the value you want divided) first, press the slash key (/), and then select the cell containing the divisor (the value by which you want to divide).
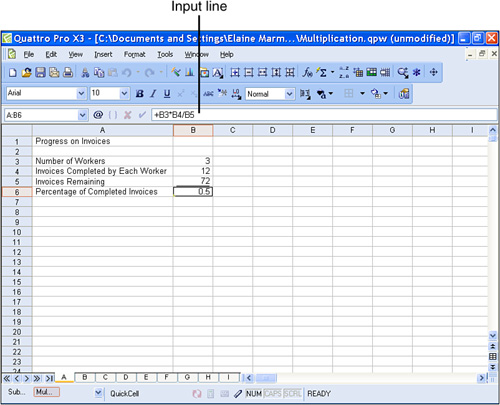
You also can use cell references to create a formula that multiplies and divides values. In Figure 10.6, I used multiplication and division to calculate the percentage of completed invoices. You can see the formula in the Input Line and the result in the cell containing the formula. I used the steps provided earlier in this section, substituting the slash key (/) and the asterisk key (*) for the plus sign (+) or the minus sign (–) to indicate the correct mathematical operation.
Figure 10.6. To multiply or divide cell values, use the asterisk key (*) or the slash key (/).
Using Quick Math
Many of the formulas that you need to create are commonly used formulas, like summing a column of numbers. For a very long list of numbers, you’d find it exceedingly tedious to create the formula using the technique I described in the preceding section, where you select each value in the list, preceded by a plus sign.
To save you time and effort, Quattro Pro contains a number of special built-in functions that make common calculations; a function is nothing more than a predefined formula. A function’s appearance differs from a formula’s appearance because all functions are preceded by an at sign (@).
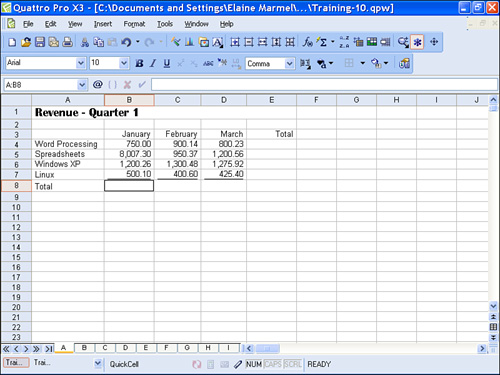
When you are first learning to use functions, you may want to take advantage of the Quick Math feature in Quattro Pro, which walks you through creating commonly used functions. I’ll show you how to sum the numbers in the January column in Figure 10.7 using Quick Math.
Figure 10.7. Columns B, C, D, and E need a sum, and column E should contain the sums for rows 4, 5, and 6.
To use Quick Math to insert a function that calculates the sum of selected cells, follow these steps:
- Click the cell in which you want to place the function; in this example, I clicked B8.
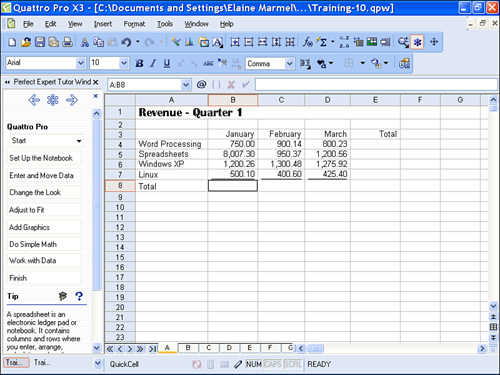
- Open the Help menu and click PerfectExpert. Quattro Pro displays the Perfect Expert pane along the left side of the screen (see Figure 10.8).
Figure 10.8. The Perfect Expert pane appears along the left side of the Quattro Pro screen.
- Click the Do Simple Math button. Quattro Pro changes the Perfect Expert pane to display choices related to making mathematical calculations.
- Click the Quick Math button. Quattro Pro displays the Quick Math dialog box.
- In the Select a Row or Column box, click the Range Picker button; Quattro Pro collapses the dialog box so that you can select cells to add in the spreadsheet (see Figure 10.9).
Figure 10.9. Select the cells that you want to sum.
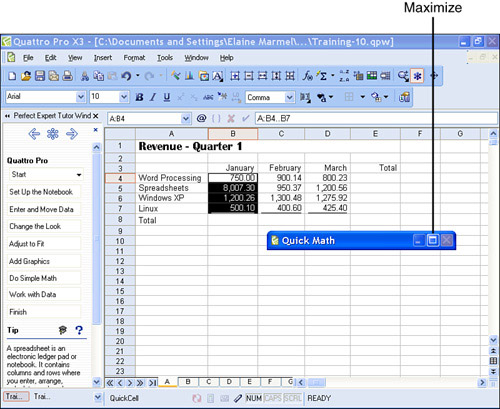
- Drag to select the cells that you want to sum; in this example, I selected B4.B7.
- Click the Maximize button to redisplay the Quick Math dialog box.
- In the Insert Answer in Cell box, click the Range Picker button; Quattro Pro collapses the dialog box so that you can select the cell in which to store the function; in this example, I selected B8.
- Click the Maximize button. Quattro Pro redisplays the Quick Math dialog box; in Figure 10.10, you see the Quick Math dialog box set up to insert in cell B8 the function to calculate the sum of B4.B7.
Figure 10.10. Use the Quick Math dialog box to quickly insert a commonly used function in a cell.

- Click OK. Quattro Pro places the function in the cell you specified (see Figure 10.11).
Figure 10.11. The result of the function appears in the cell you select, and the @SUM function appears in the Input Line.
Quattro Pro may display a warning about macros. Click Enable Macros to enable the macros; the PerfectExpert macros are safe because they come from the Corel Corporation.
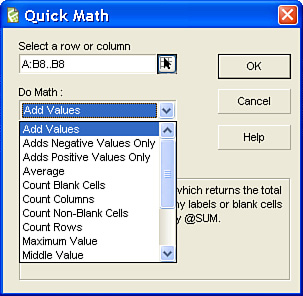
From the Quick Math dialog box, you can insert a number of functions that perform common mathematical calculations; for example, you can calculate the average of a range of cells or you can identify the maximum, minimum, or most frequent value in a range of cells. To insert any of these functions, follow the previous steps, but after step 7, open the Do Math list and select the appropriate type of calculation (see Figure 10.12). When you select a function, Quattro Pro changes the description that appears in the lower-portion of the Quick Math dialog box to give you an idea of the function’s purpose.
Figure 10.12. Use the Do Math list to select the type of function you want to insert in the spreadsheet.
In addition to the functions you see in the Quick Math dialog box, you can use the More Quick Math dialog box to calculate fractions, percentages, and square roots of specified cells, and you can raise specified cells to a power you specify. In the Perfect Expert pane, click the Do Simple Math button and then the More Quick Math button to display the More Quick Math dialog box shown in Figure 10.13. The four calculations you can insert appear in the Do Math list box, and the rest of the dialog box works just like the Quick Math dialog box.
Figure 10.13. Use the More Quick Math dialog box to perform additional common calculations that are not functions in Quattro Pro.

The calculations that Quattro Pro performs when you make a selection from the More Quick Math dialog box are not functions; if you select a cell containing one of these functions and look at the Input Line, you won’t see an at sign (@) at the beginning of the formula.
Also, notice that I specified a single cell and not an entire range in the Insert Answers in Row/Column box. Make sure you select a blank cell and that the cells below or next to the selected cell are blank. Quattro Pro will automatically fill in the cells below the cell you selected if you selected a column of cells in the Select a Row or Column box of the More Quick Math dialog box. Similarly, Quattro Pro will automatically fill in the cells to the right of the cell you selected if you selected a row of cells in the Select a Row or Column box of the More Quick Math dialog box.
A Shortcut to Commonly Used Functions
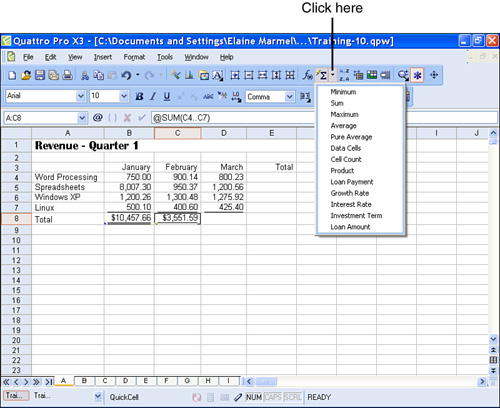
Quattro Pro contains another shortcut besides the Quick Math dialog box that you can use to insert commonly used functions. On the Notebook toolbar, the Function button is actually a list button that contains many commonly used functions (see Figure 10.14).
Figure 10.14. Click the list button beside the Function button to display a list of commonly used functions.
Tip
You cannot insert a function into a cell that already contains text or data, even if you want to overwrite the existing information. To replace the information in a cell with a function, delete the cell’s contents and then insert a function.
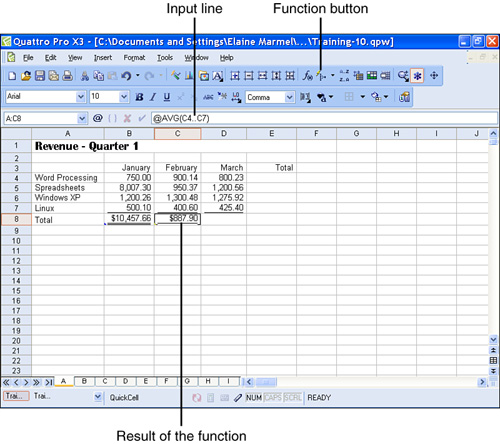
To take advantage of this shortcut, first select a blank cell in which you want to place the function. Then, click the list button beside the Function button and then click the function you want to insert. In Figure 10.15, I inserted the Average function into cell C8 (notice the Input Line); Quattro Pro displays the result of the function in the selected cell and changes the appearance of the Function button icon to match the icon you saw when you opened the Function button list.
Figure 10.15. The appearance of the Function button changes, depending on the function you select to insert.
The appearance of the Function button won’t change again until you select a different function. When you close Quattro Pro, you’ll be prompted to save changes to the UA.WB3 template; if you click Yes, the appearance of the Function button will remain at whatever it was when you closed Quattro Pro. If you click No, the next time you open Quattro Pro, the Function button will appear to have the Sum symbol that you saw in Figure 10.14.
Tip
The Formula Composer button appears immediately to the left of the Function button on the Notebook toolbar. You can use the Formula Composer to create or edit a formula; I find the Formula Composer most useful when I’m working with a complicated formula.
Copying Formulas and Functions
In many cases, you’ll find that you need the same formula or function in several different cells. For example, in the spreadsheet shown in Figure 10.16, I really need to sum columns B, C, and D and rows 4, 5, 6, and 7. I can easily sum C4.C7 and then D4.D7 by clicking in C8 and then clicking the Function button and repeating the procedure in D8. However, if I had 12 months of data, even that process would be tedious.
Figure 10.16. This spreadsheet needs sums in row 8 and column E.
You can save time by copying formulas and functions, and you copy formulas and functions the same way you copy any other spreadsheet information. Refer to “Copying Information” in Chapter 4, “Editing in a Spreadsheet,” for details. When you copy a formula or function, the results you get depend on whether you use relative or absolute cell addresses in your formulas or functions.
When you use relative cell addressing—the default in Quattro Pro—Quattro Pro adjusts cell references as you copy formulas or functions. Referring to Figure 10.16, when I copy the formula stored in B8 to C8, Quattro Pro inserts the formula @SUM(C4..C7) in C8, even though the formula in B8 is @SUM(B4..B7). In many cases, you’ll be able to use the default of relative cell addressing.
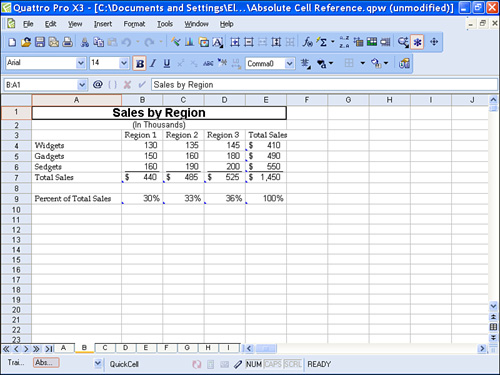
When you use absolute cell addressing, Quattro Pro does not adjust cell references as you copy formulas or functions. When would you use absolute cell addressing? Suppose that you have a spreadsheet like the one in Figure 10.17 that compares sales by region. I’ve stored each region’s percentage of total sales in row 9, using a formula that divides each region’s sales—stored in B7, C7, and D7—by total sales—stored in E7. The cell address for the total sales in each formula must be E7. The total sales cell reference must remain unchanged—absolute—to calculate each region’s percentage of the total sales.
Figure 10.17. Use absolute cell addressing when you intend to copy a formula and one or more cell references in the formula should remain constant.
Suppose that I use relative cell addressing and store the formula +B7/E7 in B9. When I copy the formula to C9 and D9, Quattro Pro will adjust both cell references in the formula and the formulas in C9 and D9 will be wrong. However, if I use absolute addressing when I reference cell E7 in the formula, Quattro Pro will not adjust E7 in the formula when I copy the formula.
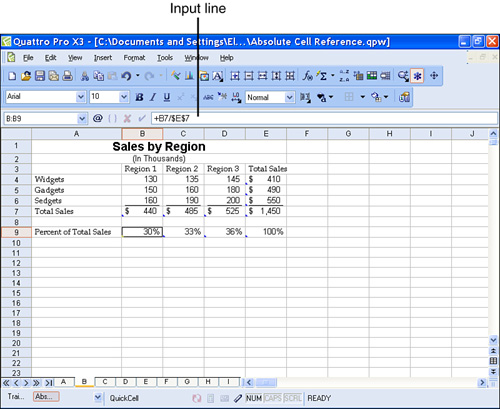
To use absolute cell referencing, you precede each portion of a cell address that you want to remain unchanged with a dollar sign ($). As you can see from the Input Line in Figure 10.18, I placed a dollar sign before both the column letter and the row number when referring to cell E7; when I copy the formula from B9 to C9, Quattro Pro changes only the first portion of the formula and uses cell E7 in the second part of the formula.
Figure 10.18. An absolute cell address contains a dollar sign before its column letter, row number, or both.
Tip
You can use a combination of relative and absolute cell addressing in a cell reference to force a portion of the cell reference to remain constant while the other part adjusts when you copy the formula or function. It is helpful to use a combination of relative and absolute cell addressing when you need a formula that always refers to the values in a specific row, but the values in the columns must change (or vice versa).