
3. Navigating in a Notebook
In This Chapter
• Navigating around spreadsheets and notebooks
• Entering information into notebooks
• Saving a notebook
Navigating a new software package is like finding your way around a new town after a move—you need to learn how to move around in it efficiently. In Quattro Pro, you also need to learn how to select so that you can move and copy information as those actions become necessary. In this chapter, you’ll learn how to move around a notebook, select cells, enter information into a spreadsheet, correct mistakes, and, most importantly, save a notebook so that you save the fruit of your efforts.
Selecting Cells
To perform an activity or function in a cell, you need to select a cell or group of cells. For example, if you want to enter text or numbers into a cell, you need to first select the cell. If you want to move or copy the contents of a cell or group of cells, you must first select the cell or cells. Selecting a cell involves making the cell selector surround the cell. In Figure 3.1, I’ve selected cell A4.
Figure 3.1. In this figure, I selected a single cell.

In Figure 3.2, I’ve selected the block of cells with an upper-left boundary of cell A5 and a lower-right boundary of E6. When you select a group of cells, called a range, the cell selector surrounds the cell in the upper-left corner of the group, but the rest of the cells appear highlighted. I selected this range by dragging the mouse pointer across the cells. You also can make this selection if you click the cell at one corner of the range (I like the upper-left corner cell), hold down the Shift key, and then click the diagonal corner cell.
Figure 3.2. In this figure, I selected a group of cells.
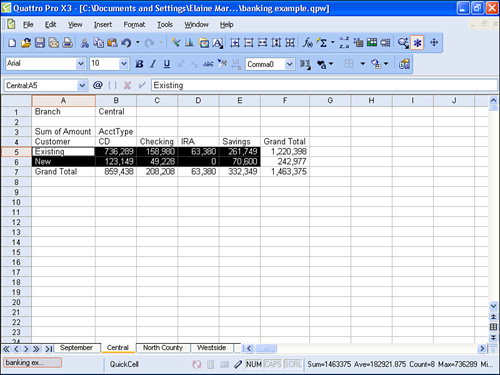
When you select a range of cells, you refer to the range by naming its upper-left and lower-right cell, and you write the cell address of a range of cells using the upper-left corner and the lower-right corner, separated by a pair of periods. In Figure 3.2, I selected the range A5..E6 and, out loud, I would say, “I selected cells A5 through E6.”
You also can select an entire row by clicking the number identifying the row; to select multiple contiguous rows, drag across the row numbers. Similarly, you select a single column by clicking its column letter and multiple contiguous columns by dragging across their column letters.
You also can select noncontiguous rows or columns by holding down the Ctrl key as you click each row number or column letter.

In writing, you can refer to a range using the upper-left cell and the lower-right cell separated either by two periods, as I did above, or by one period. Throughout the rest of this book, I’ll refer to ranges using only a single period between the cell boundaries of the range.
Moving Around in a Spreadsheet
Quattro Pro places the cell selector in cell A1 each time you start the program. You place the cell selector in a particular cell so that you can enter information into that cell. You can place the cell selector in the proper cell using either your mouse or your keyboard.
To place the cell selector in a cell using your mouse, click the cell. To place the cell selector in a cell using your keyboard, press the appropriate arrow key on the keyboard; each time you press an arrow, Quattro Pro moves the cell selector one cell in the direction of the arrow key you pressed. For example, in the blank spreadsheet that appears when you open the program, if you press the right arrow key, Quattro Pro moves the cell selector from cell A1 to cell B1. If you then press the down arrow key, Quattro Pro moves the cell selector from B1 to B2.
You also can use the vertical and horizontal scrollbars for quick navigation when the information in your spreadsheet exceeds what you can see onscreen. Click the slider box on either scroll bar and drag.
The vertical scrollbar contains two buttons with double << signs that you can click to navigate to the next and previous cells in a selected range.
Tip

If you open an existing notebook, you’ll find the cell selector in the cell that was selected at the time you saved that notebook.
Using the keyboard, you have a large number of shortcuts you can take to move the cell selector efficiently. In Table 3.1, you’ll find a list of the keys or combination of keys that you use most commonly to move around a spreadsheet and a description of the actions that occur when you press them.
Table 3.1. Keys to Help You Navigate a Quattro Pro Spreadsheet
Moving to a Different Spreadsheet
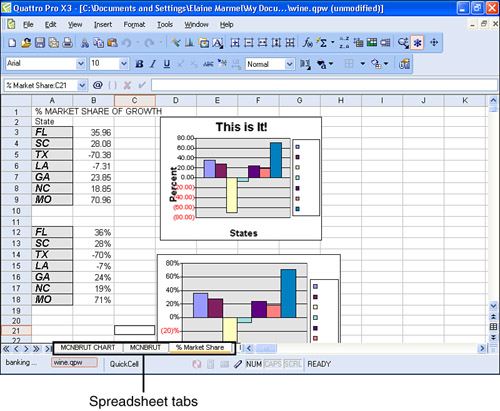
Within a particular notebook, you can navigate between spreadsheets using either the mouse or the keyboard. Using the mouse, you switch to a different spreadsheet by clicking the spreadsheet’s tab at the bottom of the Quattro Pro window (see Figure 3.3).
Figure 3.3. Switch to a different spreadsheet using the mouse by clicking the tab of the spreadsheet you want to view.
As you would expect, you can use some keyboard combinations to navigate between spreadsheets. You can press Ctrl+Page Down to move the cell selector forward to the next spreadsheet in the notebook, and you can press Ctrl+Page Up to move the cell selector backward to the preceding spreadsheet in the notebook. Quattro Pro contains one other keyboard combination that helps you navigate between spreadsheets. In Table 3.1 in the previous section, you saw that pressing the Home key moves the cell selector to cell A1 of the current spreadsheet. When you press Ctrl+Home, Quattro Pro moves the cell selector to cell A1 of the first spreadsheet in the notebook.
Entering Information
Now that you know how to navigate, you’re ready to start entering information into a notebook. The basic process involves selecting the cell into which you want to enter information and then typing.
Entering Text and Numbers
Entering text into a spreadsheet is a straightforward matter. Select the cell in which you want the text to appear and start typing. As you type, whatever you type appears in two places in the spreadsheet: the cell into which you are entering text and the Input Line (see Figure 3.4).
Figure 3.4. As you type text, Quattro Pro displays the text both in the cell and in the Input Line.
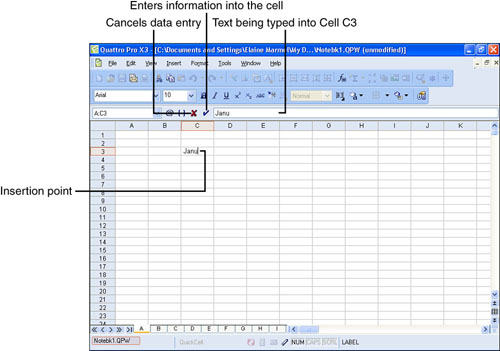
A vertical insertion point in the cell marks the location where letters or numbers appear as you type; you won’t see any indicator in the Input Line.
You store the information you typed in the cell by pressing the Enter key on the keyboard or by using the mouse to click the check mark at the left edge of the Input Line. If you change your mind as you enter the information, you can press the Escape key (Esc) on your keyboard or you can click the X at the left edge of the Input Line, and Quattro Pro won’t store any of the information you typed in the cell.
You enter numbers the same way that you enter text: Select the cell where you want the number to appear, type the number, and press Enter or click the check mark at the left edge of the Input Line.
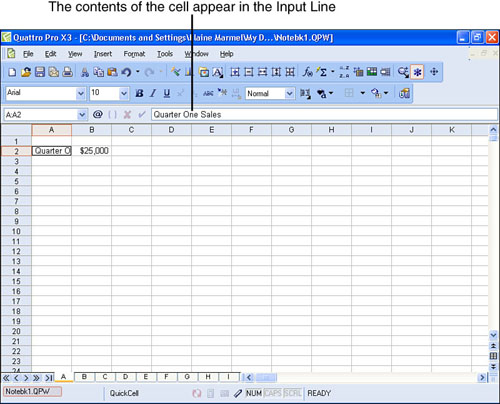
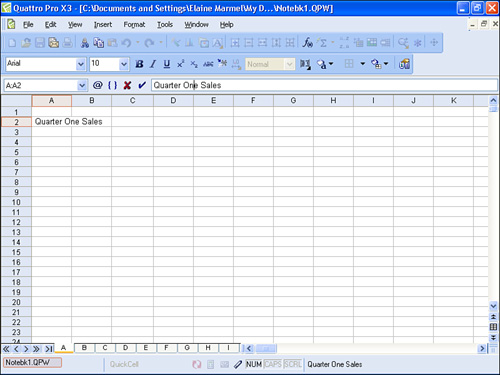
Suppose that you type “Quarter One Sales” in cell A2 and then type a dollar amount—$25,000—in cell A3. A portion of the Quarter One Sales will seem to disappear (see Figure 3.5). In reality, the information is still stored in cell A2; look at the Input Line. The width of Column A isn’t large enough to accommodate the entry you made. In Chapter 8, “Formatting Notebooks,” I’ll tell you how to widen the column.
Figure 3.5. Although text seems to disappear when a column width isn’t long enough to accommodate it, you can see the text in the Input Line.
Tip
You might be wondering if there are any advantages to pressing Enter or clicking the check mark at the left edge of the Input Line to store information. Although both methods work, most people find it most efficient to leave their hands on the keyboard as much as possible while entering text and numbers. Using Enter (and Escape to cancel an entry) can be faster than using the mouse to click the check or the X at the left edge of the Input Line.
Entering Formulas
Formulas are combinations of numbers that include a mathematical operator. In Quattro Pro, a formula can include numbers, cell addresses, or both. In this section, I focus on the basics of using numbers in formulas; in Chapter 10, “Working with Calculations,” you’ll find a more in-depth exploration of using formulas that contain numbers, formulas that contain cell addresses, and using functions as well as formulas.
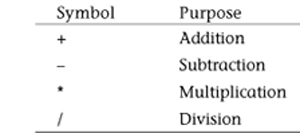
You use the symbols shown in Table 3.2 to represent the appropriate mathematical operator when you create a formula.
Table 3.2. Mathematical Operators
When you type the dollar value, you can supply the dollar sign ($) and Quattro Pro will automatically format the cell for currency and include the comma. You can read more about cell formatting in Chapter 8.
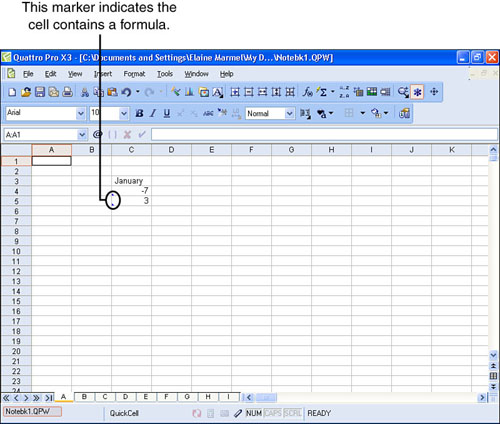
Quattro Pro helps you identify cells containing formulas by marking them with a blue triangle in the bottom-left corner of the cell. You may have trouble seeing the blue triangle until you move the cell selector out of the cell containing the formula (see Figure 3.6).
Figure 3.6. Quattro Pro marks cells containing formulas with a small blue triangle in the lower-left corner of the cell.
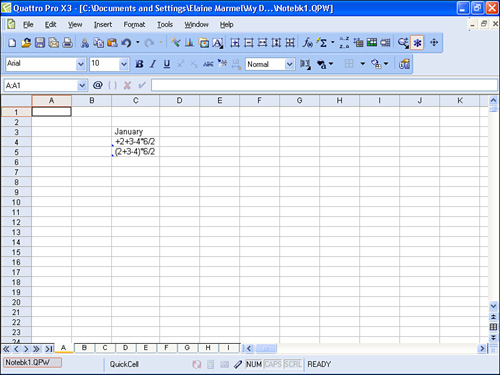
When you record a formula in a cell, Quattro Pro does math the same way you learned in high school: Quattro Pro performs multiplication and division before performing addition and subtraction. In high school math, you used parentheses to group numbers together; the rule is that you perform the calculations inside the parentheses before you perform the calculations outside the parentheses.
Tip
By default, Quattro Pro assumes that a slash (/) indicates that you want to enter a date. You can use the slash to divide two numbers by changing settings. See Chapter 16, “Customizing Quattro Pro,” for details.
Quattro Pro works the same way. In Figure 3.5, you saw two cells containing formulas; in fact, both cells contain the same formula, but I used parentheses in cell C5 to change the order of calculation. In Figure 3.7, I’ve displayed the formulas I used so that you can see how I grouped the portion of the formula using addition and subtraction to force Quattro Pro to perform that calculation before any other.
Figure 3.7. Quattro Pro performs calculations in a cell using the same rules you used in high school math.
Filling a Range
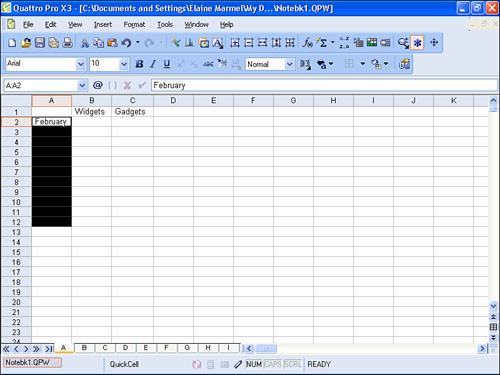
Suppose that you need to enter sales numbers for two products—widgets and gadgets—for each month of the year. You know that your column headings will be Widgets and Gadgets and your row headings will be the months January through December. Although you could just type all that information into your spreadsheet, you could save some time by using the QuickFill feature in Quattro Pro to automatically enter month names into the range that will store the names of the months. You can fill any range using lists of common entries such as months or weekdays. You can even create your own lists.
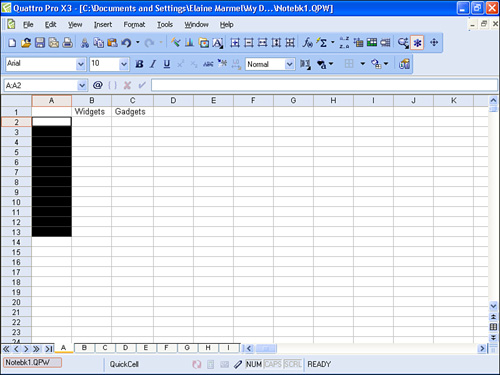
Select the range of cells that you want to fill with month names; in Figure 3.8, I selected A2.A13. Quattro Pro will fill all the cells you select so, in this example, if you select more than 12 cells, Quattro Pro will start over with January when it reaches the 13th cell.
Figure 3.8. Select the cells that you want Quattro Pro to fill.
You also can fill a range with numbers; see Chapter 4, “Editing in a Spreadsheet,” for details.
Then, open the Edit menu, point to the Fill command, and click QuickFill. Quattro Pro displays the QuickFill dialog box shown in Figure 3.9.
Figure 3.9. Use this dialog box to identify the information you want Quattro Pro to enter into the selected cells.
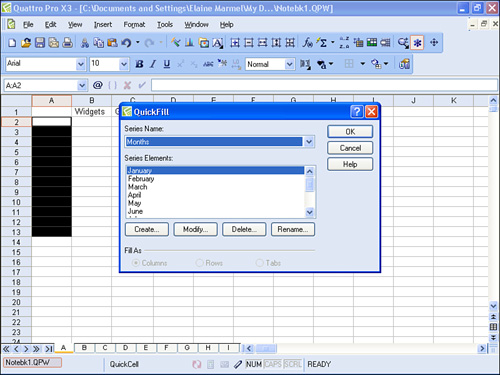
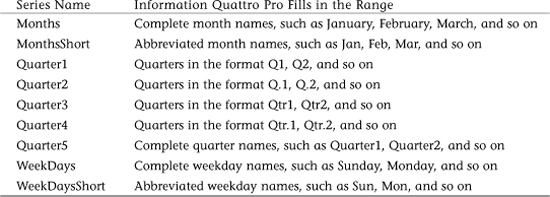
Open the Series Name list box and select the type of information you want Quattro Pro to fill into the selected cells. Table 3.3 shows you the predefined lists available in Quattro Pro.
Table 3.3. Predefined Fill Lists Available in Quattro Pro
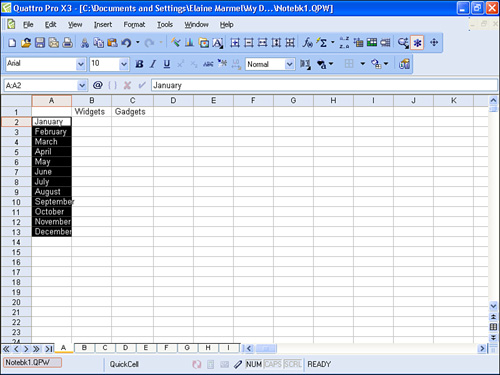
Click OK, and Quattro Pro fills the information into the selected range (see Figure 3.10).
Figure 3.10. Quattro Pro fills the type of information you chose into the selected range of cells.
As a shortcut, you can bypass displaying the QuickFill dialog box if you type the first entry of a list into a cell and then select the range you want to fill, as I’ve done in Figure 3.11.
Figure 3.11. To avoid displaying the QuickFill dialog box, type the first entry of a list into a cell and then select the range you want to fill.
When you open the Edit menu, point to Fill, and click QuickFill (or press Ctrl+Shift+L, the shortcut key combination for QuickFill), Quattro Pro simply fills the range with the information associated with the fill series containing the entry you typed.
There’s a hidden advantage to this approach: Quattro Pro is smart enough to fill the selected series starting with the entry you provide as opposed to the first entry displayed when you view the list in the QuickFill dialog box. When Quattro Pro fills the selected cells in Figure 3.10, the months February through December, in order, will appear. Notice that I selected only 11 cells, not 12; had I selected 12 cells, the last cell in the list would contain the entry January.
Correcting Mistakes
Suppose that you have entered text or numbers into a cell and saved the entry by pressing Enter or clicking the check mark at the left edge of the Input Line. Suppose further that you now discover a mistake in that cell. You can correct the mistake in a couple of ways.
First, you can simply type over the information in the cell; select the cell, type, and save the entry by pressing Enter or clicking the check mark at the left edge of the Input Line. This technique works best when the information in the cell is relatively short; for example, if the cell contains the value 2 when the value should have been 3, just type over the contents of the cell.
If, however, the cell contains a long string of information or a complex formula, you might do better to edit the contents of the cell. To edit the information in any cell, take any of the following actions:
• Double-click the cell containing the information you want to change.
• Select the cell and press F2.
• Select the cell and click in the Input Line at the location where you want to edit.
If you take either of the actions in the first two bullets, you’ll see a vertical insertion point somewhere in the information you want to edit. If you use the last method, the vertical insertion point appears in the Input Line (see Figure 3.12).
Figure 3.12. When you edit a cell by clicking the Input Line, a vertical insertion point appears somewhere within the information stored in the cell, marking your place to begin editing.
To make changes, use the left and right arrow keys on the keyboard to position the vertical insertion point at the location that you need to change. Press the Backspace key to delete the character immediately to the left of the vertical insertion point, or press the Delete key to delete the character immediately to the right of the vertical insertion point. To add characters, simply type; Quattro Pro inserts the characters starting at the location of the vertical insertion point without typing over any characters already in the cell.
Saving a Notebook
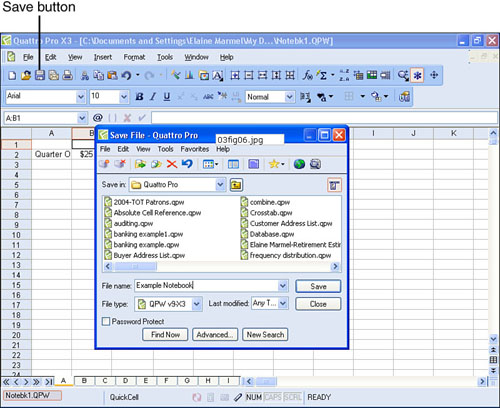
After you’ve done some work on a notebook, you’ll want to save it. To save a notebook, click the Save button on the Notebook toolbar (see Figure 3.13).
Figure 3.13. Click the Save button on the Notebook toolbar when you are ready to save changes to a Quattro Pro file.
If you have never saved the file before, the Save File dialog box appears. In the Save In list, make sure that the folder where you want to store Quattro Pro files appears. In the File Name box, type the name you want to assign to the notebook; note that you do not need to include the .QPW extension because Quattro Pro will automatically assign it to the filename. Then, click the Save button, and Quattro Pro saves the file. You’ll notice that the program title bar now contains the name you just assigned to the notebook.
If you have saved your file previously, the Save File dialog box won’t appear; instead, Quattro Pro assumes that you want to save the notebook using the same name you originally assigned.
There are times when you will want to assign a different name to a notebook than the original name you assigned. For example, suppose that you want to test certain actions and you’re afraid they aren’t going to work and they’ll mess up your notebook. In this case, you can save the notebook before you start testing using a new name for the notebook. That way, the changes you make will be to the newer version of the notebook, but your original notebook will still be available to you under the original name. To assign a new name to a notebook file, open the File menu and click the Save As command. Quattro Pro displays the Save File dialog box you saw previously in Figure 3.13. Simply assign a new name in the File Name box and click the Save button. Quattro Pro will change the name of the notebook on the program title bar, and you’ll be able to open either the original version or the new version of the file. In Chapter 7, “Managing Notebooks,” I’ll show you how to open existing notebooks.