
7. Managing Notebooks
In This Chapter
• Opening an existing notebook
• Opening and saving an Excel or Lotus 1-2-3 file
• Inserting and deleting spreadsheets
So far, I’ve concentrated on helping you enter information into a notebook, edit that information, and print it. We haven’t talked much about notebooks yet. Notebooks are the files you save and open; each notebook can contain up to 18,278 spreadsheets, each represented by a lettered tab at the bottom of your screen. In this chapter, I’ll show you how to create a new notebook and open a notebook you previously created. You’ll also learn how to open and save an Excel or Lotus 1-2-3 file using Quattro Pro. And, you’ll see how to rearrange spreadsheets in a notebook, and insert and delete spreadsheets. At the end of the chapter, I’ll show you how to group spreadsheets and link notebooks. You can group spreadsheets laid out similarly to make editing easier; you also can link notebooks so that changes you make in one notebook update all linked notebooks.
Closing a Notebook
You close a notebook when you no longer want to work on it. You may not have done all the work you want to do on the notebook, but, for the time being, you don’t want to work on it any longer. When you close a notebook, Quattro Pro removes the notebook from your screen. The file remains on your hard disk, but you need to open it to work on it.
In Chapter 3, “Navigating in a Notebook,” you learned how to save a notebook. But, you may not always want to save a notebook, and there are some really good reasons not to save a notebook. For example, suppose that you create and save a notebook and then decide to make some changes. As you make the changes, you realize that the changes are totally messing up everything you had set up correctly and saved. In this situation, you don’t want to save the notebook with the changes you tried to make. Instead, you want the notebook to remain the way it was when you last saved it, without saving any of the subsequent changes. You can get rid of the changes you made that messed things up if you close the notebook without saving it and then reopen it.

If you click Yes, Quattro Pro saves the notebook and then closes it. If you click Cancel, Quattro Pro does not close or save the notebook, and it remains onscreen.
To close a notebook, open the File menu and click Close. If you made any changes to the notebook that you have not saved, Quattro Pro prompts you to save the notebook by displaying the dialog box shown in Figure 7.1.
Figure 7.1. This dialog box appears when you try to close a notebook that you have changed.
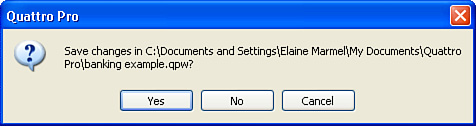
Click No, and Quattro Pro will close the notebook without saving any changes you made since the last time you saved the notebook.
Creating a New Notebook
You can create a new notebook from scratch or use one of the templates supplied with Quattro Pro. Templates are preformatted notebooks that help you accomplish common tasks.
Without a Template
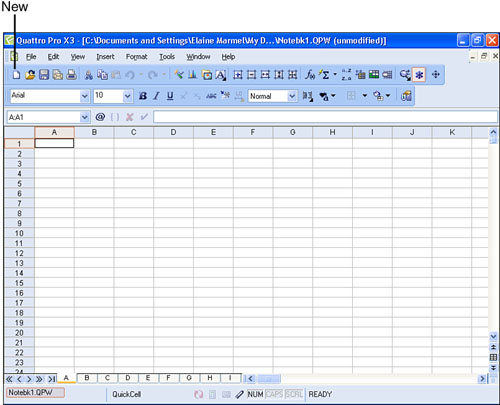
When you first open Quattro Pro, you see a new notebook named Notebk1.QPW that is not based on any special template (see Figure 7.2). But you don’t need to close Quattro Pro and then reopen it just to start a new notebook. You can click the New button, and Quattro Pro will display another blank notebook named Notebk2.QPW.
Figure 7.2. When you start Quattro Pro, you see a blank notebook that is not based on a project template.
The names that Quattro Pro assigns by default to each new notebook you create are intended to be temporary names. If you decide to save your work, don’t use the default name; instead, supply a name for the notebook that means something to you.
Tip

Quattro Pro numbers each new notebook you start in a single Quattro Pro session sequentially. So, for example, you might start Notebk1.QPW, Notebk2.QPW, Notebk3.QPW, Notebk4.QPW, and Notebk5.QPW during a single session of working in Quattro Pro. When you close Quattro Pro and reopen it, the blank notebook that appears will be named Notebk1.QPW.
With a Template
You can create notebooks in Quattro Pro that are based on predefined project templates that ship with Quattro Pro. Each of the predefined project templates is set up to help you perform calculations associated with common tasks, such as setting up a budget for retirement or analyzing whether to buy or rent a home.
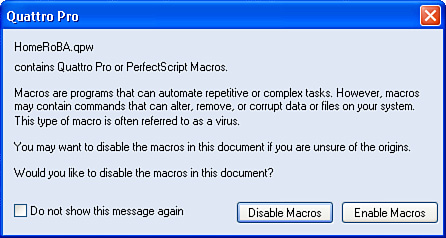
The predefined project templates all contain macros, which are small programs built into the notebook. When you create a notebook based on a template, you see a warning like the one shown in Figure 7.3. When you don’t know who created a macro, it is a good idea to disable it because macros can contain viruses. However, the macros in the project templates that ship with Quattro Pro come from a source you can trust, so you do not need to disable them.
Figure 7.3. Because the macros in these project templates ship with Quattro Pro, you can safely enable them.
To use any of the project templates that ship with Quattro Pro, open the File menu and click New from Project. Quattro Pro displays the dialog box shown in Figure 7.4.
Figure 7.4. Identify what a project template does by viewing its properties.
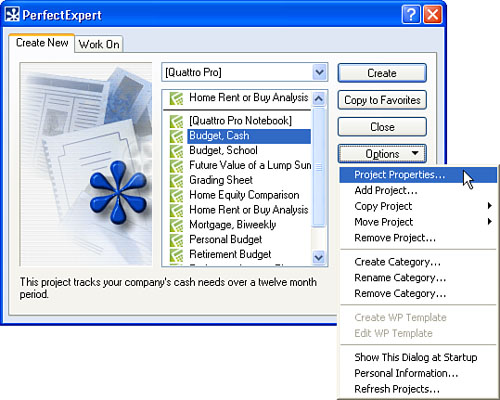
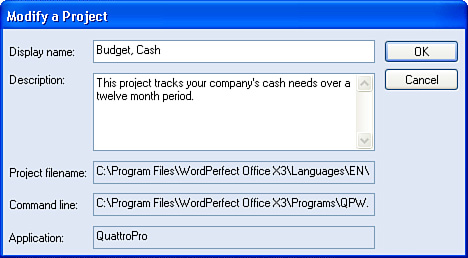
To determine what any of these templates does, you have two choices. You can open a notebook based on a selected template or you can highlight the project template and then click the Options button to display a menu; from the menu, click Project Properties. Quattro Pro displays the Modify a Project dialog box (see Figure 7.5), which contains a description of the project template’s purpose.
Figure 7.5. When you display a project template’s properties, you see a description of the template’s function.
When you click a template and then click Create, Quattro Pro displays the warning message about macros. After you dismiss the message, Quattro Pro creates a new notebook. In Figure 7.6, I created a new notebook based on the Home Rent or Buy Analysis project template; notice the notebook name is Notebk2.QPW.
Figure 7.6. A sample notebook created using a project template.
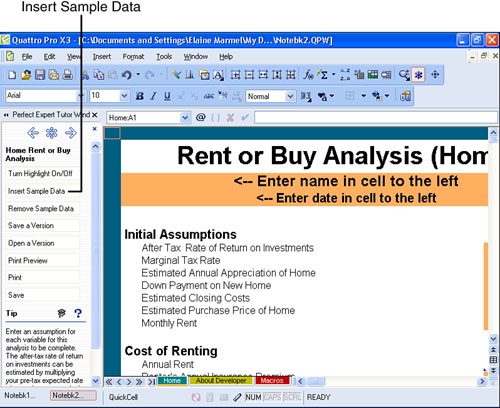
By default, no numbers appear in the notebook, but you can click the Insert Sample Data button in the Perfect Expert Tutor Window, and Quattro Pro will fill in sample values so that you can get an idea of the kind of information the notebook provides. Using the sample template I selected, you can compare the total annual cost of renting to the total annual cost of buying a home to determine which road is most economical for you.
Tip
You can display the PerfectExpert window by opening the Help menu and clicking PerfectExpert.
To use the notebook, fill in your own information; if appropriate, you can save the notebook.
Notice the spreadsheet tabs at the bottom of the screen; you can get information about the developer who created the project template if you click the About Developer tab. On the Macros tab, you can see the macros the developer used in the template. Although macros are beyond the scope of this book, when you get ready to tackle macros, review the ones in the project templates; they can teach you a lot about how to create a macro.
Opening an Existing Notebook
So, here’s the situation. Yesterday, you opened Quattro Pro and created a notebook. You saved it and closed Quattro Pro. Today, you want to reopen the notebook so that you can work on it again.
Follow these steps to open an existing notebook:
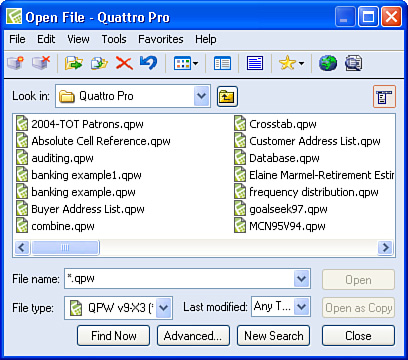
- Open the File menu and click Open. Quattro Pro displays the Open File dialog box shown in Figure 7.7.
Figure 7.7. Use this dialog box to open an existing notebook.
- Double-click the folder containing your Quattro Pro files.
- Click the notebook file you want to open.
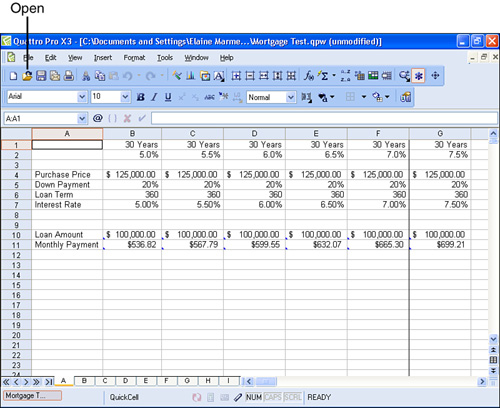
- Click Open. Quattro Pro displays the notebook onscreen (see Figure 7.8).
Figure 7.8. Quattro Pro displays the file you selected onscreen.
Tip
You can bypass step 1 if you click the Open button on the Notebook toolbar.
Opening an Excel or Lotus 1-2-3 File
Suppose that a colleague using one of those other spreadsheet programs sends you a file to review and update. Not to worry, you don’t need to do any messy conversions. You can easily open these files in Quattro Pro by following these steps:
- Click the Open button on the Notebook toolbar to display the Open File dialog box.
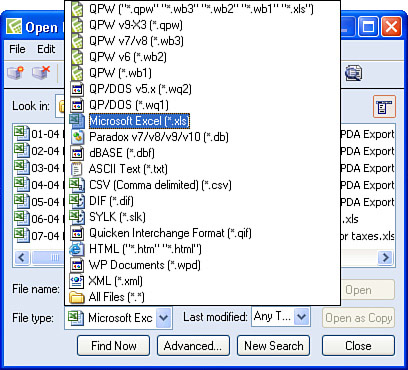
- Open the File Type list and select the type of file you’re trying to open; in Figure 7.9, I selected Microsoft Excel.
Figure 7.9. Select the type of file you want to open.
- Use the Look In list to navigate to the folder containing the file you want to open.
- Click the file.
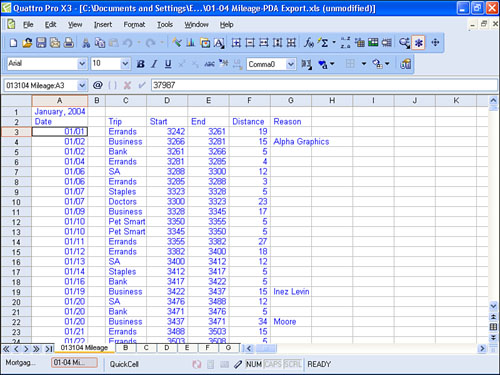
- Click Open. Quattro Pro opens the file onscreen (see Figure 7.10).
Figure 7.10. An Excel file opened in Quattro Pro.
Saving an Excel or Lotus 1-2-3 File
You can save any notebook you open in Quattro Pro as either an Excel file or as a Lotus 1-2-3 file. The file you save does not need to be a file that was originally created in Excel or Lotus 1-2-3 and then opened in Quattro Pro; you can create a new notebook from scratch in Quattro Pro and save it as an Excel or Lotus 1-2-3 file by following these steps:
- Display the file you want to save as an Excel or Lotus 1-2-3 file onscreen.
- Open the File menu and click Save As. Quattro Pro displays the Save File window shown in Figure 7.11.
Figure 7.11. Using this window, you can save a notebook in a variety of formats.
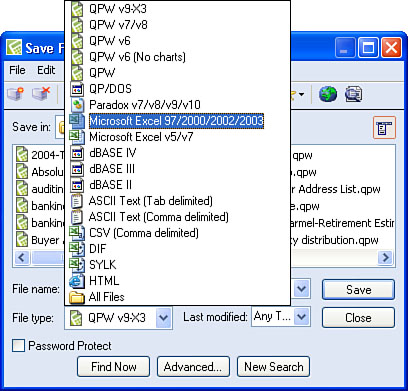
- Open the File Type list box and select the type of file you want to save. Quattro Pro automatically changes the extension of the filename to match the file type you selected.
Tip
Quattro Pro also updates the files available in the window above the filename to display only files of the type you selected.
- Optionally, change the filename.
- Click Save. Quattro Pro saves the file in the format you selected; the filename, including the extension of the file type you selected, appears at the top of the Quattro Pro window.
Tip
When sharing with others that do not have Quattro Pro, you may find it easier to work on files in Quattro Pro format and then save a copy in another spreadsheet format.
Rearranging Spreadsheets
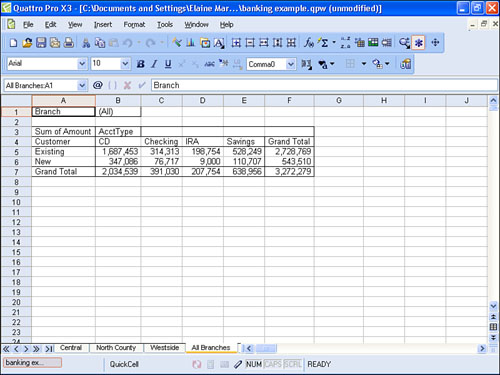
Occasionally, you’ll find that you set up some spreadsheets in a notebook and, after the fact, you really wish the sheets appeared in a different order. In Figure 7.12, I realized that I’d prefer to have the summary information shown on the All Branches spreadsheet appear first in the notebook.
Figure 7.12. The summary information appearing on the All Branches spreadsheet would be more useful if the All Branches spreadsheet were the first spreadsheet in the notebook.
You can move a spreadsheet either by dragging it to a new location or using a dialog box. When you drag a spreadsheet to a new location, the mouse pointer appears to have a sheet attached to it (see Figure 7.13). To move the All Branches spreadsheet to appear in front of the September spreadsheet, release the mouse button when the mouse pointer passes over the September tab.
Figure 7.13. Drag a spreadsheet to a new location in the notebook.

When you use the Move Sheets dialog box, start by clicking the spreadsheet tab that you want to move. Then, open the Edit menu and click Move Sheets. Quattro Pro displays the dialog box shown in Figure 7.14. Because you selected the sheet you want to move prior to opening the dialog box, Quattro Pro suggests that sheet as the spreadsheet to move. In the To Before Sheet box, type the name of the sheet that should follow the spreadsheet you are moving after Quattro Pro completes the move. To make the All Branches spreadsheet the first spreadsheet in the notebook, I typed September in the To Before Sheet box. When I clicked OK, the All Branches sheet became the first spreadsheet in the notebook.
Figure 7.14. You can use the Move Sheets dialog box to rearrange spreadsheets in a notebook.
Inserting and Deleting Spreadsheets
Most of the time, you shouldn’t really need to insert spreadsheets because you can rename any spreadsheet and then move it where you need it. However, Quattro Pro wouldn’t be complete if you couldn’t insert and delete a spreadsheet in a notebook.
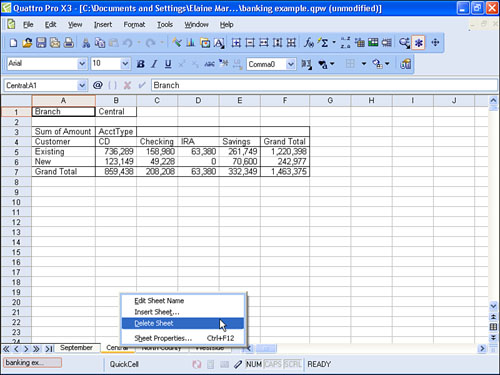
To delete a spreadsheet, right-click the sheet that you want to delete, and Quattro Pro displays a menu (see Figure 7.15). Click Delete Sheet, and Quattro Pro deletes the selected sheet.
Figure 7.15. Right-click the sheet you want to delete and then click Delete Sheet to remove a spreadsheet from a notebook.
Tip
You cannot delete a spreadsheet that doesn’t contain any data.
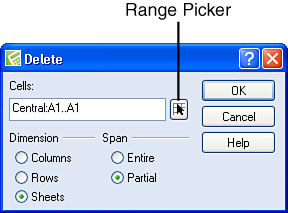
You also can delete a sheet using the Delete dialog box; this method is particularly useful if you want to delete multiple contiguous sheets. Click the tab of the first spreadsheet that you want to delete. Then, open the Edit menu and click Delete Cells to display the Delete dialog box shown in Figure 7.16. Click the Sheets option.
Figure 7.16. Use this dialog box to delete one sheet or multiple contiguous sheets.
If you want to delete more than one spreadsheet, follow these steps:
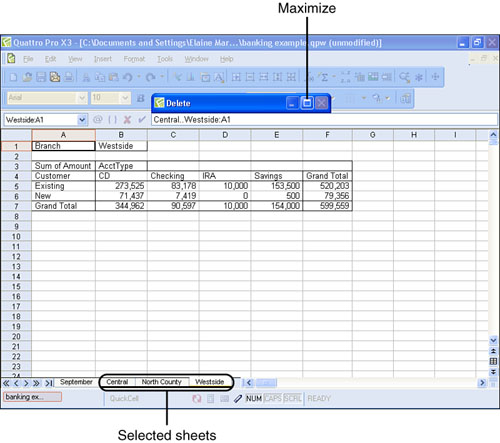
- Click the Range Picker button to collapse the dialog box.
- Press and hold the Shift key, and click the last sheet that you want to delete. Quattro Pro places a thick line around the selected sheets (see Figure 7.17).
Figure 7.17. Quattro Pro displays a thick black line around selected sheets.
Tip
The color of the thick line varies, depending on your Windows theme.
- Click the Restore button to redisplay the Delete dialog box. Quattro Pro displays the selected sheets in the Cells box.
- Click OK. Quattro Pro deletes the selected spreadsheets.
You can insert one spreadsheet or multiple contiguous spreadsheets. You position the location of the new sheet by right-clicking the sheet you want to appear behind the new spreadsheet. From the menu that appears, click the Insert Sheet command. Quattro Pro displays the dialog box shown in Figure 7.18.
Figure 7.18. Use this dialog box to insert one or more spreadsheets in a notebook.
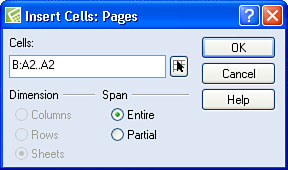
Quattro Pro automatically selects the Sheets option from the Dimension section of the dialog box; select the Entire option from the Span section. To insert a single sheet, click OK, and Quattro Pro inserts a blank sheet in front of the selected sheet.
To insert multiple contiguous spreadsheets, click the Range Picker button to specify the number of sheets to insert. For example, if you want to insert two sheets in front of sheet B, press and hold the Shift key, and click the tab of spreadsheet C. Then, click the Maximize button and click OK.
Grouping Spreadsheets
If your notebook contains several spreadsheets with similar text or formatting, you can save time editing if you group the similar spreadsheets. When you make a change to a grouped spreadsheet, Quattro Pro changes all the spreadsheets in the group.
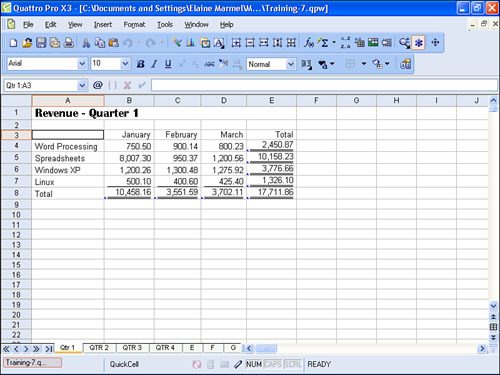
For example, in Figure 7.19, you see the Quarter 1 revenue data from training classes. The notebook contains three other spreadsheets for Quarter 2, Quarter 3, and Quarter 4. Suppose that I wanted to apply the same formatting—bold and italics—to the month names in all four sheets. I could manually select cells B4.E4 in sheet Qtr1 and apply the formatting and then repeat the process for the other three sheets. Or, I could group the sheets and apply the formatting once, and let Quattro Pro apply the formatting to the other three sheets.
Figure 7.19. A notebook that contains four spreadsheets with similar layouts.
To group sheets, follow these steps:
- Open the Insert menu, point to Name, and click Name Group of Sheets. Quattro Pro displays the Define/Modify Group dialog box shown in Figure 7.20.
Figure 7.20. Use this dialog box to define the sheets in a group.
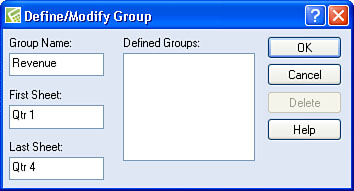
- In the Group Name box, type a name for the group; for my example, I named the group Revenue.
- In the First Sheet box, type the name of the first sheet in the group.
- In the Last Sheet box, type the name of the last sheet in the group.
- Click OK and Quattro Pro defines the group.
Tip
You can use spaces in the group name, but not as the initial character of the name.
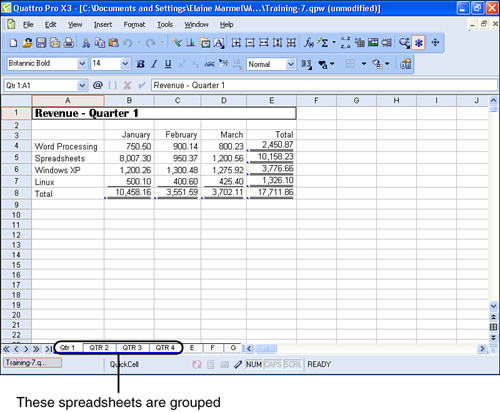
To work with the group, you must enable group mode. Open the View menu and click Group Mode. Quattro Pro places a thick blue line below the group of sheets (see Figure 7.21) and, on the View menu, a check appears beside the Group Mode command. Quattro Pro applies any formatting changes you make to a cell on any of the sheets to all of the sheets in the group.
Figure 7.21. Quattro Pro displays a thick blue line below the tabs of grouped sheets when you enable Group Mode.
When you want to make changes individually to the grouped sheets, disable Group Mode by opening the View menu and clicking Group Mode again to remove the check that appears beside the Group Mode command. The blue line below the group of sheets also disappears.
Linking Notebooks
Suppose that you have a fairly large project that involves updating a lot of spreadsheet data and you’d like to divide the job up among several people. If you store all the information in one spreadsheet, you can’t easily divide up the work. However, if you let each person create his or her own notebook, you can link the notebooks together. If you store all the notebooks on the same computer hard drive and in the same folder, links are even easier to create.
Tip
In the scenario I just described, it is wise to give setup guidelines to each person. That way, similar data will end up in similar cells in each notebook.
To create a notebook link, select the cell where you want the link to appear. Note that the notebook to which you are linking does not need to be open. In the selected cell, type a plus sign (+), an open bracket ([), and the name of the notebook you want linked to the open notebook. Include any valid sheet name and cell address. The format for the link should look like the following:
+[notebookname.qpw]A:A1
Include the drive letter and folder path if the notebooks reside on different hard drives or in different folders.
where qpw is the extension of the filename (you can link to Excel or Lotus 1-2-3 files using the proper filename extensions), A is the name of the sheet to which you want to link, and A1 is the cell address containing the information you want to appear in the linked notebook.
In Figure 7.22, cell B3 of the Annual Revenue notebook displays the word “January,” but, if you look at the Input Line, you’ll see that I linked cell B3 of the Annual Revenue notebook to cell B3 on sheet Qtr1 of a notebook called Training.
Figure 7.22. In notebook B, you can display the contents of a cell in notebook A.
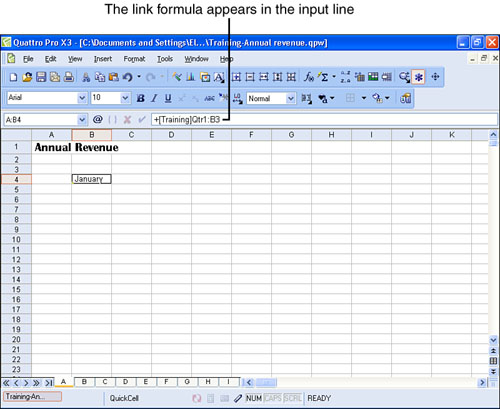
The beauty of linking lies in the editing. If I open the Training notebook and change the contents of cell B3 on sheet Qtr1, Quattro Pro will automatically update the contents of cell B4 on sheet A of the Annual Revenue notebook.
You do not need to link like cells to like cells. I linked sheet A, cell B4 in both spreadsheets because I wanted to maintain identical structures in the two notebooks. You can display the contents of sheet A, cell B4 of notebook A in notebook B, sheet X, cell A2 using exactly the same technique described in this section.