
15. Customizing Menus and Toolbars
In This Chapter
It’s always nice to be able to work the way that suits you best, and, to that end, I’m devoting the last two chapters in this book to customization. In this chapter, you’ll learn how to customize toolbars and menus, and, in the next chapter, you’ll learn how to customize various facets of Quattro Pro’s behavior.
Customizing Toolbars
As you learned in Chapter 1, “Getting Started,” toolbars are collections of buttons that act as shortcuts to execute a command on a menu. Instead of opening a menu and clicking a command, you can click a toolbar button, reducing the steps needed to select a command to one mouse click. For example, to apply boldface to an entry in a spreadsheet, you can open the Format menu, click the Selection Properties command and, in the dialog box that appears, click the Bold check box. Or, you can take the quick and easy way—click the Bold toolbar button (the one with the B on it) on the Property Bar toolbar.
When you open Quattro Pro, you see two toolbars: the Notebook toolbar and the Property Bar toolbar. But Quattro Pro actually contains 14 toolbars. In this section, I’ll show you how to display or hide any toolbar, change the appearance of any toolbar, and add and remove buttons from toolbars. Last, we’ll create a new toolbar.
Hiding and Showing Toolbars
Although you see only two toolbars when you open Quattro Pro—the Notebook toolbar and the Property Bar toolbar—you can easily display any of the other 12 toolbars, or you can hide the Notebook toolbar or the Property Bar toolbar.
You can display any toolbar by right-clicking the area where the toolbars appear. A shortcut menu appears (see Figure 15.1). Click any toolbar that doesn’t have a check beside its name; Quattro Pro displays the toolbar onscreen. For example, in Figure 15.2, I displayed the Auditing toolbar, which contains buttons that help you trace precedents and dependents (see Chapter 14, “More Data Analysis,” for details on auditing spreadsheets).
Figure 15.1. Right-click in the toolbar area to select a toolbar to display or hide.
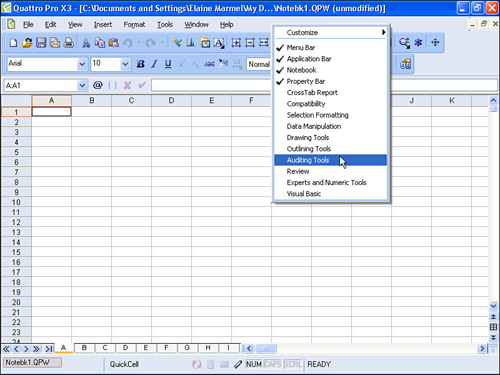
Figure 15.2. Any toolbar appearing onscreen has a check beside its name.
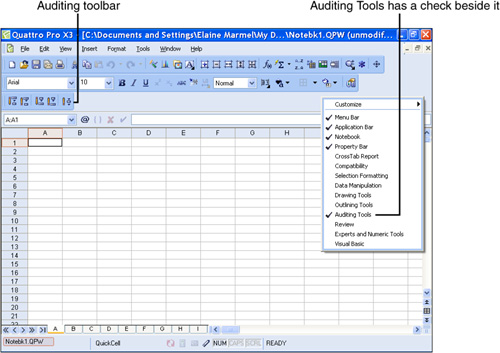
Any toolbar that appears onscreen has a check beside its name on the shortcut menu; to hide that toolbar, click it on the shortcut menu.
You should be aware that nothing stops you from hiding the Main Menu bar, the Application bar, the Notebook toolbar and the Property Bar toolbar. When you hide all these elements, you have no place to right-click to display the shortcut menu. And, you can’t get to any of Quattro Pro’s commands.
Tip

By default, toolbars dock at the top of the screen. You can float toolbars onscreen by dragging them away from the top of the screen and onto the worksheet area. If you drag a toolbar close to the left or right side of the screen, you can float or dock it in a vertical layout.
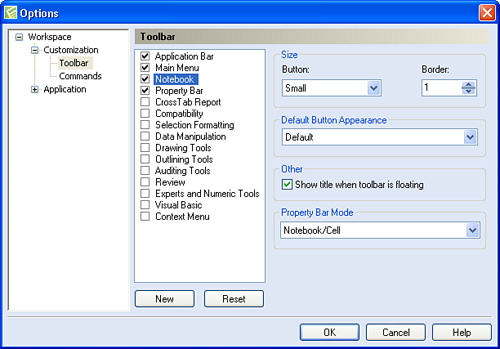
If you find yourself in this jam, right-click the program’s title bar and select Settings. In the Options dialog box that appears, click the plus sign (+) beside Customization. Then, click Toolbar. You’ll see a list of all available toolbars and check boxes beside their names. Place a check beside each element you want to display. You’ll see the Options dialog box in the next section.

Why would anyone hide all these elements? Well, first, you might do so by accident; accidents do happen. Or, you might be using Quattro Pro in a presentation and want to clear away all extra clutter to avoid detracting from the presentation.
Changing the Appearance of a Toolbar
The default toolbars contain buttons, and you can determine each button’s function from the QuickTip that appears if you rest the mouse pointer over a button. But suppose that you’re not into pictures on buttons; in fact, your fondest wish is that the function of the button would appear on the button instead of some picture that you’re supposed to recognize but don’t. Or, suppose that you like the buttons with the pictures on them, but they’re just too small for your taste. You can change the appearance of toolbar buttons by following these steps:
- Open the Tools menu and click Customize.
If no check appears beside the toolbar’s name, click the check box next to the toolbar name so that a check appears. Quattro Pro will display the toolbar onscreen behind the dialog box.
- In the Options dialog box that appears, click the plus sign (+) beside Customization. The plus sign changes to a minus sign (–), and customization options appear (see Figure 15.3).
Figure 15.3. Use this dialog box to control the appearance of toolbars.
- Click Toolbar.
- Click the toolbar you want to change.
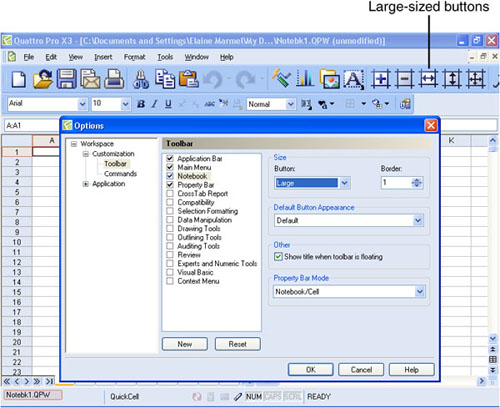
- To change the size of the button, open the button list and select Medium or Large. In Figure 15.4, I made the buttons on the Notebook toolbar Large in size.
Figure 15.4. The Notebook toolbar buttons at Large size.
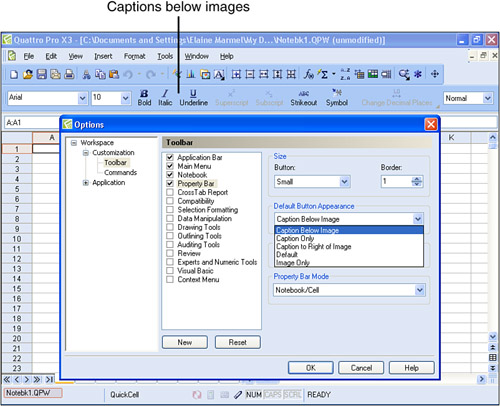
- To change the appearance of the buttons, open the Default Button Appearance List and select Caption Below Image, Caption Only, Caption to Right of Image, or Image Only. In Figure 15.5, I selected Caption Below Image for the Property bar.
Figure 15.5. Captions appear below button images on the Property bar.
- Click OK to close the Options dialog box.
Tip
As you make changes in the dialog box, your changes appear onscreen before you close the dialog box, making it easy for you to change your mind.
Adding or Removing Toolbar Buttons
It’s possible that you’ll find yourself using a particular command on a menu regularly; you may find it more convenient to create a toolbar button for that command. Suppose, for example, that you’d like to add a button to the Notebook toolbar that closes a notebook. That way, when you want to close a notebook, you won’t need to open the File menu and click Close; instead, you’ll just click a toolbar button.
Tip
You can remove any button from a toolbar. While viewing the Commands page of the Options dialog box (follow steps 1 to 5), drag the button in question off the toolbar and drop it anywhere on the spreadsheet. As you drag, the mouse pointer contains an image of the button and an X.
To add a button to a toolbar, follow these steps:
- Open the Tools menu and click Customize.
- In the Options dialog box that appears, click the plus sign (+) beside Customization. The plus sign changes to a minus sign (–), and customization options appear.
- Click Toolbar.
- Make sure that a check appears beside the toolbar to which you want to add a button.
- Click Commands. The Commands portion of the Options dialog box appears (see Figure 15.6).
Figure 15.6. Adding a button to a toolbar.
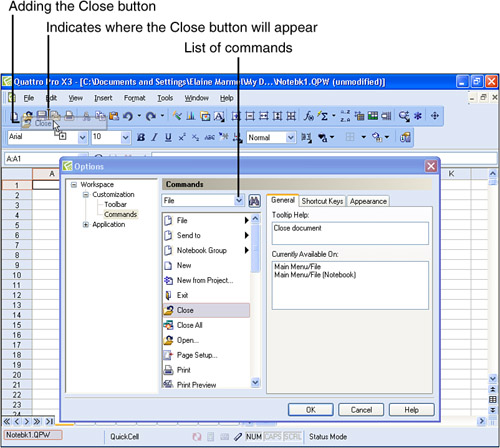
- Open the list of commands and select the menu on which the command appears. If you prefer, you can select All (Show All Items) and Quattro Pro displays all available commands in alphabetical order.
- Drag and drop the command to the toolbar where you want a button for the command to appear. As you drag, the mouse pointer changes, showing the button you’re adding. On the toolbar, a large insertion point marks the location where the button will appear when you release the mouse button. When you release your mouse button, the new button appears on the toolbar.
- Click OK to close the Options dialog box.
Creating Your Own Toolbar
Suppose that you use some buttons on the Notebook toolbar, some buttons on the Property Bar toolbar, and some commands not found on either toolbar. Suppose, further, that you’d really like to group all the commands you use regularly on one toolbar and then hide all the others. You can create your own toolbar using these steps:
- Open the Tools menu and click Customize.
- In the Options dialog box that appears, click the plus sign (+) beside Customization. The plus sign changes to a minus sign (–), and customization options appear.
- Click Toolbar.
- Click the New button. Quattro Pro displays a new item in the list of toolbars and a small blank square representing the new toolbar floats onscreen (see Figure 15.7).
Figure 15.7. Creating a new toolbar.

- Type a name for your toolbar to replace “New ToolBar 1.”
- Follow steps 5 through 7 of the preceding section to add buttons to your new toolbar.
- Click OK to close the Options dialog box.
Tip
To add a vertical line between buttons so that you can group buttons with similar functionality together, open the list box of menus and select User Menus. Then, drag the separator to your toolbar.
Customizing Menus
You can customize menus in much the same way you customize toolbars; you can add, delete, or rearrange commands. You also can add or change shortcut keys for menu commands.
Adding, Deleting, and Rearranging Commands
To add, delete, or rearrange commands on any Quattro Pro menu, open the Tools menu and click Customize. Then, click the plus sign (+) beside Customization and click Commands. Your screen will appear similar to the one shown previously in Figure 15.6.
To delete or rearrange menu commands, open the menu in question. Drag a command to a new position or simply drag it off the menu to delete it.
You can add commands to menus the same way that you add buttons to toolbars. Find the command that you want to add and drag it onto the appropriate menu; see the steps in the section, “Adding or Removing Toolbar Buttons” for details.
Adding or Changing Shortcut Keys
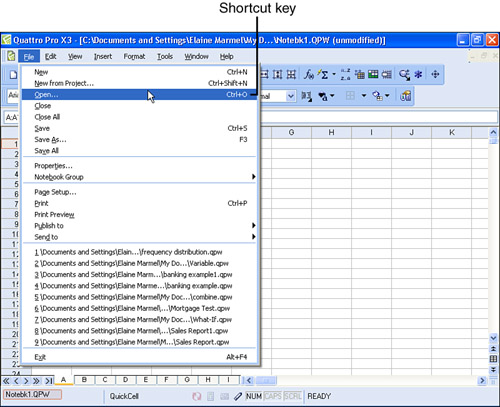
You can execute any command using its shortcut keys; if a command has shortcut keys, they appear beside the command on a menu. For example, in Figure 15.8, you can see that the shortcut key for the Open command is Ctrl+O.
Figure 15.8. The shortcut key for the Open command is Ctrl+O.
A command does not need to appear on a toolbar or the Main Menu bar for you to use it. You can execute any command using its shortcut keys. For example, Quattro Pro contains a command that enables you to save a notebook as an Excel file. This command doesn’t appear on the Notebook toolbar, the Property Bar toolbar, or any menu. But you can use this command by pressing the shortcut keys for this command on your keyboard—Alt+Shift+S.
Make sure that you assign a combination such as Alt+X if you opt to use an alphabetic or numeric character; you don’t want Quattro Pro executing a command every time you type X.
You also can add shortcut keys for commands that do not have them, and you can change existing shortcut keys. To add or change a shortcut key, follow these steps:
- Open the Tools menu and click Customize.
- In the Options dialog box that appears, click the plus sign (+) beside Customization. The plus sign changes to a minus sign (–), and customization options appear.
- Click Commands.
- Click the Shortcut Keys tab.
- Use the Command list box to find and click the command with which you want to work. Quattro Pro displays the command’s current shortcut key if one is already assigned (see Figure 15.9).
Figure 15.9. Add or modify shortcut keys using the Shortcut Keys tab of the Options dialog box.
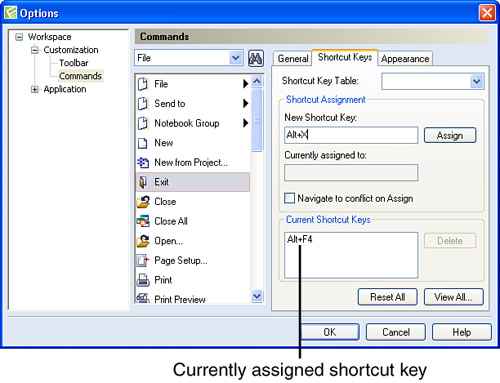
- Click in the New Shortcut Key box.
- On your keyboard, press the key combination you want to assign.
- Click the Assign button. Quattro Pro adds the shortcut key assignment to any listed in the Current Shortcut Keys box.
- If you want, you can delete an existing shortcut key assignment by highlighting it in the Current Shortcut Keys box and clicking the Delete button.
- Click OK to save your settings.
Tip
If you select a shortcut key that is already in use, it appears in the Currently assigned to box. If you check the Navigate to conflict on Assign box, Quattro Pro removes the assignment from the command to which the shortcut key was originally assigned and highlights that command so that you can assign a new shortcut.