
6. Picture Puzzles: Sliding and Jigsaw
There is a whole class of games that revolves around using photographs or detailed drawings. Things like jigsaw puzzles are fairly new to computer gaming because it wasn’t until the mid-1990s that consumer computers had graphics good enough to display detailed images.
Flash has the capability to import a few different image formats. However, it doesn’t stop at just importing them. You can actually get to the bitmap data and manipulate the images. This enables us to cut pictures apart for use in puzzle games.
Note

Flash supports JPG, GIF, and PNG file formats. The JPG format is ideal for photographs because it compresses image data well and enables you to determine the amount of compression to use when making the JPG. The GIF format is another compressed format, better suited to drawn graphics of a limited number of colors. The PNG format offers good compression and excellent full-resolution quality. All these formats can be created by Adobe Fireworks or Adobe Photoshop, which come in some of the Adobe bundles along with Flash.
Let’s take a look at the basics behind importing and manipulating images. Then, we look at two games that use playing pieces taken from cut-apart imported images.
Manipulating Bitmap Images
Source Files
A3GPU206_Bitmap.zip
Before we can play with a bitmap, we must first import it. You could also use a bitmap in the library by assigning it a classname, and then accessing it that way. But, importing an external bitmap is more versatile in almost every way.
Loading a Bitmap
A Loader object is a special version of a Sprite that pulls its data from an external source. You need to pair it up with a URLRequest, which handles the network file access.
Here is a simple class that loads a single JPG file and places it on the screen. After creating a new Loader and a new URLRequest, we pair them with the load command. The entire process takes only three lines of code. Then, we use addChild to add the Loader object to the stage, just like a normal display object like a Sprite:
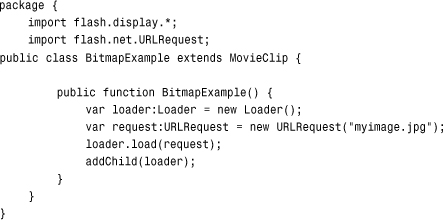
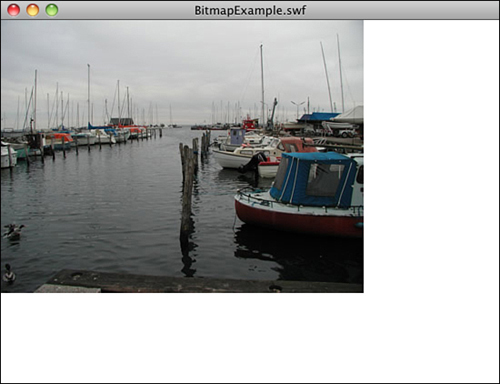
Figure 6.1 shows a bitmap loaded this way. It is positioned in the upper-left corner. Because the Loader object acts like a normal display object, we can also set its x and y position to center it on the screen or place it anywhere we want.
Figure 6.1 This bitmap image was loaded from an external file but now behaves like a normal display object.
Note
Even though URLRequest is meant to work from web servers, it works just as well from your local hard drive while testing.
This can prove useful for loading introductory or instruction graphics in a game. For instance, your company logo can appear on the introduction screen using this simple set of commands. Instead of embedding your logo in each Flash game, you can have a single logo.png file and use a Loader and URLRequest to bring it in and display it. Then, one change to logo.png and all your games are using the new logo.
Breaking a Bitmap into Pieces
Loading a single bitmap and displaying it is useful, but we need to dig into the data and extract puzzle pieces from the image to build the games in the rest of this chapter.
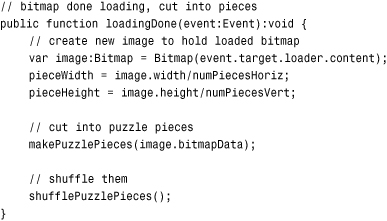
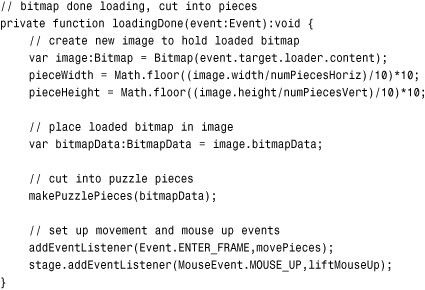
The first change we need to make to the simple example from before is to recognize when the bitmap is done loading and start processing it. This can be done with an Event.COMPLETE listener. We add that to the Loader object, and then we can put all our manipulation code into the loadingDone function that it calls.
Note
In addition to Event.COMPLETE, you can also get status reports of the progress of a downloading image. Look up URLRequest in the Flash documentation to see some examples of loading tracking and even ways to catch and handle errors.
Here is the start of the new class. We need the flash.geom class later. I’ve also put the loading code into its own function, called loadBitmap, so it is easy to transport to the games later in this chapter:
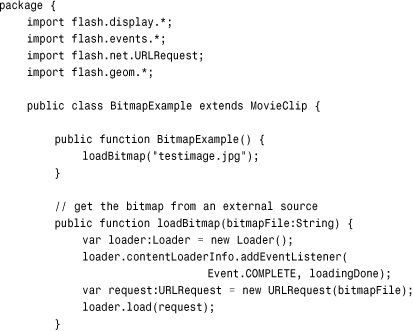
When the image is completely loaded, the loadingDone function is called. The first thing it does is to create a new Bitmap object. It takes the data for this from event.target.loader.content (in other words, the content property of the original Loader object):
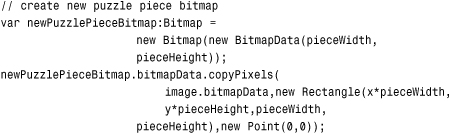
We can get the width and height of the bitmap by accessing the width and height properties of the image variable now that it contains the content. What we want to do with these is to get the width and height of each of the puzzle pieces. For this example, we have six columns and four rows. So, the total width divided by six gives us the width of each piece, and the total height divided by four gives use the height of each piece:
![]()
Now, we loop through all six columns and four rows to create each puzzle piece:
![]()
Creating a puzzle piece is done by first making a new Bitmap object. We specify the width and height to create one. Then, we use copyPixels to copy a section of the original image into the bitmapData property of the puzzle piece.
The copyPixels command takes three basic parameters: the image to copy from, the Rectangle specifying the part of the image to get, and the Point that defines where the piece of the image goes in the new bitmap:
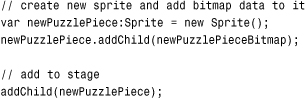
A bitmap by itself isn’t our end goal. We want to have a Sprite to show on the screen. So, we create a new one, and then add the bitmap to it. Then, we add the Sprite to the stage.
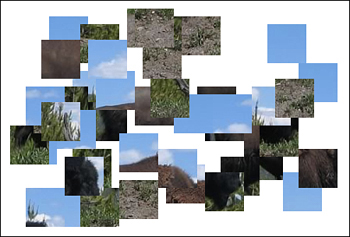
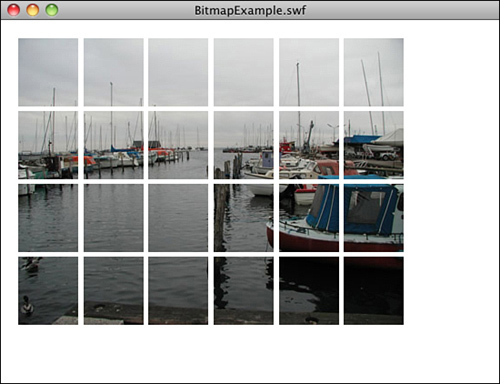
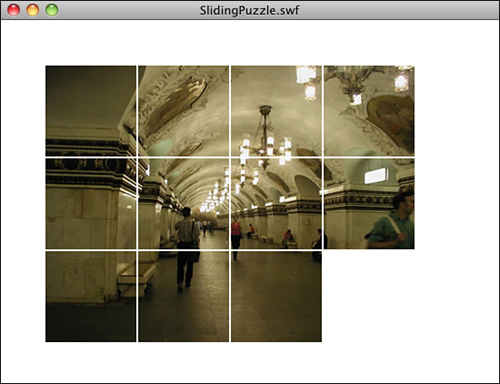
Finally, we can set the location of the sprites. We want to place them on the screen according to their column and row, plus about five pixels to create some blank spacing between the pieces. We also offset the horizontal and vertical positions of all pieces by 20 pixels. Figure 6.2 shows the 24 puzzle pieces.
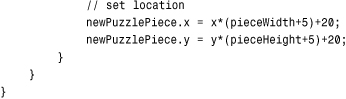
Figure 6.2 The imported image is broken into 24 pieces, which are then spaced apart on the screen.
Now that we know how to create a set of puzzle pieces from an imported image, we can go ahead and build games around them. First, we create a simple sliding puzzle. Later, we try a more complex jigsaw puzzle game.
Sliding Puzzle Game
Source Files
A3GPU206_SlidingPuzzle.zip
It is surprising that a game like the sliding puzzle game had existed way before computers. The physical game was a small handheld plastic square with usually 15 plastic interlocked pieces inside it. You could slide one of the plastic pieces into the unoccupied 16th slot, and then slide another into the newly unoccupied spot, and so on. This goes on until the puzzle is in order.
The physical version usually didn’t involve a picture, but instead the numbers 1 through 15. It was sometimes called the 15-puzzle.
Note
The problem with the physical game was that the squares often jammed and frustrated players got their fingers pinched trying to unstick them. Also, after the puzzle was solved, you needed to look away and randomly move squares for a while to reset it into a random configuration.
As a computer game, this works much better. For one, you can offer different sets of squares like an image. You can offer a new image each time, allowing players to discover the image as the puzzle nears completion. Plus, the computer can randomly arrange the puzzle pieces at the start of each game.
Oh, and no pinching.
In our version of the sliding puzzle game, we use a variable number of pieces cut from the image. In addition, there is a random shuffle of the tiles at the start of the game. Plus, we animate the pieces moving from one spot to the other so they appear to slide. We also recognize when the solution has been found.
Setting Up the Movie
This game uses the same three-frame framework we have used for the last two chapters: intro, play, and gameover. Instructions are supplied on the first frame.
The only graphic needed is the image itself. This is an external JPG image called slidingimage.jpg. We make it 400 pixels by 300 pixels.
Note
Picture size and compression are two things to take note of when creating an image for a game like this. All three images used in this chapter are less than 34K. Each is 400×300 with 80 percent JPEG compression. It would be easy to produce an image 20 times that in size using lossless compression, like PNG files. But, that level of quality is not needed and would only result in long download times for the player.
Remember that we are cutting the puzzle image, and then removing the bottom right piece. The player needs this blank spot to make moves. So, it is best to choose an image that doesn’t have anything important at the bottom right.
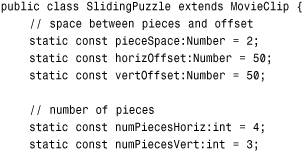
Setting Up the Class
The sliding puzzle game needs the URLRequest and geom classes to handle the image. We are also using a Timer object to facilitate the sliding animation:
There are plenty of constants to define for this game, starting with the spacing between the pieces and the general offset of all the pieces. We also decide how many pieces to cut the image into, in this case 4×3:
Note
The number of columns and rows in the puzzle should roughly mirror the dimensions of the image. In this case, we know it is a 400×300 image, and we are making a 4×3 puzzle, so the pieces are 100×100 in size. There’s nothing wrong with making rectangular pieces, like a 4×4 puzzle with 100×75 pieces, but you probably don’t want to get too far away from square.
To randomize the board at the start of the game, we make a number of random moves. We talk more about that later in the “Shuffling the Pieces” section. In the meantime, we need to store the number of random moves in a constant for easy changeability:
![]()
The puzzle pieces smoothly slide into place using a Timer. We decide the number of steps and the length of time it takes for the slider to complete its movement:
![]()
The width and height of a puzzle piece is calculated according to the numPiecesHoriz and numPiecesVert constants and the size of the image. We get those values after the image has been loaded:
We need an array to store the puzzle pieces. We don’t store just the references to the new sprites here, but a small object that contains the location of the puzzle piece in the finished puzzle as well as the sprite reference:
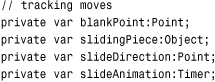
![]()
We need a host of variables to track game play and movement. First, we have blankPoint, which is a Point object indicating the location of the blank spot in the puzzle. When the player clicks a piece adjacent to the blank spot, the piece slides over into it. The slidingPiece holds a reference to the piece moving, and the slideDirection and slideAnimation Timer facilitates this animation:
When players press the Start button, they go to the second frame, which calls startSlidingPuzzle. Unlike constructor functions in other games, this one doesn’t do much; until the image is loaded, there is not much to do.
The blankPoint variable is set to the bottom left, using some of the constants. Then, loadBitmap is called with the name of the image file:

Note
Remember that we begin counting in arrays and loops in ActionScript with zero. So, the piece at the upper left is 0,0. The piece at the lower right is one less than the number of pieces wide, or numPiecesHoriz-1. If a puzzle is four pieces across and three down, the piece at the lower right is 3,2 or numPiecesHoriz-1,numPiecesVert-1.
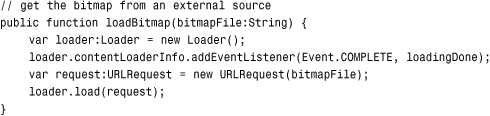
Loading the Image
The loadBitmap function is identical to the one used in the example earlier in this chapter:
The loadingDone function becomes much more important in this case than the earlier example. Now that the image has been loaded, the width and height can be obtained, which gives us the individual width and height of each piece. We can set those variables, and then call makePuzzlePieces to do the cutting. Finally, shufflePuzzlePieces randomize the puzzle and get it ready for the player:
Cutting the Bitmap into Pieces
Although our earlier example cut the image into pieces, it didn’t have to build all the data objects needed to make them useful in a game. The function makePuzzlePieces does this by creating the array puzzleObjects. After the puzzle piece sprite is created and the position of the sprite set, the temporary variable newPuzzleObject is created.
In newPuzzleObject, three properties are attached. The first is currentLoc, which is a Point object that shows where the puzzle piece is currently located. For instance, 0,0 is the upper left, and 3,2 is the lower right.
Similarly, homeLoc contains a Point, too. This is the original (and final) location for the piece. It does not change during the game and provides a point of reference so we can determine when each piece has returned to its correct position.
Note
Another way to go is to store the currentLoc and homeLoc as properties of the sprites. Then, store only the sprites in the array. In the first case, the three values are puzzleObjects[x].currentLoc, puzzleObjects[x].homeLoc, and puzzleObjects[x].piece. In the latter case, the same data is puzzleObjects[x].currentLoc, puzzleObjects[x].homeLoc, and puzzleObjects[x] (without the .piece because the item in the array is the sprite). I prefer creating my own array of objects to ensure that ActionScript can quickly get the information without having to look at the entire Sprite object each time.
We also have a piece property of newPuzzleObject. The piece property holds a reference to the piece’s sprite.
We store all the newPuzzleObject variables we create in the puzzleObjects array:
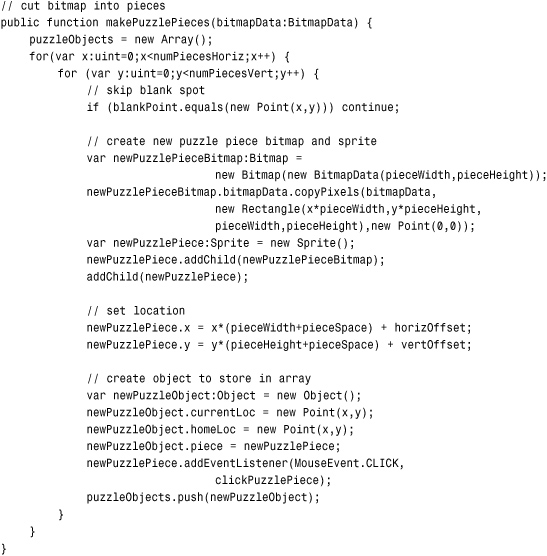
Each puzzle piece gets its own event listener to listen for mouse clicks. It calls clickPuzzlePiece.
At this point, the pieces are all in place, but not shuffled. If we didn’t shuffle them at all, the game would start out looking like Figure 6.3.
Figure 6.3 The sliding puzzle without shuffling. The piece at the bottom right has been removed to create a space to slide pieces into.
Shuffling the Pieces
After the puzzle pieces are there, we need to shuffle them. The idea is to “mess the puzzle up” so the player has the challenge of putting it back in order.
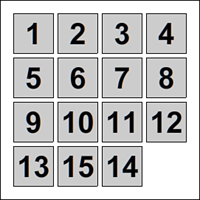
One way to mess the puzzle up is to place all the pieces at random locations. However, that isn’t the right way to do it. There is a good chance that if you simply place the pieces randomly, you end up with an arrangement that can never be reordered properly. Figure 6.4 demonstrates one such situation.
Figure 6.4 With simply the 15th and 14th pieces reversed, this puzzle cannot be solved.
Instead of randomly placing each piece, we start with the complete puzzle, and then make random moves until the board looks completely random.
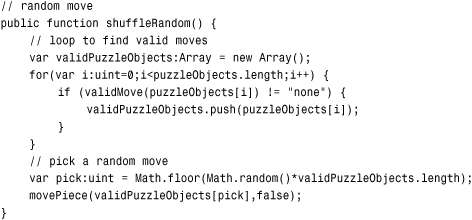
The shufflePuzzlePieces function loops and calls shuffleRandom a number of times. It is shuffleRandom that does the real work:
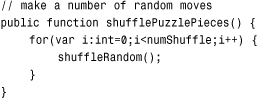
To make a random move, we look at all the pieces on the board. Then, we determine what moves are possible and put them in an array. We then pick a random move from that array and do it.
The key to this is the validMove function, which we examine next. The shuffleRandom function, after it has picked a random move, calls movePiece, which is the same function we use when the player clicks to make a move:
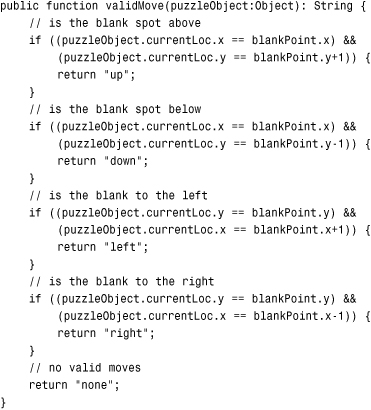
The validMove function takes as a parameter a reference to a puzzleObject. Using the currentLoc property of this puzzle piece, it can determine whether the piece is next to the blank spot.
First, it looks above the puzzle piece. In this case, the x values of both the piece and the blankSpot should match. If they do, the vertical, or y, positions are compared. The blankPoint.y should be one less than the currentLoc.y of the puzzleObject. If this all works out, "up" is returned, which tells the function calling validMove that this piece does indeed have a valid move: "up".
Note
Notice that the validMove function declaration is for it to return a string. You can see the ": String" on the first line of code that follows. It is always a good idea to indicate what type of data is returned by the function. You help the Flash player perform more efficiently when you do.
Then, the down, left, and right moves are explored. If none of these creates a valid move, the value "none" is returned. This means there is no valid move for this puzzle piece:
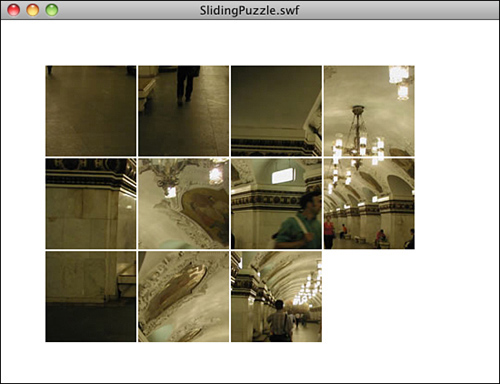
After a shuffle is done, the game starts with the pieces all mixed up, as shown in Figure 6.5.
Figure 6.5 The game now starts with the pieces shuffled.
Note
The issue of how many times to shuffle the pieces doesn’t have a definitive solution. I choose 200 because it seems about right. If you choose too few, the solution is easier; too many and you start to see a pause at the start of the game while the shuffle takes place.
Reacting to Player Clicks
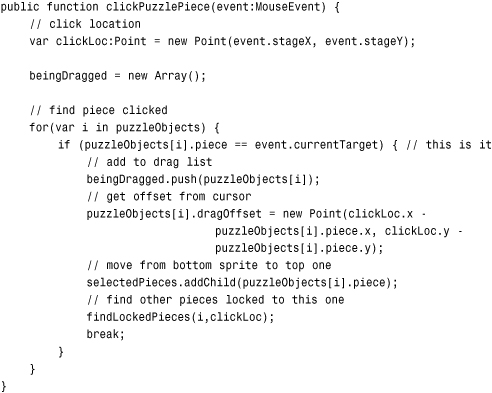
When the player clicks, the clickPuzzlePiece function runs. The event passed to it has a currentTarget that matches a piece in the puzzleObjects list. A quick loop finds which one matches, and then the movePiece function is called:
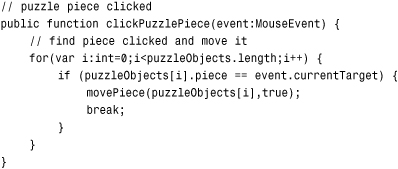
Notice that when the shuffleRandom function called movePiece, it used false as the second parameter. When clickPuzzlePiece called movePiece, however, it used true as the second parameter.
The second parameter is slideEffect, and it takes either true or false as a value. If true, a Timer object is created to move the piece gradually over a short period of time. If false, the piece immediately moves. We want the pieces to move immediately in the case of the shuffle, but when the player is making moves, we want to use the animation.
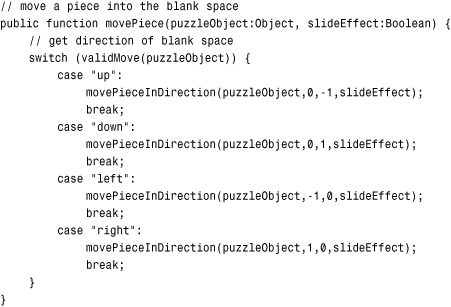
The decision is not actually completed inside of movePiece. movePiece calls validMove and determines whether the move is up, down, left, or right. Then, it calls movePieceInDirection with the same puzzleObject and slideEffect values, as well as new dx and dy values according to the direction of movement.
Note
The movePiece function uses the switch structure in ActionScript to branch into one of four pieces of code. The switch is like a series of if...then statements, but the tested variable is only needed in the switch line. Each branch starts with case and the value that needs to be matched. Each branch must end with a break command.
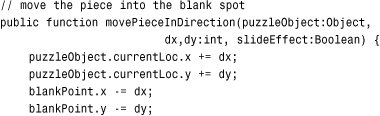
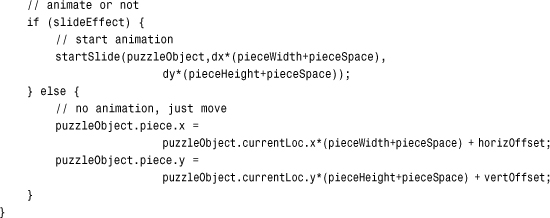
The movePieceInDirection function changes the currentLoc of the piece and the blankPoint variable instantly. This sets the game up for handling the situation where the player makes another move before the animation is done. The piece and the blankPoint are already in the correct location. The animation is just cosmetic:
If there is to be an animation, the startSlide function is called to set it up. Otherwise, the puzzle piece is moved immediately to the new location:
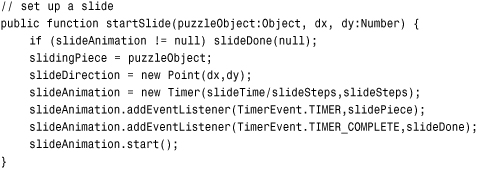
Animating the Slide
The animated slide is done by starting a Timer object and moving the puzzle piece in steps. According to the constants at the start of the class, there should be 10 steps, all 250 milliseconds apart.
The startSlide function first sets some variables to track the animation. The puzzle piece to be moved is slidingPiece. The slideDirection is a Point object with dx and dy as the movement direction. It is either 1,0, −1,0, 0,1 or 0,−1 depending on which of the four directions the piece is going.
Then, the Timer is created and two listeners are attached to it. The TimerEvent.TIMER listener moves the piece, whereas the TimerEvent.TIMER_COMPLETE listener calls slideDone to wrap up the animation:
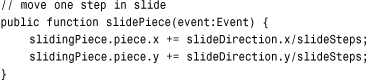
Every 250 milliseconds, the puzzle piece moves a fraction of the distance closer to its final destination.
Also notice the first line of startSlide is a potential call to slideDone. This is done if a new slide animation is about to start but the previous one has yet to finish. If so, the previous one is quickly ended with a single call to slideDone that places the animating piece in its final location, thus clearing the way for a new slide animation.
Note
This is a different type of animation from the time-based animation used in Chapter 5, “Game Animation: Shooting and Bouncing Games.” The animated slide here is not a critical game element, just a cosmetic one. So, it makes sense to place it outside of the rest of the game logic with its own temporary timer. We don’t need to worry about performance remaining consistent because it doesn’t affect game play.
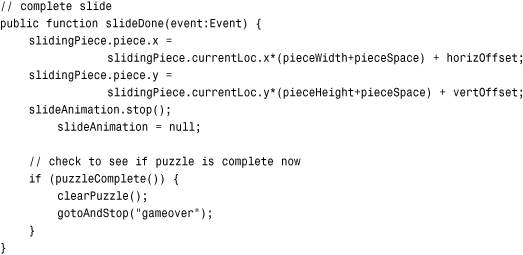
When the Timer is done, the location of the puzzle piece is set to be sure the piece is exactly where it should be. Then, the slideAnimation timer is removed.
This is also time to call puzzleComplete to see whether every piece is in the right place. If so, clearPuzzle is called, and the main timeline goes to the gameover frame:
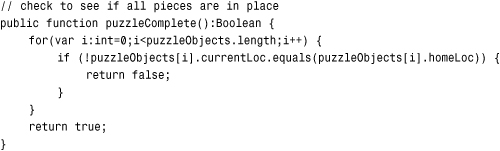
Game Over and Cleanup
Determining whether the game is over is as easy as looking at each piece and comparing the currentLoc with the homeLoc. Thanks to the equals function of the Point class, we can do this in one step.
If all the pieces are in their original locations, true is returned:
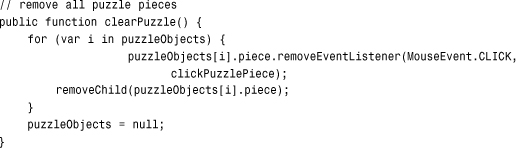
Here is the cleanup function for the game. All the puzzle piece sprites get rid of their MouseEvent.CLICK events and are removed, and then the puzzleObjects array is set to null. Because the puzzles pieces are the only game objects created, that’s all that is needed:
Modifying the Game
The game play of this game is pretty straightforward and probably doesn’t benefit from any variation. However, you can improve the program itself by allowing ways for the image to be dynamically selected. For instance, the web page could pass in the name of the image. Then, you could have one game that called on different images depending on the web page or perhaps the day.
You could also make this game progressive. After each puzzle is complete, a new level is presented. The image filename and the numPiecesHoriz and numPiecesVert could be passed in as parameters to startSlidingPuzzle. Instead of going to gameover when the puzzle is complete, it goes to the next level with a larger, harder image with more pieces.
You could also add a timer to let players see how fast they can solve the puzzle. A move counter would also be a measurement of how well the player performs.
Jigsaw Puzzle Game
Source Files
A3GPU206_JigsawPuzzle.zip
Jigsaw puzzles first became popular in the 18th century when they were made from wood using an actual jigsaw. Today, they are made from cardboard with a cutting press. Today’s puzzles can include as many as 24,000 pieces.
Computer jigsaw puzzles have been popping up around the Web and in casual game CD collections since the late 1990s. In this chapter, we build a simple jigsaw puzzle using rectangular pieces cut from an imported image.
Note
Most jigsaw puzzle games go the whole way and make the puzzle pieces look like traditional puzzle pieces with interlocking tabs. This cosmetic feature can be done in Flash, but only by using quite a bit of vector drawing and bitmap-manipulation tools. To stick with the fundamentals, we use rectangle-shaped pieces here.
In our jigsaw puzzle game, we cut pieces like the sliding puzzle game. Instead of placing them in particular spots on the screen, however, we throw them all around randomly. Then, the player can drag pieces around the screen.
The difficult part of the coding is making the pieces lock together when the player puts them side by side.
Setting Up the Class
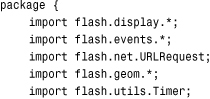
The jigsaw puzzle movie is pretty much identical to the sliding puzzle. There are three frames, and the second calls startJigsawPuzzle. The same imports are needed, too:
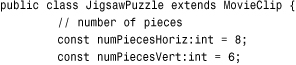
The numPiecesHoriz and numPiecesVert are listed at the top of the class. Changes to these constants are likely because you can vary the number of pieces in a jigsaw puzzle to create different levels of difficulty. We create an 8×6 jigsaw puzzle for this example:
The width and height of the pieces are decided after the image has been imported and the program can tell the size of the image:
![]()
Like with the sliding puzzle, we store all the puzzle pieces as objects in the puzzleObjects array:
![]()
Here is where the jigsaw puzzle game starts to deviate from the sliding puzzle. Instead of putting the puzzle pieces directly on the stage, we place them in one of two sprites. The selectedPieces sprite holds any puzzle pieces that are currently being dragged. The otherPieces sprite hold everything else.
Note
Placing groups of display objects inside of sprites is a great way to group similar objects together. As you see later in this example, you can use addChild to move a display object from one sprite to another.
![]()
When players select a piece to drag, they could be selecting a single piece, or they could be selecting a group of linked pieces. Instead of a single variable pointing to the piece being dragged, we need an array to store one or more pieces:
![]()
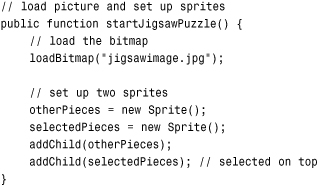
The game constructor function, in addition to calling loadBitmap, also creates the two sprites we need and adds them to the stage. The order in which these are added is important because we want the selectedPieces sprite to be on top of the otherPieces sprite:
Loading and Cutting the Image
The image is loaded in the same way as the sliding puzzle. I skip the loadBitmap function because it is identical to the previous one.
Loading the Bitmap Image
The loadingDone function isn’t too far off either. After the image is brought in and pieceWidth and pieceHeight are calculated, makePuzzlePieces is called to cut the image.
We’re doing something a little different with the pieceWidth and pieceHeight calculations. The Math.floor function is being used, along with the division by 10 to restrict the width and height numbers to multiples of 10. For instance, if we were doing 7 pieces across, into 400 pixels wide, we have 57.14 pixels across for each piece. But, we are using a 10×10 grid here to allow players to match pieces side by side easily. By rounding that down to 50, we ensure the widths and heights match up on a 10×10 grid. We discuss more about this when we build the lockPieceToGrid function later.
Finally, two event listeners are added. The first is an ENTER_FRAME event for piece movement during dragging. The second is a MOUSE_UP event on the stage. This is needed to get mouse up events that signal the end of dragging.
The user clicks a piece to start a drag, and the MOUSE_DOWN event acts on the piece itself. Then when the drag is complete, we can’t rely on the mouse to be over the same, or any, piece. The player might move the cursor quickly and have the cursor slightly off any pieces. However, mouse events carry through to the stage, so we are safer placing a MOUSE_UP listener on the stage to make sure we get notified.
Cutting the Puzzle Pieces
The basics for cutting the pieces are the same in this game. However, we don’t need to set any location for the pieces because they are arranged randomly a bit later.
After the sprites are created, they are added to otherPieces, which is the bottom of the two sprites we created.
The puzzleObject elements are also slightly different. Instead of currentLoc and homeLoc, we just have loc, which is a Point object that tells us where the puzzle piece belongs in the complete puzzle. For instance, 0,0 is the top left piece.
Also, we add a dragOffset property to the puzzle pieces. We use this to position each piece the proper distance from the cursor while dragging:
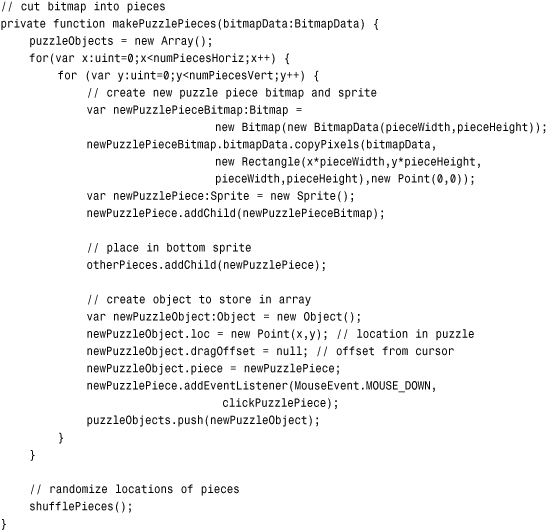
The shuffle function picks random locations for all the puzzle pieces. We don’t care whether the pieces fall on top of each other or how they are distributed. It should be as if they all just fell out of the box. Figure 6.6 shows such a random distribution.
Figure 6.6 The pieces of the jigsaw puzzle are randomly arranged on the screen.
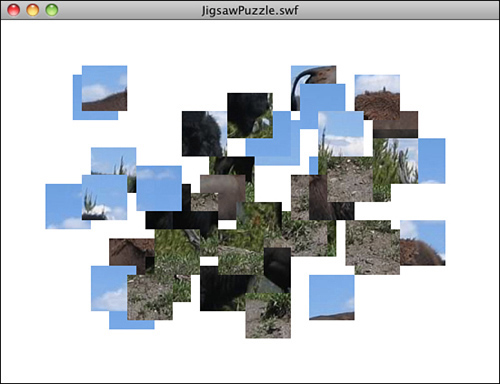
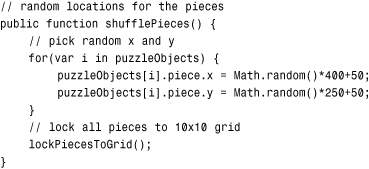
The last line of shufflePieces calls lockPieceToGrid. This function loops through all the puzzle pieces and moves them to the closest location to a 10×10 grid. For instance, if a piece is at 43,87 it is moved to 40,90.
The reason for using lockPieceToGrid is that it is a simple way to allow the player to move one piece close, but not exactly next to, another piece and have the pieces lock together. Normally, if a piece is just one pixel away from another, it doesn’t lock. By putting all the pieces on a 10×10 grid, however, it means that pieces are either perfectly matching, or they are 10 pixels away:

Note
Because we are using puzzle pieces that are multiples of 10 wide and high, it is better to use a source image that has dimensions that are multiples of 10. For instance, a 400×300 image is used completely. However, a 284×192 image loses a bit from the right and bottom in an effort to restrict piece sizes to multiples of 10.
Dragging Puzzle Pieces
When a player clicks a puzzle piece, several things need to happen before the piece can move along with the cursor. The first is to figure out which piece was clicked.
Determining Which Piece Was Clicked
This is done by looping through the puzzleObjects until one is found where the piece property matches the event.currentTarget.
Then, this piece is added to an empty beingDragged array. In addition, the dragOffset for this piece is calculated by the distance between the click location and the sprite.
The sprite is moved from the bottom otherPieces sprite to the top selectedPieces sprite. It takes one call to addChild to do that. This means that as the player drags the puzzle piece, it floats above all other pieces that are left behind on the otherPieces sprite:
Finding Linked Pieces
The most interesting thing that goes on when the player clicks a piece is the call to findLockedPieces. After all, this piece might not be alone. It might have joined with other puzzle pieces in previous moves. Any pieces joined with the one clicked need to also be added to the beingDragged list.
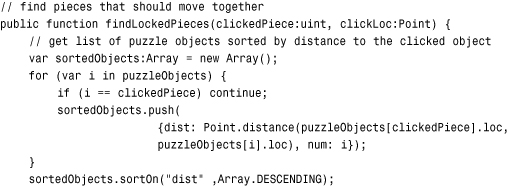
The way to determine whether a piece is locked to another is through a series of steps. This process begins by creating a sorted list of all the pieces, other than the one clicked. This list is sorted by the distance from the original clicked piece.
Note
The sortOn command is a powerful way to sort lists of objects. Assuming the array contains only similar objects, all with the same sorting property, you can quickly and easily sort the list. For instance, the array [{a: 4, b: 7}, {a: 3, b:12}, {a: 9, b: 17}] can be sorted by programming myArray.sortOn("a");.
In the following code, an array is created with the dist property and num property for each element in the array. The first is the distance of the piece from the original clicked piece. The second is the number of the piece as it appears in puzzleObjects:
Now that we have a sorted array of pieces, we can loop through that and check out each piece to see whether it is linked to the original selection.
First, we check the x and y position of the piece. What we are looking for is to see whether the piece is positioned correctly relative to the original selection. For instance, if the pieces are 50 wide and 50 high and the original piece is at 170,240, the piece directly to the left of it should be at 120,240. The piece two away to the left should be 70,240 and so on.
Figure 6.7 shows a few examples of pieces that do and do not connect.
Figure 6.7 The top two examples do not connect, but the bottom two examples do.
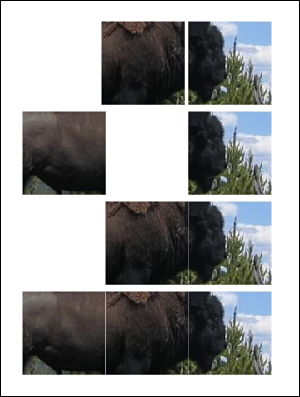
In Figure 6.7, the top example shows two pieces that are positioned close, but not close enough to connect.
The next example shows pieces positioned perfectly, but missing a connecting piece between them. The piece on the left is the exact distance from the piece on the right, but the pieces shouldn’t connect because they aren’t next to each other and the piece that would connect them is missing.
The third example shows two pieces connected. They are adjacent, and the perfect distance. The fourth example is the same with all three connected.
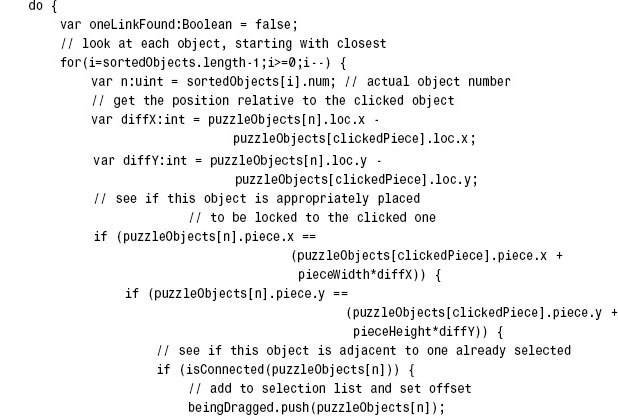
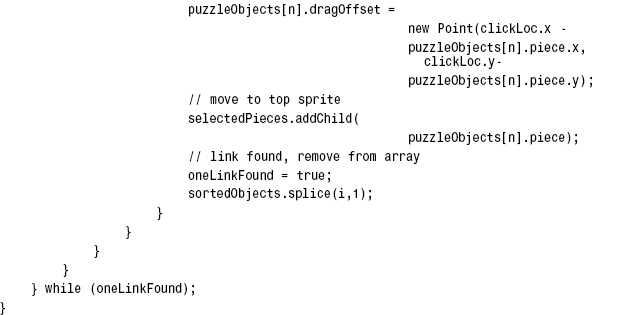
The first step is to see whether the piece under examination is correctly placed. The next step is to see whether it is connected to the pieces found so far. That is delegated to the isConnected function, which you see in a moment.
If the piece is indeed connected, we can add it to the beingDragged list, set its dragOffset property, and add it to the selectedPieces sprite.
We can put this all in a do loop so we can repeat it multiple times. It is possible to have a set of linked pieces in a U shape and try to grab one end of the U. This means the other end of the U is not recognized as a linked piece. But, if we loop through the unlinked pieces again, it finds the U. We can set a Boolean variable oneLineFound to true when we find a link. If we go through all the unlinked pieces without finding a link, then we must have gotten them all. Otherwise, we keep looping.
The key to using the isConnected function is that we already sorted the list of pieces by distance to the first piece. This is important because we should be moving outward in the search for new connected pieces. As we examine each new piece for connectivity, pieces between it and the original selection most likely have been examined and added to the beingDragged array. This minimizes the number of times we need to loop through the array of pieces.
For instance, if the clicked piece is 2,0 and we look at 0,0 next, we can determine it is not connected because 1,0 isn’t in beingDragged. Then, we look at 1,0 and find that it is connected, but it is too late to add 0,0 because we already looked at it. So, we need to look at 1,0 first because it is closer, and then 0,0, which is farther.
Note
If you think this process is complicated, consider that it is usually done using a computer science process known as recursion. Recursion is when a function calls itself. It also causes many freshmen computer science students to switch majors to business. So, I’ve come up with the methods in this chapter to specifically avoid recursion.
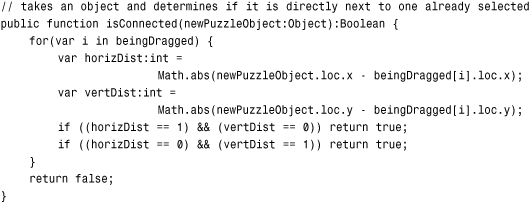
Determining If Pieces Are Connected
The isConnected function gets the difference between the horizontal and vertical position of the piece under examination and places each piece in beingDragged. If it finds that it is only one away horizontally or vertically (but not both), it is indeed connected:
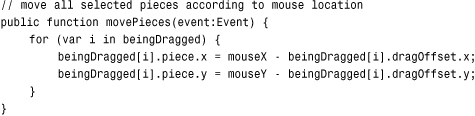
Moving the Pieces
Finally, we know which pieces should be dragged. They are now all neatly in beingDragged, which is used by movePieces in every frame to reposition all of them:
Ending Movement
When the player releases the mouse, the dragging ends. We need to move all the pieces from the selectedPieces sprite back down to the otherPieces sprite. We also call lockPiecesToGrid to make sure they can be matched with the pieces that were not dragged.
Note
When the addChild function is used to move the pieces back down to the otherPieces sprite, they are added above all the other pieces there. This works out nicely because they were already floating above them. The result is that they maintain the appearance of being on top.
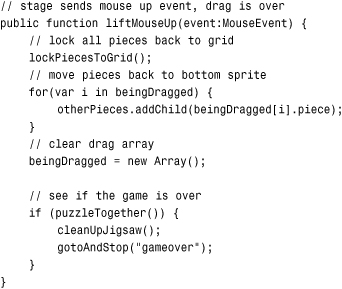
Game Over
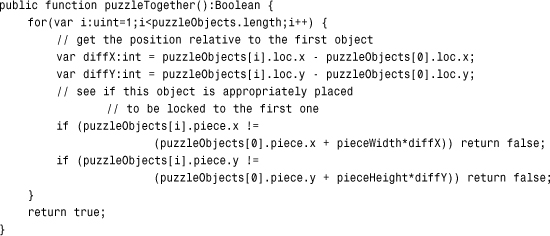
When the mouse is released, we also want to check to see whether the game is over. To do this, we can loop through all the puzzle pieces and compare their positions to the position of the first piece at the upper left. If they are all in the exact correct position relative to that one, we know the puzzle is done:
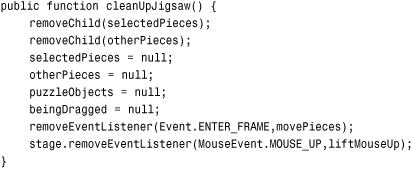
The obligatory cleanup function benefits from our use of the two-sprite system. We can remove these from the stage and set the variables referencing them to null. We also want to set the puzzleObjects and beginDragged to null, as well as the ENTER_FRAME and MOUSE_UP event:
Modifying the Game
Game developers have come up with lots of ways to make computer jigsaw puzzles more interesting than their physical counterparts.
If you have played with creating bitmap filters using ActionScript, you might want to try doing that here. Applying glows, drop shadows, or bevels to the pieces can really make them pop.
You can also add piece rotation to make the puzzle harder. The pieces can be rotated 90, 180, or 270 degrees and must be rotated back to 0 to fit in. Of course, you should also allow the player to rotate pieces after they are connected, which would add some challenging code to rotate linked pieces together. Only attempt this if you are a ninja-level ActionScript programmer.