
12. Game Worlds: Driving and Racing Games
• Creating a Top-Down Driving Game
• Building a Flash Racing Game
In the preceding chapter, you saw how it was possible to create a small world inside an ActionScript game. This type of platform game creates a side view that is usually used for indoor adventures and quests.
Another type of game world can be done with a top-down view. This can fit almost any scenario and theme. There are quite a few top-down games where the player drives a vehicle around a town or other outdoor location.
In this chapter, we look at a top-down driving game and a straightforward racing game. Both types of games have some things in common.
Creating a Top-Down Driving Game
Let’s create a simple top-down driving game. This game features a detailed map, a car, objects to collect, and a complex game logic involving a place to deposit the objects collected.
Source Files
A3GPU212_TopDownGame.zip
Creating a Top-Down World
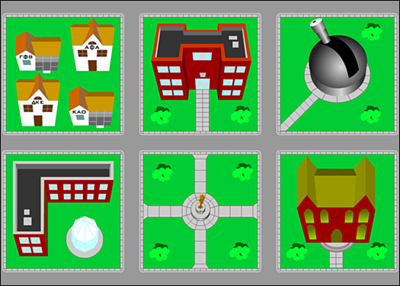
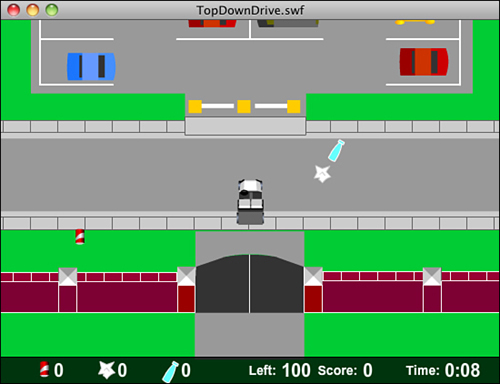
Our example game for this chapter features a college campus. There is a three-block by three-block area and various buildings coloring in the spaces between the streets. Figure 12.1 shows the campus.
Figure 12.1 The entire game world is about 2,400 pixels wide and 2,400 high.
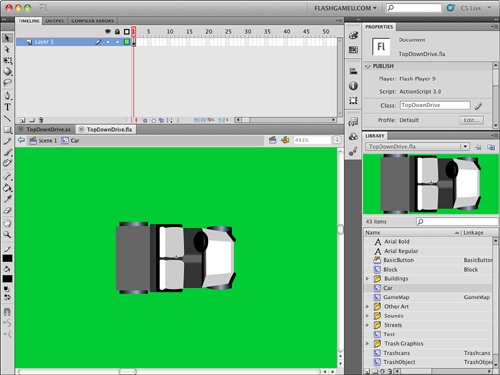
If you look closely at the gate near the bottom of the map, you see a small car. This is the player’s car, and she can “drive” around the map using it.
Because the map is so big, the player can’t see more than a small section of it at a time. The map is 2,400 pixels square, and the screen is 550×400.
As the player drives, the map repositions itself with the location of the car at the exact center of the stage.
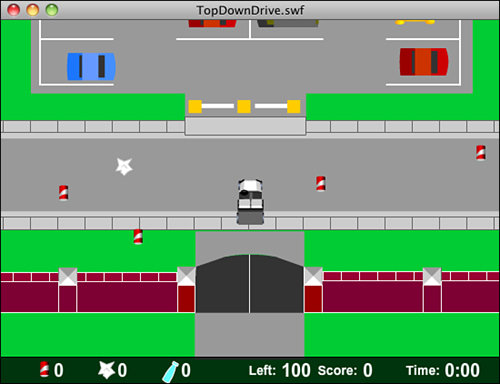
Figure 12.2 shows the screen when the player starts. You can see the gate at the bottom and a bit of the parking lot above it. At the bottom is a semitransparent strip with score elements in it.
Figure 12.2 Only a small 550×400 area of the map can be seen at any given time.
The map is located in a single movie clip named GameMap. Inside it, the nine building groups each has its own movie clip for organizational purposes. The streets are made up of straight pieces and three different types of corners. The outer fence is made up of a few different pieces, too.
All these graphic elements are just for decoration. They aren’t actually important to the game code. This is great news for artists because it means they can have free reign on creating an artistic backdrop for the game.
The car can move around the screen anywhere with only a few simple restrictions.
First, the car is restricted to the area inside the fence. This is defined by minimum and maximum x and y values.
Second, the car is restricted from entering the area of certain other movies clips. We call these Blocks. If the car collides with one of these Blocks, it stops at the edge.
Note

The use of the term block has three meanings. Most important, it blocks the car from entering an area. But, it also represents city blocks in this map. In addition, it also means rectangular in shape.
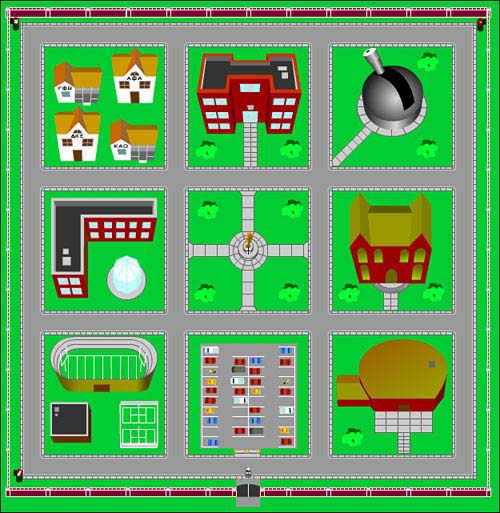
The nine Blocks are placed over the nine city blocks in the map. Figure 12.3 shows the locations of these with thick borders.
Figure 12.3 The nine Block movie clips are shown with thick outlines.
The object of the game is to collect trash around campus and deposit it in recycling bins. There are three recycling dumpsters placed in three of the corners of the campus.
There are three different types of trash, one for each dumpster: cans, paper, and bottles.
Instead of placing the trash items in the map by hand, we have our code do it. It places 100 different pieces of trash randomly on campus. We need to make sure they are not on Blocks; otherwise, the car cannot get to them.
The challenge is to collect all the trash and deposit each type into its own bin. However, the car can only hold ten different pieces of trash at a time. Before players can pick up any more, they must visit a dumpster and deposit some trash.
The game gets challenging as players must decide which pieces of trash to pick up based on which bin they are heading for.
Game Design
It is worth taking a look at all of the game inputs, objects, and mechanisms before we start programming. This helps clarify what we need to do.
Car Control
The car is controlled by the arrow keys. In fact, only three of the four arrow keys are needed. Figure 12.4 shows the car movie clip.
Figure 12.4 The car movie clip is pointed to the right, so 0 rotation matches the direction that Math.cos and Math.sin represent.
We’re not creating a simulation here, so things such as acceleration, braking, and reversing can be ignored so long as the player doesn’t need them. In this case, being able to steer left and right and move forward is fine for getting around.
We use the left- and right-arrow keys to directly change the rotation property of the car. Then, we use the Math.cos and Math.sin values of the rotation to determine forward movement. This is similar to how we used arrow keys and trigonometry in the space rocks game from Chapter 7, “Direction and Movement: Air Raid II, Space Rocks, and Balloon Pop.”
Car Boundaries
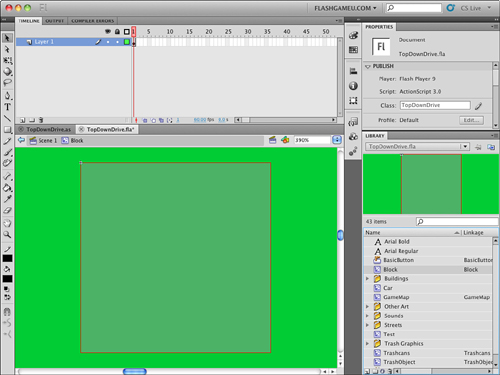
The car is restricted to the streets. To be more precise, the car cannot leave the map, and it cannot run over any of the Block movie clips. The Block movie clip can be seen in Figure 12.5.
Figure 12.5 The Block is never seen except by us as we design the level. A thin red border and a semitransparent fill helps us place them.
To do this, we compare the rectangle of the car to the Block rectangles. We get a list of them when the game first starts. If the car’s rectangle and any one of the Blocks intersect, we push the car back to the point where it is just outside of the Block.
This is similar to how the paddle ball game worked in Chapter 5, “Game Animation: Shooting and Bouncing Games.” However, instead of bouncing the car off the Block, we set it perfectly so it is just outside of the Block.
Trash
The trash is actually a single TrashObject movie clip with three frames. We place them randomly on the map, making sure that none are placed on the Blocks.
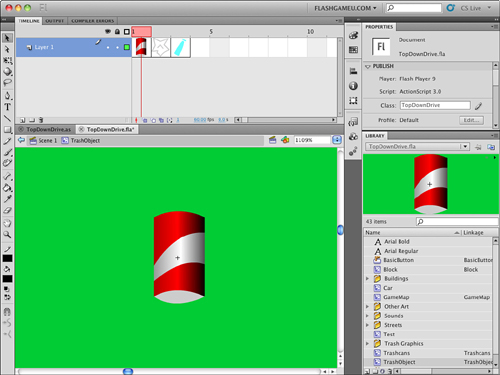
When one is placed, it is randomly set to frame 1, 2, or 3, representing one of the three types of trash: cans, paper, or bottles. Figure 12.6 shows the TrashObject movie clip.
Figure 12.6 The TrashObject movie clip has three different frames, each with a different type of trash on them.
As the car moves around, we look for the distance between each TrashObject and the car to be close enough so that the car picks it up.
We remove these from the screen and keep track of how much of each type of trash the player has. We limit that to 10 items at a time and indicate to the player when they are full.
Then, when the player gets close to a dumpster, we zero out one of the kinds of items in the player’s collection. A smart player will fill up on only one type of trash, and then dump all 10 of those items at the proper dumpster.
Game Score and Clock
The score indicators, shown at the bottom of Figure 12.7, are more important in this game than in others we have made so far. The player must pay careful attention to them.
Figure 12.7 The score indicators are at the bottom of the screen with a semitransparent box under them.
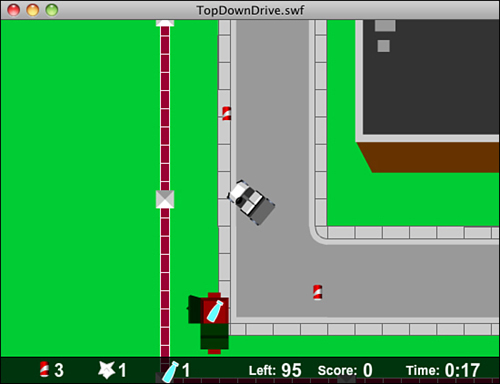
The first three indicators are the number of trash items the player has. Because players can only have 10 items before going to a dumpster, they want to get mostly one type of item. And, they want to pay attention to when they are getting close to full.
We have all three numbers turn red when the car is full of trash. We also use sound to indicate this. There is a pickup sound when the player drives near a piece of trash. If the car is full, however, they get a different sound instead, and the trash remains on the street.
The next two indicators show the number of trash items left to find, the number found, and the time. The time is the key value here. Players always find all 100 pieces of trash, unless they quit early. The time is the score. Playing the game well means finishing in less time.
The Class Definition
The code for this game is fairly simple considering all that the game does. The game starts by examining the world created in the Flash movie, and then checks every frame for player changes and movement.
The package starts off by importing a wide range of class libraries. We need the usual suspects, plus flash.geom.* for use of the Point and Rectangle objects and flash.media.Sound and flash.media.SoundChannel for sound effects:
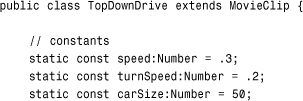
The game has quite a few constants. The speed and turnSpeed control how the car reacts to the arrow keys. The carSize determines the boundary rectangle of the car from its center point:
The mapRect constant defines the boundaries of the map. This is approximately the location of the fence surrounding the campus:
static const mapRect:Rectangle = new Rectangle(-1150,-1150,2300,2300);
The numTrashObjects constant is the number of pieces of trash created at the start of the game. We also have the maxCarry to set the number of pieces of trash that the player can have in the car before they need to empty out at a dumpster:
static const numTrashObjects:uint = 100;
static const maxCarry:uint = 10;
The next two constants set the distance for trash and trashcan collisions. You might need to adjust this number if you move the trashcans further off the road or change the carSize constant:
static const pickupDistance:Number = 30;
static const dropDistance:Number = 40;
Note
You don’t want to make pickUpDistance too large because it is important for players to sneak the car past some pieces of trash if they are only collecting trash of one type.
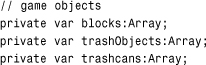
The variables can be divided into three groups. The first group is a series of arrays that keeps track of the game objects.
The blocks array contains all the Block objects that prevents the car from leaving the road. The trashObjects is a list of all the trash items spread randomly around the map. The trashcans array contains the three trashcans that are the drop-off points for the trash:
The next set of variables all deal with the game state. We start with the usual set of arrow-key Boolean variables:
// game variables
private var arrowLeft, arrowRight, arrowUp, arrowDown:Boolean;
Next, we’ve got two time values. The first, lastTime is used to determine the length of time since the last animation step. The gameStartTime is used to determine how long the player has been playing:
private var lastTime:int;
private var gameStartTime:int;
The onboard array is a list with one item for each trashcan—so a total of three items. They all start at 0 and contain the number of each kind of trash that the player has in the car:
private var onboard:Array;
The totalTrashObjects variable contains the sum of all three numbers in onboard. We’ll use it for quick and easy reference when deciding whether there is enough room in the car for more trash:
private var totalTrashObjects:int;
The score is simply the number of trash objects that have been picked up and delivered to trashcans:
private var score:int;
The lastObject variable is used to determine when to play the “can’t get more trash because the car is full” sound. When players have 10 items already collected, and they collide with a piece of trash, we play a negative sound, as opposed to the positive sound they get when they have room for the trash.
Because the trash is not removed from the map, chances are that they will collide with the piece again immediately and continue to do so until the car moves far enough away from the trash.
So, we record a reference to the Trash object in lastObject and save it for later reference. This way we know that a negative sound already played for this object and not to play it again and again while the car is still near it:
private var lastObject:Object;
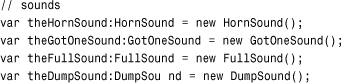
The last variables are references to the four sounds stored in the movie’s library. All these sounds have been set with linkage properties so that they exist as classes available for our ActionScript to access:
The Constructor Function
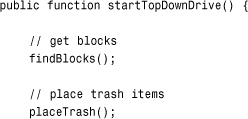
When the movie reaches frame 2, it calls startTopDownDrive to begin the game.
This function immediately calls findBlocks and placeTrash to set up the map. We look at those functions soon:
Because there are only three trashcans and they have been specifically named in the gamesprite, we place them in the trashcans array in one simple line of code.
Note
The gamesprite is the instance on the stage of the GameMap library element. In the library, it is actually a MovieClip. Because it is only a single frame, however, we call it gamesprite.
Because the Trash objects are created by our code, and the car exists in the gamesprite before our code runs, the trash is on top of the car. This is apparent after the car is full and the player is racing past other pieces of trash. You see the trash float over the car unless we do something about it. By calling setchildIndex with gamesprite.numChildren-1, we place the car back on top of everything else in the game:
// make sure car is on top
gamesprite.setChildIndex(gamesprite.car,gamesprite.numChildren-1);
Note
Alternatively, we could have created an empty movie clip in the GameMap movie clip to hold all the trash items. Then, we could have placed it in a timeline layer just below the car, but above the street. This is important if we want to have some items, such as a bridge, remain on top of both the car and the trash.
We need three listeners, one for the ENTER_FRAME event, which runs the entire game. The other two are for the key presses:

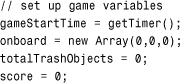
We set up the game state next. The gameStartTime is set to the current time. The onboard array is set to all zeros, as well as the totalTrashObjects and score:
We call two utility functions right away to get the game going. The centerMap function is what places the gamesprite so that the car is at the center of the screen. If we don’t call that now, we get a flash of how the gamesprite appears in the raw timeline before the first ENTER_FRAME.
A similar idea is behind calling showScore here, so all the score indicators are set to their original values before the player can see them:
centerMap();
showScore();
Finally, we end by playing a sound using the utility function playSound. I’ve included a simple horn honk to signal the player that the game has begun:
playSound(theHornSound);
}
Finding the Blocks
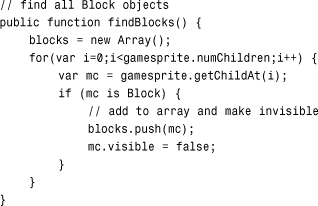
To find all Block objects in the gamesprite, we need to loop through all the children of gamesprite and see which ones are Block types by using the is operator.
If they are, we add them to the blocks array. We also set the visible property of each of the Block objects to false so they don’t appear to the player. This way we can clearly see them while developing the movie, but don’t need to remember to hide them or set them to a transparent color before finishing the game:
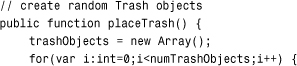
Placing the Trash
To place 100 random pieces of trash, we need to loop 100 times, placing 1 piece of trash each time:
For each placement, we start a second loop. Then, we try different values for the x and y position of the trash:
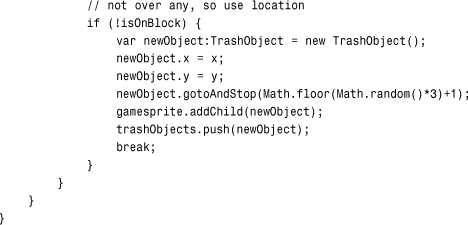
After we have a location, we check it against all the Block objects. If the location is on a Block object, we note it by setting the isOnBlock local variable to true:
If the location doesn’t intersect with any Block objects, we go ahead and create the new TrashObject object. Then, we set its location. We also need to choose a random type for this piece, by setting the movie clip to frame 1, 2, or 3. Figure 12.8 shows the beginning of a game where three TrashObject movie clips have been placed near the starting point of the car.
Figure 12.8 Three TrashObject movie clips have been randomly placed near the car at the start of the game.
Note
The TrashObject movie clip has three frames, each with a different graphic. These are actually movie clips themselves. Their use in TrashObject doesn’t need them to be separate movie clips, but we want to use the same graphics for the trashcans to indicate which trashcan can take which type of trash. This way, we only have one version of each graphic in the library.
We add this piece of trash to trashObjects and then break.
This final break exits the while loop and moves on to placing the next piece of trash. However, if the isOnBlock is true, we continue with the while loop by choosing another location to test:
Note
When testing out a placement function such as placeTrash, it is useful to try it with the number of objects set high. For instance, I tested placeTrash with a numTrashObjects set to 10,000. This littered trash all over the road, but I can see clearly that the trash is only on the road and not in places where I didn’t want it.
Keyboard Input
The game includes a set of keyboard input functions similar to the ones we have used in several games up to this point. Four Boolean values are set according to whether the four arrow keys are triggered on the keyboard.
The functions even recognize the down arrow, although this version of the game doesn’t use it:
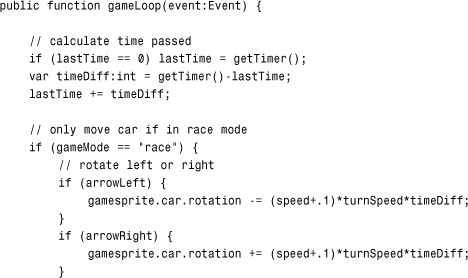
The Game Loop
The gameLoop function handles car movement. There are actually no other moving objects in the game. The player moves the car, and everything else remains static inside the gamesprite.
This is a time-based animation game, so we calculate the time that has passed since the last frame and move things according to this time value:
We check the left and right arrow keys and call rotateCar to handle steering. We pass in the timeDiff and the direction of the turn:
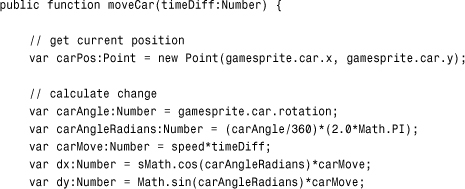
If the up arrow is pressed, we call moveCar with the timeDiff. Then, we call centerMap to make sure the gamesprite is positioned correctly with the new location of the car.
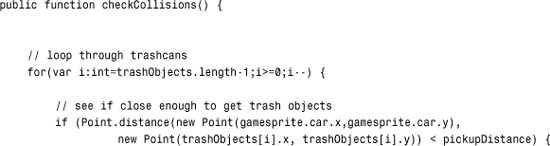
The checkCollisions function checks to see whether the player has grabbed any trash or has gotten close to a trashcan:
Remember that the time is the real score in this game. The player is racing the clock. So, we need to update the time for the player to know how she is doing:
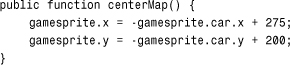
Let’s take a look right away at the centerMap function because it is so simple. All it needs to do is to set the location of the gamesprite to negative versions of the location of the car inside the gamesprite. For instance, if the car is at location 1000,600 in gamesprite, setting the location of the gamesprite to −1000,−600 means that the car is at location 0,0 on the stage.
We don’t want the car at 0,0, which is the upper-left corner. We want it in the center of the stage, so we add 275,200 to center it.
Note
If you want to change the size of the visible area of the stage, say to 640×480, you also want to change the values here to match the middle of the stage area. So, a 640×480 stage means 320 and 240 as the x and y adjustments place the car at the middle of the screen.
Moving the Car
Steering the car is unrealistic in this game; the car is rotated around its center by a few degrees each frame. In fact, the car can turn without moving forward. Try that in your Toyota.
If you play, however, you hardly notice. The rotation is time based, so it is the product of the timeDiff and the turnSpeed constant. The car should turn at the same rate no matter what the frame rate of the movie:

Moving the car forward is pretty simple, too, or it can be, if not for the need to detect and deal with collisions between the Block objects and the edges of the map.
We simplify the collision detection by using simple Rectangle objects and the intersects function. So, the first thing we need is the Rectangle of the car.
The car is already a rectangular shape because the car rotates; using the movie clip’s exact Rectangle is a problem. Instead, we use a made-up Rectangle based on the center of the car and the carSize. This square area is a good enough approximation of the area of the car that the player doesn’t notice.
Note
Keeping the car graphic to a relatively square size, where it is about as long as it is wide, is important to maintaining the illusion of accurate collisions. Having a car that is much longer than wide requires us to base our collision distance depending on the rotation of the car relative to the edge it might be colliding with. And, that is much more complex.
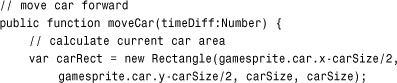
So, now we have the car’s present location in carRect. To calculate the new location of the car, we convert the rotation of the car to radians, feed those numbers to Math.cos and Math.sin, and then multiply those values by the speed and timeDiff. This gives us time-based movement using the speed constant. Then, newCarRect holds the new location of the car:
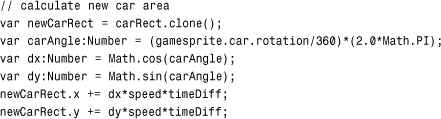
We also need the x and y location that matches the new Rectangle. We add the same values to x and y to get this new location:
![]()
Now, it is time to loop through the blocks and see whether the new location intersects with any of them:
If there is a collision, we look at both the horizontal and vertical aspects of the collision separately.
If the car has passed the left side of a Block, we push the car back to the edge of that Block. The same idea is used for the right side of the Block. We don’t need to bother to adjust the Rectangle, just the newX and newY position values. These are used to set the new location of the car:
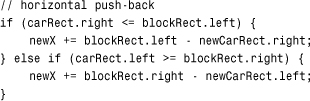
Here is the code that handles the top and bottom sides of the colliding Block:
After all the Block objects have been examined for possible collisions, we need to look at the map boundaries. This is the opposite of the Block objects because we want to keep the car inside the boundary Rectangle, rather than outside of it.
So, we examine each of the four sides and push back the newX or newY values to prevent the car from escaping the map:

Now that the car is safely inside the map and outside of any Block, we can set the new location of the car:
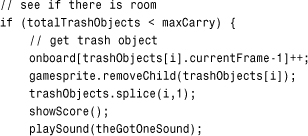
Checking for Trash and Trashcan Collisions
The checkCollisions function needs to look for two different types of collisions. It starts by looking at all the trashObjects. It uses the Point.distance function to see whether the location of the car and the location of the TrashObject are closer than the pickupDistance constant:
If an item is close enough, we check totalTrashObjects against the maxCarry constant. If there is room, the item is picked up by setting the right slot in onboard according to the currentFrame-1 of the TrashObject movie clip. Then, it is removed from gamesprite and the trashObjects array. We need to update the score and play the GotOneSound:
Note
One aspect of our code that can be confusing is the way in which trash item types are referenced. As frames in the TrashObject movie clip, they are frames 1, 2, and 3. But, arrays are 0 based; so, in the onboard array, we store trash types 1, 2, and 3 in array locations 0, 1, and 2. The trashcans are named Trashcan1, Trashcan2, and Trashcan3 and correspond to the frame numbers, not the array slots. As long as you keep this in mind, you can avoid any problems in modifying the code. Having 0-based arrays, but frame numbers that start at 1, is a constant problem for ActionScript developers.
On the other hand, if the player has hit an item, but there is no more room, we play another sound. We play the sound only if the item is not the lastObject. This prevents the sound from playing over and over as the player moves across an object. It plays just once per object hit:
The next set of collisions looks at the three trashcans. We use Point.distance here, too. After a collision is detected, we remove any of that type of trash from the onboard array. We update the score and play a sound to acknowledge the player’s achievement:
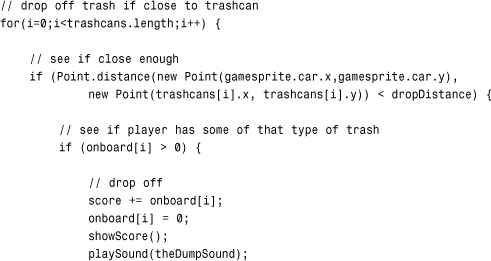
If the score has risen to the point of the numTrashObjects constant, the last piece of trash has been deposited, and the game is over:
The Clock
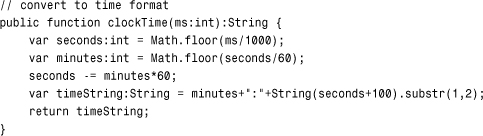
Updating the clock is pretty simple and similar to what we did in the matching game in Chapter 3, “Basic Game Framework: A Matching Game.” We subtract the current time from the start time to get the number of milliseconds. Then, we use the utility function clockTime to convert that to a time format:
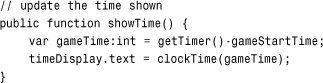
The clockTime function computes the number of seconds and minutes, and then formats it with leading zeros if needed:
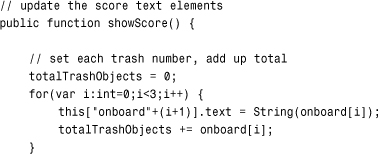
The Score Indicators
Showing the score in this game is much more complex than just showing a single number. We show the three numbers stored in onboard. At the same time we add these numbers for totalTrashObjects, which are used elsewhere in the game to determine whether there is more room in the car:
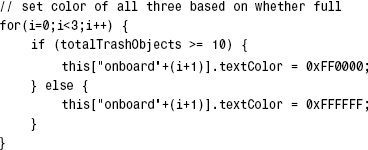
We also use totalTrashObjects right now to color all three numbers red or white depending on whether the car is full. This gives us a natural indicator for the players to see whether they have maxed out the car’s capacity and need to go to a trashcan:
Then, we show both the score and the number of trash objects still out there for the player to find:
Game End
When the game is over, we remove the listeners, but not the gamesprite. That’s because we didn’t create the gamesprite. It disappears when we use gotoAndStop to go to the next frame. Because the gamesprite is only on the play frame, it is not shown on the gameover frame:
When the gameover frame has been reached, it calls back to showFinalMessage. We can’t call it earlier because the finalMessage text field is only on the gameover frame and cannot be accessed until that frame is visible.
We place the final time in this text field:
One last function we need is the playSound utility function. It simply serves as a central place for all sound effects to be triggered from:
Note
An advantage of having a single function where all sound effects are initiated is that you can quickly and easily build in mute and volume functions. If you placed your sound code all over the game, you need to modify each one of those places to add a check for a mute or volume setting.
Modifying the Game
This game can be modified to be almost any free-exploring, item-collecting game. You can change the background elements with no programming at all. The collision areas, the Block objects, can be changed by moving and adding new Block movie clips.
You can even make the game last longer by having more pieces of trash appear as time goes on. You could set a Timer so that a new piece of trash is added every five seconds, for instance. The Timer could do this for a few minutes before it stops.
You could also add negative items—ones that you want to avoid. These can be things such as oil slicks or land mines. A military version of this game could have a hospital vehicle picking up soldiers on a battlefield, but you need to avoid the land mines.
Building a Flash Racing Game
One thing you might be tempted to do while playing the top-down driving game is to race. For instance, you can see how fast you can make it around the campus.
Although the previous game is a good start, we need to add a few more elements to make a racing game.
Source Files
A3GPU212_RacingGame.zip
Racing Game Elements
Even though we are building an “arcade” racing game and not a real racing simulation, we want to make it realistic enough to make it feel like a real car. This means that the car shouldn’t lurch into full speed the minute the up arrow is pressed, and it shouldn’t stop as soon as the up arrow is released.
We add acceleration and deceleration to the game. So, the up arrow adds acceleration to the speed of the car. And then, the speed of the car is used to determine movement for each frame.
Note
The distinction between an arcade game and a simulation is bigger here than in any other kind of game we have looked at. A true simulation takes into account physics, such as the mass of the car, the torque of the engine, and the friction between the tires and the road, not to mention skidding.
Not only is this beyond the scope of a simple Flash game, but it is usually simplified or ignored in many high-budget console games. It is important to not let reality get in the way of fun. Or, let it get in the way of finishing a game on time and on budget.
Likewise, if the down arrow is pressed, there is reverse acceleration. From a standstill, the down arrow produces a negative speed value, and the car moves backward.
Another aspect of a racing game is that the car should follow a specific path. The player shouldn’t be able to cut across the track or reverse over the finish line to cross it again in a few seconds.
To keep track of the player’s path, we use a simple technique called waypoints. Basically, the player needs to get close to and mark off a list of points around the track. Only after the player has hit all these points will he be allowed to cross the finish line.
The best part about waypoints is that players don’t even know they are there. We hide the waypoints and quietly mark them off, without bothering the players about this detail. All they know is that they have to race fast and honest.
One last feature of this game that adds a little more of a racing feel is the starting countdown. Instead of the game just starting, there are three seconds where the player cannot move and a large 3, 2, and 1 display.
Making the Track
The collision detection in the top-down driving game is based on rectangular blocks. It is fairly easy to detect collisions against straight horizontal or vertical edges.
However, a racetrack includes curves. Detecting collisions against curves, or even short segments of diagonal walls, is much more difficult.
So, we avoid it altogether in this game.
The track consists of three areas: the road, the sides, and everything else. If the car is on the road, it moves unimpeded. If it is on the side of the road, it still moves, but with a constant nagging deceleration that causes the racer to lose time. If the car is off both the road and the side, the deceleration is severe, and the car needs to turn and limp back on to the road.
Figure 12.9 shows these three areas. The road is in the middle and appears gray in Flash. Just outside of it is the side, a brown area, which appears as a slightly different gray in this black and white figure.
Figure 12.9 The track is surrounded by a thicker “side” element.
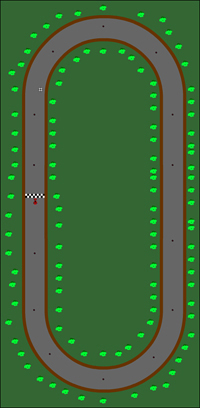
The track also includes some nonactive elements, such as the trees you see scattered around.
Note
Although the trees are not referenced in our code and are not even movie clips, just graphics symbols, they do serve an important role. Without these incidental elements, it is sometimes hard for the player to notice the movement of the car and gauge its speed.
The car movie clip is placed on the track in the position where it starts. This happens to be right on the finish line, which is a separate movie clip.
The dots you see around the track are Waypoint objects. You can place only a few around the track, like we have done, or many more if your track includes more twists and turns and you need to prevent the player from cheating and cutting across curves.
All these elements are in the Track movie clip, which is the gamesprite referred to in our code.
Sound Effects
This game uses quite a few sounds effects. Three different driving sounds loop as the player moves the car. Here is a list of all the sounds used in the game:
• DriveSound—A sound loop that plays while the car is accelerating and is on the road. It sounds like a sports car engine.
• SideSound—A sound loop that plays while the car is accelerating and on the side of the road. It sounds like tires moving through dirt.
• OffroadSound—A sound loop that plays while the car is accelerating and off both the road and the side of the road. It sounds like a car moving over gravel.
• BrakestopSound—A screeching-brake sound to be used when the car crosses the finish line.
• ReadysetSound—A high beep that sounds during the countdown at the start of the game.
• GoSound—A low beep that sounds when the countdown reaches zero.
The game could easily have more sounds, such as an idle sound for when the car is not accelerating. Also, the BrakestopSound can be replaced with a crowd cheering sound as an alternative way to end the race.
Constants and Variables
Some parts of this game’s code are the same as the top-down driving game. We focus on the new code here.
The constants now include acceleration and deceleration constants. They are pretty small because they are multiplied by the milliseconds that pass by between frames:

The game variables include a gameMode, which indicates whether the race has started. We also have a waypoints array, to hold the Point locations of the Waypoint movie clips. The speed variable holds the current rate at which the rate is moving, which changes as the car accelerates and decelerates:
Here are the initial definitions for all the new sounds. Each one is in the library and has been set to export for ActionScript use:
Starting the Game
When this game starts, it doesn’t need to look for Blocks. Instead, it needs to find Waypoint objects. The findWaypoints function does that. We look at it next:
The listeners needed are the same as for the top-down driving game, but the variables that need to be set at the start of the game now include gameMode, and speed. We also set the timeDisplay text field to empty because it is blank for the first 3 seconds of the game, until the race starts:
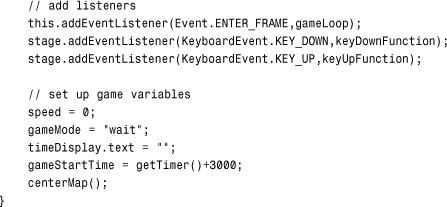
Notice that the gameStartTime has 3 seconds added to it. This is because the game starts with a 3-second countdown. The car isn’t allowed to move until 3 seconds have passed and the gameTimer() catches up with the gameStartTime.
The findWaypoints function is similar to the findBlocks function in the previous game. However, this time we only need to know the Point location of each waypoint. After we record that, the movie clip itself is irrelevant:

The Main Game Loop
We skip the keyboard listener functions because they are identical to the top-down driving game.
The gameLoop, however, is different. We include much more of the game mechanics right inside the function, instead of delegating it to other functions.
After determining the amount of time that has lapsed since the last time gameLoop ran, we examine the left and right arrows and turn the car:
Notice three factors impact the amount of the turn: the speed, the turnSpeed constant, and the timeDiff. In addition, the speed is supplemented by .1. This allows the player to turn the car slightly when at a standstill, and slightly more when moving slowly. Although not accurate to a driving simulation, this does make the game less frustrating to play.
Note
By tying the speed to the amount the car turns, we’re allowing the car to turn faster when it is moving faster. This makes the steering feel a little more realistic and helps get around the curves.
Also, notice that turning, and the movement to come next, only happens if the gameMode is set to “race.” This doesn’t occur until the 3-second countdown is over.
The car movement is dependent on the speed. The speed is dependent on the acceleration, which occurs when the player uses the up or down arrows. This next bit of code takes care of these changes and makes sure that the speed doesn’t get too out of control by restricting it to maxSpeed:
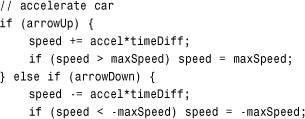
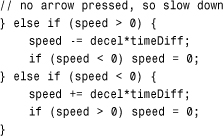
However, if neither the up or down arrow is being pressed, the car should slowly come to a halt. We use the decel constant to reduce the speed of the car:
Note
You could also easily add a brake to the car. Just include the spacebar along with the four arrow keys when looking at the keyboard. Then, when the spacebar is pressed, you can have a more severe slowdown than the decel constant.
We only need to check the car’s movement if there is a speed value. If the car is standing perfectly still, we can skip the next part.
However, if the car is moving, we need to reposition it, check whether it is on the road or not, center the map over the car, check to see whether any new Waypoint objects have been encountered, and check to see whether the car has crossed the finish line:
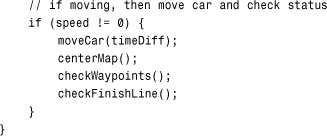
Whether the car moves or not, the clock still needs to be updated:
![]()
Car Movement
The car moves depending on the rotation, speed, and timeDiff. The rotation is converted to radians, and then fed into Math.cos and Math.sin. The original position of the car is stored in carPos and the change in position in dx and dy:
While figuring out where the new location of the car should be, we also need to figure out which sound should be playing. If the car is moving, and it is on the road, theDriveSound should be playing. We assume that is the case at this point and adjust the value of newSound as we examine more aspects of the game state:
// assume we'll use drive sound
var newSound:Object = theDriveSound;
The first test we perform here is to see whether the car is currently on the road. We use hitTestPoint to determine this. The third parameter in hitTestPoint allows us to test a point against the specific shape of the road. We need to add gamesprite.x and gamesprite.y to the position of the car because hitTestPoint works at the stage level with stage positions, rather than at the gamesprite level with gamesprite positions:
![]()
Note the critically important exclamation point in the previous line of code. The ! means not and reverses the Boolean value that follows it. Instead of looking to see if the car’s location is inside the road, we check to see if it is not in the road.
Now that we know the car is not on the road, the next test is to see whether the car is at least on the side of the road:
![]()
If the car is on the side of the road, we use theSideSound rather than theDriveSound. We also reduce the speed of the car by a small percentage:
![]()
If the car is neither on the road nor on the side of the road, we use theOffroadSound and reduce the speed by a much larger amount:

Now, we can set the location of the car:
![]()
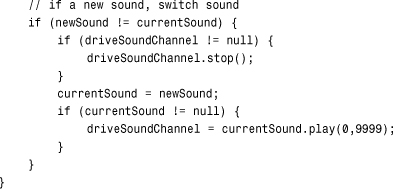
All that is left is to figure out which sound to play. We have newSound set to either theDriveSound, theSideSound, or theOffroadSound. If the player is not accelerating at this moment, however, we want to play no sound at all:
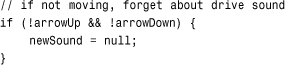
The newSound variable holds the proper sound. If that sound is already playing, and looping, however, we don’t want to do anything except let that sound continue. We only want to take action if a new sound is needed to replace the current sound.
If that is the case, we issue a driveSoundChannel.stop() command to cancel the old sound, and then a new play command with a high number of loops to begin:
In addition to the moveCar function, we also need the centerMap function, which is identical to the one in the top-down driving game in the first part of this chapter. This will keep the car visually centered on the screen.
Checking Progress
To check the player’s progress around the track, we look at each of the Waypoint objects and see whether the car is close to them. To do this, we use the Point.distance function. The waypoints array already contains Point objects, but we have to construct one on-the-fly with the location of the car to compare it to.
I’ve chosen 150 as the distance needed to hit a waypoint. This is far enough so that the car cannot miss a waypoint in the middle of the road, even if it passes the waypoint off to the side. It is critical that you make this distance large enough so that players cannot sneak by a waypoint easily. If they do, they cannot finish the race, and they have no reason why:
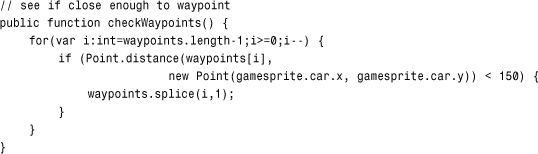
When a Waypoint is encountered, it is removed from the array. When the array is empty, we know that all Waypoint objects have been passed.
This is precisely what checkFinishLine looks for first. If the waypoints array has any items left in it, the player isn’t ready to cross the finish line:
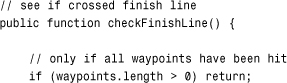
On the other hand, if the player has hit all the Waypoint objects, we can assume he is coming up toward the finish line. We check the y value of the car to see whether it has crossed the y value of the finish movie clip. If it has, the player has completed the race:

Note
If you change the map and reposition the finish line, be careful how you test to see whether the car has crossed finish. For instance, if the car approaches the finish from the left, you need to check to see whether the x value of the car is greater than the x value of the finish.
The Countdown and the Clock
Although the clock in this game is similar to the clock in the top-down driving game, it has a companion clock (in this case, one that counts down the time until the race starts).
If the gameMode is "wait", the race has yet to start. We check the gameTime to see whether it is negative. If it is, the gameTimer() has not yet caught up with the 3-second delay we created when we set the gameStartTime to getTimer()+3000.
Instead of showing the time in the timeDisplay field, we show it in the countdown field. But, we only show it as a rounded number of seconds: 3, 2, and then 1. We also play theReadysetSound every time this number changes. Figure 12.10 shows this countdown clock at the start of the game.
Figure 12.10 A number in the center of the screen shows the time until the race begins.

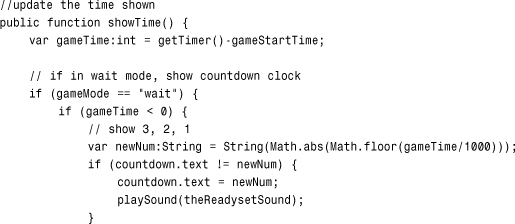
When the gameTime reaches 0, we change the gameMove and remove the number from countdown. We also play theGoSound:
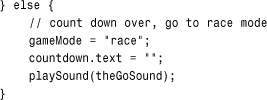
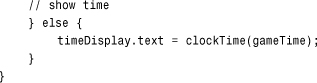
For the rest of the race, we display the time in the timeDisplay field. The clockTime function is the exact same one used earlier in this chapter:
Game Over
When the game ends, we need to do more cleanup than usual. The driveSoundChannel needs to stop playing any sound. However, we also trigger theBrakeSound at this point.
Then, we remove all the listeners and go to the gameover frame:

After we are at the gameover frame, we show the final score just like with the top-down driving game. In this case, however, we want to keep the gamesprite visible. In the main timeline, it exists across both the play and gameover frames, so it stays put when we go to the gameover frame.
The showFinalMessage function is the same as in the previous game, so there is no need to repeat it here. The main timeline also has the same code in the gameover frame.
Modifying the Game
The track in this game is pretty simple—just a standard speedway. But, you could make it much more complex with many twists and turns.
Note
The trick to creating first a road and then a roadside movie clip is to just worry about the road movie clip first. After you have that perfect, make a copy of it and call that side. Then choose the shape inside that movie clip and choose Modify, Shape, Expand Fill. Expand the track about 50 pixels. This creates a copy of the road that is thicker and a perfect match the original road.
You could also put hazards on the road. For instance, oil slicks could slow the car down. These could be done the same way as Waypoint objects, but the car has to get close to them to “hit” them. Then, the speed of the car can be affected.
It also common in this type of game to have a dirt patch in the middle of the road. You could do this by ripping a hole in the road movie clip’s shape and letting the side movie clip show through.
Another improvement can be to put the Waypoint objects in a specific order. Right now, the game ends when the player hits all the Waypoint objects and then crosses the finish line. But, the order in which the Waypoint objects are hit doesn’t matter. So, technically, the player could drive around the track the wrong way, hit all the Waypoint objects, and win the minute he hits the last waypoint because he is already above the finish line. This doesn’t get the player a better time because it takes a while to turn around.
You could order the Waypoint objects by naming them something like waypoint0, waypoint1, and so on. Then, you can look for each Waypoint by name rather than by type. Then, only look for the car to be near the next Waypoint object, instead of all of them.