
5. Game Animation: Shooting and Bouncing Games
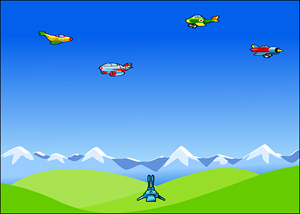
• Air Raid
So far, we have only built games where the game pieces stay in one place. They change and accept player input, but they don’t move.
In this chapter, we work with animated game pieces. Some are controlled by the player, and others have a life of their own.
After looking at some animation examples, we build two games. The first is Air Raid, a simple game in which you control an antiaircraft gun and try to shoot down planes flying overhead. The second game is Paddle Ball, in which you control a paddle and direct a ball up into a field of blocks that disappear when the ball hits them.
Game Animation
Source Files
A3GPU205_Animation.zip
In Chapter 2, “ActionScript Game Elements,” we looked at two main types of animation: frame based and time based. We use only time-based animation in this chapter because it is the most reliable and provides the best-looking results.
Time-Based Animation
The basic idea of time-based animation is to move objects at a consistent rate, no matter the performance of the Flash player.
A single movement, which we call a step, takes place every frame. So, a frame rate of 12 frames per second should mean 12 steps per frame. Even though the animation steps occur in every frame, this is not frame-based animation because we determine the size of each step based on the time.
For each step, we calculate the time since the last step was taken. Then, we move the game pieces according to this time difference.
If the first step takes 84 milliseconds and the second step takes 90 milliseconds, we move things slightly farther in the second step than in the first step.
Figure 5.1 shows a diagram of what three frames of movement using time-based animation might look like.
Figure 5.1 The object travels 400 pixels in 1 second regardless of the frame rate.
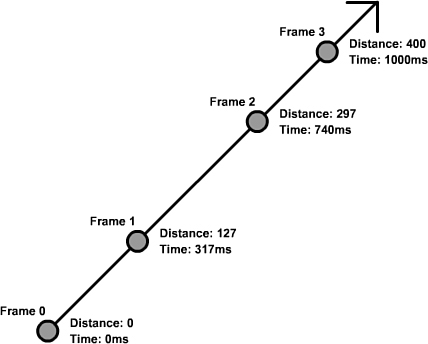
The object in Figure 5.1 is supposed to move 400 pixels in 1 second. The movie is set to a slow four frames per second. To complicate things, the computer is being unresponsive, perhaps dealing with other applications or network activity. It is unable to deliver an even frame rate or generate four frames per second.
Note

When developing with time-based animation it is a good idea to frequently change the frame rate of your movie while testing. I usually switch back and forth between 12 and 60 frames per second. My goal is to have something that looks great at 60 frames per second, but plays just as well at 12 frames per second.
Using this method, if I accidentally tie some game element to the frame rate rather than the time, I can quickly see there is a huge difference between game play in the two frame rates.
When the first frame passes, and an ENTER_FRAME event triggers the animation function on our code, 317 milliseconds have passed. At four frames per second, only 250 milliseconds should have passed. So, the frame rate is already lagging.
By using the time of 317 milliseconds, we can calculate that the object should have moved the distance of 127 pixels; that’s 400 pixels per second, times .317 seconds. So, at the first frame, the object is exactly where it needs to be.
The second frame takes even longer, an additional 423 milliseconds. This is a total of 740 milliseconds, which places the object at 297 pixels out.
Then, in the final frame of the example, an additional 260 milliseconds goes by. This puts the time at exactly 1,000 milliseconds. The distance is 400 pixels. After 1 second, the object has moved 400 pixels, despite the fact that the movie delivered an inconsistent frame rate and failed to generate four frames in the second.
If we made the object move 100 pixels every frame, it would be at 300 pixels out, having gotten only three frames to move. This could be different on another computer or at another time on the same computer, when performance was good enough to deliver four frames per second.
Coding Time-Based Animation
The trick to coding time-based animation is to keep track of the time. By looking at the function getTimer, you can get the number of milliseconds since the movie started. The actual value of getTimer isn’t important. It is the difference in time between frames that matters.
For instance, it might take 567 milliseconds for your movie to initialize and place items on the screen. The first frame happens at 567 milliseconds and the second frame at 629. The difference is 62 milliseconds, which is what we need to know to determine how far an object has moved between the frames.
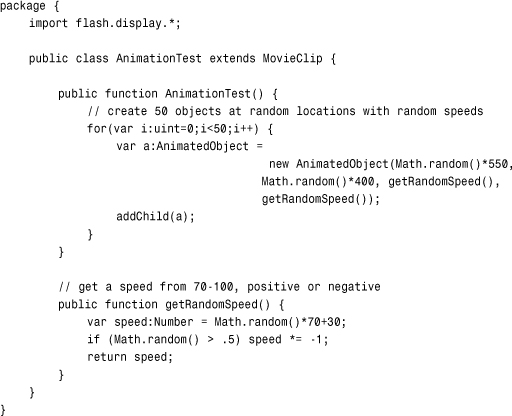
The movie AnimationTest.fla contains a simple circle movie clip to demonstrate time-based animation. The movie uses AnimationTest.as as its main script and AnimatedObject.as as the class for the movie clip.
The AnimatedObject class has a constructor function that accepts parameters. This means that when you create a new AnimatedObject, you must pass parameters in, like this:
var myAnimatedObject:AnimatedObject = new AnimatedObject(100,150,5,-8);
The four parameters represent the horizontal and vertical location of the movie clip, plus the horizontal and vertical speed of the movie clip.
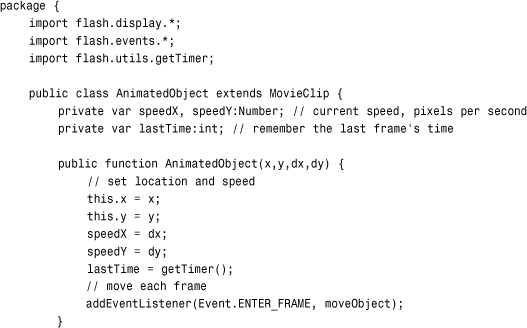
Here is the class declaration, variable declarations, plus the AnimatedObject function. You can see the four parameters, defined simply as x, y, dx, dy:
Note
Using dx and dy to store “difference in x” and “difference in y” is a pretty common practice. In this chapter and the following ones, we use these two variable names often.
The function takes the four parameters and applies them. The first two are used to set the location of the movie clip. The other two are stored in speedX and speedY.
Then, the variable lastTime is initialized with the current value of getTimer(). Finally, addEventListener enables the function moveObject to run every frame.
The moveObject function first calculates the time passed, and then adds that to the lastTime. The value of timePassed is then used in calculating the change in location.
Note
By adding timePassed to lastTime, you ensure that no time is lost in the animation. If you instead set lastTime to getTimer() with every animation step, you might lose small slices of time between the calculation of timePassed and the setting of lastTime.
Because timePassed is in thousandths of a second (milliseconds), we divide by 1,000 to get the correct amount to multiply by speedX and speedY. For instance, if timePassed is 100, that is the same as 100/1000 or .1 seconds. If speedX is 23, the object moves 23*.1 or 2.3 pixels to the right:

A simple way to test this AnimatedObject class is with a main movie class like this:
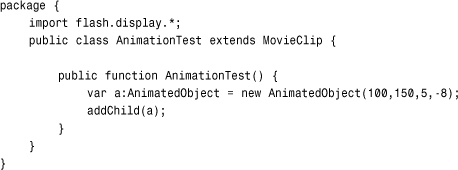
This would create a new movie clip at 100,150 that is moving at a speed of 5 horizontally and -8 vertically. The AnimatedObject class has essentially enabled us to add a moving object to the stage with only two lines of code.
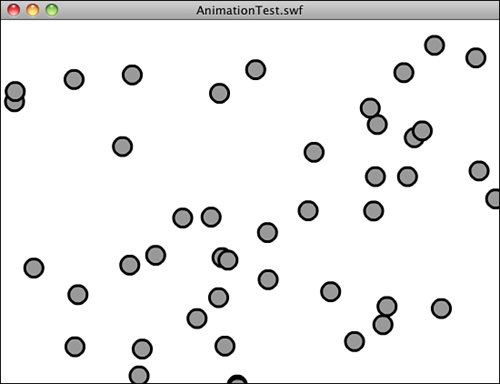
A better test of the AnimatedObject class is to add multiple objects and have them all move around in random directions. Here is a version of the main movie class that does just that:
In this version of the class, we create a new AnimatedObject with a random location and a random speed. The random location is made by the use of Math.random. For a random speed, however, I used a separate function that returns a value between 70 and 100, positive or negative. This is to prevent having objects that are moving close to 0 speed in a direction.
Figure 5.2 shows this movie when it first runs. The objects are scattered on the screen.
Figure 5.2 The AnimationTest movie places 50 random objects on the stage.
You can play with this class a bit to create some interesting effects. For instance, if you have all the objects starting at the same location, you get an explosion effect.
You can also adjust both the number of objects created and the frame rate of the movie to see how well your computer handles a heavy load of animation.
Now, let’s use this technique in a game that has three different types of animated objects.
Air Raid
Source Files
A3GPU205_AirRaid.zip
Air Raid is similar to many early arcade games. Most of these were naval themed, where you played a sub commander shooting up at ships on the surface. The earliest was probably Sea Wolf, which featured a fake periscope that you looked through and used to aim. It was actually a video game version of competing electronic games called Periscope, Sea Raider, and Sea Devil.
Note
Naval torpedo games were probably easier to make in the early days of computer games because ships and torpedoes moved slowly compared to planes and anti-aircraft fire.
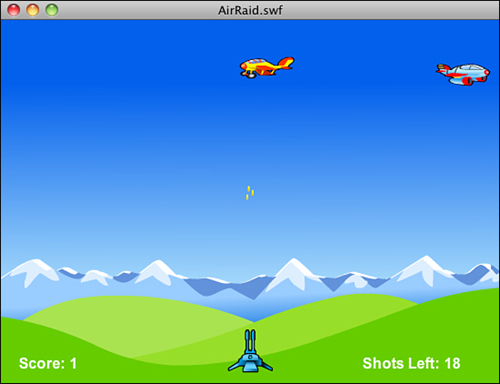
In our game, the player moves an anti-aircraft gun along the bottom of the screen with the keyboard arrows. The player fires straight up at passing planes and tries to hit as many as possible with a limited amount of ammo.
Movie Setup and Approach
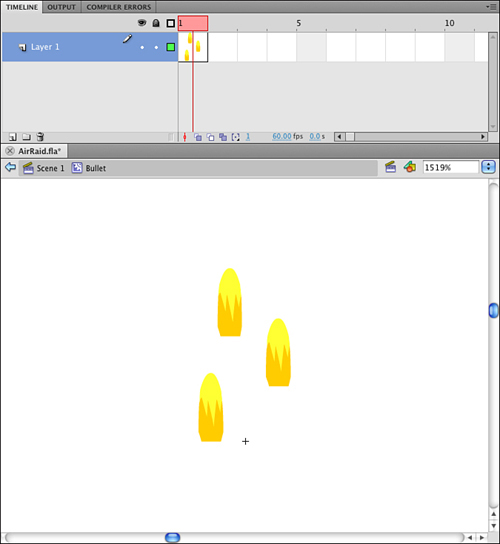
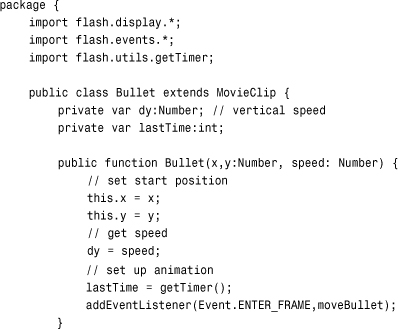
This game is a perfect opportunity to create a game that uses multiple classes. We’ve got essentially three different types of objects: airplanes, the turret, and bullets. By creating a single class for each, we can build the game step by step, and then specialize the code for each.
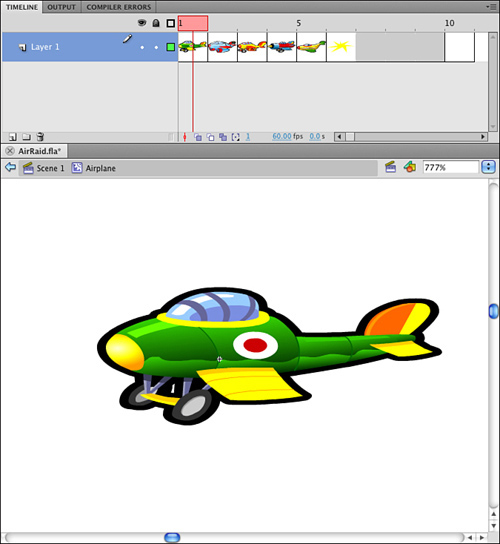
We need three movie clips to go with the three classes. The AAGun and Bullet movie clips are one frame each. However, the Airplane movie clip is several frames, each with a different drawing of a plane. Figure 5.3 shows this movie clip. The sixth frame through the end contains an explosion graphic that we use when a plane is hit.
Figure 5.3 The Airplane movie clip has five different airplanes, each in its own frame.
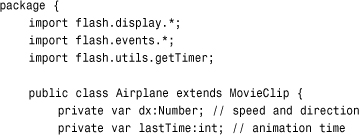
In addition to the three class files AAGun.as, Airplane.as, and Bullet.as, we need a main class file for the movie, AirRaid.as.
Flying Airplanes
The ActionScript class for the airplanes aren’t too different in structure from the AnimatedObject from earlier in this chapter. It accepts some parameters in the constructor function to determine the starting position and speed of the plane. It uses the time to track the difference between frames. It uses an ENTER_FRAME event to step forward the animation.
Class Declaration and Variables
The following code is the class definition and the variables the class use. Because the plane only flies horizontally, it only needs dx, the horizontal speed:
The Constructor Function
The constructor function take three parameters: side, speed, and altitude. The side parameter is either "left" or "right," depending on which side of the screen the plane emerges from.
The speed parameter is used to fill the dx variable. If the plane is coming from the right side of the screen, we automatically put a negative sign in front of the speed. So, a left-to-right plane with a speed of 80 has a dx of 80, but a right-to-left plane with a speed of 80 has a dx of -80.
The altitude is a fancy name for the vertical position of the plane. So, 0 is the top of the screen, 50 is 50 pixels below the top, and so on.
In addition to setting the location and dx, we also need to flip the plane so it faces the right direction. We can do this by using the scaleX property of the movie clip. A value of -1 flips the image.
Remember the movie clip has five frames in it, each representing a different airplane graphic. We use gotoAndStop to jump to one of those frames based on a random value from 1 to 5:

The Airplane function ends by setting the event timer and initializing the lastTime property just like we did in the AnimatedObject class.
Moving the Plane
The movePlane function first calculates the time passed, and then moves the plane according to the timer passed and the speed of the plane.
Then, it checks to see whether the plane has completed its journey across the screen. If so, the deletePlane function is called:
Removing Planes
The deletePlane is a somewhat self-cleaning function. You can see this in the next code block. It removes the plane from the stage with a removeChild command. It then removes the listener to the movePlane function.
Note
It is always a good idea to include a function with a class that deletes the object. This way, the class can handle the removal of its own listeners and any commands needed to clean up other references to itself.
For the plane to completely go away, we need to tell the main class that the plane is done. We start by calling removePlane, a function of the main timeline’s class. The main timeline is what created the plane in the first place, and in doing so, it stores it in an array. The removePlane function, which we get to in a minute, removes the plane from the array:
Note
After all references to an object have been reset or deleted, the Flash player reclaims the memory used by the object.
There is a second function for removing the airplane. This one looks similar to deletePlane, but it handles the situation where the plane is hit by the player’s fire. It also kills the frame event and tells the main class to return the plane from the array. Instead of removing the child from the stage, however, it tells the movie clip to go to the frame labeled “explode” and play from there.
The movie clip has an explosion graphic starting at frame 6. This goes on for a few frames, and then hits a frame with a simple parent.removeChild(this); and a stop(); on it. This completes the deletion of the plane, after a brief glimpse at an explosion for the player to enjoy:
Note
You can make the explosion longer by lengthening the number of frames between the “explosion” frame and the last one with the script on it. Similarly, you can place an animated explosion on those frames with no additional ActionScript needed.
Testing the Airplane Class
The main timeline is what is in charge of creating and removing the planes. We create that class later. If we want to test the Airplane class, we can do it with a simple main class like this:

It is a good idea, if you are testing, to try different values for the parameters. For instance, try a "left" and a speed of 30. Try as many different values as you need to be sure that Airplane is working before moving on to the next class.
Moving Gun
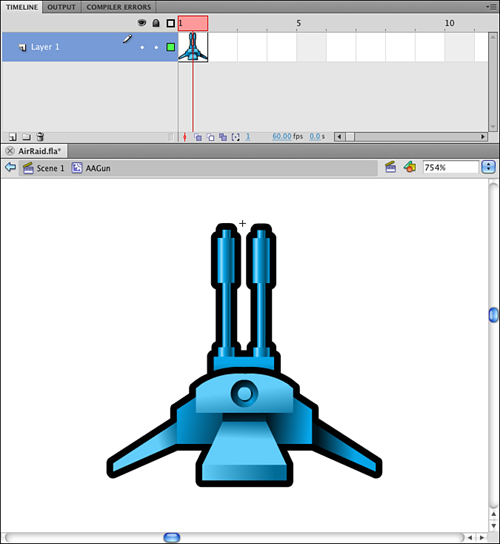
The class that controls the anti-aircraft gun, seen in Figure 5.4, is a little different in that the movement is controlled by user actions. We could use the mouse to set the position of the gun, but that would make the game almost too easy. It only takes one flick of the wrist to move from one side of the screen to the other.
Figure 5.4 The anti-aircraft turret is positioned so its registration point is at the tips of the gun barrels.
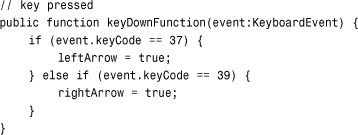
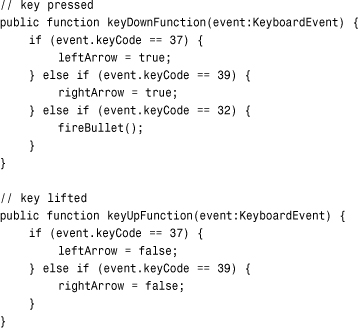
Instead, we use the left and right arrow keys to move the gun. Like the planes, it moves at a set speed to the left or right, depending on which key is pressed.
The arrow keys are handled by the main movie class, not the AAGun class. This is because the keyboard, by default, sends events to the stage, not a particular movie clip.
The main movie class has two variables, leftArrow and rightArrow that are set to true or false. The AAGun class simply looks to those variables to see what direction, if any, to send the gun.
We have one constant in the class: the speed of the gun. This makes it easy to adjust later when fine-tuning gameplay. Then, the constructor function sets the initial position of the gun to the bottom middle of the stage at 275, 340. The constructor function also starts listening to ENTER_FRAME events:
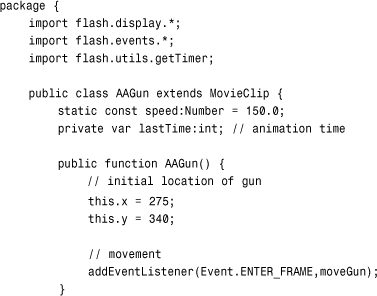
Now that the location of the gun has been set and the listener added, the moveGun function runs once every frame to handle the movement, if any:
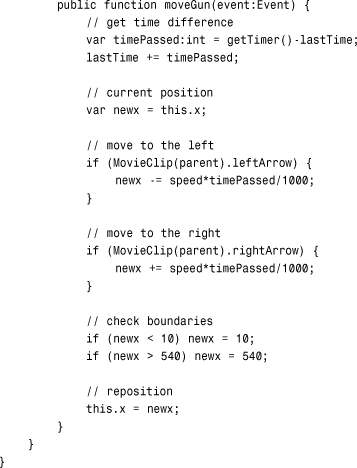
Besides moving the gun, under the comment “check boundaries,” you can see two lines above where the new location of the gun is checked to be sure it did not go beyond the sides.
It is worth looking at how the main class handles the key presses right now. In the constructor function, two addEventListener calls set it up:
stage.addEventListener(KeyboardEvent.KEY_DOWN,keyDownFunction);
stage.addEventListener(KeyboardEvent.KEY_UP,keyUpFunction);
The two functions that are called set the Boolean values of leftArrow and rightArrow accordingly:
Note
The event.keyCode value is a number that is matched to a key on the keyboard. Key 37 is the left arrow, and key 39 is the right arrow. Key 38 and 40 are the up and down arrows, which we use in other chapters.

So, the movement of the gun is really a joint effort by the main class and the AAGun class. The main class handles the keyboard input, and the AAGun class handles the movement.
There is one more part to AAGun: the deleteGun function. We only use this when it is time to remove the gun from the stage to jump to the gameover frame:
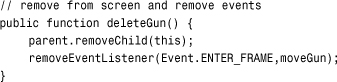
Note
It is important to always remember to use removeEventListener to get rid of frame and timer events. Otherwise, those events continue to happen even after you think you have deleted the parent object.
Skyward Bullets
Bullets are probably the simplest of all the moving objects. In this game, the graphic is actually a grouping of bullets, as seen in Figure 5.5.
Figure 5.5 The bullet grouping has the registration point at the bottom, so when they start at the gun, they are just above the tops of the barrels.
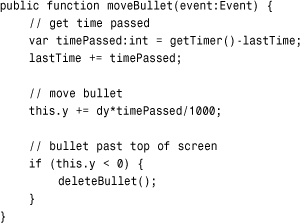
They originate at the location of the gun and move upuntil they reach the top of the screen. All the code in the Bullet class we have seen before were in the Airplane and AAGun classes.
The constructor function accepts a starting x and y value and a speed. The speed is applied vertically, rather than horizontally like the airplanes:
The moveBullet function is called in each frame; it calculates the time passed and uses that to determine how much the bullet should move. It also checks to see if the bullet has passed the top of the screen.
The removeBullet function, like the removePlane function, exists in the main class. It is in charge of removing bullets when they reach the top of the screen:

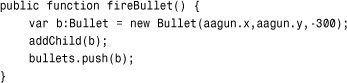
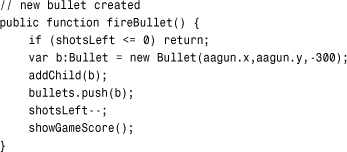
To start a bullet, the player presses the spacebar. We need to modify the keyDownFunction in the AirRaid class to accept spaces and pass them along to a function that handles the creation of a new Bullet:

Note
The key code 32 is for the spacebar. To find out what other keys correspond to which codes, look in the Flash help. Search for “Keyboard Keys and Key Code Values.”
The fireBullet function passes the location of the gun and a speed to the new Bullet. It also adds the new Bullet to the array bullets so it can keep track of it later for collision detection:
Now that we have airplanes, an anti-aircraft gun, and Bullet objects, it is time to tie all these together with the main AirRaid class.
The Game Class
The AirRaid class contains all the game logic. It is here that we create the initial game objects, check for collisions, and handle scoring. After the game gets going, it looks something like Figure 5.6.
Figure 5.6 The Air Raid game with anti-aircraft gun, bullet in mid-movement, and two airplanes flying overhead.
Class Declaration
The class needs the standard classes we have been using so far, including access to getTimer and text fields:
The variables we need for the class include references to the gun and arrays that reference the airplanes and bullets that we create:

The next two variables are true or false values that track the player’s use of the left- and right-arrow keys. These need to be public variables because the aagun object is accessing them to determine whether to move:
public var leftArrow, rightArrow:Boolean;
Note
You can include more than one variable on a variable definition line. This works great when you’ve got small groups of variables that are related and of the same type. The leftArrow and rightArrow variables are a good example.
The next variable, nextPlane, is going to be a Timer. We use this to determine when the next plane appears.
private var nextPlane:Timer;
Finally, we’ve got two score-keeping variables. The first keeps track of how many shots are left, and the second tracks how many hits the player scored:
private var shotsLeft:int;
private var shotsHit:int;
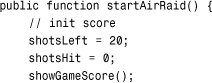
There is no AirRaid constructor function for this game because it is not starting on the first frame. Instead, we have one called startAirRaid that is called from the main timeline on the “play” frame.
The function starts off by setting the number of shots left to 20 and the score to 0:
Next, the anti-aircraft gun is created and added to the stage, as aagun:
![]()
We also need to start off the arrays to hold the bullets and airplanes:
![]()
To know which arrow keys have been pressed, we need two listeners, one for the key down events and one for the key up events:
![]()
We need an ENTER_FRAME event listener to trigger the checkForHits function. This is the all-important collision detection between the bullets and the planes:
// look for collisions
addEventListener(Event.ENTER_FRAME,checkForHits);
Now, we need to kick off the game by getting some planes in the air. The setNextPlane function does this, and we look at it next:
![]()
Creating a New Plane
New planes need to be created periodically at somewhat random times. To do this, we use a Timer and trigger a newPlane function call in the near future. The setNextPlane function creates the Timer with only one event and sets it for 1 to 2 seconds in the future:

When the Timer is done, it calls newPlane to create a new airplane and send it on its way. The three parameters of the Airplane object are randomly decided using several Math.random() function results. Then, the plane is created and added to the stage. It is also added to the airplanes array.

At the end of the function, the setNextPlane function is called again to schedule the next plane. So, the creation of each plane also sets the timer for the creation of the next one. It’s an infinite onslaught of airplanes!
Collision Detection
The most interesting function in this entire game is the checkForHits function. It looks at all the bullets and the airplanes and determines whether any of them are intersecting at the moment.
Note
Notice that we are looping backward through the arrays. This is so that when we delete an item from an array we don’t trip over ourselves. If we were moving forward through the array, we could delete item 3 in the array, which would make the old item 4 the new item 3. Then, moving forward to look at item 4, we would be skipping an item.
We use the hitTestObject to see whether the bounding boxes of the two movie clips overlap. If they do, we do several things. First, we call planeHit, which starts the death of the airplane. Then, we delete the bullet. We up the number of hits and redisplay the game score. Then, we stop looking at collisions for this airplane and move on to the next bullet in the list:
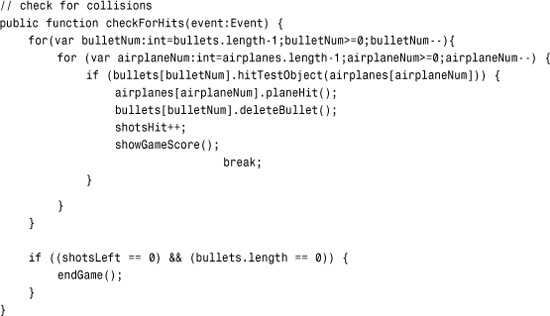
At the end of the function, we check to see whether the game is over. This happens when there are no shots left, and the last bullet has gone off the top of the screen or it has hit a plane.
Handling Keyboard Input
The next two functions handle the key presses. We’ve seen both these functions before:
To create a new bullet when the player presses the spacebar, create the object and feed it the location of the gun and the speed of the bullet (in this case, 300 pixels per second).
We add the bullet to the bullets array and subtract one from shotsLeft. We also update the game score.
Notice that before any of this happens, we check shotsLeft to make sure the player can even fire another shot. This prevents the player from getting a few extra bullets in at the end of the game:
Other Functions
We have now called showGameScore a few times. This little function just places the shotsHit and shotsLeft into text fields on the stage. These aren’t text fields that we created in the code, but rather ones that I put on the stage manually in the sample movie. I didn’t want to clutter this example with TextField and TextFormat code:

Note
Although I didn’t create the text fields in the code, I still need to put the import flash.text.TextField; statement at the start of the class. You need this to create and access text fields.
The next two functions simply remove a single item from an array. The for...in loop is used to go through the array, and then the splice command is used to remove it when it is found. The break command is used to quit looping after the match has been found.
We need a function to remove a plane from the airplanes array and another to remove a bullet from the bullets array:
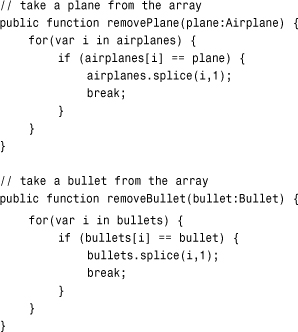
We could use a single function to take the place of both the removePlane and removeBullet function. This single function is passed into both the array and the item to find. By using separate functions, however, we set up future development of the game where removing airplanes and bullets might have other effects. For instance, removing an airplane could be the signal to call setNewPlane instead of after a plane is created.
Cleaning Up After the Game
When a game ends, there are still game elements on the screen. We know all the bullets are gone because that is a condition that has to be met for the game to be over. However, planes and the gun are still there.
We didn’t store all the display objects in a single array, as we did for the deduction game in the preceding chapter. Instead, we’ve got them in the airplanes array, the aagun variable, and the bullets array, which we know is already empty.
After removing the airplanes and the gun, we also need to remove the keyboard listeners and the checkForHits event listener. The nextPlane Timer needs to be cleaned up, too. Then, we can go to the gameover frame without any of the game elements hanging around:
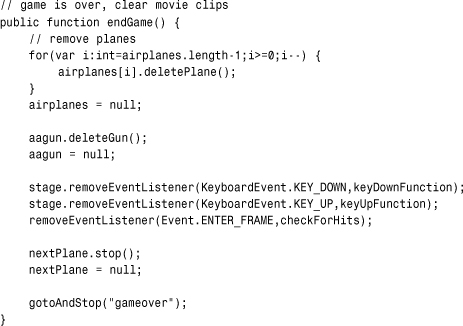
After this function, you need two more brackets to close out the class and the package.
One good thing about using manually created text fields in the main timeline rather than ActionScript-created fields is that they stick around for the gameover frame. This means the player can see their score on that last frame.
Modifying the Game
The AirRaid.fla movie contains the same frame scripts and buttons that Deduction.fla from the preceding chapter had. The intro frame has a Start button on it, and the gameover frame has a Play Again button. The middle frame is labeled "play".
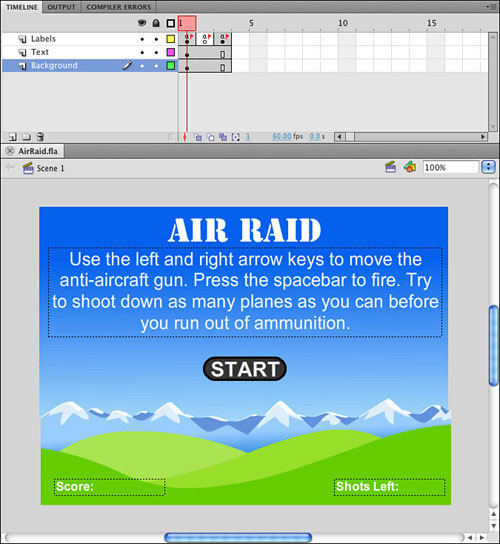
In this game, I’ve also added instructions to the intro frame. Figure 5.7 shows the first frame complete with the instructions, title, Start button, and the text fields at the bottom that are used in the game.
Figure 5.7 The intro frame has instructions and a Start button.
Improving this game can be as simple as adding more planes or updating planes to follow a more serious style. The background and turret can also be changed.
In the code, you can vary the speed at which the planes appear and how fast they move. Perhaps you might even want to have these speeds increase with time.
You can also, of course, change the number of bullets that the player starts with.
More drastic modifications can include changing the theme of the game entirely. You can revert back to the old submarine games by making the planes into ships and the gun into a periscope viewer. In that case, I would slow down the speed of the bullets dramatically and use the background art to create some depth to the scene.
Paddle Ball
Source Files
A3GPU205_PaddleBall.zip
Air Raid involved simple one-dimensional movement for a variety of objects and collisions resulting in objects being eliminated. This next game, Paddle Ball, includes diagonal movement and collisions that result in bounces.
Paddle Ball is a version of Breakout, an early and popular video arcade game. Versions of this game appear frequently online.
Note
The original version of Breakout for Atari in 1976 was developed by Steve Jobs and Steve Wozniak, before they founded Apple Computer. Wozniak’s chip design for the game didn’t work with Atari’s manufacturing process, so it was scrapped.
Versions of Breakout have appeared as hidden Easter eggs in many versions of the Mac OS. Even today, it is included on some iPods.
In this version of Paddle Ball, the player controls a paddle at the bottom of the screen, which he or she can move left and right with the mouse. The main active element in the game is a ball, which can bounce off the side, walls, and top, but passes through the bottom of the screen if the paddle isn’t there.
At the top of the screen are many rectangular bricks that the player must eliminate by directing the ball to them with the paddle.
Setting Up the Movie
The movie is arranged just like Air Raid and Deduction. The first frame is the intro, and the third frame is the gameover. They both have buttons to start a new game and instructions on the first frame.
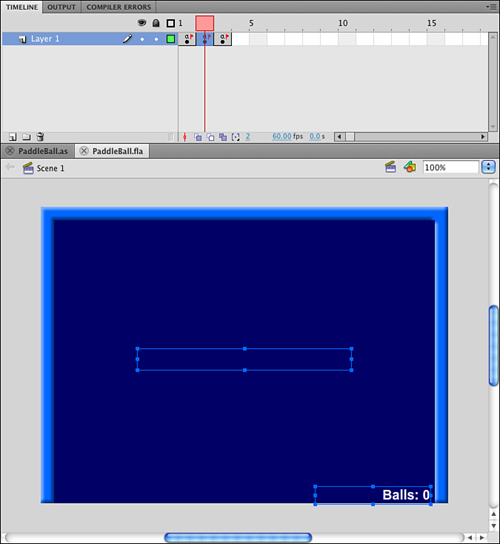
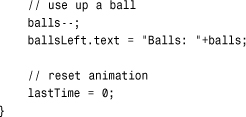
The middle frame is play. This is where the game play takes place. On it, we’ve got a drawn border, a text field in the middle for messages such as “Click to Start,” and a text field to the bottom right to tell players how many balls they have left. Figure 5.8 shows you these three elements against a dark background.
Figure 5.8 The middle text field is gameMessage, and the one in the lower right is ballsLeft.
The library in this movie is also a little more crowded than the games we have attempted so far. Figure 5.9 shows the library, complete with the class name of the movie clips that our scripts are accessing.
Figure 5.9 There are seven items in the library, including the ball, brick, and paddle.
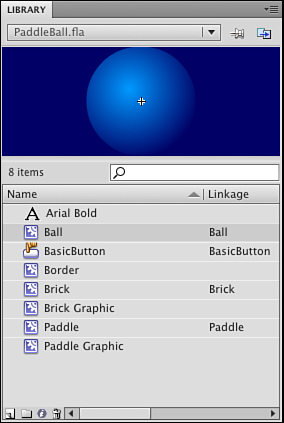
You notice that there is a "Brick" and a "Brick Graphic" as well as a "Paddle" and "Paddle Graphic". The second of each pair is contained in the first. So, the "Brick Graphic" is the one and only element in "Brick".
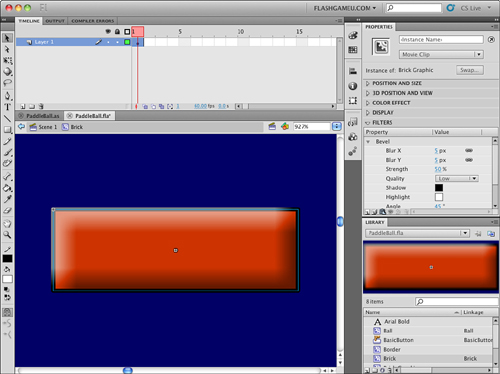
The reason for this is that we can easily apply a filter to these elements. A filter, like the Bevel filter we are using here, can be applied in the Properties panel of a movie clip. However, because both "Brick" and "Paddle" are created by ActionScript, we can’t apply filters to them this way. So, we have a “Brick Graphic" that is inside "Brick".
The "Brick Graphic" has the filter applied to it. Then, we can create a copy of "Brick" in ActionScript without worrying about this.
Note
We could apply the filter in ActionScript, too. However, this would take extra code that doesn’t really have anything to do with the game. Another good reason to leave the filter settings outside of ActionScript is that these things can be left to an artist who is working with the programmer. It is easier for artists to create the graphics and apply the filters than to rely on the programmer to do it for them.
Figure 5.10 shows the Brick movie clip, with the Brick Graphic movie clip inside it. You can also see the Properties panel with the filter settings.
Figure 5.10 A Bevel filter is used to make simple rectangles into more interesting graphics.
Class Definition
Unlike the Air Raid game, this game uses one single ActionScript class to control everything. This class needs a lot of support, including getTimer, the Rectangle class, and text fields:

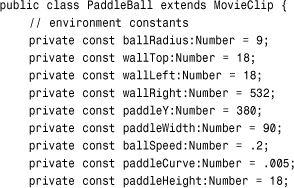
There are a lot of constants to consider in this game. The following list is pretty self-explanatory. It includes the positions and dimensions of many of the items in the game, such as the ball, walls, and paddle:
The only two objects that move in this game are the ball and paddle. In addition, we need an array to store the bricks:
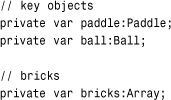
To keep track of the ball’s velocity, we use two variables: ballDX and ballDY. We also need a lastTime variable as in Air Raid:
Note
Velocity is a combined measurement of speed and direction. A variable such as dx measures the horizontal speed of an object. But a combination of variables, such as dx and dy, is said to measure both speed and direction: velocity. Alternatively, a game might track speed as one variable (pixels per second) and direction as another (a vector or angle). Combined, these also represent velocity.
One last variable is the number of balls remaining. This is the first game we have built that gives the player a number of chances, or lives, before the game is over. The player has three balls to use when playing. When the player misses the third ball and lest it pass the paddle, the game ends:
// number of balls left
private var balls:Number;
There is no constructor function for this game because we wait for the second frame to start. So, we leave out a PaddleBall function.
Starting the Game
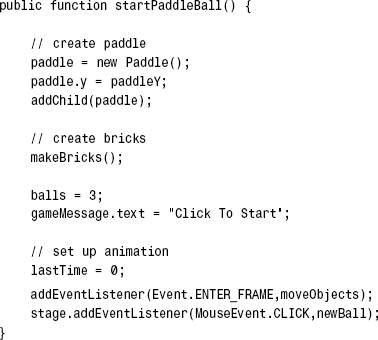
When the game is started, the paddle, bricks, and ball are created. The creation of the pattern of bricks is delegated to another function. We look at that next.
The number of balls is set at three, and the initial game message is placed in the text field. Also, the lastTime is set to zero. This is different from how we have worked before, setting it to getTimer. I explain this when we get to the animation functions that use lastTime.
Two listeners are set. The first one calls the moveObjects function every frame. The second is an event listener placed on the stage to capture mouse clicks. We’ ask the player to “Click to Start,” so we need to get this click and use it by running newBall:
The makeBricks function creates a grid of bricks. There are eight columns across and five rows down. We use a nested loop with x and y variables to create all 40 bricks. The positions of each brick are spaces 60 pixels vertically and 20 horizontally, with a 65- and 50-pixel offset.

Note
When creating arrangement functions like this, don’t be afraid to experiment with numbers to get the desired result. For instance, I plugged numbers into the makeBricks function until I got an arrangement of bricks that looked good. Sure, I could have calculated the spacing and offsets in my head or on paper beforehand, but it was easier and quicker to just make a few educated guesses.
ActionScript is a great environment for experimentation and discovery. You don’t need to plan every little thing before typing the first line of code.
One of the advantages of farming out the brick creation to its own function is that you can later replace it with a function that produces different patterns of bricks. It can even read from a database of brick layouts if you want. Any changes you want to make to the pattern are isolated in a single call to makeBricks, so it is easy to have a second programmer work on brick arrangement, while you work on game play.
Figure 5.11 shows the game at the start, with the ball, paddle, and bricks. You can also see the walls, which are purely cosmetic. The ball is bouncing off the invisible walls we created by setting wallLeft, wallRight, and wallTop.
Figure 5.11 All the game elements are shown at the start of the game.
Starting a New Ball
When the game begins, there is no ball. Instead, the message “Click to Start” appears, and the player must click the stage. This calls newBall, which creates a new Ball object and sets its position and related properties.
First, newBall checks to make sure that ball is null. This prevents the user from clicking on the screen while a ball is already in play.
Next, the gameMessage text field is cleared:
A new ball is created at the exact center of the screen, using the halfway point between wallLeft and wallRight and wallTop and the vertical position of the paddle:
The ball velocity is set to be straight down at the ballSpeed constant:
![]()
The balls variable is reduced by one, and the text field at the bottom right is changed to show the number remaining. Also, lastTime is reset to zero so the animation timekeeper starts off fresh:
The newBall function is used at the start of the game and also to begin a new ball in the middle of the game.
Game Animation and Collision Detection
So far, the game code has been simple and straightforward. When we start looking at the moving objects, however, things get complicated. The ball must detect collisions with both the paddle and the bricks. It then needs to react to the collisions appropriately.
The event listener for ENTER_FRAME calls moveObjects every frame. This function then delegates to two other functions, movePaddle and moveBall:

Paddle Movement
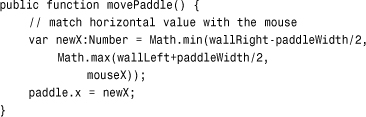
The movePaddle function is simple. It sets the x property of the paddle to the mouseX location. However, it also uses Math.min and Math.max to restrict the location to the left and right sides of the stage.
Note
The mouseX and mouseY properties return the cursor location relative to the current display object. In this case, that would be the main class, which is equivalent to the stage. If we were looking at mouseX and mouseY from inside a movie clip class, we need to adjust the results or look for stage.mouseX and stage.mouseY.
Ball Movement
The function that moves the ball, moveBall, gets the lion’s share of code. The basic movement is similar to the moving objects in Air Raid. However, the collisions are far more complex.
The function starts off with a check of ball to make sure it is not null. If it is, we are between balls, and the rest can be skipped:
![]()
Remember that we initialized the lastTime variable to zero rather than getTimer. This is so that the time it takes to create the game objects and draw the screen for the first time is not used in determining the amount of the first animation step. For instance, if it takes 500 milliseconds for the game to start, getTimer() minus lastTime is 500 milliseconds or greater. So, the ball jumps quite a bit before the player has a chance to even react.
Note
One reason this game mightg take a half a second or so to begin is the use of Bevel filters. This slows down the start of the game as the modifications to the visual representation of the bricks and paddle is generated. However, it does not slow down the game play after that initial hit.
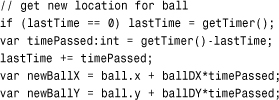
By starting the lastTime at zero, we can recognize it in the animation function and get a fresh new value for lastTime. This means the first time through the function the timePassed is most likely zero. But that doesn’t affect anything. What it does, however, is make sure the animation timer isn’t ticking until we are at the point of calling moveBall for the first time:
Collision Detection
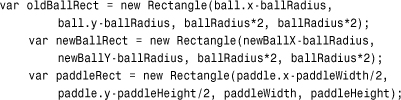
To start our collision detection, we get the rectangle of the ball. In fact, we get two different versions of the rectangle: the current ball rectangle, called oldBallRect and the rectangle of the ball if it completes its movement unimpeded as newBallRect.
Note
The Rectangle object is a good example of an object that works to bring out more information from the data you feed it. You give it an x and y position and a width and a height. But, you can ask it for interpreted information like the top, bottom, left, and right sides of the rectangle. You can even get Point objects for the corners (for example, bottomRight). We use the top, bottom, left, and right sides of the rectangle in our calculations.
The way we calculate oldBallRect and newBallRect is to use the x and y positions, plus or minus the ballRadius. For instance, ball.x-ballRadius gives us the x position, and ballRadius*2 gives us the width. We calculate the paddleRect the same way:
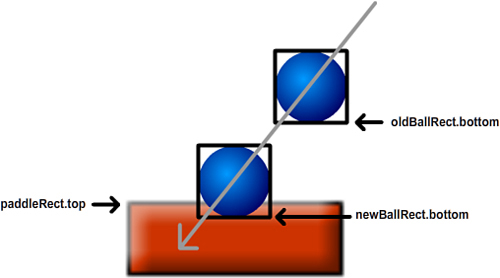
Now that we have these three rectangles at our fingertips, we can use them to see whether the ball has hit paddle. This happens when the bottom of the ball passes the top of the paddle, but determining this moment is harder than it seems. We don’t want to simply know whether the bottom of the ball is greater than the bottom of the paddle. We want to know that this has just happened, right now in this step of the animation. So, the correct question to ask is this: Is the bottom of the ball greater than the top of the paddle, and was the bottom of the ball previously above the top of the paddle? If both of these conditions are met, the ball has now passed the paddle. See Figure 5.12 for more clarification.
Figure 5.12 The diagram shows the ball in the previous frame, and the ball as it would be if the motion were unimpeded. The ball has crossed into the paddle and must be deflected.
Another test that needs to be performed is whether the horizontal location of the ball matches that of the paddle. If the right side of the ball is greater than the left side of the paddle and the left side of the ball is less than the right side of the paddle, we have an actual collision.
In case of a collision, the ball must be deflected upward. This is as easy as reversing the direction of ballDY. In addition, a new location for the ball must be defined. After all, the ball cannot remain inside the paddle as it is now, as shown in Figure 5.12.
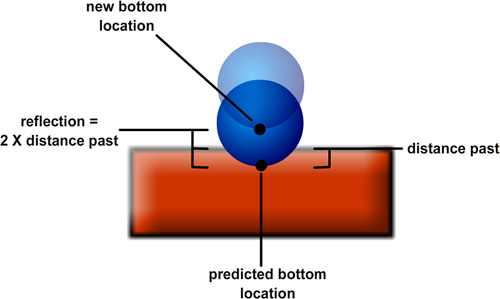
So, the distance past the top of the paddle is calculated, and the ball is reflected up by twice that distance (see Figure 5.13).
Figure 5.13 The ball moves slightly into the paddle, so it is placed the same distance back away from the paddle.

While the vertical speed of the ball is simply reflected, the horizontal speed, ballDX, is set to a new value altogether. This value is determined by the distance from the center of the paddle. It is multiplied by a constant paddleCurve.
The idea here is that the player needs to direct the ball. If the player is hitting it with an actual flat surface, the ball never shoots off at any angle except the one it started with. The game most likely is impossible to win.
The effect of this system is that the ball bounces straight up and down at the center of the paddle and shoots off at steeper and steeper angles toward the end.
Note
One common way to represent this visually is to have a slight curve at the top of the paddle. This gives the player the general idea of what happens when the ball hits the paddle. However, because this behavior has been in every Breakout-style game since the first, most people take it for granted.
If the ball has passed the paddle, there is no turning back. But, we don’t remove the ball from play right away. Instead, it is allowed to continue until it reaches the bottom of the screen, and then it is removed.
If this is the last ball, the game is over, and endGame is called. Otherwise, the gameMessage field is populated with “Click For Next Ball.” Because the ball variable is set to null, the moveBall function no longer acts on anything, and the newBall function accepts the next click as a trigger to create a new ball. We can, and should, quit this function now with a return command. No need to check for wall collisions or brick collisions if the ball is gone:

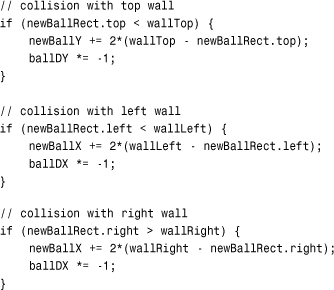
Next, we check for collisions with the three walls. These are simpler checks because the ball should never go past one of these. In each case, the vertical or horizontal speed is reversed, and the location of the ball is altered in the same way we did with the paddle collisions, so the ball is never “in” the walls:
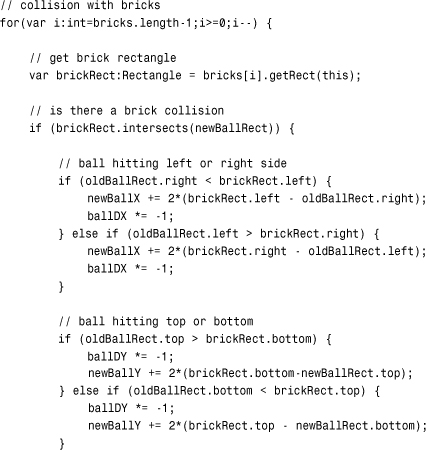
To calculate the collision with bricks, we need to loop through all the bricks and check each one. For each, we create a brickRect so we can access the top, bottom, left, and right of the brick as easily as we can with the ball.
Note
Normally when you want to loop through an array of objects looking for a collision, you do it in reverse. This way, you can remove objects in the list without skipping any. This time, however, we can move forward because after the ball collides with a brick, we stop looking for other collisions (because only one collision should be happening at a time).
Detecting a collision with a brick is easy, but reacting to it is trickier. Because we have a Rectangle for the ball and one for the brick, we can use the intersects function to see whether the new location of the ball is inside a brick.
If so, it is a matter of determining what side of the brick was hit. A series of tests compares the sides of the ball with the opposite sides of the bricks. When a crossover side has been found, the ball is reflected in the correct direction and the location is adjusted:
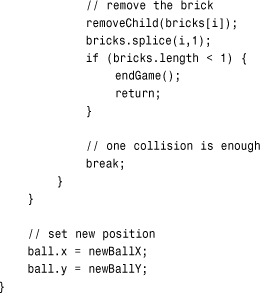
If the ball has collided with a brick, the brick should be removed. In addition, if the bricks array is empty, the game is over. We also want to use return here because if the game is over, there is no need to set the ball location at the end of this function. In addition, we’ll use a break at the end of the collision loop so that if any collision is detected, we only deal with that one collision, and not multiple ones. Although that is extremely unlikely, the results of the ball hitting two bricks at once will make the ball behave strangely:
One important aspect of this game is that there are two game modes. The first is with the ball in play, and the second is waiting for the player to click the screen to create a new ball. The code tells the difference between these by looking at the value of ball. If it is null, the game is in the second state.
Game Over
The game ends when one of two things happens: The player loses the last ball, or the last brick is hit.
Just like in Air Raid, we use the endGame function to clean up all the leftover movie clips. We also set references to these movie clips to null so the Flash player can remove them from memory.
It is important to check to make sure the ball isn’t already gone because it will be if the endGame function is called when the last ball is lost.
We also need to remove the listeners, both the one that calls moveObjects every frame and the one that listens for mouse clicks:
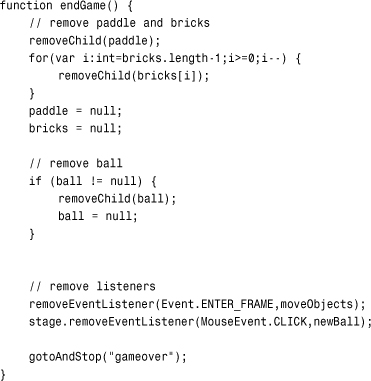
At the end of the code, don’t forget the closing brackets to close off the class and the package.
Modifying the Game
This game cries out for sound. You can add sound to this game easily using the examples from the matching game in Chapter 3, “Basic Game Framework: A Matching Game.” One for hitting the paddle and another for hitting a brick is a good start. Also, one for hitting the walls and another for missing the ball would be nice.
Another great modification is to have different colored bricks. You could do this by using multiple frames in the Brick Graphic movie clip, and then going to the appropriate frame. You could make each row a different color.
Scoring is a good idea, although progress in the game is obvious without it. Scoring works better if you create multiple levels. More levels could be created by increasing the speed of the ball with each level or presenting a new arrangement of bricks.
When the player has removed all the bricks, the ball could be removed, and the message “Click For Next Level” could appear. Then, when players click, not only would a new ball appear, but a whole new set of bricks.