
13. Recording in the Multitrack Editor
Lesson overview
In this lesson, you’ll learn how to do the following:
• Assign a track to your audio interface’s input or your computer’s default sound inputs so you can record into a Multitrack Editor track
• Monitor the interface input while you record
• Set up the metronome track for different patterns and sounds
• Record an overdub (additional part)
• “Punch in” over a mistake to correct it
• Record multiple takes and choose the best parts to create a composite track
This lesson takes about 50 minutes to complete. Download the project files for this lesson from the Lesson & Update Files tab on your Account page at www.peachpit.com and store them on your computer in a convenient location, as described in the Getting Started section of this book. Your Accounts page is also where you’ll find any updates to the chapters or to the lesson files. Look on the Lesson & Update Files tab to access the most current content.

In addition to simply recording into a track in the Multitrack Editor, you can also “punch” over mistakes and assemble multiple takes into an idealized, composite take.
Getting ready to record a track
You can record directly into the Multitrack Editor. For the purposes of this lesson, use any audio source that’s compatible with your audio interface—a microphone, a USB microphone that plugs directly into your computer, a musical instrument like a guitar or drum machine, CD or MP3 player output, and so on. Start with a new Multitrack Session.
![]() Note
Note
If you have not already downloaded the project files for this lesson to your computer from your Account page, make sure to do so now. See “Getting Started” at the beginning of the book.
1. With Audition open, choose File > New > Multitrack Session or press Ctrl+N (Command+N), name the Session Recording, and choose the template Empty Stereo Session. Click OK.
2. Choose Multitrack > Track > Add [Mono or Stereo, depending on the source]. For example, if you’re recording a voice, that would require a Mono track. However, most drum machines have stereo outputs, so if you were recording a drum machine to lay down a rhythm part, you’d choose a Stereo audio track.
3. From the Multitrack Editor four-button main toolbar, choose the Inputs/Outputs area for the newly created track, and extend the track height so you can see the Input and Output fields.

![]() Note
Note
The Input field arrow points inward toward the Multitrack Editor; the Output field arrow points outward away from the Multitrack Editor.
4. The input defaults to the Default Stereo Input, as described in Chapter 1, “Audio Interfacing.” Verify that your signal source is plugged into the correct default hardware input. If it is plugged into an input that is not the default input, you can change the default using the Input field drop-down menu (also described in Chapter 1).
![]() Note
Note
If you add a Mono track, the input will nonetheless show Default Stereo Input. However, the default input will actually be the left channel, or lower-numbered input, of a stereo pair. For example, if your default stereo input is called 1+2, with a Mono track the default input will be 1.
5. The output will default to the Master track output bus. If for any reason you want to bypass the Master track output and send the input directly to an audio interface hardware output, choose the appropriate Mono or Stereo output from the Output field drop-down menu.
![]() Note
Note
Because the track’s output is assigned to the Master track output bus, you should also see signal level in the Master bus meter.
6. Click the track’s Arm for Record (R) button and play your audio source. The track meter should indicate signal level. Like most recording software, you’ll need to adjust levels at the audio source or with your interface; there is no internal input level adjustment within Audition. Make sure that with the loudest anticipated signal the meter does not go into the red, and typically, that peaks don’t exceed -6dB in order to leave some headroom.
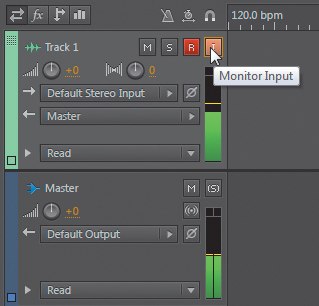
7. Click the Monitor Input button. The input signal will pass through Audition and to the default output. With slower computers, this may result in latency—an audible delay between what you’re hearing compared to the input. For information on minimizing latency, refer to Chapter 1.
8. Keep this project open in preparation for the next lesson.
Setting up the metronome
The metronome helps you record by providing a rhythmic reference during the recording process. The metronome signal is not recorded into any track but is routed directly to the Master track output bus so you can hear it.
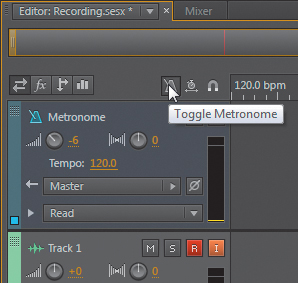
1. Click the Toggle Metronome button to the left of the timeline. The metronome track appears above any audio tracks, but you can move it within a project, like any other track.
2. Click Play and you’ll hear the metronome signal.
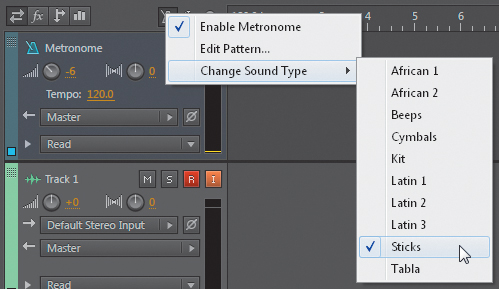
3. You can modify which sounds play on which beats. Right-click (Control-click) on the Toggle Metronome button, and choose Edit Pattern to define a rhythmic pattern.

4. The metronome plays four “clicks.” The default is a downbeat using one sound and three “subdivision” beats using a different sound (e.g., TICK - tock - tock - tock). However, clicking on any beat square (labeled 1–4) cycles through four options for what that beat can play: Down Beat, Upbeat, Subdivision, or None. Click once on beat 3 to select None, and then click OK.
5. Click Play, and you’ll notice that the third beat is missing.
6. Right-click (Control-click) on the Toggle Metronome button again, and then choose Edit Pattern. This time click twice on beat 3 to select Up Beat (it will turn orange); click OK. Click Play, and you’ll hear a different accent for the third beat.
7. Return the metronome to the standard setting. Right-click (Control-click) on the Toggle Metronome button, choose Edit Pattern, and then click the Reset Accent Pattern button to the immediate left of the OK button. Click OK.
8. You can also change the metronome sound. Right-click (Control-click) on the Toggle Metronome button and choose Change Sound Type > [desired sound]. Sticks is the most conventional, followed by Cymbals, Kit, and Beeps; other options are available for more unusual sounds. Click Play after choosing an option to audition it.
9. After choosing a sound, adjust the Metronome Tempo as desired. The metronome’s Volume and Pan controls, and Mute and Solo buttons, work identically to other tracks.
10. Keep this project open in preparation for the next lesson.
Recording a part in a track
Now that the levels have been set and the metronome is set up, you can record a part.
1. If necessary, return the playhead to the file start (recording begins at the playhead position) and make sure the track’s Arm for Record button is on.
![]() Tip
Tip
If you can’t enable Arm for Record, it means no input is selected.
2. Click the Transport Record button or press Shift+spacebar to begin recording. Several events occur:
• The playhead starts moving to the right and the metronome plays.
• The Transport Record button glows red.
• The Arm for Record button remains dimmed until recording stops.
• A red-tinted clip (the color indicates that the clip is currently recording) shows the waveform being recorded.

3. When you’re finished recording, click the Transport Stop button or press the spacebar.
4. Keep this project open in preparation for the next lesson.
Recording an additional part (overdub)
Recording an additional part is equally simple. This process is called overdubbing and is a mainstay of modern recording techniques. For example, a vocalist will often overdub an additional vocal part to create a thicker sound, or a drummer might overdub hand percussion parts (like tambourine) over a standard acoustic drum part.
1. Create a new track, select an input, enable Arm for Record and Monitor Input, and set levels as described previously.
2. Turn off the Arm for Record button on the previously recorded track.
3. Click the Transport Record button, and then click Stop when you’re done.
4. Close the project; you’ll be opening a new project for the next lesson.
![]() Tip
Tip
If you forget to turn off a previously recorded track’s Arm for Record button and accidentally record on that track, a new clip records on top of any existing clip. When you’re finished recording, simply click the accidentally recorded track to select it, and then press Delete.
“Punching” over a mistake
If you make a recording mistake, you may be able to edit it, for example, by finding someplace else in the song where you play the same part and then copying that part and pasting it over the mistake. But sometimes it’s easier and more natural just to play the part again. However, you don’t have to play the entire part; you can select only the section of the part with a mistake and record over that. “Punching in” initiates recording at the desired section, and “punching out” stops recording at the section’s end.
As mentioned previously, although you’ll be punching over a guitar part for the purposes of this lesson, use any audio source that’s compatible with your audio interface—a microphone, a USB microphone that plugs directly into your computer, a musical instrument like a guitar or drum machine, CD or portable music player output (iPod, smart phone, MP3 player), and so on. The point of this lesson is to demonstrate the process of punching more than fixing the guitar part.
1. With Audition open, navigate to the Lesson13 folder, and open the Multitrack Session named PunchingIn.sesx.
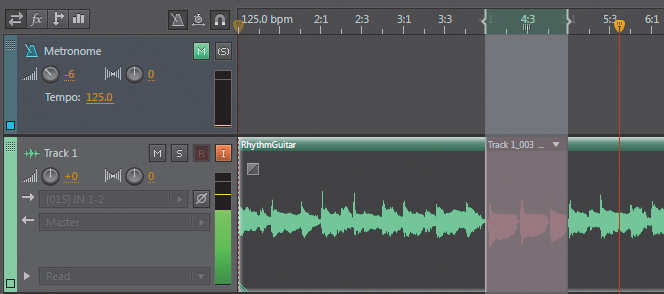
2. Click Play. Note the mistake between measures 4:1 and 5:1.
3. Type S to enable Snap, or click the Magnet button to the right of the Metronome button. Choose the Time Selection tool, and then click at 4:1 and drag to 5:1.
4. In the timeline, place the playhead before measure 4:1—for example, at the beginning or at measure 2:1.
5. Click the Track 1 Arm for Record button and Monitor Input, because you’ll want to hear yourself play the part you’re punching in.
6. Click the Transport Record button. Several events occur:
• You can hear the previously recorded clip along with what you’re playing into the interface input.
• Recording (punch in) begins only when the playhead reaches the selection’s beginning.
![]() Tip
Tip
Because recording won’t start until the playhead reaches the beginning of a selection, you can start listening well before the punch-in point (called pre-roll) to get warmed up and play along with the track. Then when punching occurs, you’re already “in the groove.”
• While recording within the selection, the previously recorded clip is muted.
• When the playhead reaches the selection end, recording stops (punch out); you can again hear the previously recorded clip, and playback continues. The section that was punched in is tinted red until you click Stop.
7. Click Play. The punched part, being on top of the previously recorded clip, will play back and “cover over” the mistake. You can just leave it there or temporarily move it so you can remove the part with the mistake and replace it with the new clip.
8. Close the project to start fresh with the next lesson.
Composite recording
Some recording software allows for looping a selection while in Record mode so you can record take after take without stopping, and then choose the version you like best after you stop. Although Audition doesn’t have that exact function, it provides a similar option. The process is called composite recording because you composite several takes into a single, perfected take.
This lesson explains how to create several alternate takes, and then choose the best one (or assemble parts of the best ones).
1. With Audition open, navigate to the Lesson13 folder, and open the Multitrack Session named PunchingIn.sesx.
2. As in the previous lesson, make sure Snap is enabled, choose the Time Selection tool, and then click at 4:1 and drag to 5:1.
3. In the timeline, place the playhead somewhere before measure 4:1 (e.g., measure 2:1).
4. Click the Track 1 Arm for Record button and Monitor Input.
5. Right-click (Control-click) on the Play button, and choose Return Playhead to Start Position on Stop.
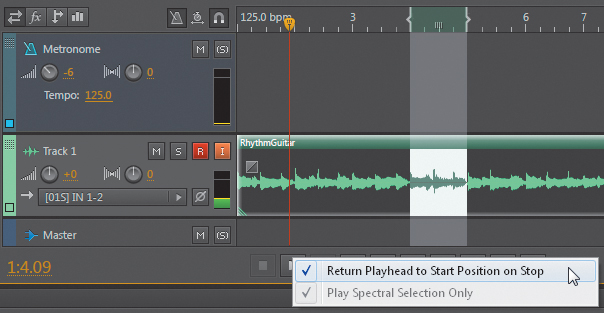
6. Click the Transport Record button, and record something during the selection. This will be your first take.
7. After the playhead passes the selection, click Stop. The playhead returns to where it started.
8. Click the Transport Record button again, and record something during the selection. This will be your second take.
9. Click Stop. The playhead returns to where it started.
10. Repeat the previous procedure to create one more take (for a total of three takes).
11. Click Stop, and then disable the Record and Monitor Input buttons.
12. Click the header in the clip on top of the original clip (take 3 in the selection area), and drag straight down to create a new track with only this take.
13. Click on the next clip (take 2) in the selection area and drag down into another track, and then click on the next clip (take 1) in the selection area and drag down into another track. Now each take is in its own track.
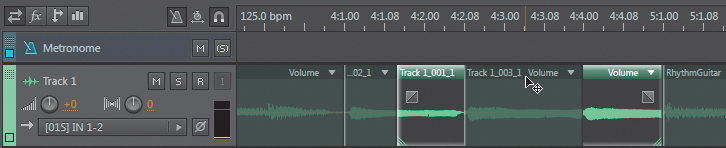
14. With the selection you made back in step 2 still active, click on the original clip’s header (the clip with the mistake in it) to select it.
15. Choose Clip > Split to prepare the section with the mistake for deletion.
16. Click the section you just split to select it, and then press Delete, or right-click (Control-click) on it and choose Mute.
17. Solo the original track, solo the track with the first take, and listen to how they sound together.
18. Un-solo the track with the first take, solo the track with the second take, and listen to how they sound together. Similarly, listen to the track with the third take.
19. If you like one take best, drag it into place in the original track, and then delete the tracks with the unused takes.
![]() Tip
Tip
If you can’t solo more than one track at a time, Ctrl-click (Command-click) on a Solo button to enable it in addition to other Solo buttons.
20. If you like different parts of different takes, use the Trim tool to isolate the sections you like, and then drag them into place on the original track. Remember that if a clip is on top of another clip, the uppermost clip is what you’ll hear. If you need to send a clip behind another clip, right-click (Control-click) on it and choose Send Clip to Back.

![]() Tip
Tip
To delete a track, right-click (Control-click) on an empty space in the track to be deleted, and then choose Track > Delete Selected Track.
Review questions
1. What is the disadvantage of monitoring the input signal through Audition?
2. Is clicking the Transport Record button sufficient to initiate the recording process?
3. What is the purpose of the metronome?
4. What is “punching in” and “punching out”?
5. What is “composite recording”?
Review answers
1. With slower computers, you may experience latency, where the signal you hear coming out of Audition is delayed slightly compared to the input.
2. No; you also need to arm at least one track for recording.
3. The metronome provides a rhythmic reference while you record.
4. Punching in initiates recording at a designated start point; recording stops at the designated punch-out point.
5. Composite recording involves recording multiple takes of the same part, and then assembling the best sections into a final, combined take.