
6. Mastering
Lesson overview
In this lesson, you’ll learn how to do the following:
• Use effects to improve the sound of a mixed, stereo piece of music
• Apply EQ to reduce “mud,” emphasize the kick drum, and articulate cymbals more
• Apply dynamics to give music more apparent level, which can also help overcome background noise in cars and other environments
• Create ambience for music that has a “dry,” sterile sound
• Alter stereo imaging to create a wider stereo effect
• Make small edits to emphasize particular parts of a piece of music
• Use diagnostic tools to monitor level and phase
This lesson will take about 45 minutes to complete. Download the project files for this lesson from the Lesson & Update Files tab on your Account page at www.peachpit.com and store them on your computer in a convenient location, as described in the Getting Started section of this book. Your Accounts page is also where you’ll find any updates to the chapters or to the lesson files. Look on the Lesson & Update Files tab to access the most current content.
Mastering is the stage between mixing and distribution. By tasteful application of EQ, dynamics, waveform editing, widening, and other techniques, you can shape a piece of music into a refined audio experience that’s ready for distribution or posting online.
Mastering basics
Mastering is the process that occurs after mixing but before distribution or publishing. It’s where you add any final edits or enhancements (equalization, dynamics, fade-in or fade-out, etc.) to a stereo or surround mixed file, as well as run any diagnostics to make sure the file meets particular audio specifications. With album projects (whether a CD or collection of music posted online), mastering also involves determining the correct order of the songs in the album (“sequencing” the songs) and matching their levels and timbres for a cohesive listening experience.
![]() Note
Note
If you have not already downloaded the project files for this lesson to your computer from your Account page, make sure to do so now. See “Getting Started” at the beginning of the book.
As the final link in the music production chain, mastering can make or break a project. As a result, people often hand off projects to veteran mastering engineers, not just for their technical expertise, but to enlist a fresh, objective set of ears.
However, if your goal with mastering is simply to make a good mix better, Audition provides the tools required for professional-level mastering. The more you work with mastering, the more your skills will improve. But it can’t be emphasized enough that the most important mastering tool is a good set of ears that can analyze where a piece of music is deficient, coupled with the technical expertise of knowing what processing will compensate for those deficiencies.
In addition, remember that ideally the purpose of mastering is not to salvage a recording, but to enhance an already superb mix. If there’s a problem with the mix, remix the tune; don’t count on mastering to solve the problem.
In Chapter 4, “Signal Processing,” you learned how to do basic mastering with the mastering suite of effects in the Special menu. This chapter takes a more “component” approach by using individual effects, which are presented in the order in which you would typically apply these effects (equalization, dynamics, ambience, stereo imaging), and waveform “touchup.” Note that sometimes touching up the waveform occurs first if there are known problems that need to be fixed, such as using the Amplify effect to raise part of a track’s level if it’s too quiet.
Step 1: equalization
Usually, the first step of mastering involves adjusting equalization to create a pleasing tonal balance.
1. With Audition open to the Waveform Editor, choose Window > Workspace > Mastering and Analysis.
2. Choose File > Open, navigate to the Lesson06 folder, and open the file KeepTheFunk.wav.
3. In the Effects Rack, click insert 1’s right arrow and choose Filter and EQ > Parametric Equalizer.
4. If necessary, choose the Default preset from the Presets drop-down menu, and then select the 30dB Range radio button toward the lower right.
5. Loop the file by pressing Ctrl+L (Command+L) or by clicking the Transport’s loop button so the file keeps playing while you make the following adjustments. Click the Transport Play button and listen. The music sounds a little “muddy” in the low frequencies and lacks crispness in the highs.
6. One way to identify problem areas is to boost a parametric stage’s Gain, sweep its Frequency, and listen to whether any frequencies jump out as excessive. So, click the Band 2 square box on the filter’s graphic, drag it all the way up to +15dB, and drag the box left and right. Note that the sound is “tubby” around 150Hz.
![]() Note
Note
If you want to click the Waveform Editor’s loop button, you’ll probably have to widen the Waveform Editor with its right splitter bar to reveal the button.
7. Drag the Band 2 box down to around -5dB at around 150Hz. Note how this tightens up the low end. The difference is subtle (enable and disable the Band 2 button to hear the difference), but often, mastering is about the cumulative effect of multiple subtle changes.
8. The kick drum seems like it should be stronger and have more of a deep “thud” for this kind of music; use Band 1 to dial in the drum’s frequency and add a narrow boost. Set Band 1’s Q to 8, and drag the Band 1 box up to +15dB. Sweep the Frequency back and forth between 20 and 100Hz, and note that the kick really stands out around 45Hz.
9. Bring the Band 1 level back down to around 5–6dB so the kick isn’t too prominent.
10. The hi-hat and cymbals seem kind of dull, but increasing the high-frequency response can improve that. Set Band 4’s Q to 1.5, set Frequency to around 8kHz, and drag the Band 4 box up to around +2dB.
11. Toggle the power state button again for comparison. Note that in the screen shot, unused bands have been turned off for clarity. Keep this project open for the next lesson.

Step 2: dynamics
Dynamics processing can make a piece of music “jump out” of the speakers because it acquires more punch and makes low-level sounds louder. This can also help the music overcome background noises found in many different listening environments. To avoid listener fatigue, you don’t want to add too much processing and kill the dynamics, but some processing can produce a nice, lively lift.
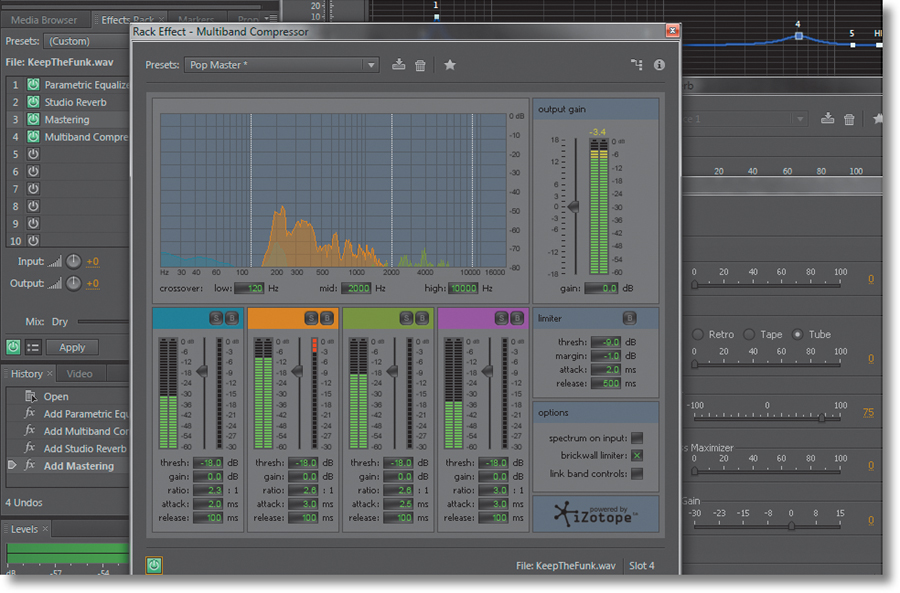
This lesson uses the Multiband Compressor to control dynamics. In addition to offering compression in four frequency bands, there’s also an overall output limiter.
1. In the Effects Rack, click insert 4’s right arrow and choose Amplitude and Compression > Multiband Compressor. (The reason for choosing insert 4 is that you’ll want to add some effects later between the EQ and dynamics.)
![]() Note
Note
Dynamics is usually the last processor in a mastering chain because it sets the maximum allowable level. Adding effects afterward could increase or decrease the overall level.
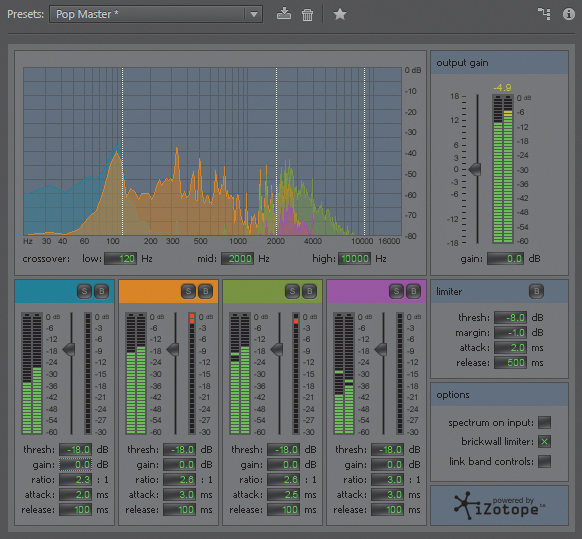
2. Choose the Pop Master preset from the Presets menu to give the music much more apparent loudness.
3. If you listen for a while, you’ll hear that the dynamics have been reduced dramatically—in fact, too much. To restore some dynamics, set each band’s Threshold parameter to -18.0dB.
4. Click in the limiter section’s Threshold field and drag down to -20dB. The sound becomes overly limited, squashed, and uneven. Now drag up to 0. No limiting is being applied, and the sound lacks “punch.” Drag down to a good compromise setting between these two extremes, like -8.0dB.
![]() Note
Note
The meters to the immediate right of each band’s Threshold slider (whose position follows the numeric Threshold field) indicate the amount of compression. The further down the red “virtual LED” goes, the more compression is being applied.
5. Toggle the Effects Rack’s power state to compare the sound with and without the EQ and Multiband Compressor. The processed sound is fuller, tighter, more distinct, and louder. Also, note that the Multiband Dynamics has emphasized the EQ changes made previously. Keep this project open for the next lesson.
Step 3: ambience
Although reverb is seldom added during mastering, the music seems a little “dry.” So, you’ll add some ambience to give the illusion of the music being played in an acoustic space.
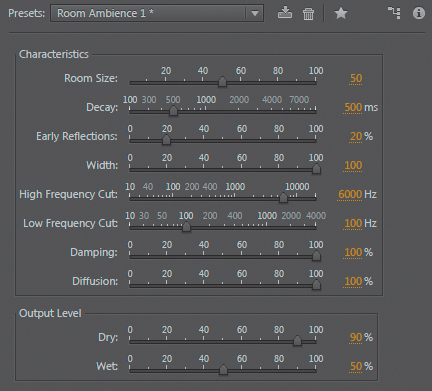
1. In the Effects Rack, click insert 2’s right arrow and choose Reverb > Studio Reverb.
2. You’ll need to stop the Transport to choose a preset. Choose the Room Ambience 1 preset from the Presets menu. After choosing the preset, click the Transport Play button.
![]() Tip
Tip
With albums that contain tracks recorded at different times or in different studios, sometimes adding a subtle overall ambience produces a more cohesive sound.
3. Set the Dry slider to 0 and the Wet slider to 40% so it’s easy to hear the results of any edits.
4. Set Decay to 500ms, Early Reflections to 20%, Width to 100, High Frequency Cut to 6000Hz, Low Frequency Cut to 100Hz, and both Damping and Diffusion to 100%.
5. Adjust the blend of Dry and Wet signals. Set Dry to 90% and Wet to 50%.
6. Toggle the Reverb’s power state; you won’t hear much difference unless you listen very carefully, because this adds just a tiny bit of “spice.” The added ambience is most noticeable when the drums hit by themselves. To hear more ambience, increase the Wet slider value. Keep this project open for the next lesson.
![]() Note
Note
The Studio Reverb trades off sound quality for real-time adjustment. For critical applications, one of the other reverbs is preferable, but for learning how reverb affects the sound, the Studio Reverb is a better choice due to its immediacy in changing settings.
Step 4: stereo imaging
As with reverb, stereo imaging isn’t added often, but it’s appropriate for this particular lesson. Stereo imaging stretches the stereo image so the left channel moves more to the left, and the right channel moves more to the right. In this lesson, increasing the stereo image helps separate the two guitars in the opposite channels even more.
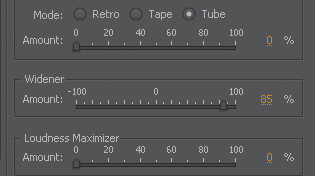
1. In the Effects Rack, click insert 3’s right arrow and choose Special > Mastering. Only the Widener will be used.
2. If necessary, choose the Default preset from the Presets menu.
3. Set the Widener slider to 85%.
4. Toggle the Effects Rack’s power state to compare the sound with and without the various mastering processors—the results speak for themselves. Also, try turning the power state on and off for the individual processors to hear each processor’s overall contribution to the sound.
5. Often during the mastering process, one processor will change the effect of another, requiring a readjustment. In this case, the compression has perhaps emphasized the brightness too much. Open the Parametric Equalizer interface, and turn off Band 4 to hear if you like that better.
Step 5: “push” the drum hits; then apply the changes
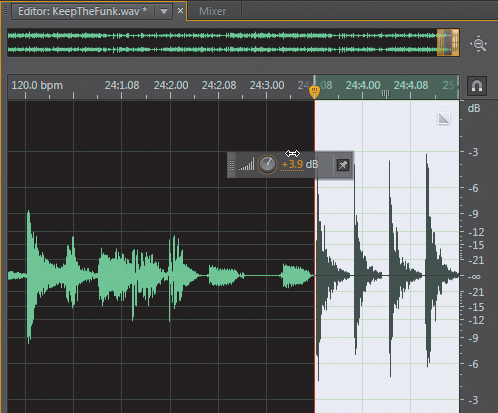
Four drum hits happen at the end, starting at 24:3.08 (with the timeline set to display Bars and Beats). You’ll boost them just a bit to give them more emphasis.
![]() Note
Note
Making edits to the waveform can be done prior to adding effects or after adding effects if a particular issue doesn’t become obvious until after you’ve applied effects that change the overall sound in a subtle, or even dramatic, way.
1. Click the Transport Stop button. Select the four hits (zoom in if necessary) and add +3.9dB of gain with the HUD (heads-up display).
![]() Note
Note
The Apply function resets all effects to their default value. If you don’t like the results of using Apply, choose Edit > Undo to restore the effects and the settings you edited.
2. Play the file to hear the result of boosting these four drum hits.
3. You’ll apply all these effects to make them a permanent part of the file, which will also redraw the waveform to show the changes caused by mastering. In the Effects Rack, choose Entire File from the Process drop-down menu in the panel’s lower right.
4. Click Apply. Audition applies the result of all the effects to the file and removes the effects from the Effects Rack.
5. Choose File > Close All, and then choose No to All in preparation for the next lesson.
![]() Note
Note
This lesson gives you a basic idea of the power of mastering, which is a very complex process; it can take years to become good at the art and science of mastering, especially if the file has problems that need to be fixed. Nonetheless, most mastering simply involves EQ, dynamics, and some other selected processors.
Mastering diagnostics
Although it’s best to listen with your ears, not your eyes, diagnostic tools and metering can tell you much about an audio file’s characteristics. Audition’s diagnostic tools are quite advanced and intended more for professional broadcast and similar uses, but some are applicable even to basic projects.
Checking phase
Chapter 15, “Mixing,” covers the importance of having your monitor speakers in phase—in other words, if the same signal is applied to both speakers, both speaker cones move outward or inward. If one cone moves in one direction and the other moves in the opposite direction when fed the same signal, the speakers are out of phase. However, out-of-phase conditions can also happen within audio files. Audition can detect and fix this condition.
1. Choose Window > Workspace > Reset “Mastering and Analysis.”
2. Choose File > Open, navigate to the Lesson06 folder, and open the file EthnoWorld5_phase.wav. (This file was created using the Best Service Ethno World 5 sound library.)
3. Click the Phase Analysis tab, and then start playback. Observe the Phase Analysis panel as well as the Phase Meter to the right of the Levels meter. You may need to resize some of the panels to see the waveform, Phase Meter, and Phase Analysis panel simultaneously.
4. If the Phase Meter “needle” goes to the left of 0 or the Phase Analysis “ball” drops below the centerline and turns red, that means that one of the channels is out of phase with respect to the other. This is not desirable, because it produces a thin sound due to cancellations occurring between the two channels.
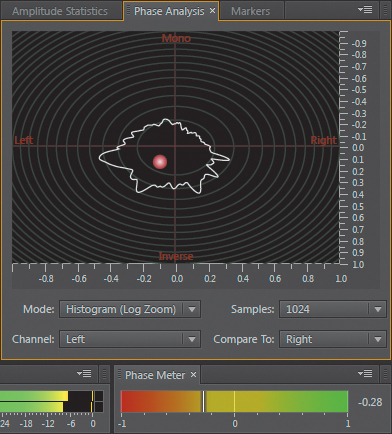
5. To fix this, click on the waveform and press Ctrl+A (Command+A).
6. Press the down arrow key to select only the right channel. Then choose Effects > Invert to invert the right channel’s phase.
7. Press the up arrow so that both channels are selected, and start playback. Note that the Phase Meter needle now moves to the right of 0, the Phase Analysis ball is now green and above the centerline, and the sound is much fuller.
8. To compare the in-phase and out-of-phase sounds, choose Edit > Undo Invert. The sound is thinner, and the phase meters indicate the out-of-phase condition. Now choose Edit > Redo Invert; the channels are no longer out of phase, and the sound is fuller.
Amplitude statistics
Audition can analyze your file to provide statistics for amplitude, clipping, DC offset, and other characteristics.
1. If the entire waveform isn’t already selected, press Ctrl+A (Command+A).
2. Click the Amplitude Statistics tab, and then click Scan Selection.
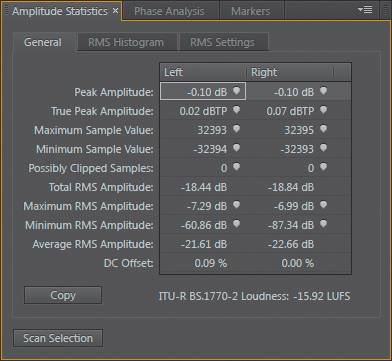
3. The Amplitude Statistics panel shows peak levels, whether some samples may be clipped, average (RMS) amplitude, DC offset, and other statistics. Here’s one example of how these statistics can be useful: Note that there’s some DC offset in the left channel, which reduces the available amount of headroom. Choose Favorites > Repair DC Offset, and then click Scan Selection again. The left channel no longer has any DC offset.
![]() Note
Note
Total RMS Amplitude is another useful statistic, because it represents a file’s overall loudness. If two files have very different Total RMS Amplitude statistics, one will probably sound much louder than the other.
4. Keep this project open for the next lesson.
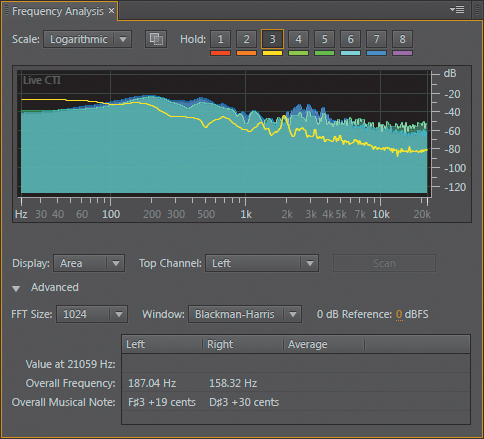
Frequency analysis
You can see which frequencies are most prominent in an audio file or selection, as well as freeze the frequency analysis graph at specific times during file playback. Frequency analysis can help show if there are “rogue” peaks, excessive bass or treble, and the like.
1. Click the Frequency Analysis tab. If necessary, resize the panel to see the entire frequency response graph.
2. Choose Logarithmic from the Scale drop-down menu, because this most closely approximates how the human ear responds to frequencies.
3. Start playback, and you’ll see the amplitude of various frequencies change as the file plays. To “freeze” (hold) the response at a specific part of the file, click one of the eight Hold buttons. Each held response will have a different color.
4. Choose File > Close All, and then select No to All in preparation for the next lesson.
Loudness metering
Audition incorporates a version of TC Electronic’s ITU Loudness Radar, a plug-in that indicates peak and average loudness levels, as well as whether the levels conform to specific broadcast regulations. Explaining conformance to international broadcast regulations is beyond the scope of this book, but TC maintains the “Loudness Authority” website at www.tcelectronic.com/loudness, which offers a wealth of information on this topic.
The following describes how to use the ITU Loudness Radar plug-in from a general standpoint.
1. With Audition still open to the Waveform Editor from the previous lesson, choose Window > Workspace > Reset “Mastering and Analysis.”
2. Choose File > Open, navigate to the Lesson06 folder, and open the file EthnoWorld5.wav.
3. Click the Effects Rack tab, click insert 2’s right arrow, and choose Special > Loudness Radar Meter. Choose the Radar Meter’s CD Master preset from the Presets drop-down menu, and then start playback.
4. The outer dotted ring indicates the momentary loudness, like a standard level meter. As the “radar” follows the song over time, the concentric rings farther away from the center indicate louder signals. The Loudness Range (LRA) statistic describes the overall program material range, from softest to loudest; however, to exclude extreme levels from the overall result, the top 5% and lowest 10% of the total loudness range aren’t included in the LRA measurement. For more information on the ITU Loudness Radar’s statistics, refer to the website referenced at the beginning of this section.
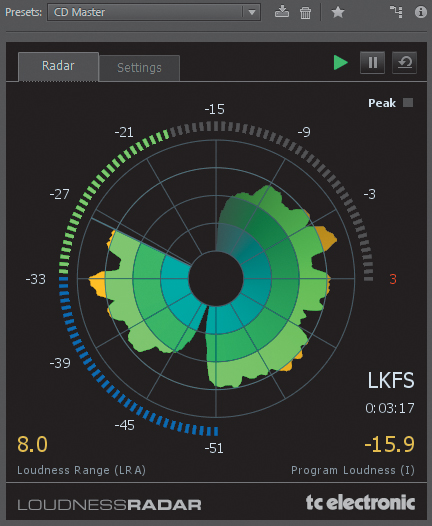
![]() Note
Note
The default radar rotation is 4 minutes. To change this, click the Settings tab, and then choose a different Radar Speed from the drop-down menu.
5. To see how changing dynamics alters the Radar display, click the Effects Rack tab, click insert 1’s right arrow, and choose Amplitude and Compression > Hard Limiter.
6. Reset the ITU Loudness Radar by clicking its Resets Measurement button toward the window’s upper right.
7. Start playback, and move the Hard Limiter’s Input Boost control to around +6dB. Note how most of the signal now hits the outer concentric band, and the Peak indicator lights up occasionally.
Review questions
1. At what stage of the music production process does mastering occur?
2. Does mastering only involve optimizing individual tracks?
3. What are the most essential processors used in mastering?
4. Is adding ambience recommended when mastering?
5. What is the main disadvantage of excessive dynamics compression?
Review answers
1. Mastering occurs after mixing but before music distribution.
2. With album projects, mastering also sequences the songs in the correct order and aims for sonic consistency from track to track.
3. Typically, EQ and dynamics processors are the main effects used in the mastering process.
4. No. Normally, ambience is added during the mixing process but can sometimes improve the sound when added while mastering.
5. The main disadvantage is a lack of dynamics, which can lead to listener fatigue because there are no significant variations between loud and soft passages.