
14. Automation
Lesson overview
In this lesson, you’ll learn how to do the following:
• Automate volume, pan, and effect changes within clips by using automation envelopes
• Use keyframes to edit automation envelopes with a high degree of precision
• Use spline curves to smooth automation envelopes
• Show/hide clip envelopes
• Automate Mixer fader and Pan control moves
• Create and edit envelopes in the Multitrack Editor automation Lanes
• Protect envelopes from accidental overwriting
This lesson will take about 60 minutes to complete. Download the project files for this lesson from the Lesson & Update Files tab on your Account page at www.peachpit.com and store them on your computer in a convenient location, as described in the Getting Started section of this book. Your Accounts page is also where you’ll find any updates to the chapters or to the lesson files. Look on the Lesson & Update Files tab to access the most current content.
Audition can retain parameter changes you make in a Multitrack Session and store those changes as part of the Session file—whether those changes are performed in real time as control movements or created/edited in non-real time. These automation processes can apply to individual clips or complete tracks.
About automation
Automation records the control changes you make while mixing, including track parameters and effects. Before automation existed, if during mixdown you forgot to mute one channel at the right time or alter a mixer channel’s volume when needed, you usually needed to start the mix from scratch. With automation, not only can you record your mixing “moves,” you can edit them. For example, if a mix is perfect except that you didn’t mute a track in time, simply add the mute where needed.
![]() Note
Note
If you have not already downloaded the project files for this lesson to your computer from your Account page, make sure to do so now. See “Getting Started” at the beginning of the book.
Audition offers two types of automation in the Multitrack Editor: clip automation and track automation. The Waveform Editor does not support automation.
Automation can be recorded during recording or during playback; it is not necessary to put a track into record mode to record automation moves. These moves are recorded as envelopes, which are lines—superimposed on a clip or track—that graphically indicate the value of the parameter being automated over time. There are multiple ways to create and edit envelopes, as you’ll see in this chapter.
Clip automation
Every clip includes two default envelopes—one for controlling volume and the other for pan. You can manipulate these envelopes to create automation within a clip. Later in this chapter, you’ll learn how to automate clip effect envelopes as well.
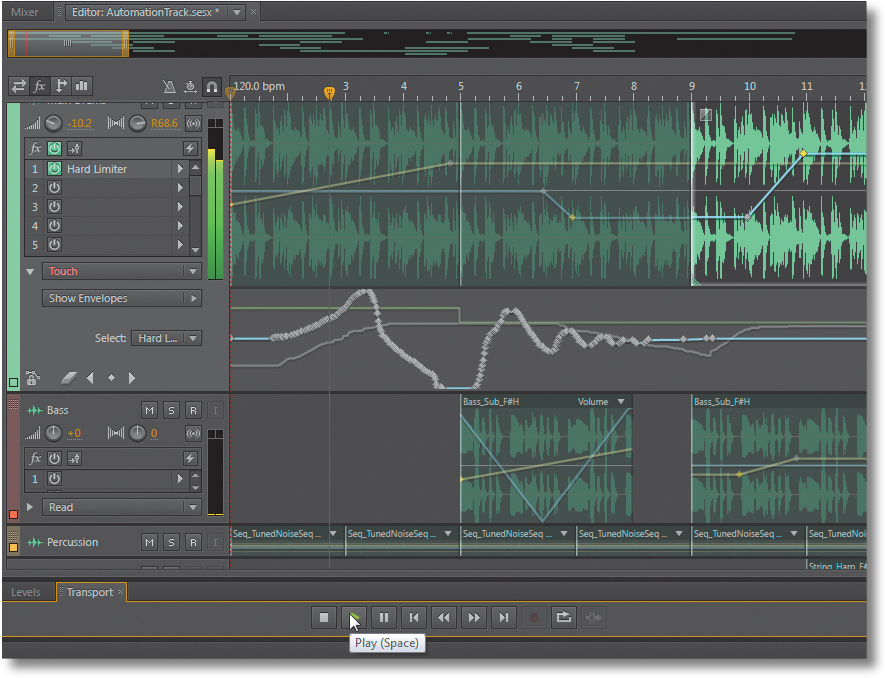
1. With Audition open, navigate to the Lesson14 folder, and open the Multitrack Session named AutomationClip.sesx. Then right-click (Control-click) in the timeline, and choose Time Display > Bars and Beats.
2. You’ll add a volume fade-in to the first clip in the Main Drums track. For easy viewing of the envelope, extend the track height and zoom in so the clip fills much of the window.
3. Note the yellow Volume envelope (currently a straight line) in the clip’s upper half and the blue Pan envelope that marks the clip’s middle. Click on the Volume envelope, and while holding down the mouse button, drag down. The tooltip shows how much the gain is being reduced; this acts like a Volume control, because you’re changing volume for the entire clip. Because the object is to create a fade-in, drag back up so the tooltip shows a level of +0.0dB.
4. You can add control points called keyframes along the envelope to change the line’s shape. Click once on the Volume envelope around 3:1. This places a keyframe on the envelope. Click on the envelope again around 1:3 to create a second keyframe.
![]() Note
Note
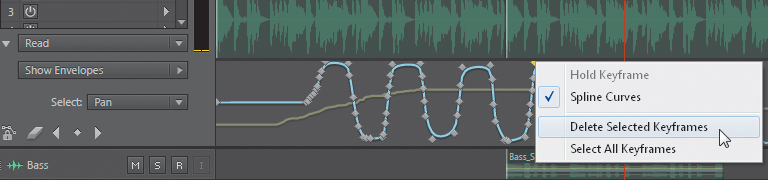
If you create a keyframe accidentally or want to remove a keyframe, click on it to select it and press Delete, or right-click (Control-click) on it and choose Delete Selected Keyframes. If multiple keyframes were selected via Ctrl-click (Command-click) or by selecting a string of keyframes by clicking at one end of the string and Shift-clicking at the other end of the string, deleting one keyframe will delete all selected keyframes.
5. Click on the second keyframe you made at 1:3, and drag it down and to the left so it’s at the clip beginning and shows a volume of around -14dB.
![]() Tip
Tip
Hover the cursor over a keyframe to see a tooltip with the keyframe’s parameter value.
6. Start playback from the beginning of the song, and you’ll hear the drums fade in.
7. Suppose you want the music to fade in a little faster but not reach full volume until 3:1. Click on the line between the first and second keyframes, and then drag to around -3.6dB at 1:4. Click Play, and you’ll hear that the fade-in is a little faster at first and then fades in at a slower rate.
8. Now pan this clip so it starts in the left channel, moves to the right channel, and then ends up centered. Click on the blue Pan envelope at 4:2 to add a keyframe. This will be where the panning returns to center.
9. Click on the Pan envelope around 2:4, and drag all the way down so the tooltip shows R100.0.
10. Click toward the beginning of the Pan envelope, and drag all the way up and to the left until the tooltip shows L100.0.
11. Click Play, and you’ll hear the sound pan.
12. Make the pan a little more complex: Click on the Pan envelope around 3:3, and drag this new keyframe all the way up. Click Play, and you’ll hear the sound move from left to right, back to left, and then end up in the center.
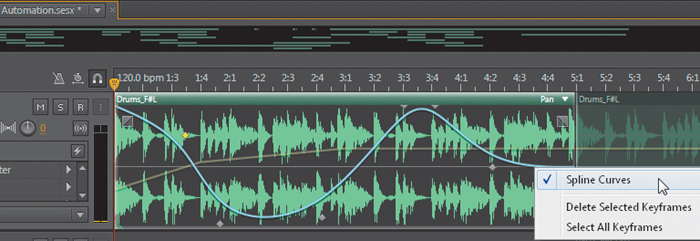
13. The panning transitions seem a little abrupt because the lines change angles sharply at each keyframe. To change these angles into smooth curves, right-click (Control-click) anywhere on the envelope and choose Spline Curves. Now the envelope becomes similar to a “rubber band,” which allows you to click and drag to create any kind of curved shape you want.
14. Keep this project open for the next lesson.
Move parts of an envelope or an entire envelope
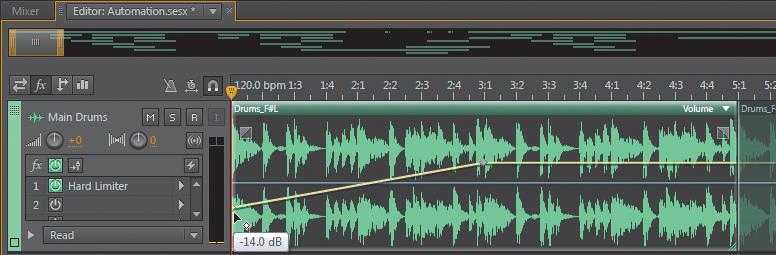
You’ve already learned that you can click on a single keyframe and move it around. However, you can select multiple keyframes and move them around as a group. For example, suppose you like the shape of the fade-in you created for the drums but want to raise the level of the entire envelope so that it makes for a slightly louder introduction before more clips start playing. Here’s how to do it.
1. Right-click (Control-click) on the Volume envelope you created in the first Main Drums clip to select it for editing.
2. Right-click (Control-click) on the envelope or an envelope keyframe, and choose Select All Keyframes.
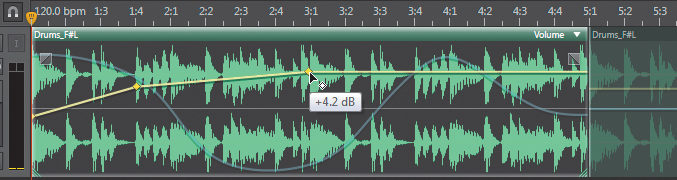
3. Click on any keyframe, and drag up so the tooltip shows approximately +4dB more than its original value. All the other keyframes move simultaneously.
![]() Tip
Tip
If you click on a Volume or Pan envelope to select it, you’ll place a keyframe on the envelope. To select the envelope without adding a keyframe, right-click (Control-click) on it.
4. You can also select particular keyframes and have them move together as a group. Click the clip outside of the Volume envelope to deselect all keyframes.
![]() Tip
Tip
To select a string of keyframes, click on the leftmost one, and then Shift-click on the rightmost one. Those keyframes and all keyframes in between are selected.
5. Click on the leftmost keyframe (the one at the beginning of the clip) to select it, and then Ctrl-click (Command-click) the second keyframe from the left (the one at 2:1).
6. Click on the first selected keyframe, and drag up until the second selected keyframe reaches the top of the clip (you could click on either keyframe, but choosing the first one allows you to learn an additional characteristic of moving keyframe groups). The line defined by the two keyframes will move, and the nonselected keyframe to the right will remain “anchored.”
7. Keep moving the first keyframe up. Note that the second keyframe remains “stuck” at the top; however, it “remembers” its original position. Drag the first keyframe back down again to where it started (around -7.5dB), and the second keyframe will return to its original position.
![]() Note
Note
When you move a keyframe up or down within a clip, you cannot move it any farther than the clip’s upper and lower limits. When moving a group of keyframes left or right, you can’t move the group farther than the leftmost keyframe allows or farther than the rightmost keyframe allows.
8. Leave this project open for the next lesson.
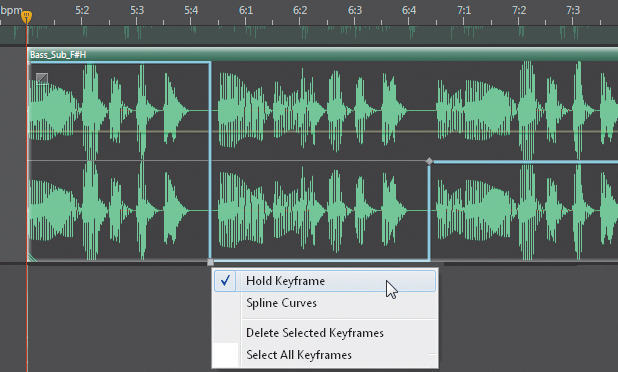
Keyframe hold
The Hold Keyframe option keeps an envelope at the current value set by the keyframe until the next keyframe, at which point the envelope jumps instantly to the next value. Here’s how to use this effect to create abrupt panning changes.
1. Locate the first clip in the second track (Bass), and zoom in so you can easily see the clip and its automation envelopes.
2. Click on the Pan envelope just before the note that starts after 6:4 to create a keyframe.
3. Click on the Pan envelope just before the note that starts after 5:4 to create a keyframe, and then drag it all the way down.
4. Click on the Pan envelope toward the left of the envelope, and then drag the keyframe to the upper-left corner.
5. Hover the cursor over the leftmost keyframe until you see the tooltip, which means you’re hovering directly over the keyframe. Right-click (Control-click), and choose Hold Keyframe.
![]() Note
Note
A Hold Keyframe has a square shape, whereas a standard keyframe has a diamond shape.
6. Similarly, hover over the next keyframe to the right, right-click (Control-click) on it, and choose Hold Keyframe. The envelope now makes sharp, right-angle turns as the envelope jumps to the next value.
7. Leave this project open for the next lesson.
Clip effects automation
In addition to volume and pan, you can automate the parameters of clip effects within the clip (see Chapter 11 for more information about clip effects).
1. Rather than working with the clip you just used to learn about Volume and Pan envelopes, you’ll use a different clip to learn about clip effects automation. Locate the clip in the Main Drums track that begins around 9:1 and select it.
2. In the Effects Rack, click the Clip Effects tab. You’ll add a wah effect by using EQ.
3. In the first insert, click the right arrow, and choose Filter and EQ > Parametric Equalizer. Choose Default from the Presets menu.
4. Turn off all bands except band 2. Set its gain to around 20dB and Q to around 12.
5. Click the triangle in the clip’s upper right, and choose Parametric Equalizer > EQ Band 2 Center Frequency. This specifies the automation envelope that will be added to the clip.

6. An envelope appears and a small fx icon appears along the bottom of the clip. Click toward each end of the envelope to add two keyframes.
7. Drag the left keyframe to the lower left until the tooltip indicates a frequency of around 130Hz. You may need to extend the track height to obtain the necessary resolution.
8. Drag the right keyframe to the upper right until the tooltip indicates a frequency of around 4000Hz.
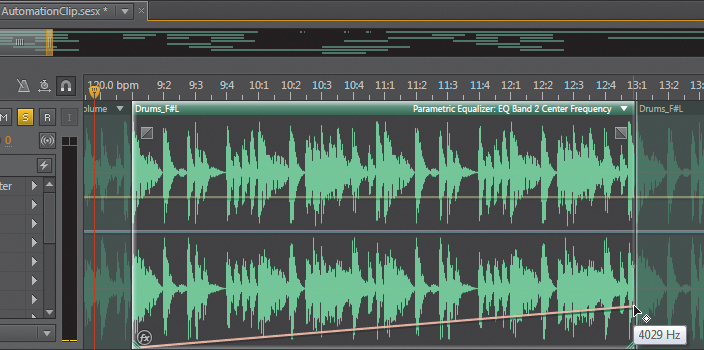
9. Place the playhead before the clip starts, and then click Play. You’ll hear a filtering effect that goes from low to high over the course of the clip. You may want to click the track’s Solo button so you can focus in on hearing the effect; keep the effect’s window open if you want to see the parameter change in real time.
![]() Note
Note
When you select an automation envelope in a clip, the upper right of the clip header displays the name of the parameter it controls.
10. Leave this project open for the next lesson.
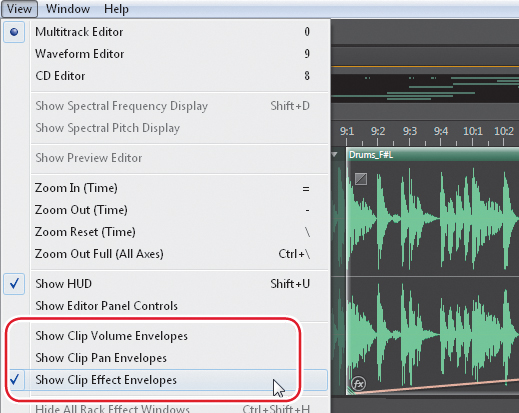
Show/hide clip envelopes
If you have lots of envelopes in a clip, the view can become cluttered. However, you can show and hide particular envelope types. Note that this changes the view for all clips in the project, not just a selected clip.
1. Choose the View menu.
2. Choose the envelopes you want to see—Volume, Pan, or Effect.
3. Close the project so you can start fresh for the next lesson.
Track automation
Track automation has some similarities to clip automation but is more flexible and applies to an entire track. You can work with track automation from either the Multitrack Editor or Mixer view.
For individual tracks, you can automate:
• Volume
• Mute
• Pan
• Track EQ (including all EQ parameters—frequency, gain, Q, and so on)
• Rack Output level
• Rack Mix (crossfades between the dry sound and the sound processed by the Effects Rack)
• Rack Power
• Most plug-in parameters, including VST and AU-format plug-ins. (For example, you could automate delay so that the delay feedback increases over a certain number of measures and then decreases.)
There are three main ways to work with track automation:
• Move onscreen controls in real time and record the control motions as envelopes.
• Create an envelope, and then add keyframes to create an envelope shape.
• Combine the two—create the envelope with control motion, and then edit it by adding, moving, or deleting keyframes.
Automating fader mixes
In addition to automating using keyframes, you can also take a more “hands-on” approach by automating mixing moves you make with the Mixer faders.
1. Open Audition, navigate to the Lesson14 folder, and open the Multitrack Session named AutomationTrack.sesx. The Default Workspace is recommended; reset to this workspace if needed.
With most of the steps in this lesson, you’ll want to start the file from the beginning after stopping playback.
2. To start file playback from the beginning, position the playhead at the beginning of the file, and then right-click (Control-click) on the Transport Play button and choose Return Playhead to Start Position on Stop.
3. Click the Mixer tab.
4. Click the Main Drums track’s fader automation drop-down menu and choose Write.
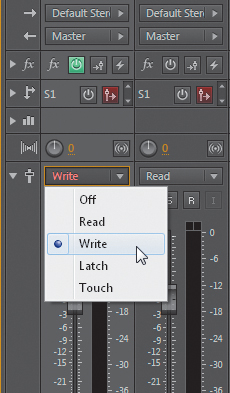
5. Start with the fader for Track 1 (Main Drums) at around -18dB, because you’ll fade the level up.
6. Start playback from the file beginning. As the file plays, bring up the fader to around 0. Let the file play for several seconds, and then fade the drums out all the way.
7. Stop playback. Note that the Main Drums automation drop-down menu option changes automatically from Write to Touch. As you’ll see, this makes it convenient to fine-tune your fader moves.
8. Start playback, and the fader re-creates the fader moves you made. After the fader fades out, stop playback.
![]() Note
Note
In Touch mode, any existing automation remains as is until you “touch” the fader (i.e., click on it) and move it. Then the new fader moves take over for as long as you hold down the mouse button. When you release the mouse button, the automation returns to any previous automation data.
9. Suppose you decide that fading out all the way wasn’t a great idea, and once the level starts fading out, you want the drums to fade back in again. You can always write new automation, but it’s easier just to “punch in” with the new automation move by using Touch mode. Start playback, grab the fader partway through the fadeout, and then fade back up to 0. Let the file play for a few seconds, and then release the mouse and stop playback. The fader returns to 0, because that was the automation data prior to adding the new automation moves.
![]() Note
Note
Another automation drop-down menu, Latch, is identical to Touch except that when you release the mouse button from a control, the automation data does not revert to any previous automation. Instead, the automation envelope stays on the control setting that existed when you released the mouse button.
10. You can also automate panning. With the automation drop-down menu set to either Touch or Write, start playback and move the Pan control. Panning back and forth rhythmically will provide plenty of data to work with. When you’ve done at least several measures of panning moves, stop playback.
11. Now automate an effect. Expand the fx section by clicking its disclosure triangle.
12. In the Percussion channel’s automation drop-down menu, choose Write.
13. In the Percussion track’s fx area, double-click on the Echo insert to bring up its interface so you can modify its controls. Locate the 1.4k slider in the Echo effect’s Successive Echo Equalization area; that’s the one you’ll be altering.
14. Start playback from the file beginning, and move the 1.4k fader up to around 5dB.
15. The echo sound will start feeding back after a few seconds. Before it gets too out of control, pull the fader down to around -5dB to reduce the amount of echo feedback. Stop playback.
![]() Tip
Tip
You cannot automate the power state of individual effects in a track’s Effects Rack, but you can automate the track Effects Rack’s master power state. Turning this off when not in use saves CPU power.
16. Start playback, and you’ll see the 1.4k slider re-create your mixing moves. When the mixing moves end, stop playback.
17. When you’re finished making automation moves, change the automation drop-down menus for the Main Drums and Percussion channels to Read. This will prevent accidental erasures or edits (Off ignores any automation data).
![]() Note
Note
You can also automate Send level, pan, and power state. You cannot automate the Send Pre-Fader/Post-Fader button.
18. Keep this project open in preparation for the next lesson.
Editing envelopes
Although you can edit automation by using the Touch, Latch, and Write modes to make real-time edits, these automation moves also create envelopes that you can access and edit in the Multitrack Editor, similarly to how you edit clip envelopes.
1. Click the Editor tab to leave the Mixer.
2. Expand the Main Drums track height until you see the automation drop-down menu (which should show Read).
3. Click the disclosure triangle to the left of the automation drop-down menu to view the automation envelope Lanes.
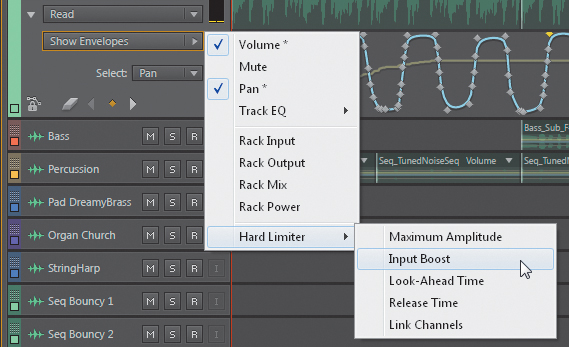
4. If you use lots of envelopes, showing them all simultaneously can clutter up a Lane. As a result, Audition lets you specify which envelopes you want to see in the automation envelope Lane. Click the Show Envelopes drop-down menu, and choose the automation envelopes you want shown. Because you recorded both Volume and Pan automation, choose those.
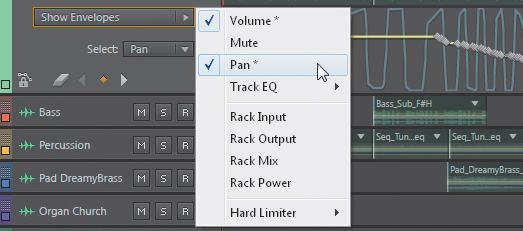
![]() Tip
Tip
If you’re interested in editing automation only for a particular parameter, usually it’s best to show only that envelope. However, sometimes two parameters are interrelated, and you’ll want to edit one envelope while referencing changes in another envelope. In these situations, being able to show multiple envelopes is ideal.
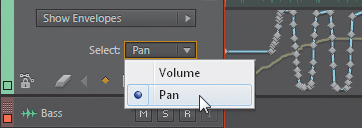
5. If multiple envelopes are visible, seeing all those keyframes in multiple envelopes can sometimes be confusing. Therefore, Audition lets you choose which envelope to edit (you can still see the other envelopes you’ve chosen to show, but you can’t edit them). Choose the envelope you want to edit in the Select drop-down menu. The chosen envelope will be highlighted, and the other envelopes will be dimmed.
Keyframes in track envelopes work exactly as they do in clip envelopes. For example, suppose your panning envelope doesn’t look smooth enough but more like an on-off switch. You can fix this with spline curves.
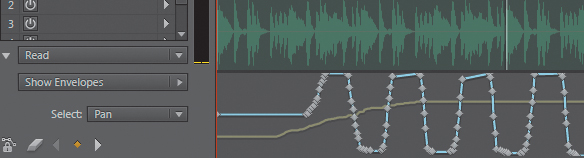
6. Choose Spline Curves by right-clicking (Control-clicking) on the envelope and choosing Spline Curves from the context menu, as you did with Clip Automation, and curves will form between the keyframes instead of straight lines. You can also delete selected keyframes to “thin out” the curve, either by clicking on them and pressing Delete, or by right-clicking (Control-clicking) on a keyframe (or a selected number of keyframes) and choosing Delete Selected Keyframes.
Creating envelopes in the automation Lane
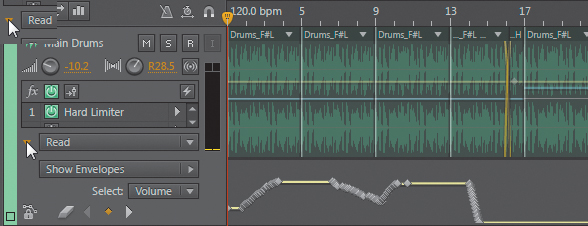
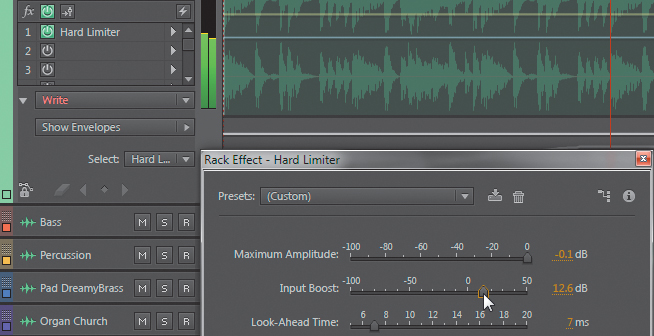
In addition to editing existing envelopes, you can also create and edit track envelopes, as you did with clip envelopes. In this lesson, you’ll create a precise, hard-limiting change to make the drums beefier when they first start playing, and then dial back on the beefiness when the bass starts.
1. Click the Main Drums track’s Show Envelopes drop-down menu, and choose Hard Limiter > Input Boost. As soon as you choose a new envelope, it’s automatically selected (you don’t have to use the Select drop-down menu), highlighted in the automation Lane, and set to whatever its current value is in the effect. The default Input Boost for the Hard Limiter is 0.0dB (no boost).
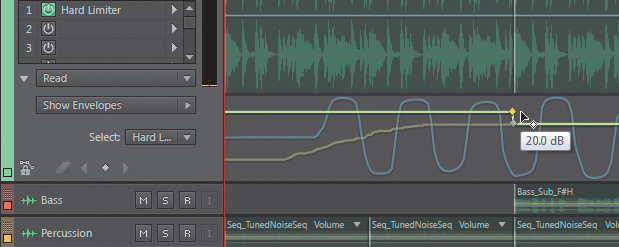
2. Because you don’t want any boost when the bass starts playing (at measure 5:1), click on the Input Boost envelope at 5:1. This places an envelope keyframe at 0.0dB.
3. Click on the envelope to the left of the keyframe you just added. Drag it up to around 20dB, and position it just before the keyframe that reduces the Input Boost.
4. Start playback from the beginning, and listen to how this processing affects the sound.
5. Keep this project open for the next lesson.
Precision keyframe editing
In some cases, you might want to do precise keyframe editing. Selecting and deleting can become tedious, so Audition includes four keyframe editing tools.
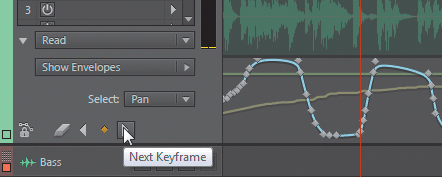
1. Select the Pan envelope, which presumably has multiple keyframes.
2. Click the Next Keyframe button, and the playhead will move right from its current position to the next keyframe.
3. Click the Add/Remove Keyframe button (the diamond icon to the immediate left of the Next Keyframe button) to delete the keyframe. If the playhead was not on a keyframe, clicking this button would add a keyframe.
4. The Previous Keyframe button (left-arrow icon) to the immediate left of the Add/Remove Keyframe button steps through keyframes from right to left. Click this button a few times to see how the playhead moves.
5. Click the Clear All Keyframes button (the eraser icon) to delete all keyframes for the selected envelope.
6. Keep this project open for the next lesson.
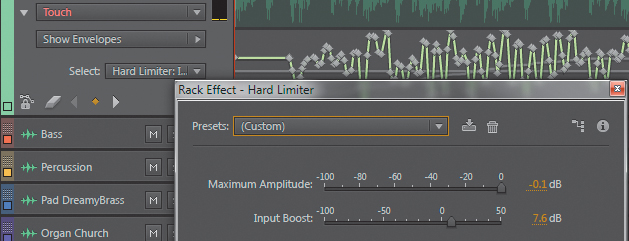
Protecting automation envelopes
When you’re doing lots of complex automation, you want to avoid accidentally writing new automation where it’s not intended or overwriting existing automation (it can happen!). You can protect an envelope from these kinds of unintentional mistakes with a write-protect feature.
1. Click the Protection button (the lock icon). The envelope dims to show it’s protected, even if it’s selected. Note that you can still edit it via the automation Lane when it’s protected.

2. In the Main Drums track, with the Hard Limiter Input Boost envelope still selected, choose Write from the automation drop-down menu.
3. Double-click on the Effects Rack’s Hard Limiter insert to open its user interface window.
4. Make sure the playhead is at the beginning of the file, and then start playback.
5. Move the Hard Limiter’s Input Boost control back and forth. Stop playback; note that no change has been made to the envelope.
6. Turn off the Protection button, start playback, and then vary the Hard Limiter Input Boost control again.
7. Stop playback. Note that the Hard Limiter Input Boost envelope has been overwritten.
Review questions
1. Is there any parameter you can automate in tracks that you can’t automate in clips?
2. What is a keyframe?
3. What is an automation Lane?
4. What is the difference between Touch and Latch mode for writing automation?
5. How does Audition prevent accidental editing of the wrong envelope?
Review answers
1. Clips cannot automate mutes.
2. A keyframe is a point on an automation envelope that represents a particular parameter value.
3. A Lane is part of the Multitrack Editor where you can create and edit envelopes for a track. Every track has a corresponding Lane.
4. After releasing a control in Touch mode, from that point on the automation returns to any previously written automation. After releasing a control in Latch mode, the automation envelope retains the last control value prior to releasing it.
5. Only the selected envelope can be edited, even though other envelopes are visible. You can also use the Protection button to prevent overwriting automation moves when recording automation.