
16. Audio/Video Applications
Lesson overview
In this lesson, you’ll learn how to do the following:
• Load a video preview file into Audition
• Synchronize ADR (dubbed) dialogue with original dialogue
• Evaluate which type of dialogue synchronization provides the best audio quality
• Edit Adobe Premiere Pro audio files in Audition
• Export a multitrack project’s tracks to Adobe Premiere Pro
• Link a multitrack project to Adobe Premiere Pro so that edits in the Audition project are reflected in Adobe Premiere Pro
This lesson will take about 60 minutes to complete. Download the project files for this lesson from the Lesson & Update Files tab on your Account page at www.peachpit.com and store them on your computer in a convenient location, as described in the Getting Started section of this book. Your Accounts page is also where you’ll find any updates to the chapters or to the lesson files. Look on the Lesson & Update Files tab to access the most current content.
Audition and Adobe Premiere Pro can work together using the Adobe Dynamic Link so that clips from Adobe Premiere Pro can be edited in Audition, and multitrack projects can be transferred back to Adobe Premiere Pro and updated in the sequence.
Importing a video
When you’re working with video, Audition can create a separate video preview track at the top of the workspace. If you import video that also includes an audio track, the audio will likewise be imported into Audition and placed in the audio track immediately below the video track.
![]() Note
Note
If you have not already downloaded the project files for this lesson to your computer from your Account page, make sure to do so now. See “Getting Started” at the beginning of the book.
1. Open Audition, and choose File > New > Multitrack Session.
2. Name the file Audio for Video. Choose None for Template, 44100Hz for Sample Rate, 16 for Bits, and Stereo for Master. Click OK.
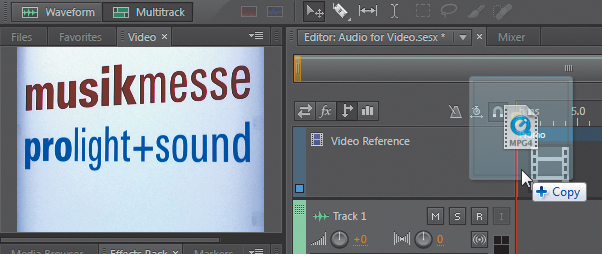
3. Open the Lesson16 folder, and then open the folder Audio for Video Files and drag the file Promo.mp4 into the beginning of Track 1. This creates a video track automatically, as well as opens a Video panel where you can see the video. You may want, or need, to resize the Video panel to see the entire video. (Note: The video file is provided courtesy of HarmonyCentral.com.)
![]() Note
Note
Audition can recognize almost any type of common video format, but Audition is not a video editor and cannot edit the preview video. Any video edits need to be done in a program like Adobe Premiere Pro prior to loading the file into Audition. However, a video’s start point can be moved within the video track.
4. Choose File > Close All, and select No To All.
![]() Tip
Tip
You can right-click (Control-click) in the Video panel and choose five different scaling options and three different resolutions. Best Fit Scaling is usually the optimal choice, because the video size will conform to the size of the panel.
Automatic Speech Alignment
Automatic Speech Alignment is very important when you’re processing dialogue in movies. Dialogue that’s recorded on location is often subject to noise, an inability to get actors close enough to the microphone without the mic appearing in the picture, and other issues. As a result, the actors will come in after the shoot and dub new parts. This process is also called looping or ADR (Automated Dialogue Replacement).
ADR is not easy to do. The actor typically listens to the original part on headphones in a recording studio (as opposed to being on location) and tries to match the original speech as closely as possible. Sometimes actors do ADR even if it’s not absolutely necessary, because they want to add a different emotional inflection than what they originally used while shooting the scene.
Audition’s Automatic Speech Alignment feature automates this process. You load the original reference dialogue (which can even be relatively noisy) into an Audition track, and then record the new dialogue into a second track. Audition can then compare the new dialogue to the original and use a combination of stretching and alignment processes to match the new dialogue to the reference track.
1. Navigate to the Lesson16 folder, and open the Multitrack Session named Vocal Alignment.sesx from the Vocal Alignment folder.
2. Initiate playback to hear the Session’s two tracks, OriginalVocal and ADRVocal. ADRVocal is out of time with the original vocal track; you can use the ADRVocal track to experiment with the Automatic Speech Alignment feature, but it’s instructive to record your own dialogue and try to match the OriginalVocal track.
3. Mute the ADRVocal track, and while listening to the OriginalVocal track on headphones, record a new vocal track where you’ll try to match the OriginalVocal phrasing as closely as possible. If you decide to create your own ADR track, the B-movie-type dialogue is “Helen said she thought she’d found Tesla’s lab notes on wireless power transmission, and if she did, that would explain her disappearance. She would instantly be targeted as one of the most wanted people on this planet.”
![]() Note
Note
The ADRVocal clip supplied with this project is deliberately way out of sync with the original dialogue so you can hear how Automatic Speech Alignment affects the sound quality of the dialogue when it has to do lots of correction.
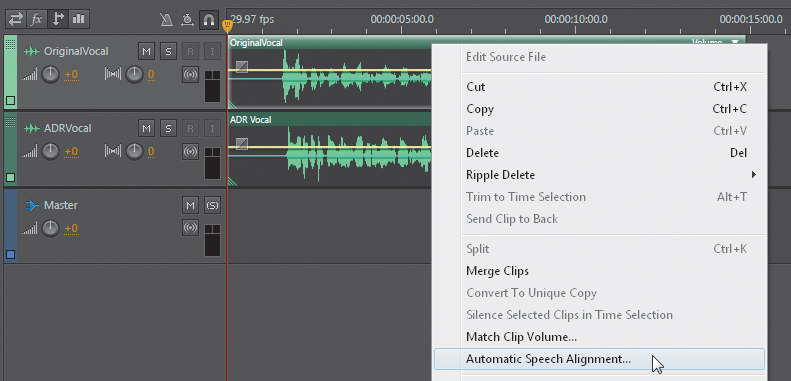
4. You now have two tracks to align, using either the one supplied with the lesson or one you created. If you recorded a vocal, trim the new clip to the same length as the OriginalVocal track. Select the Move tool, and draw a marquee to select both tracks.
5. Right-click (Control-click) the OriginalVocal clip that will serve as the reference to which the other clip should be aligned, and choose Automatic Speech Alignment.
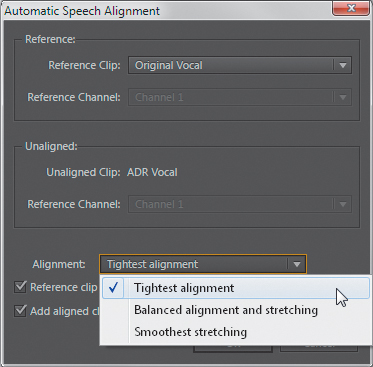
6. A dialog box appears. For the Reference Clip, if needed, choose the clip to which you want the new dialogue aligned (in this project, OriginalVocal). There are three Alignment options; you’ll try all three, so start with Tightest Alignment. Select the “Reference clip is noisy” check box because in this case, it is; also select the “Add aligned clip to new track” check box to allow for easy comparison. Click OK.
7. The aligned track appears below the reference track. Solo the OriginalVocal and ADRVocal tracks (or OriginalVocal and the ADR track you recorded), and then play them back together so you can hear the differences between the two.
8. Now solo the OriginalVocal track and the new, aligned track. You’ll hear far fewer differences.
9. Click on the OriginalVocal clip, and then Ctrl-click (Command-click) on the ADRVocal track. Repeat steps 4 and 5, but this time choose “Balanced alignment and stretching” in the alignment drop-down menu. Click OK.
10. Repeat step 8, but this time choose “Smoothest stretching” in the alignment drop-down menu. Click OK.
11. You now have three clips with the suffix “Aligned.” Solo each one to hear how the three different processes affect the sound quality.
![]() Note
Note
The “Smoothest stretching” option usually provides the best audio quality, yet the alignment will still be very tight. Of course, the closer the ADR vocal is to the original, the less processing the Automatic Speech Alignment needs to do, and therefore, the higher the sound quality.
Audition integration with Adobe Premiere Pro
Adobe Premiere Pro integrates with Adobe Audition in several ways, such as:
• You can edit Adobe Premiere Pro sequences and audio files in Audition.
• You can export each Audition Multitrack Session track to an Adobe Premiere Pro sequence.
• You can link an Audition multitrack project to its mixed file in Adobe Premiere Pro so that when you edit the Audition multitrack project, Adobe Premiere Pro’s mixed file can reflect those edits. You can also open the mixed file (typically a stereo mixed file) in Audition’s Waveform Editor if editing individual tracks isn’t needed.
These features make it easy to send anything from individual clips to a selected work area in Adobe Premiere Pro to Audition for restoration, mastering, or processing (“sweetening”). With individual clips, saving any edits made in Audition will automatically update the clips in Adobe Premiere Pro. Similarly, you can edit clips from Adobe After Effects.
The level of integration between Audition and Adobe Premiere Pro can smooth your workflow dramatically when you’re combining audio and video projects. Although covering all aspects of this integration is beyond the scope of this book, many tutorials, blog posts, and additional information are available on the Adobe website.
Installing Adobe Premiere Pro
The following lessons require that Adobe Premiere Pro be installed on the same computer as Audition. If Adobe Premiere Pro is not already installed, please do the following.
1. Go to www.adobe.com and download a trial version of Adobe Premiere Pro. It’s fully functional for 30 days.
2. Follow the installation instructions.
3. Launch Adobe Premiere Pro, and it will scan any existing audio plug-ins. Adobe Premiere Pro may quit when it reaches plug-ins that are not compatible. If so, launch Adobe Premiere Pro again, and it will skip the plug-in that caused it to quit. You may need to repeat this process several times if you have lots of installed plug-ins.
4. After Adobe Premiere Pro displays the main Welcome screen, it’s ready to use in the following lessons. Keep Adobe Premiere Pro open for the following lesson.
Editing Adobe Premiere Pro audio files in Audition
This lesson demonstrates how to edit an Adobe Premiere Pro clip in Audition and have that clip within an Adobe Premiere Pro project reflect these edits.
1. Click Open Project from the Welcome screen, navigate to the Lesson16 folder, and open the folder Edit in Audition. Select Edit in Audition.prproj, and then click Open (or double-click Edit in Audition.prproj).
2. Click Play, and listen to the sound track file for at least 90 seconds. The Soundtrack.wav file is too long: We need only about 32 seconds, and a better musical choice would be the section of the sound track file that starts at around 41 seconds.
![]() Note
Note
If you don’t hear anything, check your connections and audio hardware preferences.
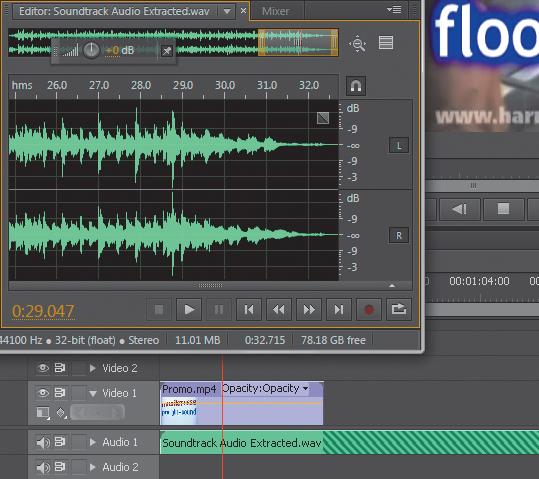
3. Right-click (Control-click) on the Soundtrack.wav clip, and choose Edit Clip in Adobe Audition. Audition opens.
4. Choose Decimal for Audition’s timeline, click at 41.500 (where we want the sound track to begin), and drag left to select everything back to the beginning.
5. Press Delete to remove the selected part of the waveform.
6. Click at 32.715, and drag right to select everything to the end. Then press Delete to remove the selected part of the waveform.
7. Create a fade-out that starts at 30 seconds, and then choose File > Save.
8. Click on Adobe Premiere Pro to bring it to the front. Start playback, and you’ll hear that the edits you made in Audition have now been transferred over to Adobe Premiere Pro.
![]() Note
Note
The deleted section of the original Soundtrack.wav file is now crosshatched, indicating that there is no longer audio in that section.
9. Close Adobe Premiere Pro and Audition without saving any changes, so that neither is open at the start of the next lesson.
Exporting a multitrack project’s tracks to Adobe Premiere Pro
You can export each track of an Audition multitrack project into its own audio track within Adobe Premiere Pro.
1. Open Adobe Premiere Pro. Click Open Project from the Welcome screen, navigate to the Lesson16 folder, and open the folder Export Multitrack. Click ExportMultitrack.prproj, and then click Open.
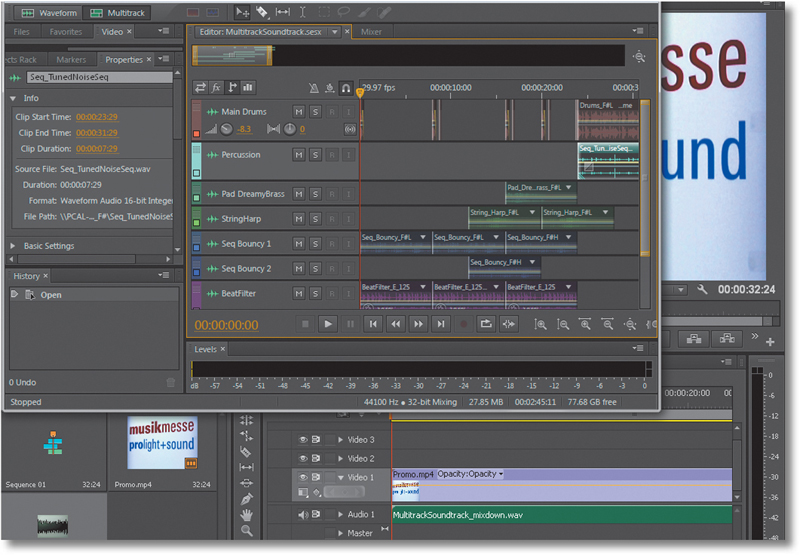
2. Open Audition. Choose File > Open, navigate to the Lesson16 folder, and if necessary, open the folder Export Multitrack. Click MultitrackSoundtrack.sesx, and then click Open.
3. In Audition, choose Multitrack > Export to Adobe Premiere Pro. Retain the existing default filename. For Options, choose Export Each Track as Stem, and select Open in Adobe Premiere Pro. For location, if necessary browse to the Export Multitrack folder in Lesson16 and open it; then click Save. Click Export.
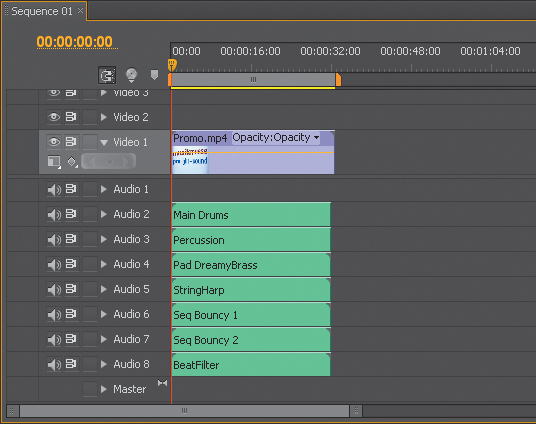
4. When the Copy to Active Sequence appears, click OK. All the Audition tracks now appear as separate tracks within Adobe Premiere Pro, starting with the track named Audio 2.
![]() Note
Note
If you prefer to have the tracks start at track Audio 1, select Audio 1 from the Copy to Active Sequence drop-down menu.
5. In Adobe Premiere Pro, start playback. Note that the levels are a bit “hot” and the Output meter is going into the red. Click Adobe Premiere Pro’s Audio Mixer: Sequence 01 tab and set all the track faders to -6.0. Start playback again; this time the master level remains undistorted.
![]() Note
Note
Once tracks are in Adobe Premiere Pro, you can add fades, change levels, trim clips, and more. It is not necessary to do all your editing in Audition.

6. Close Adobe Premiere Pro and Audition without saving anything so that neither is open at the start of the next lesson.
Linking a multitrack project to Adobe Premiere Pro
When you’re using Adobe Dynamic Link, an Audition multitrack project’s mix appears in an Adobe Premiere Pro Audio Track. Any changes you make to the mix within Audition can be sent to Adobe Premiere Pro to update the existing mix. This feature is exceptionally useful when you need to make changes in a mix as an Adobe Premiere Pro project develops.
1. Open Audition. Choose File > Open Project, navigate to the Lesson16 folder, and open the folder Linking. Click MultitrackSoundtrack.sesx, and then click Open.
2. In Audition, choose Edit > Preferences > Markers & Metadata for Windows or Audition > Preferences > Markers & Metadata for Mac. Make sure that Embed Edit Original Link Data in Multitrack Mixdowns is selected, as well as Include Markers and Metadata in Recordings and Multitrack Mixdowns. Click OK.
3. Choose File > Export > Multitrack Mixdown > Entire Session. In the Export Multitrack Mixdown dialog box, retain the default filename. Make sure that Include Markers and Other Metadata is selected. For Location, browse to the Linking folder in Lesson16, select it, and click Open. Click Save.
4. Click OK to dismiss the Export Multitrack Mixdown dialog box, and then choose File > Close All.
5. Open Adobe Premiere Pro. Click Open Project from the Welcome screen, navigate to the Lesson16 folder, and open the folder Linking. Click Linking.prproj, and then click Open.
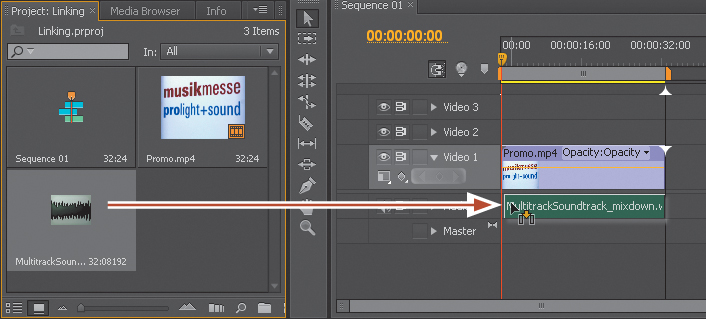
6. In Adobe Premiere Pro, choose File > Import. Navigate to the Linking folder in Lesson16, and then click MultitrackSound_Mixdown.wav. Click Open.
7. A tile opens in the Project: Linking frame. Drag and drop this tile into Sequence 01’s Audio track.
8. Start playback in Adobe Premiere Pro and listen to the mix.
9. To edit this audio mix, right-click (Control-click) on the MultitrackSoundtrack_Mixdown clip in Adobe Premiere Pro, and choose Edit Original. Select Open the Audition Multitrack Session that Created the File, and then click OK.
10. Add a fade-out starting at 29 seconds to the last Main Drums and Percussion clips; this will fade out the sound track, because they’re the only clips playing at the end.
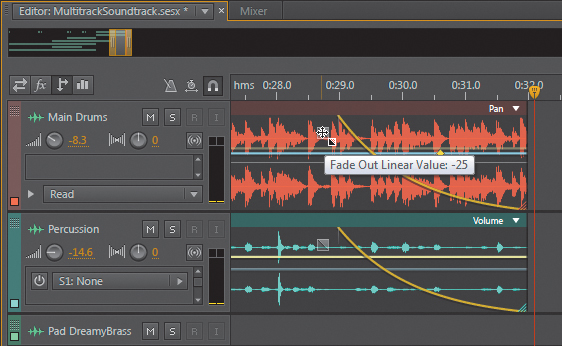
11. After adding the fades, choose File > Export > Multitrack Mixdown > Entire Session. Specify the same name and location as the original file; the defaults are likely to be correct. Click OK, and when asked if you want to overwrite the existing file, click Yes.
12. Play the project in Adobe Premiere Pro; the sound track will contain the fades you added.
![]() Note
Note
After making edits in Audition and exporting them to Adobe Premiere Pro, you cannot make additional edits and re-export without closing the project and then opening it again using the Edit Original command described in step 9.
Review questions
1. Does Audition do video editing?
2. What is ADR or looping?
3. Why is it necessary to do Automatic Speech Alignment in the Multitrack Editor instead of the Waveform Editor?
4. Are you limited to a single speech alignment process?
5. Is it possible to do extremely detailed editing in Adobe Premiere Pro?
Review answers
1. No. An imported video file is used as a preview, and Audition can add audio to the video.
2. ADR and looping are techniques that allow actors to replace low-quality dialogue in a movie with higher-quality dialogue, typically recorded in a studio instead of on location.
3. You must do Automatic Speech Alignment in the Multitrack Editor because you need to have two tracks in the Session—the original dialogue and the replacement dialogue you want to align to the original dialogue.
4. No; there are three different ways to do alignment that trade off tighter alignment for smoother vocal quality.
5. No; but thanks to integration between Adobe Premiere Pro and Audition, it’s not only possible to edit Adobe Premiere Pro audio files in Audition, but you can also export multitrack mixes to Adobe Premiere Pro.