
2. The Audition Environment
Lesson overview
In this lesson, you’ll learn how to do the following:
• Create custom workspaces for particular workflows
• Arrange panels and frames for optimum workflow
• Use the Media Browser to find files on your computer
• Listen to files before loading them using the Media Browser’s Playback Preview function
• Create shortcuts to frequently used folders
• Navigate to specific sections of a file in the Waveform Editor or a Session in the Multitrack Editor
• Use markers to create points you can jump to immediately in the Waveform Editor or a Session in the Multitrack Editor
• Use zooming to focus in on particular sections in the Waveform or Multitrack Editor
This lesson will take about 60 minutes to complete. Download the project files for this lesson from the Lesson & Update Files tab on your Account page at www.peachpit.com and store them on your computer in a convenient location, as described in the Getting Started section of this book. Your Accounts page is also where you’ll find any updates to the chapters or to the lesson files. Look on the Lesson & Update Files tab to access the most current content.
You can create custom workspaces with particular selections of windows and window arrangements, as well as choose various ways to navigate through Audition’s Waveform Editor and Multitrack Editor.
Audition’s dual personality
A unique aspect of Audition is that it combines the functionality of two programs within a single piece of software:
• A Waveform Editor that can perform highly detailed and sophisticated editing
• A Multitrack Editor for creating multitrack music productions
![]() Note
Note
If you have not already downloaded the project files for this lesson to your computer from your Account page, make sure to do so now. See “Getting Started” at the beginning of the book.
In addition, the two sections are interrelated in that audio can move freely between the two environments. Audio in the Multitrack Editor can be transferred to the Waveform Editor for detailed editing and then transferred back. Files brought into the Waveform Editor can be tweaked prior to making them the basis of a multitrack project.
Both editors have highly customizable workspaces that you can optimize for any of Audition’s uses—not just editing or multitrack productions, but also audio for video, sound library development, audio restoration, sound effects creation, and even forensics. This chapter concentrates on the Waveform Editor, but operations in the Multitrack Editor are similar, and in many cases identical.
The Audition Workspace
Audition’s Workspace, which is consistent with other Adobe video and graphics applications so you needn’t learn multiple user interfaces, consists of multiple windows. You choose which windows make up a workspace, and you can add or remove them at any time. For example, you don’t need a video window if you’re not doing an audio-for-video project, but you’ll need it if you’re creating a sound track. Or, when you’re creating a multitrack project, you may need the Media Browser open to locate files you want to use, but when mixing, you can close the Media Browser to create space for inserting other windows. You can also save a particular window setup as a workspace.
Once windows are brought into a workspace, they are arranged as frames and panels.
Frames and panels
Frames and panels are the main elements in a workspace, and you can rearrange them to suit your particular needs.
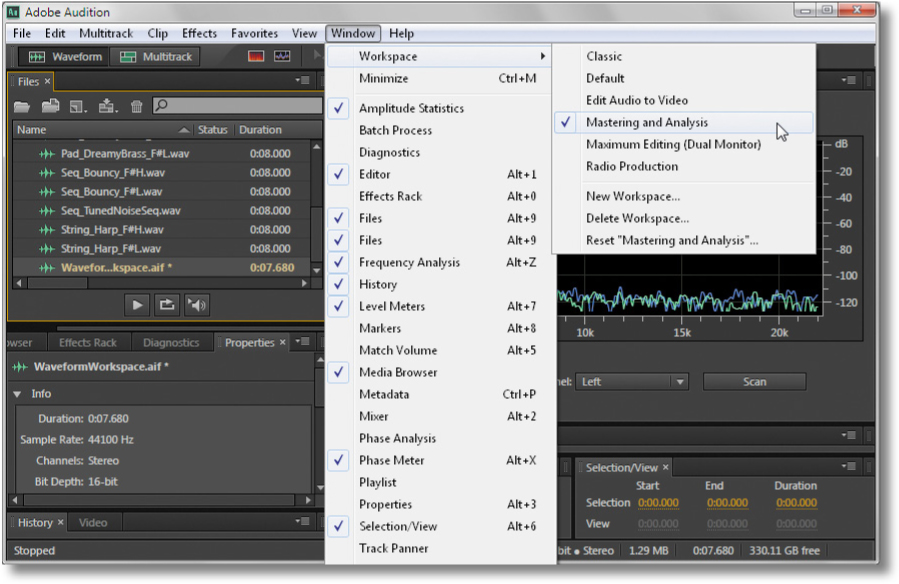
1. With Audition open, navigate to the Lesson02 folder, and open the file WaveformWorkspace.aif.
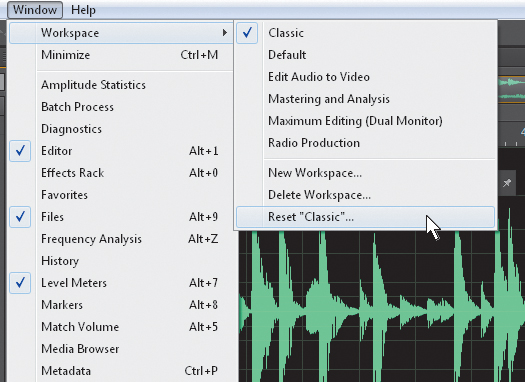
2. Choose Window > Workspace > Classic.
3. To make sure the workspace uses the stored version, choose Window > Workspace > Reset “Classic.”
![]() Note
Note
When you open Audition, it opens to the last workspace you were using. You can modify a workspace as much as you want, but always revert to the original version you created (as described later) by choosing Window > Workspace > Reset [name of workspace].
4. A dialog box asks if you want to reset Classic to its original layout. Click Yes.
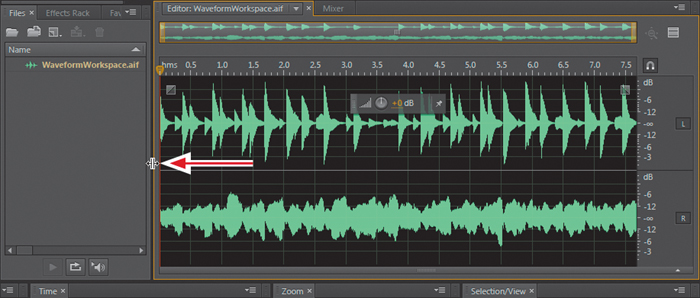
5. Click on the waveform, which is within the waveform’s Editor panel. When you click in a panel, a yellow line outlines the panel.
6. If you want to see more of the waveform’s Editor panel, click the panel’s left yellow line, and drag to the left to widen the panel.
![]() Note
Note
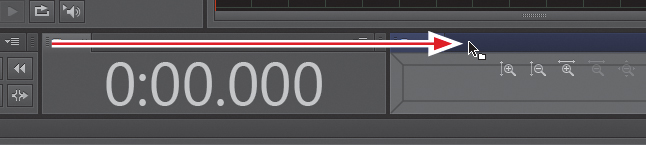
Panels can have divider lines at the top, bottom, right, and/or left. If a divider icon appears when you hover over one of these lines, you can click and drag to resize the panel. You can also resize the entire workspace by clicking on any edge and dragging.
7. Increase the panel’s height by clicking the panel’s lower line and dragging down. However, this may cause the panels below the waveform to disappear or become narrow enough to be unusable. So, return the panel’s lower line to where it was, and then start to customize the workspace.
Every panel has a tab toward the top of it. The right part of the tab has a Close box, which closes the panel (you can always reopen a panel from the Window menu if you need it later).
8. The Selection/View panel toward the lower right probably isn’t needed right now, so click its Close box to free up some more space. Note how the Zoom panel expands to take up the space.
Every panel is housed in a frame. You can save space by grouping several panels into the same frame to create a collection of panels that has tabs across the top for bringing a particular panel to the “front” of the frame.
9. Hovering the cursor over a panel’s tab highlights the tab, which means you can click the tab and drag it to change the panel’s location. Click the Time panel’s tab and drag it to the right of the Zoom panel’s tab. A strip containing this tab turns blue to indicate it is a “drop zone” where a panel can be dropped.
10. Release the mouse button; the Time and Zoom panels are now within a tabbed frame.
![]() Note
Note
With narrow frames containing multiple tabs, a tab’s Close box may not be visible. You can close tabs via a frame’s drop-down menu, which is accessible in the frame’s upper-right corner.
11. Click the Transport panel’s gripper (the section where you can click and drag a panel to move it), and drag it into the blue drop zone strip that already has the Zoom and Time tabs. Now the Zoom, Transport, and Time panels are all within a tabbed frame.
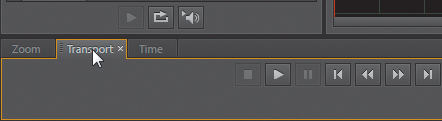
12. Click the Zoom tab, then the Time tab, and then the Transport tab. Note that the original double rows of Transport buttons are now arranged as a single row, which allows more space for increasing the Editor panel’s height.
![]() Note
Note
You can click and drag on a tab to change its position among the other tabs.
13. With the Transport tab showing, click in the Editor panel. Click its lower yellow line and drag down until the Transport panel is just high enough to show all the Transport buttons. Click the Time tab and then the Zoom tab, and note that they’ve also been resized to fit.
![]() Note
Note
There are three green drop zones on the left, right, bottom, and top edges of the Audition Workspace. These are different from the blue drop zones because anything dropped into these green drop zones will extend to the main window’s full length or height.
14. To create even more space, move the Levels panel to the left of the Audition Workspace. Click the Levels panel gripper, and drag it to the Audition Workspace’s left edge, to the left of the waveform’s Editor. Now you can drag the bottom of the Editor panel down even further.

Adding a new panel
So far, you’ve rearranged existing panels within a workspace. However, you can also add a new panel to a frame.
1. Currently, the Files, Effects Rack, and Favorites panels are in a single frame. This would be a convenient frame for placing the Media Browser panel, so add it to the frame.
2. Click a panel in this frame, like Files.
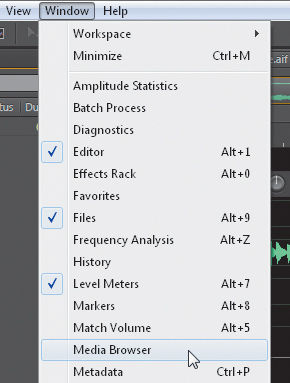
3. Choose Window > Media Browser. The Media Browser tab is added to the frame.
4. Click the right side of the Media Browser panel, and drag left to make the frame narrower. At some point, all tabs will no longer be visible. However, when this happens, Audition adds a scroll bar just above the frame.
5. Click the scroll bar and drag left and right to reveal the various tabs. Click the Effects Rack tab. The frame now shows the Effects Rack panel.

![]() Note
Note
If your mouse has a scroll wheel, you can also hover over any frame tab and scroll from tab to tab using the mouse scroll wheel.
Dragging panels and frames into panel drop zones
When you click a tab and drag a panel over another panel, blue “drop zones” appear that indicate where the panel can be dropped. There are five main drop zones.
If the panel drop zone is in the panel center, dropping a panel there is equivalent to dropping it into the bar with the tabs. However, if the panel drop zone shows a bar with beveled edges, the frame will land where the bar is and push the panel with the bar over to make room.
The frame with the Media Browser, Effects Rack, Favorites, and Files panels seems unnecessarily tall, and the space at the bottom isn’t really necessary. That might be a good place to drag the Time panel.
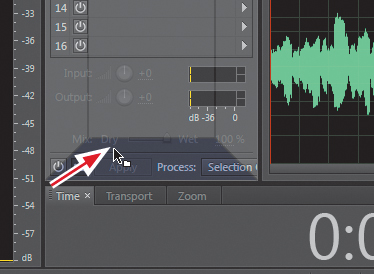
1. Click the Time panel tab, and drag it toward the Effects Rack. As it passes over the bottom of the Effects Rack panel, you’ll see a blue bar with beveled edges. Release the mouse button to reposition the Time panel.
You can also drag frames into drop zones; the frame gripper is in the frame’s upper-right corner and to the right of the Frame’s drop-down menu (described next). Suppose you decide you’d rather have the Time panel above the frame with the Media Browser, Effects Rack, and Files panels. You could drag the Time panel into the frame’s upper beveled bar, but there’s another way. Neither option is inherently superior, but you might prefer one workflow over the other.
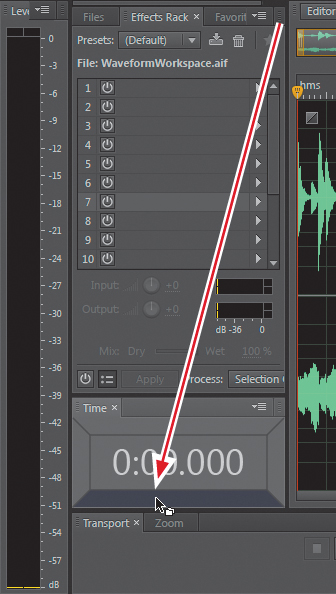
2. Click the frame’s gripper, and drag it into the Time panel’s lower bar.
The Frame drop-down menu
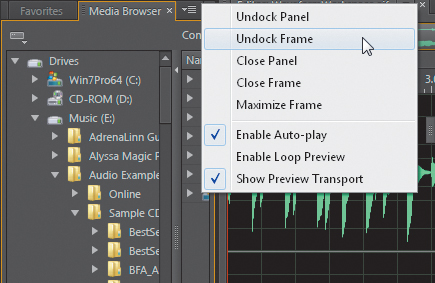
Every frame has a drop-down menu in the upper-right corner. This menu always contains at least five options:
• Undock Panel
• Undock Frame
• Close Panel (same as clicking a tab’s Close box)
• Close Frame
• Maximize Frame
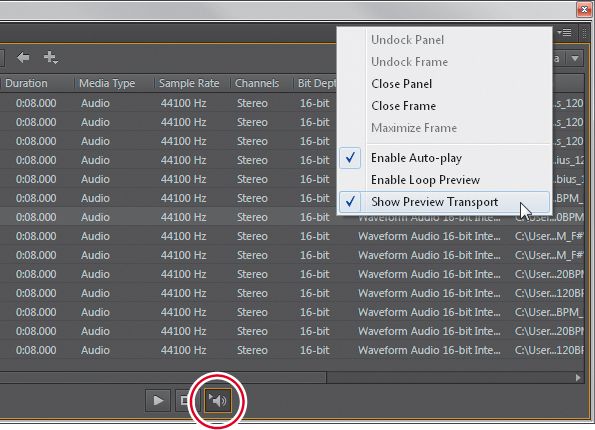
There may also be options that relate to specific panels. For example, the Media Browser panel drop-down menu has options for Enable Auto-Play, Enable Loop Preview, and Show Preview Transport. This is handy because even if the Preview Transport isn’t visible, it’s still possible to enable its Auto-Play and Loop Preview functions.
Undocking allows you to “float” a panel or frame outside of the main window. Here’s how it works.
1. Click the drop-down menu for the frame containing the Media Browser, Files, Favorites, and Effects Rack panels.
2. Choose Undock Frame.
The frame becomes a separate window that can be moved independently of the Audition Workspace and resized.
![]() Note
Note
You can undock a frame or panel by clicking its gripper or tab, respectively, and dragging the gripper or tab outside the Audition Workspace.
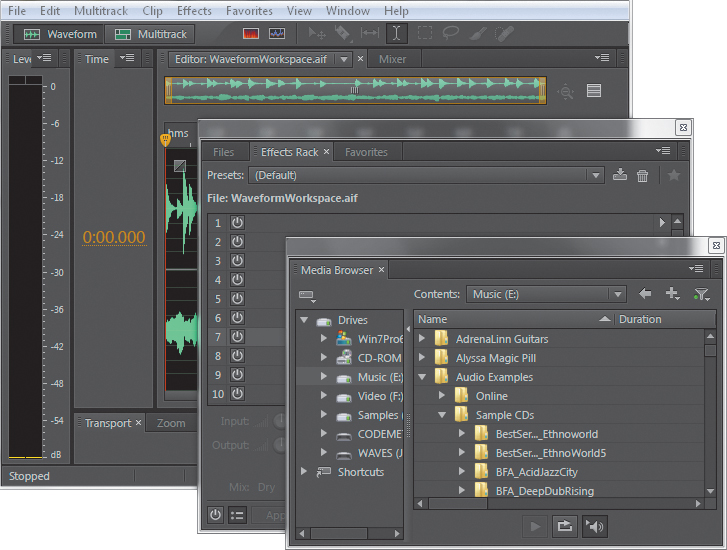
3. Click the Media Browser panel.
4. Click the drop-down menu of the frame containing the Media Browser panel.
5. Choose Undock Panel. Now there are three separate windows—the Audition Workspace, the frame with the Files, Favorites, and Effects Rack panels, and the Media Browser panel.
![]() Note
Note
After undocking frames or panels, they will still have grippers or tabs, respectively, that you can use for re-docking as you would any other frame or panel.
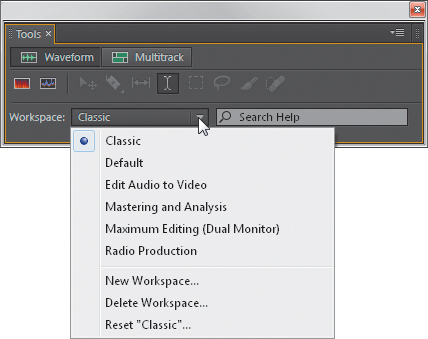
Tools panel
The Tools panel has some unique attributes compared to the other panels.
1. The Tools panel defaults to being a toolbar—a thin strip of buttons along the top of the Audition Workspace—and has no drop-down menu. Undock it by clicking the gripper in the upper-left corner, which undocks the Tools panel automatically (you don’t need to drag it outside the Audition Workspace).
![]() Note
Note
The Status Bar at the bottom of the workspace is the one element that is permanent and cannot be floated or docked (however, you can choose whether to show or hide it by choosing View > Status Bar > Show). The Status Bar shows statistics about file size, bit resolution, sample rate, duration, available disk space, and the like.
When undocked, the toolbar takes on the characteristics of a panel: It’s housed within a frame, can be combined with other panels within the frame, and contains a frame drop-down menu. It also includes two extra fields: a drop-down menu for choosing a workspace that duplicates the Window > Workspace path, and a search box.
2. Re-dock the toolbar along the top of the Audition Workspace before proceeding.
Favorites panel
Favorites are common editing operations that are only a click or two away. Not only can you run favorites, but you can create new favorites and remove, organize, and edit Favorites. Although some workspaces default to including the Favorites panel, you can open it by choosing Window > Favorites or Favorites > Edit Favorites. Chapter 4 describes how to create and apply Favorites with effects, but this feature is so powerful—because it offers instant access and editing of commonly used functions—that this section describes more advanced techniques involving Favorites.
1. Choose Window > Workspace > Reset “Classic” to start fresh.
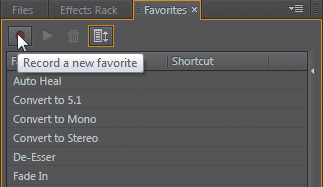
2. Click the Favorites tab to show the current list of Favorites in the Favorites panel.
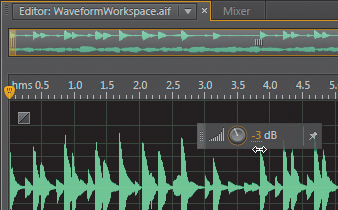
3. Suppose a common operation your client needs on a regular basis is lowering a file’s level by 3dB and adding a fade-in over the first second, so you want to create a Favorite that does both actions with one click. To start recording a favorite, click the Record button in the Favorites panel’s upper left. If a dialog box appears that describes what a Favorite is, click OK to dismiss it.
4. Click the knob in the HUD (heads-up display) toward the middle of the waveform, and set it to -3dB. When you release the mouse button, the gain is reduced, the waveform is highlighted to show that it’s selected, and the HUD control reverts to 0dB.
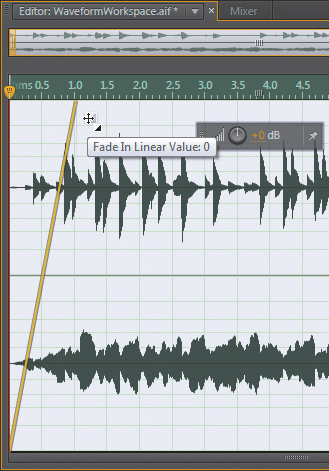
5. Click the Fade In button and drag it toward the right, up to around the 1.0 second mark.
6. Click the Stop button (this was the Record button in step 3).
7. A dialog box appears prompting you to name the favorite. Enter -3dB+Fade In, and then click OK. This adds the Favorite to the list of Favorites in the Favorites panel.
![]() Tip
Tip
You can also select the newly created Favorite from the Favorites menu.
8. Now revert the waveform to how it was prior to adding your edits. Press Ctrl+Z (Command+Z) once to undo the fade-in, and then press Ctrl+Z (Command+Z) again to undo the gain change.
9. In the list of Favorites, click -3dB+Fade In to select it, and then click the Play button (to the right of the Record button). The waveform will now be 3dB softer and have a fade-in over the first second.
10. You can also reorder the list of Favorites to place your most-used Favorites near the top of the list. Click the Adjust Order button to the right of the Trash button, and then reorder your Favorites by dragging and dropping them within the list.
![]() Tip
Tip
The Adjust Order button is a toggle. When the button is selected, the order reflects your customized order; when deselected, Favorites are arranged in alphabetical order.
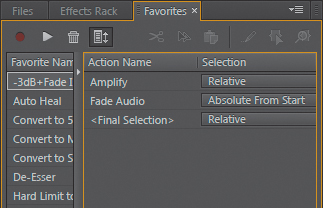
11. Right-click on the -3dB +Fade In Favorite to display a context menu. The menu items let you run, delete, and record Favorites, and also see the steps in the Favorite. To see these steps, click Show Actions. Note that the Favorite consists of Amplify and Fade Audio.
12. Right-click (Control-click) the Amplify action to display a context menu with advanced editing options, such as edit the selected action, capture a particular time, and so on. Describing these in detail is beyond the scope of this book, but this gives you an idea of the power of Favorites. Choose Help > Adobe Audition Help for more information about editing Favorites.
13. Now suppose you decide that the -3dB+Fade In operation doesn’t really need to be a favorite. Click it to select it, and then click the Trash button (to the right of the Play button). When asked if you’re sure you want to remove the selected favorite, click Yes.
Create and save custom workspaces
You are not limited to the workspaces that are included with Audition (like Mastering and Analysis, Radio Production, Edit Audio to Video, etc.) and can create your own.
1. Arrange the workspace exactly as desired. Or for now, for the sake of practicing, arrange the workspace arbitrarily.
2. Choose Window > Workspace > New Workspace.
3. Name the workspace by typing a name into the New Workspace dialog box, and then click OK. Your new workspace now joins the list of current workspaces.
4. To delete this workspace, choose Window > Workspace and select a workspace other than the one you want to delete.
5. Choose Window > Workspace > Delete Workspace.
6. When the Delete Workspace dialog box appears, choose the workspace you want to delete from the drop-down menu, and then click OK.
7. Close Audition without saving anything in preparation for the next lesson.
• Navigating to desired files and projects so you can open them, typically using Audition’s Media Browser
• Navigation related to playing back and recording audio within the Waveform Editor and Multitrack Editor
• Navigating visually within the Waveform Editor and Multitrack Editor (zooming in and out to specific parts of the file)
Navigating to files and projects
For Mac and Windows, Audition adopts standard navigation menu protocols (such as Open and Open Recent) for navigating within the computer to find specific files and projects.
1. Open Audition, navigate to the Lesson02 folder, and open the file WaveformWorkspace.aif. Or as a shortcut, choose File > Open Recent > WaveformWorkspace.aif.
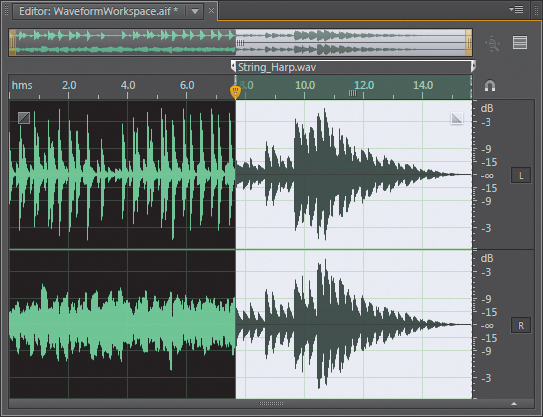
2. Choose File > Open Append > To Current.
3. Navigate to the Lesson02 folder, choose String_Harp.wav, and in the dialog box, click Open.
4. The file you selected is appended to the end of the current waveform in the Waveform Editor.
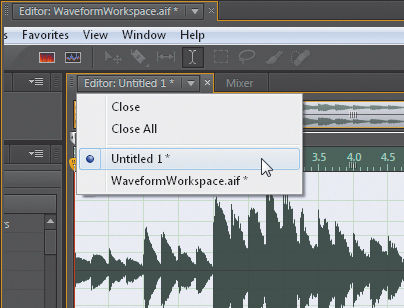
5. Choose File > Open Append > To New.
6. Navigate to the Lesson02 folder, choose String_Harp.wav, and then click Open.
7. The file you selected opens in a new Waveform Editor view. It does not replace the previously loaded file, and you can select either one using the Editor panel’s drop-down menu.
8. Choose File > Close All, and then select No to All from the dialog box that appears, but leave Audition open in preparation for the next lesson.
![]() Note
Note
You can choose Open Append > To New in the Multitrack Editor; however, this will simply open the file in the Waveform Editor, not the Multitrack Editor.
Navigating with the Media Browser
The Media Browser is an enhanced version of the browsing options offered on the Windows and Macintosh operating systems. If you use Windows, it works similarly to the standard Windows Explorer. If you use the Mac, the Media Browser resembles the list view browser in the left column, but selecting a folder in the left column opens its contents in the right column, like the Mac Finder’s column view.
Once you locate a file, you can drag it into the Waveform Editor or Multitrack Editor window.
1. Choose Window > Workspace > Default.
![]() Tip
Tip
You can toggle a panel between full size and its current size by pressing the ` (accent) key that’s just above a QWERTY keyboard’s Tab key.
2. Choose Window > Workspace > Reset “Default.” Click OK when the confirmation dialog box appears.
3. Click the Media Browser panel’s tab or gripper, and drag the panel outside of the workspace to float it. This isn’t strictly necessary but makes it easy to extend the size to see all the available options in the Media Browser. Drag the window to the right to extend it.
4. The left Media Browser column shows all the drives mounted to your computer. Clicking any of these drives displays its contents in the right column. You can also click a drive’s disclosure triangle to reveal its contents.
![]() Tip
Tip
The Locations drop-down menu in the upper left, above the list of your computer’s drives, lets you select any drive. Its contents appear immediately in the right column.
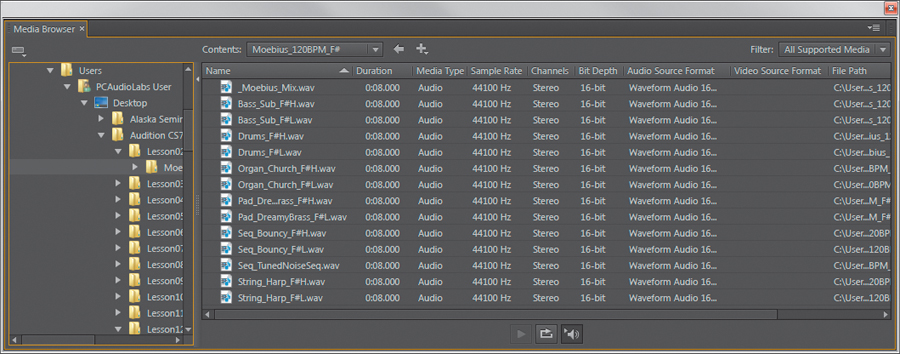
5. In the left column, navigate to the Lesson02 folder. Click its disclosure triangle to expand it, and then click the Moebius_120BPM_F# folder.
The folder’s audio files are shown in the right column. Note how additional subcolumns show file attributes, such as duration, sample rate, channels, and more.
6. You can change subcolumn widths. Click the divider line between two subcolumns, and drag left or right to change the width.
7. You can rearrange the order of subcolumns. Click a column name, like Media Type. Drag it left or right to position it. This feature is helpful because you can drag the columns containing the information you need the most to the left side, so the data is visible even if the window isn’t fully extended to the right.
8. For providing single-click access to specific folders, the Media Browser offers a “virtual drive” along with the other computer drives in the left column that contains shortcuts for often-used folders. To create a shortcut for the Moebius_120BPM_F# folder, click it in the left column.
9. In the right column, click the + symbol and choose Add Shortcut for “Moebius_120BPM_F#.”

10. In the left column, close the Drives disclosure triangle. Under Drives, click the Shortcuts disclosure triangle to reveal your shortcut, which now provides one-click access to the designated folder.
11. Another Media Browser advantage is that you can listen to the files as you browse, thanks to the Preview Transport. If it’s not visible, choose Show Preview Transport from the drop-down menu in the Media Browser window’s upper-right corner. Click the Auto-Play button with the speaker icon; you’ll then be able to hear a file play when you click it.
![]() Note
Note
If enabled, the Loop Playback button to the left of the Auto-Play button will cause the file to play back until you either choose another file or click the Stop button to the left of the Loop Playback button. If you don’t want Auto-Play but want to play files manually, deselect Auto-Play and click the Play button (which toggles with the Stop button) to start playback.
12. Close the project without saving anything.
Navigating within files and Sessions
Once you’re in the Waveform Editor or Multitrack Editor, you’ll want to be able to navigate within the Editor to locate or edit specific sections. Audition has several tools that you can use to do this.
1. Navigate to the Lesson02 folder, and open the file WaveformWorkspace.aif.
2. Choose Window > Workspace > Default.
3. Choose Window > Workspace > Default > Reset “Default,” and then click OK.
4. Click the Editor window’s gripper in the upper-right corner, and drag it outside of the workspace to float the window.
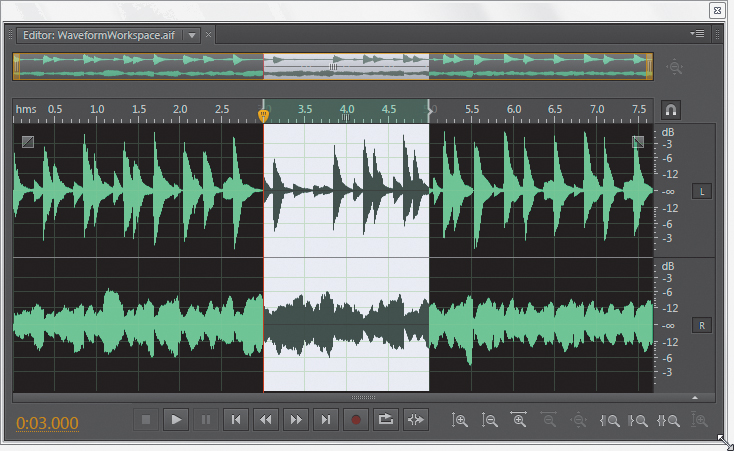
5. Click the workspace’s lower-left corner and drag diagonally down toward the left until you can see all the Transport and Zoom buttons. Then click about a third of the way into the waveform and drag to about two-thirds of the way through the waveform to create a selection. The orange icon at the beginning of the selection is called the current time indicator (CTI), or playhead in previous versions of Audition. For the benefit of those who are used to the previous terminology, we’ll use playhead throughout the rest of the book.
6. Click anywhere in the waveform to deselect the selection.
Navigation via zooming
Zooming acts the same way it does with a camera: Zoom out to see more of an object, and zoom in to see more detail. The Waveform Editor includes zoom buttons, but you can also open a Zoom panel that contains these same eight buttons if you want to position them elsewhere or float them. The Multitrack Editor includes these same zoom buttons.
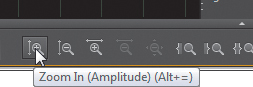
1. The Zoom toolbar consists of eight buttons that control zooming. Click twice on the leftmost Zoom In (Amplitude) button. Zooming in on amplitude lets you see low-level signals more easily.
2. Click twice on the next button to the right, the Zoom Out (Amplitude) button, to return to the previous amplitude zoom level.
3. Click eight times on the next button to the right, the Zoom In (Time) button, to see very short sections of time on the waveform.
![]() Note
Note
If you zoom in all the way using the Zoom In (Time) button, you can see—as well as edit—the individual samples that make up the waveform.
4. Click twice on the next button to the right, the Zoom Out (Time) button, to zoom back out.
5. Click once on the next button to the right, the Zoom Out Full (All Axes) button. This “shortcut” button zooms out the time and amplitude axes to their maximum size so you can see the complete waveform.
6. Make a selection: As in the previous lesson, click about a third of the way from the beginning, and then drag to about a third of the way from the end. Click the next button to the right, the Zoom In at In Point button, to place the selection start (In point) in the middle of the waveform.
7. Click the next button to the right, the Zoom In at Out Point button, to place the selection end (Out point) in the middle of the waveform.
8. Click the rightmost button, the Zoom to Selection button, to make the selection fill the window. Click anywhere in the waveform to deselect the selection.
9. Click the Zoom Out Full button (the fifth button from the left in the Zoom toolbar) to return both axes to zoomed out full.
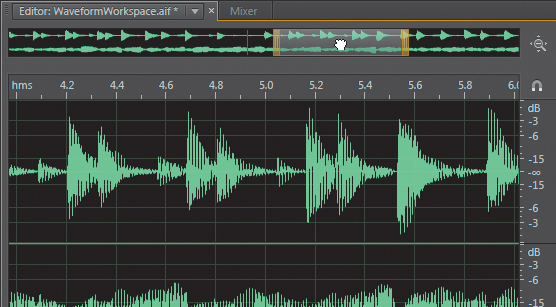
10. At the top of the window is an additional Zoom tool that shows a global overview of your audio file. Drag the left or right side of the yellow grabber to zoom in or out of an area. The area between the two yellow grabbers is what you’ll see in the Editor. Note that you can click the grabber in the middle of the two yellow bars to move the zoom area left or right.
11. Use the mouse scroll wheel to zoom in and out horizontally, centered around the grabber inside the two yellow grabber tools in the overview. This is the default. Now press and hold the Ctrl (Command) key while using the mouse scroll wheel; zooming centers around the current playhead position. You can reverse these default settings by choosing Edit > Preferences > General > Mouse Wheel Zoom.
12. To reset the zoom to see the entire audio waveform again, click the Zoom Out Full button in the Zoom toolbar or the equivalent button to the right of the upper overview. Keep Audition open in preparation for the next lesson.
Navigation with keyboard shortcuts
Keyboard shortcuts can help tremendously with navigation. Once you’ve memorized important shortcuts, it takes less effort to press a couple of keys than to locate a specific area on the screen, move your mouse to it, access a menu, choose an item, and so on.
Audition even lets you create your own keyboard shortcuts for the various commands. Choose Edit > Keyboard Shortcuts, or press Alt+K (Option+K), and then follow the onscreen directions to add and remove shortcuts.
Here are some common keyboard shortcuts for navigation.
1. In the upper overview Zoom tool, click the right yellow grabber, and drag left until the lower waveform shows about 2.0 seconds of audio.
2. Press the Page Up key on your keyboard, and then press the Page Down key. The playhead alternates between the left and right sides of the waveform Editor, respectively.
3. Press the Page Up and Page Down keys repeatedly. Note how the zoomed-in area in the overview moves left and right, respectively. Also note that the playhead tracks these changes: Whenever you press Page Up, the playhead will always “stick” to the left side of the waveform Editor, and when you press Page Down, the playhead will always “stick” to the right side.
4. Hold down the Ctrl (Command) key, and press the Page Up and Page Down keys repeatedly. The zoomed-in area moves as in the previous step, but the playhead remains in its current position.
5. Press the plus (+) key (either on the numeric keypad or the main keyboard section; don’t press Shift) to zoom in, and press the minus (–) key to zoom out. Pressing and holding these keys zooms repeatedly.
6. Close the project file without saving anything in preparation for the next lesson.
Navigation with markers
You can place markers (also called cues) within the Waveform Editor and Multitrack Editor to indicate specific places you want to navigate to immediately. For example, in a Multitrack project, you might place markers before a verse and chorus so you can jump back and forth between them. In the Waveform Editor, you might place markers to indicate places where edits are required.
1. Navigate to the Lesson02 folder, and open the file WaveformWorkspace.aif.
2. Choose Window > Workspace > Default.
3. Choose Window > Workspace > Reset “Default.” Click OK to confirm.
4. Choose Window > Markers to open the Marker panel.
5. Click in the waveform toward the beginning, around 1.0 second.
6. Press M to add a marker at the playhead location and add the marker to the list of markers in the marker window.
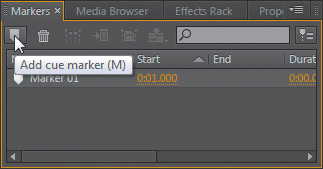
7. Now click in the waveform at around 3.0 seconds. As an alternate way to add a marker, click the Add Cue Marker button in the Markers panel.
8. You can also mark a selection. Click around 5.0 and continue to drag right to 6.0 to create a selection. Press M to mark the selection. Note that the Markers panel shows a different symbol to indicate that this Range marker is marking a selection.
![]() Tip
Tip
To set a default marker name, right-click on the Markers panel’s tab, and choose Default Marker Name. If a marker already exists, subsequent markers will have the name you specified. You can also set this default in Windows by choosing Edit > Preferences > Markers & Metadata > Default Name for New Cue Markers, or on the Mac by choosing Audition Menu > Preferences > Markers & Metadata, and then entering the name in the Default Name for New Cue Markers box.
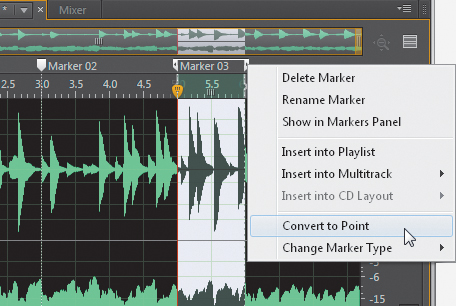
9. You can also convert the Range markers to an individual marker at the selection start. Right-click (Control-click) on either the start or end of the Range marker, and then choose Convert to Point. You will then see a single marker around 5.0.
10. There are several ways to navigate among markers. Double-click any marker in the Markers panel list, and the playhead will jump to that marker. With Range markers, the playhead will jump to the marker at the range’s beginning.
11. Another method for marker navigation involves the Transport. We’ll cover that next. Leave this project open in preparation for the next lesson.
![]() Note
Note
To rename a marker, right-click (Control-click) on its white handle in the Waveform Editor and choose Rename Marker. Or, click the marker name in the Markers panel, click again after a slight pause (you don’t want to double-click), and then type in a new name. Renaming using either method renames both instances of the marker.
Navigation with the Transport
The Transport offers several navigation options, including navigation using markers.
1. Click the Move Playhead to Previous button. The playhead moves to Marker 2.
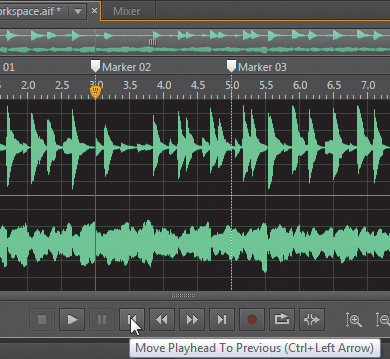
2. Click the Move Playhead to Previous button again. The playhead moves to Marker 1. Click the Move Playhead to Previous button once more, and the playhead moves to the beginning of the file.
![]() Note
Note
If a file contains no markers, Move Playhead to Next jumps to the end; Move Playhead to Previous jumps to the beginning.
3. Click the Move Playhead to Next button (the button to the left of the Record button with the red dot) four times. The playhead steps to each marker until it reaches the end of the file.
4. To move the playhead backward in the file without dragging the playhead or using markers, click and hold the Rewind button until the playhead is in the desired location. You’ll hear audio during the scrolling process. Rewind back to the beginning.
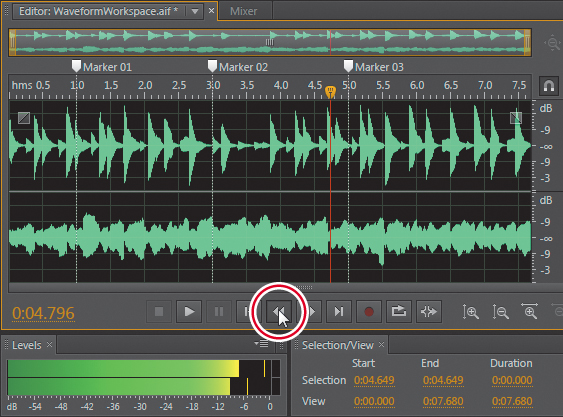
![]() Note
Note
The Fast Forward button to the right of the Rewind button works similarly to the Rewind button but moves the playhead forward in the file. Note that you can right-click (Control-click) on either button to set the speed with which it moves.
![]() Note
Note
The Rewind, Fast Forward, Move Playhead To Next, Move Playhead to Previous, and of course Stop can all be invoked during playback.
5. Click the Play button (the second Transport button from the left with the right arrow). Playback begins.
6. As soon as the playhead passes the first marker, click the Move Playhead To Next button. The playhead jumps to the second marker. Click the Move Playhead To Next button again, and the playhead jumps to the third marker.
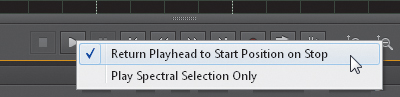
7. Right-click (Control-click) the Transport Play button and choose Return Playhead to Start Position on Stop. With this option selected, clicking Stop will return the playhead to where it started. With this option deselected, the playhead will stop at the position it had when you clicked the Stop button.
Review questions
1. What is the difference between a frame and a panel?
2. What is a drop zone?
3. What is a “floated” window?
4. In addition to locating files, name two major advantages of using the Media Browser.
5. What is the purpose of a marker?
Review answers
1. A frame contains one or more panels.
2. A drop zone indicates where a panel or frame will dock when it’s dragged to that zone.
3. A floated window exists outside of an Audition Workspace and can be dragged anywhere on your screen.
4. You can listen to the files you locate as well as see their attributes.
5. A marker indicates a place in a file or Session that the playhead can jump to immediately, thus speeding up navigation.