
What You’ll Do
Testing is an integral part of the design of a Web site. In fact, the term used to describe a good Web site is bullet proof. Without the ability to test a site, you would never know what works, and what needs help. Dreamweaver gives you a host of tools to help make sure that your visitors have a pleasant experience. Some of the things Web testing can and should look for are:
• Validation. Is your HTML and CSS code compatible with your visitors? Do your Web pages have any broken links? If problems arise on your site, visitors will go elsewhere, which isn’t the goal.
• Browser Independence. Do your Web pages load and function on the various browsers used by your visitors? Your site may be viewed in a large variety of situations: different browsers, different operating systems, or different features enabled or disabled.
• Accessibility. Do your Web pages conform to the standards set by the government on accessibility standards? Your site may be viewed by those with physical limitations, such as the visually impaired.
• Speed. Is it easy and fast to access your Web pages? Remember, visitors do not like to wait. The 8-second rule is a good guideline to remember.
All of these items are important because they make your site more compatible to your visitors. It gives them a better experience, and it helps to keep them at your site.

DW 9.3
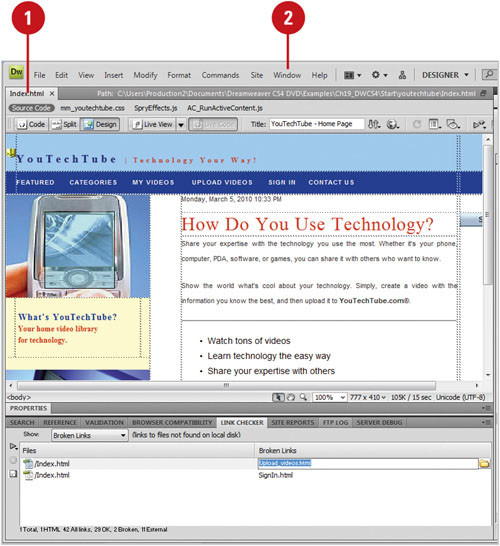
One of the most absolute, worst, horrible (enough adjectives for you) things is to create a Web site with links that don’t work. You know what I’m talking about; you click on a link and a page pops up saying the link can’t be found... I HATE it when that happens. A broken link to another site, although not acceptable, is sometimes understandable. For example, you have a link to a photography site that you like, the site goes down, and the owner never bothered to tell you. A few weeks later, you discover the problem and fix it; however, you know a lot of your visitors clicked that link. The worst types of broken links are those to pages within your own document... to pages that you created. The good news is that Dreamweaver provides you with the tools to make sure that all of your links (external and internal) function correctly using the Link Checker in the Results panel. You can check links in the current document, for the entire site, or for selected files.
![]() Open the Web page you want to find links (if you plan to check just one page).
Open the Web page you want to find links (if you plan to check just one page).
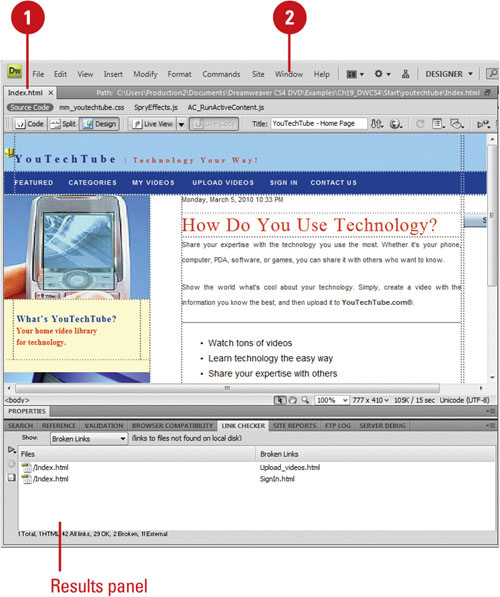
![]() Click the Window menu, point to Results, and then click Link Checker.
Click the Window menu, point to Results, and then click Link Checker.
You can also click the Site menu, and then click Check Links Sitewide.
![]() Select from the following Link Checker options:
Select from the following Link Checker options:
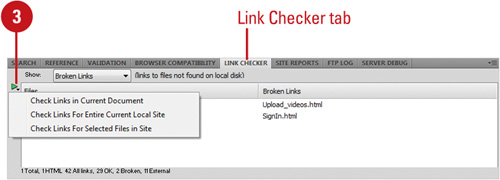
Check Links. Click the Check Links button, and then select the command you want:
• Check Links In Current Document.
• Check Links For Entire Current Local Site.
• Check Links For Selected Files In Site.
Stop. Click the Stop button to stop the current link check.
Save Report. Click the Save Report button to save the report.
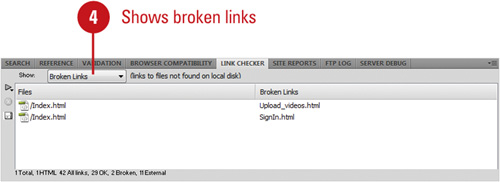
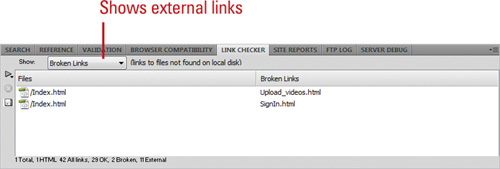
![]() Click the Show popup, and then choose from the following options:
Click the Show popup, and then choose from the following options:
Broken Links. Select to display a listing of all files that contain broken links (default).
External Links. Select to display a listing of all external links.
Orphaned Links. Select to display all the files with no incoming links (available when choosing Check Links For Entire Local Site).
DW 9.3
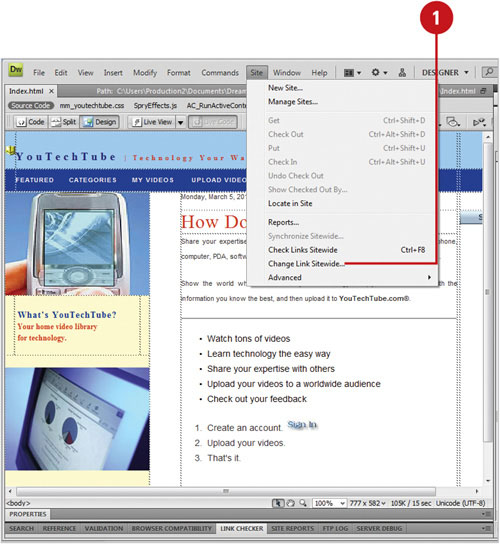
After you find the broken links in your site using the Link Checker in the Results panel, you can use Dreamweaver tools to fix them. It’s pretty simple. All you need to do is relink it. In the Link Checker, a broken link appears with a folder icon, which you can use to open a dialog box and select a reference to an active link. In the dialog box, you can enter a URL, select related parameters, and select whether the link is relative to the Document or Site Root. If a link changes over the entire site, you can use the Change Link Sitewide command to quickly redirect it to another place. If you want to delete a link, you can use this command.
![]() Open the Web page you want to fix (if you plan to check just one page).
Open the Web page you want to fix (if you plan to check just one page).
![]() Click the Window menu, point to Results, and then click Link Checker.
Click the Window menu, point to Results, and then click Link Checker.
![]() If needed, click the Check Links button, and then select a Check Links command.
If needed, click the Check Links button, and then select a Check Links command.
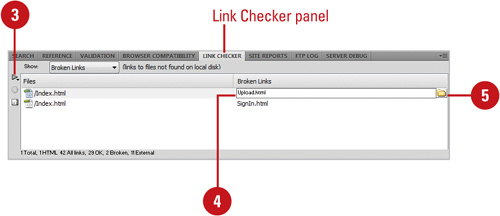
![]() Select a broken link from the Link Checker panel.
Select a broken link from the Link Checker panel.
![]() Click the folder icon, associated with the broken link (located to the right of the broken link).
Click the folder icon, associated with the broken link (located to the right of the broken link).
The Select File dialog box appears.
![]() Choose to select file names from the Site Root, Server, or Data Sources (default: Site Root).
Choose to select file names from the Site Root, Server, or Data Sources (default: Site Root).
![]() Select the correct link from the Select File dialog box, or enter the correct link directly into the URL input box.
Select the correct link from the Select File dialog box, or enter the correct link directly into the URL input box.
![]() Select whether the link is relative to the Document or Site Root (default: Document).
Select whether the link is relative to the Document or Site Root (default: Document).
![]() To add any additional parameters to the link, click Parameters.
To add any additional parameters to the link, click Parameters.
![]() Click OK to update the link.
Click OK to update the link.
![]() Click the Site menu, and then click Change Link Sitewide.
Click the Site menu, and then click Change Link Sitewide.
![]() Enter a path or click the folder icon to browse and select the target file from which to unlink.
Enter a path or click the folder icon to browse and select the target file from which to unlink.
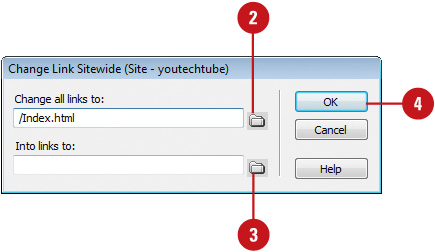
![]() Enter a path or click the folder icon to browse and select the new file to link to.
Enter a path or click the folder icon to browse and select the new file to link to.
![]() Click OK.
Click OK.
Did You Know?
You can check links sitewide. Click the Site menu, and then click Check Links Sitewide to generate a quick report of all the links associated with the working site.
DW 9.1
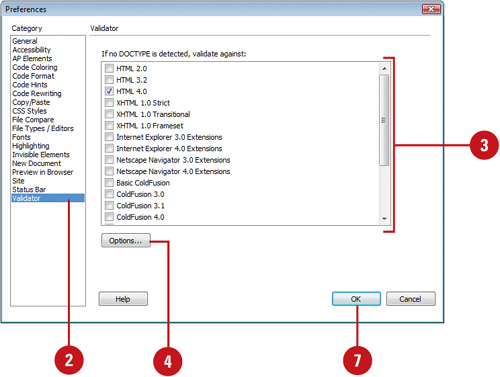
The Validator in Dreamweaver allows you to quickly locate tag or syntax errors in your code. You can specify the tag-based languages against which the Validator should check, the specific problems that the Validator should check, and the types of errors that the Validator should report. Validating Web pages differs from checking for browser support in that the Validator checks for specific problems such as support for a specific version of HTML, or ColdFusion. Understanding the specific problems associated with a Web page help you to further refine the document to generate compliant code.
![]() Click the Dreamweaver (Mac) or Edit (Win) menu, and then click Preferences.
Click the Dreamweaver (Mac) or Edit (Win) menu, and then click Preferences.
![]() Click the Validator category.
Click the Validator category.
Timesaver
Click the Validation button on the Validation tab in the Results panel, and then click Settings.
![]() Select the items that you want to validate by checking the box, located to the left of the item.
Select the items that you want to validate by checking the box, located to the left of the item.
![]() Click Options.
Click Options.
![]() Select from the following validator options:
Select from the following validator options:
• Display. Select what options you want to display (Errors, Warnings, Custom Messages, or Nesting Errors).
• Check For. Select the options to check for Quotes In Text or Entities In Text.
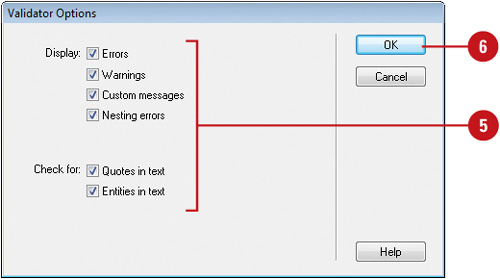
![]() Click OK.
Click OK.
![]() Click OK.
Click OK.
![]() Click the Window menu, point to Results, and then click Validation.
Click the Window menu, point to Results, and then click Validation.
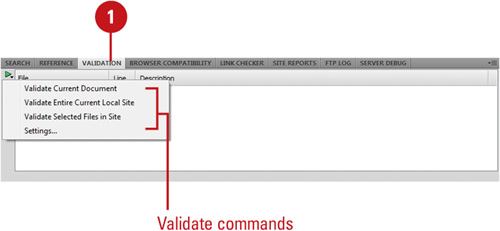
![]() Select from the following Validator options:
Select from the following Validator options:
• Validate. Click the Validate button, and then select the validate command you want: Validate Current Document, Validate Entire Current Local Site, and Validate Selected Files In Site, Settings.
• Stop. Click the Stop button to stop the current validation check.
• More Info. Select an item from the validator list of errors, and then click the More Info button to receive more information on the selected error.
• Save Report. Click the Save Report button to save the document as an XML file.
• Browse Report. Click the Browse Report button to view an ordered listing of the current errors in your default browser.
Did You Know?
You can do further validation of your Web site online. The World Wide Web Consortium gives you the ability to check your HTML and CSS according to the latest standards. Visit http://validator.w3.org/ to validate your HTML, or use http://jigsaw.w3.org/css-validator/ to check your CSS.
The Browser Compatibility Check (BCC) analyzes the HTML and CSS on the open page and determines whether it has problems in certain browsers. When you run the BCC, it scans the open page and reports any potential HTML problems in the Results panel. Each potential problem is given a confidence rating, a circle. The amount of the circle filled in—quarter, half, three-quarter, or full—determines the occurrence probability level of the problem. Browser problems fall into three categories: serious (visible problem), warning (not supported), and informational (no visible effect). You can also check browser compatibility in Code view. When you refresh a page, Dreamweaver checks the code and inserts a wavy red underline under the name of every item creating an error in one of your predefined target browsers.
![]() Click the File menu, point to Check Page, and then click Browser Compatibility.
Click the File menu, point to Check Page, and then click Browser Compatibility.
The Results panel appears with the Browser Compatibility Check tab, indicating any potential problems.
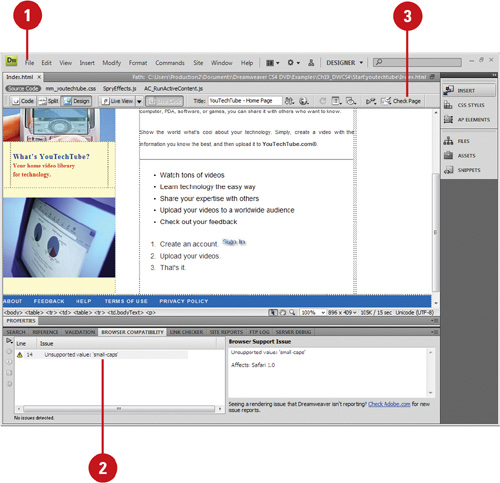
![]() Double-click an issue to select it.
Double-click an issue to select it.
Information about the potential problem appears to the right in the Results panel.
![]() To display the issue in the code, click the Check Page button on the Document window, and then click Next Issue or Previous Issue.
To display the issue in the code, click the Check Page button on the Document window, and then click Next Issue or Previous Issue.
![]() To exclude an issue from future checking, right-click the issue in the Results panel, and then click Ignore Issue.
To exclude an issue from future checking, right-click the issue in the Results panel, and then click Ignore Issue.
• To edit the Ignore Issues list, click the green arrow in the Results panel, click Edit Ignored Issues List, delete the issue from the Exceptions.xml file, and then save and close the file.
![]() Open the document you want to check.
Open the document you want to check.
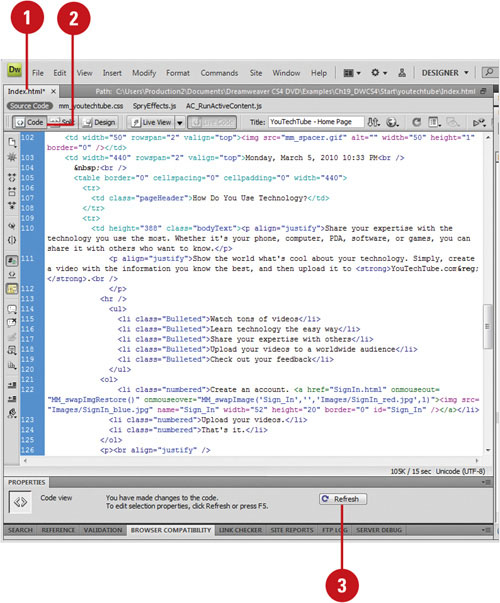
![]() Switch to Code view.
Switch to Code view.
![]() After making a change in Code view, click the Refresh button in the Properties panel, or press F5.
After making a change in Code view, click the Refresh button in the Properties panel, or press F5.
A wavy red underline appears under the name of every item that’s an error in one of your pre-defined target browsers.
Note
If Dreamweaver finds no unsupported markup, then nothing is underlined, and the Target Browser Check menu icon in the Document toolbar changes to indicate that there are no errors.
Did You Know?
You can check to see exactly what browser is not supported. Simply position the pointer to point to the red-underlined text, and a tool tip appears, indicating which browsers don’t support that item.
You can select browsers to check. Click the Check Page button on the Document window, click Settings, select the browser and versions you want, and then click OK.
See Also
See “Checking for CSS Browser Compatibility” on page 234 for information on viewing and saving a BCC report.
HTML is a very structured language and needs to follow specific rules to be error free. HTML code includes tags, parentheses (( )), braces ({ }), and square brackets ([ ]) that need to be balanced, meaning every opening tag, parentheses, brace, or bracket has a corresponding closing one. If HTML is not balanced, the code will not work properly and cause errors. You can use commands in Dreamweaver to make sure the tags, parentheses (( )), braces ({ }), and square brackets ([ ]) in a page are correctly balanced.
![]() Open the Web page in Code view you want to check.
Open the Web page in Code view you want to check.
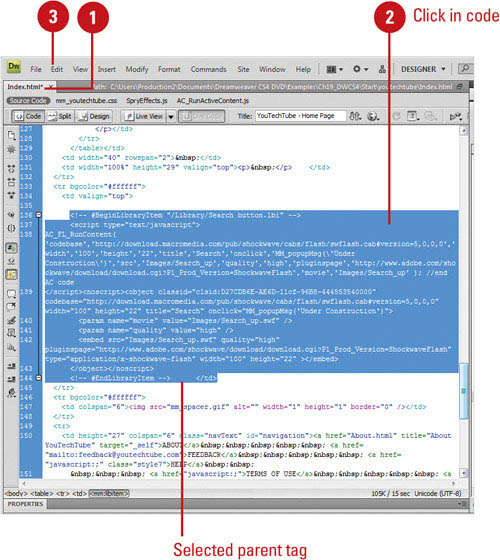
![]() Click to place the insertion point in the nested code you want to check.
Click to place the insertion point in the nested code you want to check.
![]() Click the Edit menu, and then click Select Parent Tag.
Click the Edit menu, and then click Select Parent Tag.
The enclosing matching tags (including the contents) are selected in Code view.
![]() Click the Edit menu, and then click Select Parent Tag again to continue checking tags.
Click the Edit menu, and then click Select Parent Tag again to continue checking tags.
![]() Open the Web page in Code view you want to check.
Open the Web page in Code view you want to check.
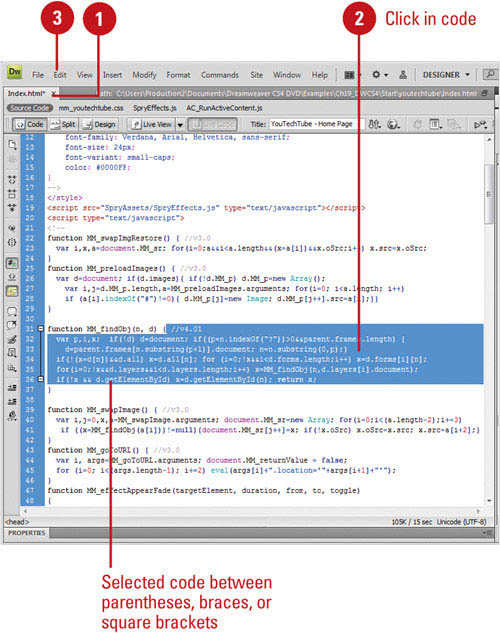
![]() Click to place the insertion point in the code you want to check.
Click to place the insertion point in the code you want to check.
![]() Click the Edit menu, and then click Balanced Braces.
Click the Edit menu, and then click Balanced Braces.
The code between the enclosing parentheses, braces, or square brackets are selected in Code view.
![]() Click the Edit menu, and then click Balanced Braces again to continue checking parentheses, braces, and square brackets.
Click the Edit menu, and then click Balanced Braces again to continue checking parentheses, braces, and square brackets.
Not all HTML documents are created equal. Some HTML documents contain problems with the overall coding; empty tags, individual font tags, improperly implemented tables... the list goes on and on. The good news is that Dreamweaver can automatically remove empty tags, combine nested font tags, and otherwise improve messy or unreadable HTML or XHTML code, and more. The question to ask is where did this sloppy code come from? Did Dreamweaver generate code that subsequently must be cleaned up? The answer to that question is no. However, not all the code associated with a particular Web page is generated by Dreamweaver. For example, you might switch from Design view to Code view, and enter your own code, or (and this is more likely), you might want to insert an HTML page into your Dreamweaver site that was written by another designer, or generated by another application. If that’s the case, Dreamweaver can help you straighten out the code with a click of a button. It’s really that simple.
![]() Open the Web page you want to clean up.
Open the Web page you want to clean up.
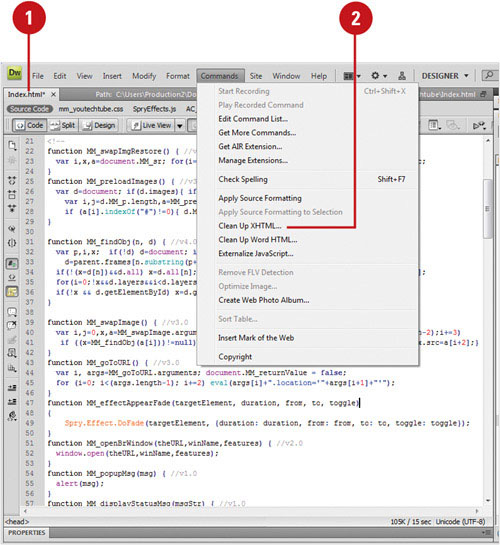
![]() Click the Commands menu, and then click Clean Up HTML or Clean Up XHTML.
Click the Commands menu, and then click Clean Up HTML or Clean Up XHTML.
![]() Select the Remove check boxes you want from the following options:
Select the Remove check boxes you want from the following options:
• Empty Container Tags. Removes tags that have no content.
• Redundant Nested Tags. Removes all redundant instances of a tag.
• Non-Dreamweaver HTML Comments. Removes all comments not inserted by Dreamweaver.
• Dreamweaver Special Markup. Removes comments related to Dreamweaver code for automatically updating templates and library-based documents.
• Specific Tags. Removes custom tags specified in the Adjacent text box.
![]() Select the Options check boxes you want from the following options:
Select the Options check boxes you want from the following options:
• Combine Nested <font> Tags When Possible. Combines two or more font tags when they control the same range of text.
• Show Log On Completion. Displays an alert with details about the changes made to the document when the cleanup is complete. A pop-up window will appear listing what actions were performed in cleaning up the document.
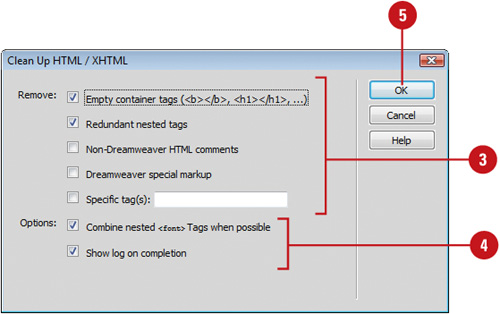
![]() Click OK to clean up the active document.
Click OK to clean up the active document.
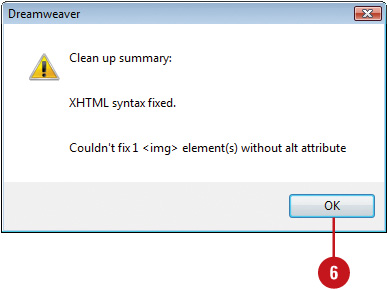
![]() Review the clean up summary results, and then click OK.
Review the clean up summary results, and then click OK.
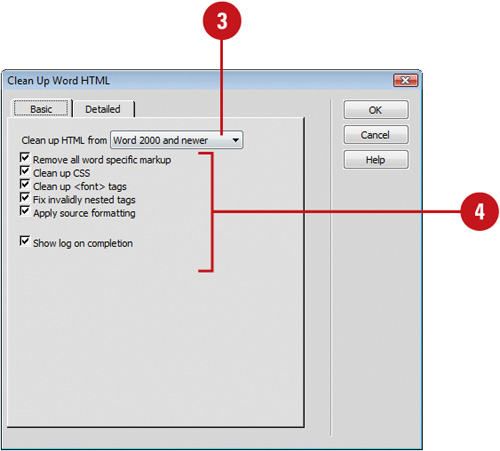
If you have a Microsoft Word document saved as an HTML file, you can open it in Dreamweaver, and then use the Clean Up Word HTML command to convert the file into HTML compliant Web pages. The Clean Up Word HTML command removes unnecessary HTML code generated by Word. Before you convert a Word HTML file to a compliant Web page in Dreamweaver, it’s a good idea to create a backup of the original Word (.doc and .htm) files, because you may not be able to reopen the HTML document in Word once you’ve applied the Clean Up Word HTML command.
![]() Open the HTML file created in Microsoft Word 97 or later you want to use in Dreamweaver.
Open the HTML file created in Microsoft Word 97 or later you want to use in Dreamweaver.
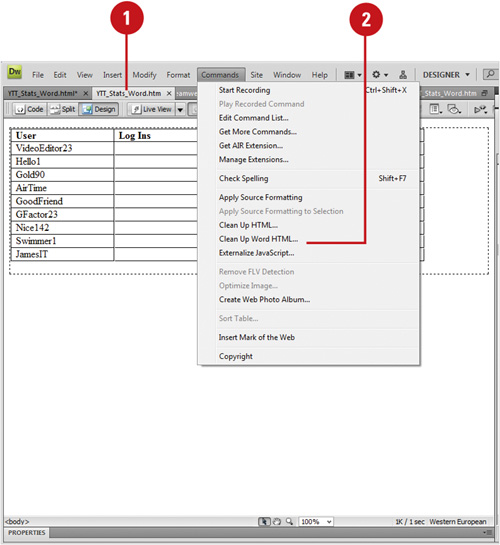
![]() Click the Commands menu, and then click Clean Up Word HTML.
Click the Commands menu, and then click Clean Up Word HTML.
![]() Click the Clean Up HTML From popup, and then select the Word version you want to use.
Click the Clean Up HTML From popup, and then select the Word version you want to use.
![]() Select from the following Basic options:
Select from the following Basic options:
• Remove All Word Specific Markup. Removes Word-specific HTML code. You can select the options you want on the Details tab.
• Clean Up CSS. Removes Word-specific CSS.
• Clean Up <font> Tags. Removes HTML tags, converting the default body text to size 2 HTML text.
• Fix Invalidly Nested Tags. Removes the font markup tags generated by Word.
• Set Background Color. Replaces the gray background from Word to a color you choose (in hexadecimal).
• Apply Source Formatting. Uses source formatting in the HTML Format Preferences dialog box.
• Show Log On Completion. Displays an alert with details about the changes made to the document when the cleanup is complete. A pop-up window will appear listing what actions were performed in cleaning up the document.
![]() Click the Detailed tab.
Click the Detailed tab.
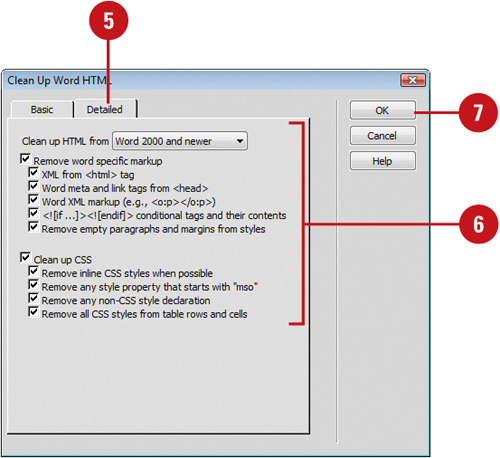
![]() Select from the following Advanced options:
Select from the following Advanced options:
• Remove Word Specific Markup. Select to enable the options.
• XML from <html> tag
• Word meta and link tags from <head>
• Word XML markup
• Conditional tags and their contents
• Remove empty paragraphs and margins from styles
• Clean Up CSS. Select to enable the options.
• Remove inline CSS styles when possible
• Remove any style property that starts with “mso”
• Remove any non-CSS style declaration
• Remove all CSS styles from table rows and cells
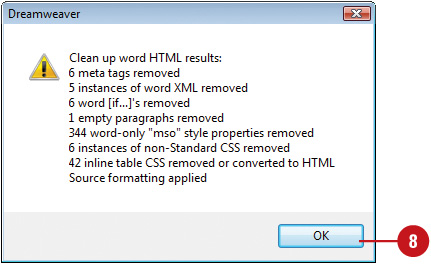
![]() Click OK to perform the conversion.
Click OK to perform the conversion.
![]() Review the clean up summary results, and then click OK.
Review the clean up summary results, and then click OK.
DW 1.6
When you create accessible pages, you need to associate information, such as labels and descriptions, with your page objects to make your content accessible to all users. Web accessibility means that people with disabilities can use the Web. In addition, older people with changing abilities due to aging have better access to the Web. Web accessibility encompasses all disabilities that affect access to the Web, including visual, auditory, physical, speech, cognitive, and neurological disabilities. Dreamweaver understands the importance of Web accessibility and gives you the means to make your pages more accessible to the handicapped. As a matter of fact, Dreamweaver offers screen reader support, keyboard navigation, and operating system accessibility support. A screen reader speaks the text that appears on the computer screen. In addition, it reads non-textual information, such as button labels or image descriptions in the application. Dreamweaver supports JAWS for Windows from Freedom Scientific, and Window-Eyes screen readers from GW Micro. When designing pages to be compliant with screen readers, understand that the screen reader starts reading in the upper-left corner of the Document window. In addition, since the policy on accessibility standards changes every year, Dreamweaver gives you the ability to check your pages against the current standards. Whenever you create a new Form object, Frame, Media or Images item, a dialog box appears with accessibility options.
![]() Click the Dreamweaver (Mac) or Edit (Win) menu, and then click Preferences.
Click the Dreamweaver (Mac) or Edit (Win) menu, and then click Preferences.
![]() Click the Accessibility category.
Click the Accessibility category.
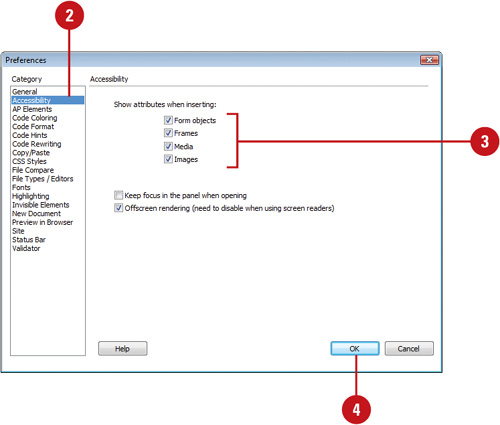
![]() Select the items you want to display accessibility options for:
Select the items you want to display accessibility options for:
• Form Objects
• Frames
• Media
• Images
![]() Click OK.
Click OK.
![]() Open the Web page with the accessibility you want to add.
Open the Web page with the accessibility you want to add.
![]() Add a specific item to the Web page (in this example, an image was added).
Add a specific item to the Web page (in this example, an image was added).
![]() Select from the following options in the Image Tag Accessibility Attributes dialog box:
Select from the following options in the Image Tag Accessibility Attributes dialog box:
• Alternate Text. Reader programs use the text to describe the item to the visually impaired. For example, if it were a Home button, you might add the text, Home Page. In addition, the text pops up in a small window, when the visitor’s mouse hovers over it.
• Long Description. Displays a file that contains a longer textual description of the object. For example, you might have an image of a sunset, and you want to give visually impaired readers a more in depth description. Enter the URL to the file, or click the folder icon to browse for it.
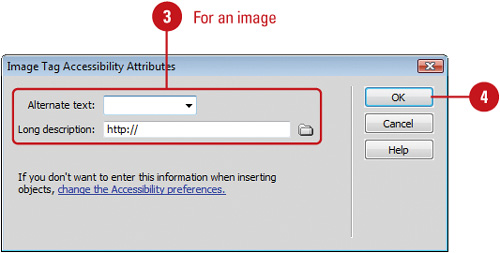
![]() Click OK.
Click OK.
Did You Know?
You can add accessibility to an element. If you want to add or modify accessibility options to an existing element, click the object, add the Alt tag information using the Properties panel, or right-click the object, and then click Edit Tag.
You can create an accessibility report. Click the File menu, point to Check Page, and then click Accessibility.
DW 9.2
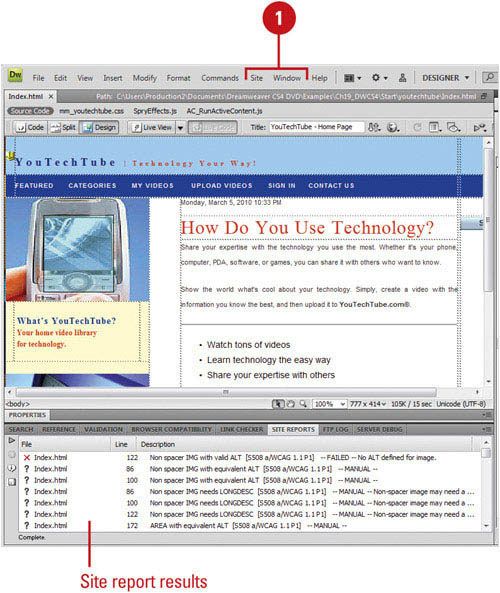
Dreamweaver has a lot of site reports for you to select from; for example, you can run site reports on workflow or HTML attributes, including accessibility, for the current document, selected files, or the entire site. In addition, workflow reports can improve cooperation among designers working on the same Web site. Workflow reports display checked out files and who checked them out, which files have Design Notes attached, and what, if any, files have been modified. To generate workflow reports, you need active Design notes and access to the remote server holding the information. In addition, HTML reports enable you to compile and generate reports for HTML attributes. For example, you can check for combinable nested font tags, accessibility, missing Alt text, redundant nested tags, removable empty tags, and untitled documents. Many of the site report items have options to help you further refine what you’re looking for. For example, the Recently Modified item has options to allow you to define what recently modified means. Simply select the item, and then click the Report Settings button located at the bottom of the Reports dialog box. Site reports can and should be conducted on a regular basis during the construction of any Web site, be it complex or simple.
![]() Open the Web page you want to get a report (if you plan to get a report on just one page).
Open the Web page you want to get a report (if you plan to get a report on just one page).
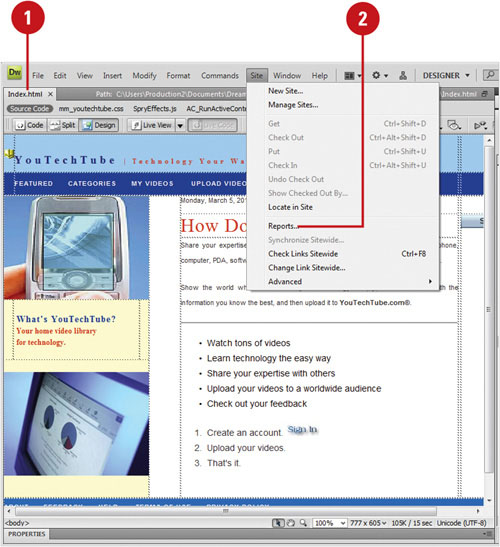
![]() Click the Site menu, and then click Reports.
Click the Site menu, and then click Reports.
![]() Click the Report On popup, and then select from the following options:
Click the Report On popup, and then select from the following options:
• Current Document.
• Entire Current Local Site.
• Selected Files In Site.
• Folder. Select the folder you want a report.
![]() Select from the following site Workflow (requires remote server access) options:
Select from the following site Workflow (requires remote server access) options:
• Checked Out By. Lists what designer checked out what files and when.
• Design Notes. Lists all design notes for the selected report.
• Recently Modified. Lists all files modified since the last check.
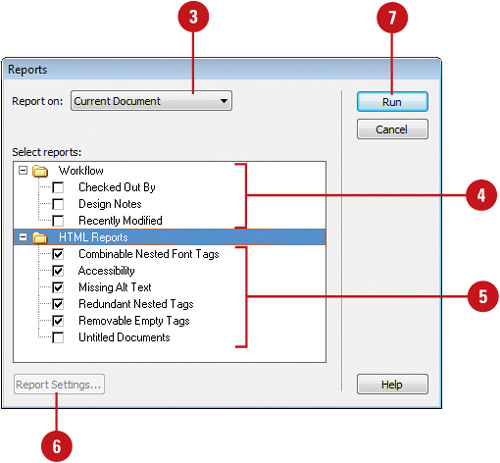
![]() Select from the following site HTML Reports options:
Select from the following site HTML Reports options:
• Combinable Nested Font Tags. Lists any nested font tags that can be combined to create tighter code.
• Accessibility. Lists all current accessibility standards (based on the level of HTML used).
• Missing Alt Text. Lists any missing alternate <alt> text.
• Redundant Nested Tags. Lists any redundant nested tags.
• Removable Empty Tags. Lists any empty tags.
• Untitled Documents. Lists any documents named Untitled.
![]() To set specific options for a report, select the report, click Report Settings, specify the options you want (options vary depending on the report), and then click OK.
To set specific options for a report, select the report, click Report Settings, specify the options you want (options vary depending on the report), and then click OK.
![]() Click the Run button to generate the report.
Click the Run button to generate the report.
Important
After you run an HTML report, use the Clean Up HTML command on the Site menu to correct any HTML errors the reports listed.
Did You Know?
You can access more reports on the Dreamweaver Exchange Web site. If you need additional reports, click the Help menu, and then click Dream-weaver Exchange to search for the ones you want.
DW 9.2
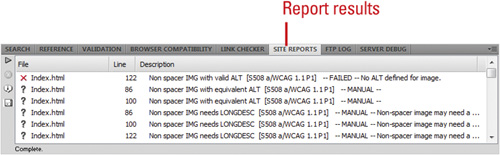
After you run a report, the results appear on the Site Reports tab in the Results panel. The Site Reports tab displays information in columns relating to the reports you selected. If you don’t see enough information regarding a report item, you can display additional reference material in the Results panel. In the Site Reports tab, you can also save a report as an XML file, which you can import into a database, spreadsheet, or Web site. After you import the XML data into another file, you can print or use the report information like any other XML data.
![]() Create a report or display an existing one.
Create a report or display an existing one.
• Create. Click the Site menu, click Reports, select report options, and then click Run.
• Existing. Click the Window menu, point to Results, and then click Site Reports.
The Results panel appears, displaying the Site Reports tab with report details.
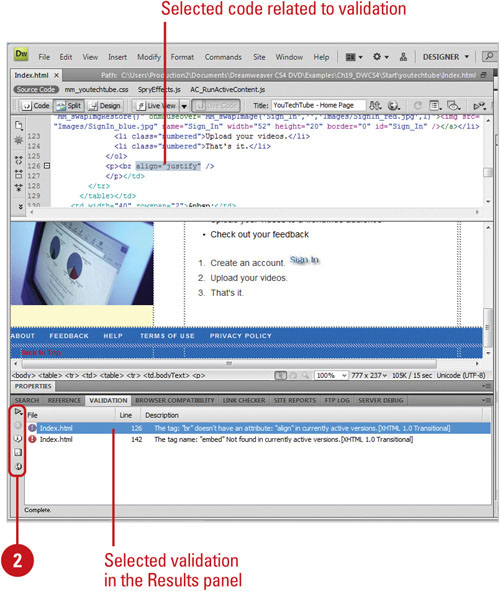
![]() The Site Reports tab in the Results panel displays the following:
The Site Reports tab in the Results panel displays the following:
• Item Icon. An icon appears to the left of the item indicating the type of error or problem associated with the file.
• File. Contains the name of the file.
• Line. Displays the line number of the code associated with the file.
• Description. Displays a description of the error.
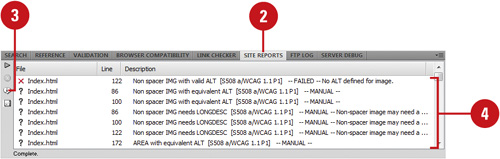
![]() To find out more information about a report item, select the report item, and then click More Info.
To find out more information about a report item, select the report item, and then click More Info.
The information appears on the Reference tab in the Results panel.
![]() To open the document associated with the problem or error, double click the report item.
To open the document associated with the problem or error, double click the report item.
![]() Create a report or display an existing one.
Create a report or display an existing one.
• Create. Click the Site menu, click Reports, select report options, and then click Run.
• Existing. Click Window, point to Results, and then click the Site Reports tab.

The Results panel appears, displaying the Site Reports tab with report details.
![]() Click the Save Report button in the Results panel.
Click the Save Report button in the Results panel.
![]() Select a location where you want to save the site report.
Select a location where you want to save the site report.
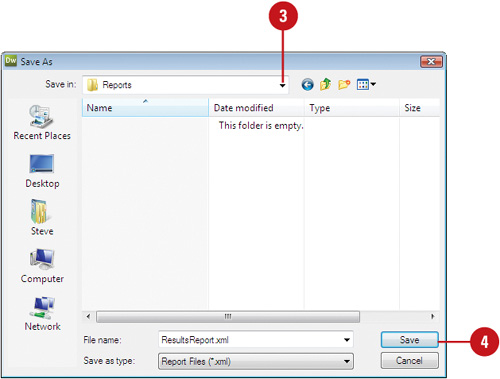
![]() Click Save.
Click Save.
See Also
See “Running Reports to Test a Site” on page 468 for information on creating a site report.
There’s an expression, and I’m sure that you’ve heard it before. It goes something like this: Build it and they will come. That might be true of baseball fields; however, I’m not so sure it’s true of Web sites. Building it is one thing... building it in an efficient way so that visitors will stay for the experience is quite another. Dreamweaver gives you the ability to gauge how well your pages download, based on a user-defined value. For example, the rule on the Internet today is called the 8-second rule. That simply means that visitors, on average, will only wait 8 seconds for your initial (home) page to load, before they get bored and go somewhere else... that’s not a whole lot of time. In response, Dreamweaver lets you view download statistics, based on the average bandwidth of your average viewer.
![]() Click the Dreamweaver (Mac) or Edit (Win) menu, and then click Preferences.
Click the Dreamweaver (Mac) or Edit (Win) menu, and then click Preferences.
![]() Click the Status Bar category.
Click the Status Bar category.
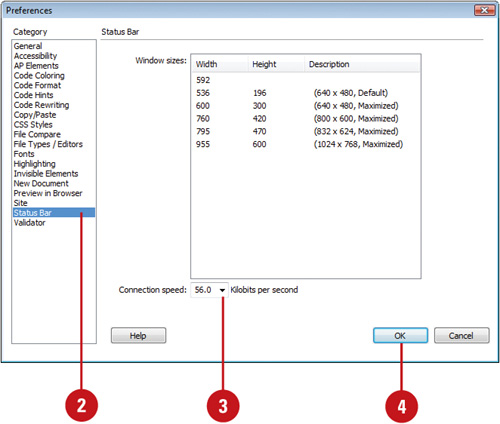
![]() Click the Connection Speed list arrow, and then select from the pre-defined bandwidth options, or enter in a user-defined bandwidth.
Click the Connection Speed list arrow, and then select from the pre-defined bandwidth options, or enter in a user-defined bandwidth.
![]() Click OK.
Click OK.
Did You Know?
You can quickly view Download statistics. View the file size and subsequent download time in the Download Statistics section of the Document window (located in the lower-right corner of the document window).
You can determine the speed of your file transfer rate to the Internet. Bandwidth is the amount of data that can be transferred over the network in a fixed amount of time. On the Net, it is usually expressed in bits per second (bps) or in higher units like Mbps (millions of bits per second). A 28.8 modem can deliver 28,800 bps, a T1 line is about 1.5 Mbps.