Chapter Eight: Preparing Photos for the Web with Photoshop
Preparing photos for use on the Web and on mobile devices (like cell phones or smart phones) requires saving the image in a file format supported by the browsing environment and then creating the best-looking image you can while keeping the file size low for quick loading on any Internet connection.
Because this section pertains to photos—as opposed to line art, such as a solid-color logo or other image with no photographic or highly detailed content—the two most appropriate formats to use are JPEG or PNG (the third widely supported image format on the Web, GIF, does not present photographs well). JPEG is the standard for photos, and provides the depth of color and detail that photos, even at the lowest resolution, need to look good online or on a mobile device.
So, this chapter will focus on how to use Photoshop CS5 to prepare photos for the Web, exploring approaches and techniques that best handle preserving image quality while generating Web-ready images that download quickly and are accessible in any browsing environment.
#47 Saving Photos for the Web and Mobile Devices
Photoshop’s Save for Web & Devices window is almost an application in and of itself. It is the tool through which photos (or other artwork) opened and edited in Photoshop is compressed (reduced in file size) so that it will open quickly in a browser. And it’s where you define the type of file and compression to use in generating Web-ready artwork.
Most of this chapter will focus on using the Save for Web & Devices window, and we’ll zoom in on some features that make a big difference in how your photos appear online. To begin, let’s walk through the basic steps of using the Save for Web & Mobile Devices window.
The first step is to open your image file—in whatever format it was originally captured—in Photoshop. With Photoshop CS5 open, choose File > Open, and, in the Open dialog, navigate to and double-click on an image file to open it in Photoshop.
With the photo open in Photoshop, follow these steps to save it as a Web-ready file:
- Choose File > Save for Web & Devices. The Save for Web & Devices window opens. In the following steps, and in future sections of this chapter, I’ll survey options for controlling the quality and size of your image, but one of the great things about this window is that you can choose the 4-Up tab in the upper left and compare different settings. Click in any of the four preview quadrants. As you do, export settings adjust in the dialog (Figure 47a).
Figure 47a. Previewing four options for exporting an image to a Web-ready, compressed JPEG file.
- As you adjust different settings in the Save for Web & Devices window, you can preview how those settings will look in the selected quadrant of the Preview section.
- You can increase Blur (the default is 0) to reduce the number of artifacts in your photo. Artifacts are stray pixels of nonmatching colors, common in low-resolution JPEG images, that appear on or near large areas of solid color. The higher the number, the less sharp the image will be, but if you have a lot of artifacts to deal with, that can be an appealing trade-off. The key is to establish a blur setting that reduces the artifacts without reducing too much detail in the image.
- Select or deselect the Optimized check box. Selected, the default, creates the smallest-size file possible, without loss of quality, based on all the settings you put in place for the chosen format.
- If saving to PNG or GIF, use the Matte pop-up menu when assigning transparency (see #53, “Saving Images with Transparent Backgrounds”).
- You might well want to check the “Embed Color Profile includes an ICC Color Profile” check box. More and more browsers can read the profile, so for sites with high-quality artwork, it is worth the slight increase in file size to select this option and attach an sRBG profile.
- After you have defined your output settings and previewed them, you are ready to save your image for the Web. Click Save, and in the resulting Save Optimized As dialog, choose a location and name for the file and click Save again.
#48 Cropping for the Web
Often images from a camera are too large to fit onto a Web page. Even $100 digital cameras are capable of taking high-quality images with pixel dimensions in the thousands. Those images must be reduced in size (and correspondingly in file size, to speed up downloading) to work on a Web page.
There are two basic solutions to resizing an image: cropping or rescaling. Cropping cuts out a part of the image, whereas rescaling changes the size of the entire image (while maintaining the same height-to-width ratio so as to avoid distorting the photo).
You can rescale an image in the Save for Web & Devices window. But you must crop an image before you launch the dialog.
To crop an image for the Web:
- With your image open, click the Crop tool in the toolbox, and draw a box surrounding the portion of your image you wish to retain after cropping.
- Resize the box, using the handles, as needed (Figure 48a). You can also move the box to reposition the cropping area.
Figure 48a. Resizing a crop area (the Crop tool is selected in the toolbar).
- Press Return/Enter. The crop is performed.
#49 Scaling for the Web and Devices
The Save for Web & Mobile Devices is designed to fine-tune sizing to match a Web size or Mobile device, not to reduce images from their original (from a camera) size to a Web-appropriate size. So, before resizing an image in Save for Web & Mobile Devices, rescale your image in the regular Photoshop window:
- Choose Image > Image Size. The Image Size dialog opens.
- Set Resolution to 72 pixels/inch—standard Web resolution.
- Leave the Scale Styles check box in the default (checked) state. In the event that you apply a style to a photo (like a drop shadow), this setting will adjust the size of the style proportionally if the image is rescaled.
- Select the Constrain Proportions check box to maintain the original height-to-width ratio. Also, select the Resample Image check box to allow Photoshop to intelligently handle the resizing process, and figure out which pixels to eliminate with minimal distortion to the image. Generally the Bicubic Sharper options works best for reducing artwork in size for the Web (Figure 49a).
Figure 49a. Resizing an image for the Web, and resampling to maximize image quality.
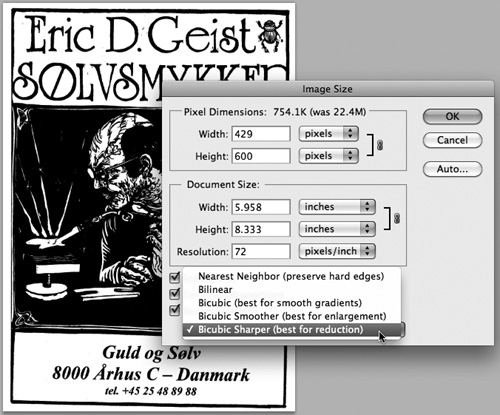
- Enter either a height or a width in the Pixel Dimensions area of the dialog; the other dimension adjusts to maintain the original image proportions. With the new dimensions selected, click OK.
After you have resized your image to something close to the final output size, you can use Save for Web & Mobile Devices to tweak your image size by changing the settings in the Image Size area.
If you are creating Web images that must display well in a mobile device, you can use Adobe Device Central to test your image in a specific device.
To do that, follow these steps:
- Choose File > Save for Web & Devices.
- Click the Device Central button to open the Device Central window.
- In the Scaling panel, choose Use Original Size to see how the image, at its current size, will look in a mobile device.
- Next, choose a device to preview the image in. Click the Browse link in the upper-right corner of the Device Central window, and scroll down to find the device you wish to resize your image for. Drag that device into the Test Devices panel (Figure 49b).
Figure 49b. Adding a test device in Device Central.

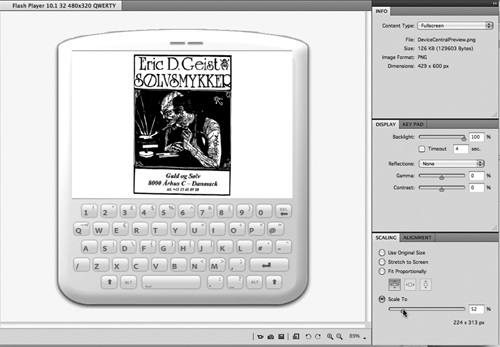
- Click the Emulate Image to preview your image in the selected device. If the size does not work well, use the Scale To slider in the Scaling panel to preview different dimensions. Note the best display dimensions in the Scaling panel (Figure 49c). Device Central will not resize your image; you’ll need to do that back in the Save for Web & Devices window.
Figure 49c. Previewing and scaling an image in a device.
- Exit Device Central by choosing File > Return to Photoshop. Enter either the height or width you identified in the previous step in the Image Size area of the Save for Web & Devices dialog. Click Save to save a rescaled version of your image for use in the mobile device.
#50 Preparing Thumbnails
One of the most asked questions I get from students, readers, and clients is: What’s a quick, easy way to generate thumbnails? It’s an informed question—a huge part of the labor involved in preparing images for the Web involves creating small thumbnail “preview” versions of the images that download quickly and take up little page space, but give a visitor a good idea of what he or she will see if they click the thumbnail to open a full-sized image.
Sadly, Photoshop CS5 doesn’t incorporate any new tool or feature for generating thumbnails, but here’s a tried-and-true set of steps to do that.
To create thumbnails from full-size photos—to serve as links in a thumbnail gallery, for example—follow these steps:
- With the image open, decide whether you want your thumbnail to show the entire image or a portion of the image.
- If you want to have the thumbnail show just a portion of the image, use the Crop tool (or the Image > Crop command, in conjunction with the Rectangular Marquee) to crop away all but that part of the image.
- With the image displayed—in full, or now cropped to the portion you want to turn to a thumbnail—choose Image, Image Size.
- Reduce the image Pixel Dimensions to the size of the thumbnail you want to create. An average thumbnail size is something in the range of 72–96 pixels wide and/or 72–96 pixels high, but you can enter any value you choose based on the space the thumbnail should be to fit on your Web page.
- Change the Resample Image method to Bicubic Sharper (best for reduction), so that you don’t lose crisp, detailed content in the image when you reduce the image size. Click OK.
Repeat these steps for other images you want to reduce to a thumbnail, or create an Action to automate the process (see sidebar).
#51 Applying Progressive or Interlaced Downloading
There are two ways an image can download into a browser. Normally (by default) the image downloads line by line. You’ve probably experienced this. The downside is that it requires a visitor to watch the whole image download before they decide if they feel like waiting to see the image. Progressive or interlaced downloading solves this by having an image “fade in” from blurry and grainy, to full resolution.
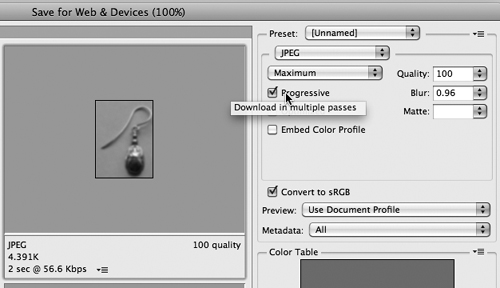
Interlacing can be applied to GIF or PNG images in the Save for Web & Devices window. But JPEG is the best format for photos. While JPEG does not support interlacing, you can choose Progressive download in the Save for Web & Devices window (Figure 51a).
Figure 51a. Selecting Progressive downloading for a JPEG image.
#52 Defining Compression, Dithering, and Color Palettes
Throughout the course of this chapter, I’ve alluded to or noted that there are three Web-friendly image formats to which you can save images: JPEG, PNG, and GIF.
Here’s a quick survey of the available settings for different formats:
• GIF, JPEG, and PNG have different compression options. When using the Save for Web & Devices dialog, the format you choose determines which of these options—for compression, dithering, and number of colors—are used to compose the image.
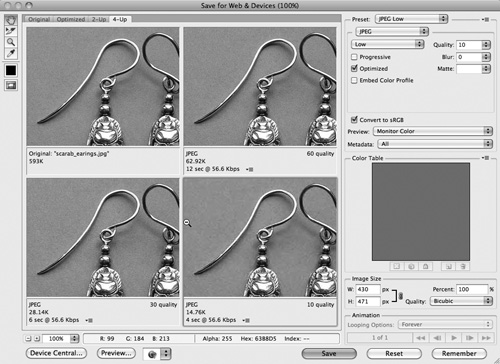
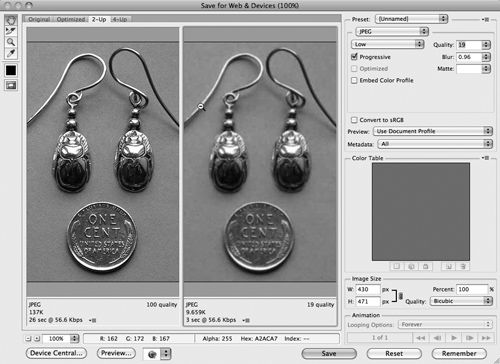
• JPEG offers none of these options, because the format itself supports millions of colors and provides lossy compression, and through your choices in the Quality settings, you determine how much is lost (Figure 52a).
Figure 52a. Comparing a highly compressed JPEG (right) to a high-quality JPEG (left).
• PNG 8 format offers Dither settings (Diffusion is the default, or you can set a percentage). You can also set the number of colors that will be used to create the image, from 2 to 256. Obviously, the higher the number, the clearer and more detailed the image will be. PNG 24 offers no Colors setting.
• GIF, like PNG 8, allows you to choose the number of colors that will be used to compose the image, make a Dither selection (using a definition—again, Diffusion is the default—and establishing a percentage). It also offers a Lossy setting, which allows you to determine how much detail is lost to compression. Another setting offered is Web Snap, which is set to 0% by default but can be increased to force Photoshop to set colors in the image closer to the Web-safe palette.
#53 Saving Images with Transparent Backgrounds
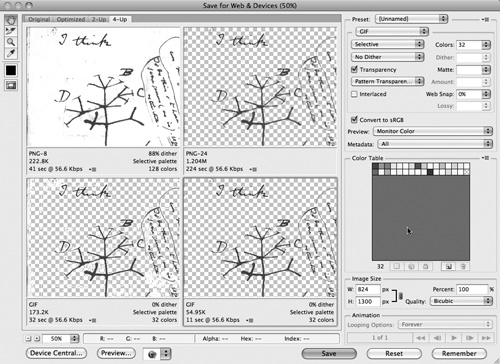
You can save artwork with transparent backgrounds in Photoshop as transparent GIF or PNG images for the Web. Let’s break that down a bit: You can create artwork in Photoshop that sits on a Web-page background, allowing the background to show through (Figure 53a).
Figure 53a. Artwork with a transparent background against a colored page background in Dreamweaver.
Using the check boxes (and the Transparency Dither settings), you can adjust the display of transparent pixels in the optimized image. There is no dithering option for PNG 24. If you choose Pattern, Noise, or Diffusion Dither (from the drop-down list that defaults to No Transparency Dither), the Amount field activates to the right, and you can enter a value or use the slider to determine how much dither to create (Figure 53b).
Figure 53b. Top left: no transparency; top right, PNG with transparency; bottom left: transparent GIF with no dithering; bottom right: transparent GIF with pattern transparency dithering.