Chapter Twelve: Designing Interactive Elements in Flash Catalyst
Flash Catalyst CS5 is an entirely new application introduced with the CS5 Web Premium Suite. Catalyst has something of a split personality: It was created to allow illustrators to prototype interactive elements (like a scrollbar, a button, or a form), and hand them off to high-level programmers who integrate those elements into complex database-driven applications coded in Flash Builder 4. If you are designing in a large environment with a rigid division of labor and an army of programmers and database geeks, you’ll use the techniques in this chapter to hand your work off to them.
Flash Catalyst’s native file format is FXP. Those files can be opened in Flash Builder 4, but—and this is a significant limitation for small, medium, and semi-large design environments—Flash Catalyst elements cannot be handed off to Flash Professional CS5 developers. But Flash Catalyst CS5 can also create some basic, interactive Flash (SWF) files that can be popped directly into a Dreamweaver CS5 Web site. It is that workflow that I’ll focus on in this chapter, even while the techniques are applicable in any environment.
Finding your way around the Catalyst environment will be a breeze. There isn’t that much to it. Don’t expect to be able to move or resize Catalyst’s limited set of panels—they sit on the right side of the screen and stay put. The toolbar is minimalist, with a bare-bones set of tools for selection, drawing, navigation, and zoom. Text editing and formatting options are similarly short-handed. The concept is you will create artwork and type in Illustrator and Photoshop, and then assign interactivity to it in Catalyst. And that’s what you’ll learn to do in this chapter.
#76 Opening and Editing Artwork from Illustrator or Photoshop
When you launch Flash Catalyst, the opening splash screen prompts you to create a new project from a design file from an Adobe Illustrator (AI) file, Adobe Photoshop (PSD) file, or an FXG file (the native format that Catalyst shares with Adobe Flash Builder 4). Or, if you choose File > New Project from Design File, you can launch a Catalyst project using an existing Illustrator (AI), Photoshop (PSD), or FXG file. And, when you need to edit that artwork, you’ll “round-trip” the illustration back to Illustrator or Photoshop, make the edits, and then pop it back into Catalyst.
Let’s walk through this. I’ll use Illustrator as an example, but the steps are almost identical in Photoshop.
- Create artwork in Illustrator or Photoshop. A simple, rounded-rectangle button will work well if you want to follow my recipe here. Save the artwork in native Illustrator or Photoshop format.
- Back in Catalyst, choose File > New Project From Design File. The Import dialog opens. Navigate to your Illustrator or Photoshop file and choose Open.
- The Import Options dialog appears. Depending on the origin of the file, the options will differ, but the default settings preserve artwork quality while limiting editability in Catalyst. Choose which options work best for you, and click OK.
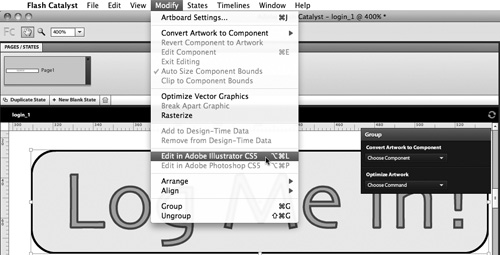
- The artwork appears on the Catalyst artboard. As I noted in the introduction to this chapter, you’ll find only the barest set of editing tools in Catalyst—that’s not its job. If you want to edit the artwork, select it (using Catalyst’s Selection tool), and choose Modify > Edit In Adobe Illustrator CS5 (or Adobe Photoshop CS5, depending on the origin of the file) (Figure 76a).
Figure 76a. Sending artwork from Catalyst back to Illustrator for editing.
- When you edit the artwork in Illustrator or Photoshop, a message appears in a bar at the top of the screen indicating that you are editing from Adobe Flash Catalyst. Click the Done link when you are done editing the artwork to return to Catalyst, bringing your edited artwork with you (Figure 76b).
Figure 76b. Editing Flash Catalyst artwork in Illustrator.

- When you click the Done link, you’ll again be prompted to define how your artwork will be exported back into Catalyst—this time with the FXG Options dialog. Again, all the various options essentially offer you a trade-off between preserving editability (of text, effects, and so on) of elements not supported in Catalyst, or preserving the artwork as faithfully as possible and in the process losing some editability in the source application. After you set the conversion settings and click OK, the FXG Save Warnings dialog appears, alerting you to any changes made to your file.
#77 Wireframing in Catalyst
Wireframing is the process of designing a rough, or sometimes a detailed prototype or sketch of a planned Web page. Although Catalyst’s drawing features are limited, they do include basic icons and tools needed to sketch out a Web page, into which you can add interactive objects (like forms or buttons) before sending it to a Flash programmer or a Dreamweaver Web designer (which might be you!).
To sketch a prototype of a page in Catalyst, choose File > New Project. In the New Project dialog, enter a name for your project, and enter the dimensions of the Web page you are prototyping in the Width and Height boxes. You can choose a background color from the Color swatch (Figure 77a); then click OK to generate a blank document.
Figure 77a. Defining a new document for wireframing.

Use File > Import to add images (PNG, JPEG, or GIF), video (FLV or FV4), sound (MP3), Flash (SWF), another Catalyst file (FXG), or Illustrator or Photoshop artwork to your wireframe.
Use Catalyst’s Select tool (or Direct Select, available from the toolbar at the top of the panel) to select or resize objects using the bounding box. Hold down the Shift key as you do to retain height-to-width ratio and to avoid distorting the objects.
Draw shapes with the Shapes tools. Control-click (Mac) or right-click (Windows) on objects to align or arrange them.
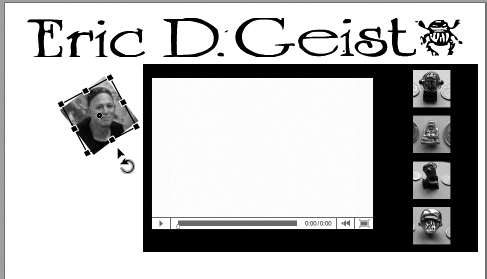
Use Catalyst’s Transform tool to rotate selected objects (Figure 77b).
Figure 77b. Wireframing and rotating an object with the Transform tool.
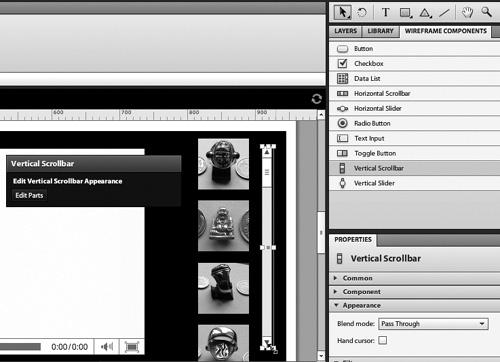
In addition to placing artwork and media on the artboard, a set of wireframing icons and objects is available in the Wireframe Components tab of the top panel in the panel bar to the right of the artboard. Click and drag to pull any of those components onto your wireframe (Figure 77c).
Figure 77c. Adding a vertical scrollbar to a wireframe.
To share the wireframe, save it as a SWF file (see #83, “Exporting Catalyst Projects to SWF”).
#78 Creating a Four-State Button
Four-state buttons—buttons that display differently in normal, hovered, clicked, and active states (or some variation of those)—add interactivity and dynamism to Web pages. Designing a four-state button is easy in Flash Catalyst, as long as you create the artwork in Illustrator or Photoshop first. But wait! Before you expend the energy creating four buttons (one for each state), hit the pause button. You only need one button from Photoshop or Illustrator.
If you’ve got a button ready as an Illustrator or Photoshop file, follow these steps to use effects in Catalyst to generate four “looks” for the button:
- Create a Catalyst file based on a button you designed and saved as an Illustrator or Photoshop file (see #76, “Opening and Editing Artwork from Illustrator or Photoshop”).
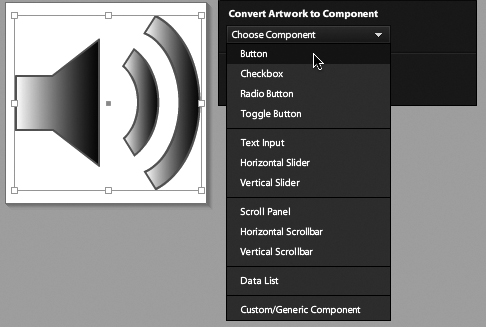
- Double-click on the button artwork from Illustrator (or Photoshop), and assign Button from Catalyst’s Convert Artwork to Component pop-up (Figure 78a).
Figure 78a. Converting artwork to a button.
- As soon as you convert the artwork to a button, the Convert Artwork to Component pop-up menu presents four button states (up, over, down, or disabled). Click on any of them to open the selected button state in the artboard (all four button states now display at the top of the screen, and you can switch to any of them by clicking on one).
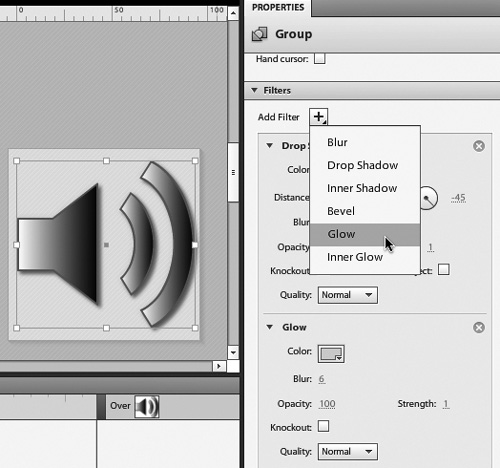
- You can use the (admittedly limited) set of graphic filters in Catalyst to modify the up, over, down, and disabled states of a button, choosing from Blur, Drop Shadow, Inner Shadow, Bevel, Glow, or Inner Glow effects available from the Filters section of the Properties panel—part of the panel bar to the right of the artboard (Figure 78b).
Figure 78b. Applying filters to a button state selection.
#79 Assigning Actions
The real power of Flash Catalyst lies in its ability to assign actions to graphic elements. A triangle can become a play button for a video, an icon can become a link, a button can launch an audio file, and so on.
The list of assignable actions is limited to the following:
• Play, pause, or stop video
• Go to a URL
• Play, pause, and stop SWF files, or go to a specific frame
• Change a component’s state
• Change or fade opacity
• Add a sound effect
• Move, resize, and rotate objects
• Rotate an object in 3D space
The basic concept in applying actions to objects is that an object with an action attached requires at least two states, or pages: the original state, and the state the object inhabits after it goes through whatever changes are defined in the action. For example, a Fade action might start with an opaque object in the first state and end with a transparent object in the second state. The Timeline is used to control the duration of the action, and the Properties panel defines the nature of the action (in the case of a fade, for example, from the opacity level at the start of the action to the opacity level at the end of the action).
I’ll walk you through the process of adding a couple of actions to a shape, and you can modify these steps to apply other actions to other objects:
- Use the Shape tool to draw a rectangle. Give it a solid color fill using the Properties panel. To make the experience more real-life, feel free to add some text and experiment with the limited text formatting options in the Text Properties panel. You can select both the text and the rectangle, and choose Modify > Group to group the text and background.
- Choose State > Duplicate State to create a second state (page) with the same content as the original page. We’ll define actions that govern the transition from the first to the second state (Figure 79a).
Figure 79a. Duplicating a state to prepare to assign actions.

- Select Page 1 in the Pages/States tab bar.
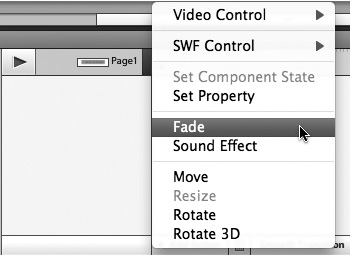
- Select an object—the object must be selected for the Add Action button to be active. Click the Add Action (+) symbol at the bottom of the Timeline, and choose Fade (Figure 79b).
Figure 79b. Adding a Fade action.
- Define the duration of the action by dragging the duration bar to 5 seconds (Figure 79c). You can use the slider at the bottom of the Timeline to zoom in and out (to expand or contract the duration spacing).
Figure 79c. Assigning a duration to the Fade action.

- Test the action in Flash Catalyst by clicking the Play button, to the left of the Timeline.
- Experiment with settings in the Fade Properties panel (like repeat, or adjusting the start and finish opacity settings). Use the Play button to preview the effect settings.
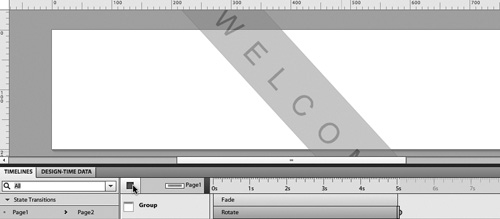
- To add a rotation, choose Rotate from the Add Action (+) pop-up. Drag the duration of the Rotate action to match the duration of the Fade action, and preview the combined effect using the Play button (Figure 79d).
Figure 79d. Previewing two effects using the Play button in the Timeline.
#80 Creating a Media Player in Catalyst
You can design custom video player controls in Flash Catalyst, and apply them to an imported Flash Video (FLV) or SWF file.
- To start out, I’ll let you design your own play, pause, and stop buttons. Feel free to do better than mine (Figure 80a). If you use more than one object for a button, select both/all objects and choose Modify > Group to convert them into an easy-to-manage group.
Figure 80a. Play, pause, and stop buttons to be assigned to a video.

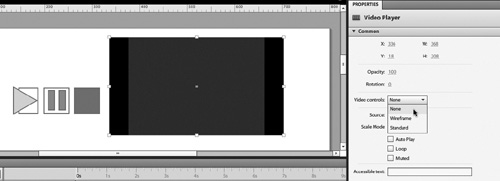
- Next, you’ll need an FLV video. To convert any video to FLV format, consult #100, “Using Media Encoder.” Insert the video on the page by choosing File > Import > Video/Sound File. Navigate to an FLV video file, and double-click on the file to insert it on the Artboard. You can choose from three player control options from the Video Controls pop-up in the Video Player properties panel. As we are creating custom player controls, choose None (Figure 80b).
Figure 80b. Customizing player controls—in this case, turning them off.
- Now we’re ready to convert the artwork to buttons. Double-click on the artwork that will be used for your Play button, and choose Button from the Component pop-up.
- Convert the artwork for your pause button, and convert stop buttons to buttons as well.
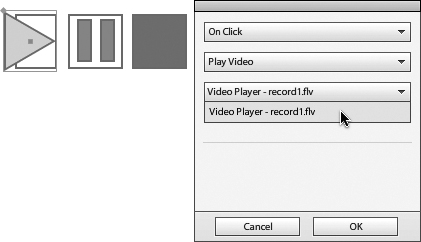
- Select the button that will become the Play button, and click the Add Interaction pop-up in the Button panel. From the first pop-up, choose On Click. From the second, choose Play Video. And from the third pop-up, select your video—unless you have two or more videos on your artboard, there will just be one video to choose from (Figure 80c).
Figure 80c. Defining a button to play a video.
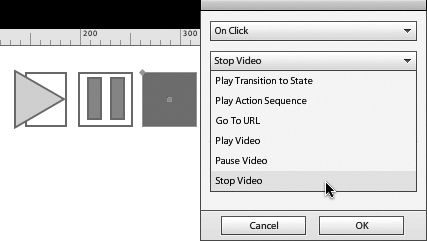
- In a similar way, define your pause button to pause the video and your stop button to stop the video (Figure 80d).
Figure 80d. Defining a Stop button.
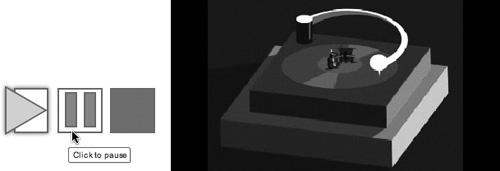
You can test your player controls by choosing File > Run Project (Figure 80e).
Figure 80e. Testing custom video controls in a browser.
#81 Creating a Custom Scrollbar
You can design a custom scrollbar for a Flash application in Catalyst from any piece of artwork. Horizontal and vertical bars work best.
You need two basic elements to create a scrollbar: a thumb and a track (up and down arrows are optional). Create that artwork in Illustrator or Photoshop and copy it into Catalyst, or simply draw a bar and a thumb using the rudimentary drawing tools in Catalyst.
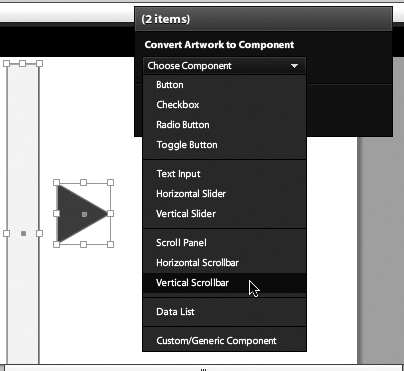
With the two objects selected, choose Vertical (or Horizontal) Scrollbar (Figure 81a).
Figure 81a. Selecting objects for a vertical scrollbar.
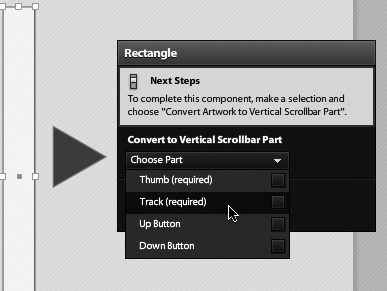
Click Edit Parts to isolate the scrollbar components. Select the artwork that will function as the scrollbar track, and choose Track (required) from the Choose Part pop-up (Figure 81b). Select the artwork that will function as the scrollbar thumb, and choose Thumb (required) from the Choose Part pop-up.
Figure 81b. Assigning a part of a scrollbar.
You can test your scrollbar by choosing File > Run Project.
#82 Building a Form
Forms, like scrollbars designed in Flash Catalyst, require additional programming to actually work, but you can use them for prototyping Web designs (or, if you’re working with a team of programmers, you can turn the form over to them to integrate with a server database).
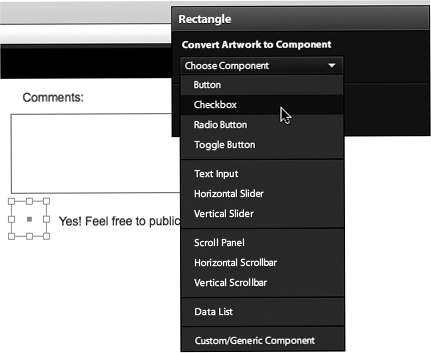
To create form objects in Catalyst, draw a rectangle and double-click on it. From the Choose Component pop-up, select one of the form elements—Button, Checkbox, Radio Button, Toggle Button, or Text Input (Figure 82a). Or, you can drag one from the Wireframe Components tab.
Figure 82a. Assigning a Checkbox component to a selected rectangle.
Test your form in a browser by choosing File > Run.
#83 Exporting Catalyst Projects to SWF
When you create a project in Flash Catalyst, you generate coding that is saved as an FXP file—a format supported by Flash Builder 4 but not Flash Professional CS5.
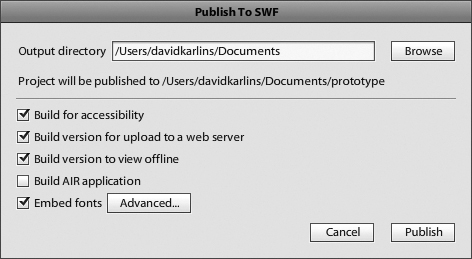
To save your Flash Catalyst project as a SWF file (which is easy to embed in a Web page), choose File > Publish to SWF/AIR.
In the Publish to SWF dialog, use the Browse button to navigate to the folder to which the SWF file will be saved (the file will adopt the name of the Catalyst project).
Use the “Build for accessibility,” “Build version for upload to a web server,” and “Build version to view offline” options to generate files that can be opened in the widest array of Web environments.
Use the “Build AIR application” to generate a version of your file that will run in a stand-alone environment, without a Web browser.
Use the Embed fonts check box to preserve any text fonts when the project is viewed.
After you define Publish to SWF options, click Publish (Figure 83a).
Figure 83a. Click Publish once you’ve defined your Publish to SWF options.