Chapter Fifteen: Using CS5 Tools for the Web
Along with the “big 5” (Dreamweaver, Flash Professional, Flash Catalyst, Illustrator, and Photoshop), Creative Design Suite 5 Web Premium ships with several other major programs: Fireworks, Flash Builder 4 Standard, Contribute, and Acrobat Pro.
Flash Builder Standard is a program for developing “back-end” connections to programs that process data, and is not part of Web “design” per se. Contribute is Adobe’s contribution to content management systems (CMSs). This book focuses on working with more widely implemented open source CMSs, like Drupal (see #22, “Connecting Dreamweaver to a CMS Site,” and #23, “Formatting CMS Themes,” both in Chapter 3). Adobe Acrobat Pro is used to create PDF files.
In addition, Web Premium ships with programs that could be called utilities but are very useful in creating and publishing Web content. We’ll focus on those in this chapter. In addition to Device Central (see #8, “Previewing in Live View and Browsers,” in Chapter 1), the most valuable (and underrated) utility is Adobe Media Encoder CS5. In a world of fast-changing online video standards, Media Encoder converts video files to a wide range of other video formats. We’ll also explore Adobe Bridge, which has useful tools for preparing photos for the Web.
While it has not been possible to explore Fireworks in our limited space in this book, in this chapter, I’ll show you how to access particularly useful Fireworks features from Bridge.
#97 Managing Files in Bridge
Adobe Bridge serves as kind of a Grand Central Station for coordinating files used in different design projects. Bridge is somewhat tilted toward print design—in part that’s because Dreamweaver handles most of the “coordinating” role for Web projects that Bridge plays for print projects. But you can survey more information about your files in Bridge than is easily available through your operating system’s file management tools. Photographers use Bridge to batch import, name, and add metadata (like camera information to date).
Bridge is a stand-alone application; you launch it like any other application. It opens with file navigation on the left (viewable in either the Favorites or Folders panel) and a large Preview section in the middle with four views (Essentials, Filmstrip, Metadata, and Output), all of which produce different displays on the right side of the screen. Like other CS5 applications, panels can be viewed or hidden using the Window menu. The Path bar, new to CS5, identifies a breadcrumb-like trail to reveal folder locations in your operating system’s file manager.
You can use Adobe Bridge to browse, view, and organize files, but I advise against editing, moving, or renaming files for Web projects in Bridge. Those changes do not coordinate with settings in your Dreamweaver CS5 Web, and changing filenames or properties in Bridge can corrupt your Web site (see the “Warning” sidebar).
Although I advise extreme caution in doing any file editing for Web projects in Bridge, there are some tools that can be big timesavers, if applied with care. One is you can rename sets of files. For example, to prepare images for the Flash CS5 Professional Advanced Slideshow template, the images need to be named image1.jpeg, image2.jpeg, and so on. You can do that renaming in Bridge by following these steps:
Select the files to be renamed in the Content window of Bridge.
- Choose Tools > Batch Rename from the main Bridge menu.
- In the Destination Folder area of the Batch Rename dialog, choose an output location. If you select Copy to Another Folder, use the Browse button to locate a new output folder.
- In the New Filenames area, leave the first pop-up set to Text, the default. Other options allow you to assign attributes like date and time, or file metadata.
- In the next pop-up menu, choose Sequence Number, and enter the number 1 in the next column. Choose One digit from the new pop-up menu that appears.
- In the third pop-up menu, choose New Extension, and type JPEG. I’m doing this because my original filenames use the .jpg filename extension for JPEGs, and the Flash Script requires .jpeg filenames.
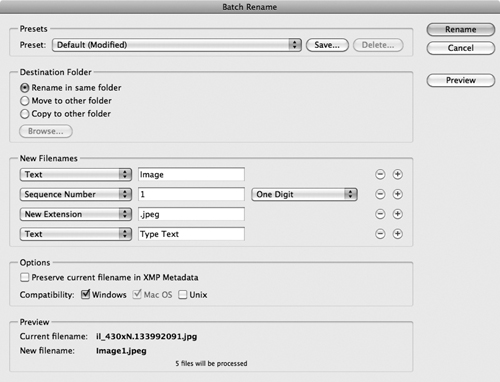
- For the purposes of this recipe, converting the filenames to image1.jpeg, image2.jpeg, and so forth, we do not want any content supplied by the last pop-up, so set it to text and delete any content that appears in the next column (Figure 97a). You can preview the output filenames in the New Filename field at the bottom of the window.
Figure 97a. Setting up the Batch Rename dialog to generate new filenames image1.jpeg, image2.jpeg, and so on.
#98 Creating an Adobe Web Gallery
One of the most useful and powerful features of Bridge CS5 for Web designers is the ability to generate a Web gallery. Web galleries (essentially slideshows) are various ways to present sets of images, and all of them work well in Web sites. Bridge CS5 includes some nice new Web Gallery templates, along with the ability to save custom galleries.
To generate a Web gallery, follow these steps:
- Organize the image files to be included in the gallery in a folder in Bridge.
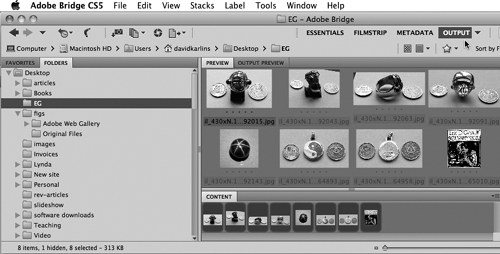
- Navigate to the folder with the image files in the Folders panel, and select the Output tab in the top right of the Bridge window (Figure 98a).
Figure 98a. Selecting files for output to a Web gallery.
- In the Output panel, click the Web Gallery button. From the Template pop-up menu, choose any of the templates, and choose additional styling from the Style pop-up menu.
- In the Output panel, expand the Color Palette and Appearance sections. Use the Color Palette swatches to change the color of any element in the gallery, and use the Appearance settings to control display of images. Click the Refresh Preview button to preview the gallery (Figure 98b).
Figure 98b. Adjusting thumbnail size, and previewing a Web gallery.

- Expand the Site Info section of the Output tab, and enter content for title, caption, contact information, and so on.
- Expand the Create Gallery section. If you are saving to a location on your computer, use the Browse button to navigate to and select that location. If you are saving to a remote Web location, enter the FTP connection.
- After you define output settings, click Save (or Upload to send to a defined remote site). All the files for the Gallery are saved, ready to upload to your Web site in Dreamweaver.
#99 Accessing Fireworks from Bridge
Adobe Fireworks CS5 is an illustration and design tool that somewhat straddles the vector/bitmap worlds that are the domain of Illustrator and Photoshop respectively. Bridge provides access to a fairly substantial set of Fireworks features through batch processing—where you select a set of files and apply changes to all of them.
To apply batch processing in Fireworks to a set of images, first select them in the Content tab in Bridge. Then, follow these steps to access different batch-processing options:
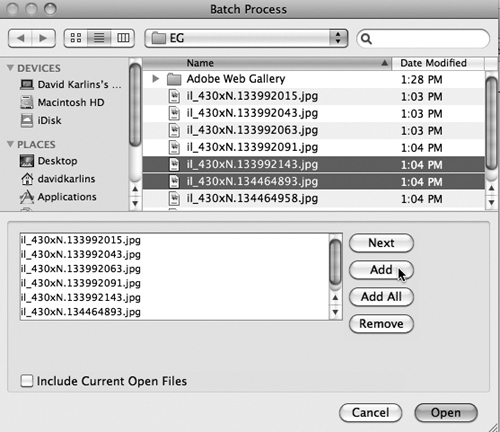
- Choose Tools > Fireworks > Batch. Fireworks CS5 launches, and the Batch Process dialog opens. Your selected files display in the bottom half of the dialog. You can use the Remove button to remove files from the batch set, or select files in the navigation section at the top of the dialog and use the Add or Add All button to include additional files (Figure 99a).
Figure 99a. Adding files to the queue for batch processing.
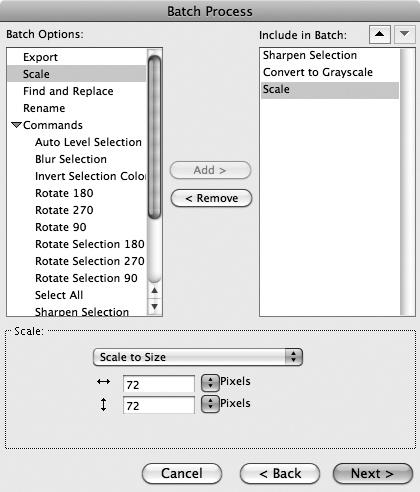
- With your set of files selected, click Next. In the new dialog, select different batch options (you can do more than one at a time) from the list on the left of the Batch Process dialog. For example, you can rescale all selected images, sharpen them, and convert them to grayscale; the last two options are available from the expanded Commands list (Figure 99b).
Figure 99b. Batch scaling, sharpening, and converting images to grayscale.
- Click Next. In the final dialog of the Batch wizard, choose an output folder (either the Same Location as the Original File, or use the Browse button to define a Custom Location), and a backup method (see the sidebar “Batch Backup”).
- When you’ve defined batch settings, click Batch. After the files are processed, they’ll be available in the folder you defined for output.
#100 Using Media Encoder
Adobe Media Encoder converts just about any media (see the sidebar “Support for Many More Formats in CS5” for exceptions) to any other media—and not just Adobe media files (like Flash SWF or FLV). You can extract a high-quality print still from a video, strip an audio soundtrack out of almost any video file, and batch-convert a video to a dozen other video formats and settings to satisfy viewers in any environment—even Apple iPhones.
As a way of introducing you to Media Encoder’s magic in our little bit of remaining space, I’ll walk you through a recipe for converting a video from another format (like QuickTime MOV, Windows AVI, or Adobe’s Flash Video (FLV) format to an iPhone-ready h.264 video. You’ll be able to substitute your own conversion output specs into the recipe to create video for other environments.
Follow these steps to convert a video to an iPhone-ready h.264 file:
- Launch Media Encoder. This is a stand-alone application that “you can’t buy in stores,” but it comes with CS5 Web Premium.
- Click the Add button in the opening dialog. In the Open dialog, navigate to and select video files to convert to another format.
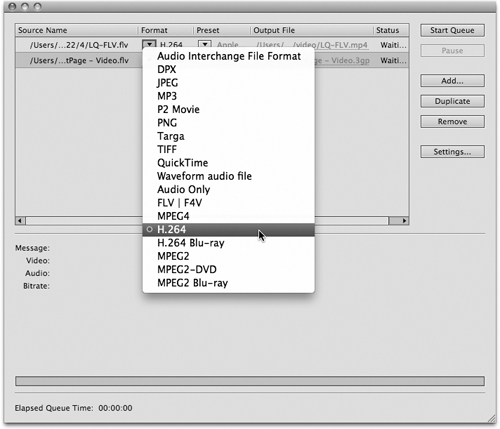
- For each file you added to the cue, select an output format from the Format pop-up menu. For example, to convert files to the h.264 format promoted by Apple, choose H.264 (Figure 100a).
Figure 100a. Defining an output format.
- Next, from the Preset pop-up, choose a format for your output video. The Presets are pretty well labeled, identifying the device (and even the screen orientation) for the output (Figure 100b).
Figure 100b. Choosing a preset to fit video onto an iPhone viewed widescreen.

- Click the Ouptut File link. The Save As dialog opens. Navigate to the folder to which you want to save your exported video file, and click Save (clicking Save doesn’t actually “save” anything; it just identifies the target folder for what will be a saved, exported video file).
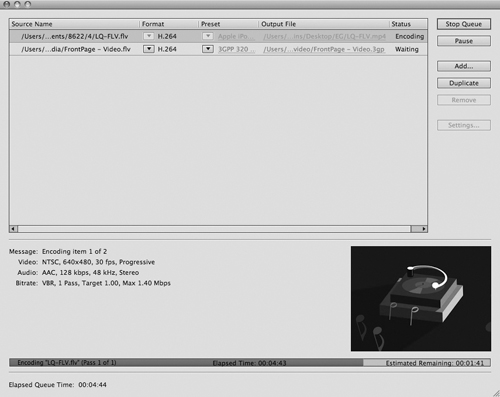
- After you’ve defined output settings for one video, or for a set of videos, click Start Cue. Your file(s) will be converted to the selected format(s). You can watch the progress in the area on the bottom of the Media Encoder window (Figure 100c).
Figure 100c. Viewing video conversion progress.