Chapter Six: Embedding Media
As this book goes to press, online media standards are in a state of flux and a bit of turmoil. Adobe’s Flash Player—which, as of this writing, is still widely established as the standard format for delivering video on the Web—is being challenged by new features in HTML5, supported by the new generation of browsers, that embed video without the Flash Player. So, in this chapter we’ll explore both approaches, as well as techniques for embedding video using the HTML4 <EMBED> tag.
Which video format should you use? I can’t make a call for you on that. All video formats have their strengths and weaknesses. Compressed and streaming video (like Flash Video [FLV]) cannot easily be downloaded or saved to a viewer’s computer or mobile device, but it provides the highest-quality, fastest-downloading video available. QuickTime movies, on the other hand, may not download as quickly, but they can be easily configured and can be easily saved to a viewer’s computer or mobile device.
Then there is the question of how to package your video. Dreamweaver CS5 makes it easy to embed FLV with a variety of player skins (controls and displays). MP4 videos (technically MP4 video can be packaged in FLVs, but here I’m referring to plain, “unwrapped” MP4s) can be embedded in Web pages using the new <AUDIO> and <VIDEO> tags in HTML5, and played on mobile devices like iPhones or iPads. I’ll show you how to do that in the last How-To in this chapter.
In short, be flexible. Consider providing multiple (or at least a couple) video formats. In the next chapter, “Working with HTML5 Pack Extensions in Dreamweaver CS5,” I’ll explain how to use new tools available for Dreamweaver that allow you to preview and prepare content for multiple browsing environments.
Finally, in this chapter I’ve included an exploration of how to embed Flash (SWF) objects. These can be interactive elements like embedded games or forms, animation, graphical (and scalable) type, or any other object created in Flash.
#38 Embedding Flash (SWF)
When you embed a Flash (SWF) object in a Web page in Dreamweaver, you can adjust the size of the object, define the size and color of a background behind the object, and even adjust features like whether or not an animation plays automatically when the page in which it is inserted opens or if a visitor has to click a Play button.
To insert a SWF file into an open Web page, choose Insert > Media > SWF. If you have not saved the open document, Dreamweaver will prompt you to do so. After you choose Insert > Media > SWF, the Select File dialog appears. Navigate to a SWF file and click OK.
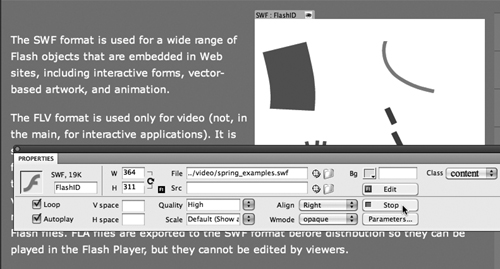
If you have selected accessibility prompts for SWF files in the Preferences dialog, you’ll be prompted to enter a title for your SWF video. When you embed a SWF file in a Web page, the movie appears as a gray box. Clicking the Play button in the Properties inspector previews animation and/or enables interactivity built into the Flash (SWF) object (Figure 38a).
Figure 38a. Previewing a Flash object with Play selected in the Properties inspector for a SWF movie.
You can adjust how the Flash Object displays and plays using parameters in the Properties Inspector:
• Use the Loop and AutoPlay check boxes to enable (or disable) looping (repeating) or autoplay (the animation plays when a page is loaded).
• The V Space and H Space fields allow you to define vertical (V) or horizontal (H) spacing between the Flash movie and other objects on the page.
• The Quality pop-up menu allows you to compress the Flash file (choose Low) for faster downloading and lower quality.
• In the Scale pop-up menu, the Default setting maintains the original height-to-width ratio of the original animation (that is, it prevents the animation from being distorted) when the Flash object is resized. The Exact Fit option in the Scale pop-up menu, on the other hand, allows you to stretch the animation horizontally or vertically if you change the original height and/or width.
• The Align pop-up menu is used to align the Flash object left or right, so text flows around the animation.
• The Bg pop-up menu is used to define a background color. The background color is active if you resize the Flash object and maintain the height-to-width aspect ratio by choosing the Default setting in the Scale field.
• The Reset size button restores the Flash object to its original size. The Edit button opens Flash (if you have it installed) to edit the Flash object.
• The Play button displays the Flash object in the Document window. Toggling to Stop displays the editable gray box.
• Selecting Transparent in the Wmode pop-up will make the background of the Flash object disappear if the background is a solid color.
#39 Embedding Flash Video (FLV)
Adobe is successfully promoting the FLV format as a kind of “universal” video format that transcends other competing media formats. This is the video format used at YouTube.
Dreamweaver CS5 makes it easy to embed movies that have been saved to the FLV format, and then choose from a nice little set of player controls that display in a browser window to make it easy for visitors to control the movie.
To embed an FLV file, follow these steps:
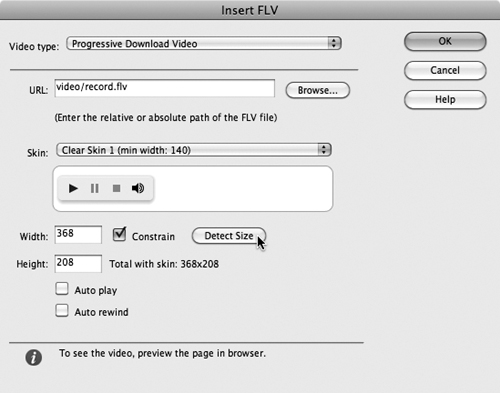
- Choose Insert > Media > FLV. The Insert FLV dialog opens. Use the Browse button to navigate to an FLV file (or enter the URL of a file on the Internet) in the URL field. Unless you are working with a special streaming server (and your server administrator will know this information), choose Progressive Download Video from the Video type pop-up menu.
- Click the Detect Size button in the dialog to detect the size of the video. Keep the Constrain check box selected since it is unlikely that you will want to distort the height-to-width ratio of the video. You can enter a new value in either the Width or Height field to resize the video. If you selected the Constrain check box, the nonedited dimension will automatically adjust to keep the height-to-width ratio of the video the same as the original (Figure 39a).
Figure 39a. Embedding a Flash Video file with detected size.
- After detecting the video size, you can use the Skin pop-up menu to select a player control set. Note that player controls require various sizes of videos, which is why you detected the video size in step 2 first (Figure 39b).
Figure 39b. Choosing a Flash Player skin for an FLV video.
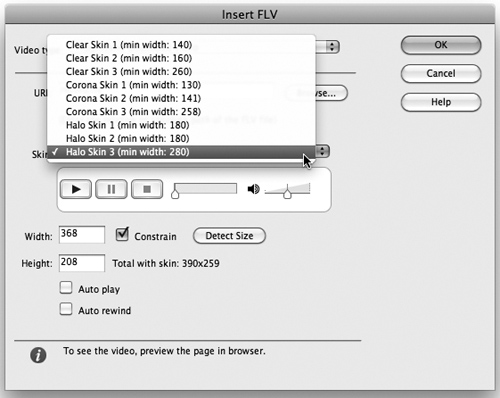
- You can enable Auto play or Auto rewind, or prompt users to download Flash Player features if necessary, using the check boxes in the dialog. If you elect to prompt users to download the Flash Player, you can accept or edit the text message that displays.
The Auto play, Loop (Auto rewind), and size can be adjusted in the Properties inspector.
Oddly enough, however, you cannot preview an FLV in Dreamweaver CS5’s Live view. To preview your video, choose File > Preview in Browser, and choose a browser or device (Figure 39c).
Figure 39c. Previewing an FLV in a browser.

#40 Embedding QuickTime Media and Windows Media
QuickTime movies can be easily embedded in Dreamweaver pages, and you can easily reset the size at which QuickTime movies will display. However, Dreamweaver does not provide easy-to-use sets of controllers for QuickTime movies like it does for Flash Video. Features like background color, autoplay, and scale (enlargement of a video by displaying it at a lower resolution) are all defined with parameters that must be entered manually.
To embed a QuickTime movie, choose Insert > Media > Plugin. The all-purpose Select File dialog (which is used for all types of plug-ins, not just QuickTime files) opens. Navigate to the QuickTime (MOV) file you want to insert, and click Choose (Mac) or OK (Windows).
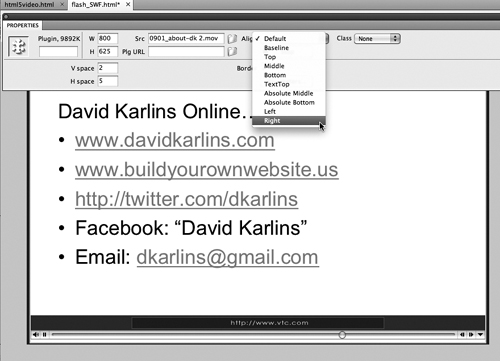
The embedded QuickTime movie appears as a minimalist 32-pixel-square box regardless of the size of the actual movie. To display the movie at an appropriate size, enter a height and width in the Properties inspector. You can also enter vertical (V) or horizontal (H) spacing in the Properties inspector. Use the Align pop-up menu to align the movie on the left or right side of the page (Figure 40a).
Figure 40a. Defining dimensions, spacing, and alignment for a QuickTime movie.
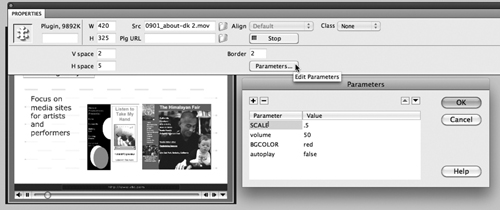
You have to manually enter display parameters into the Parameters section of the Properties inspector. Click the Parameters button in the Properties inspector to display the Parameters dialog. You can add parameters by clicking the plus button in the dialog. Enter a parameter in the left column, and enter a value in the right column. After you set parameters, click OK to close the Parameters dialog (Figure 40b).
Figure 40b. Entering parameters for a QuickTime movie.
You can preview your QuickTime movie in the Dreamweaver Document window by clicking the Play button in the Properties inspector. You can preview a QuickTime video using Live view, but you’ll have more reliable preview results if you preview the page with the movie in a Web browser (choose File > Preview in Browser, and then select a browser from the available list if you have more than one).
Embedding Windows Media is similar to embedding QuickTime movies except that the parameters are not as standardized or easy to set. To embed a Windows Media movie, choose Insert > Media > Plugin. The Select File dialog (used for all types of plug-ins) opens. Navigate to the Windows Media file you want to insert, and click Choose (Mac) or OK (Windows). A 32-pixel-square box appears regardless of the size of the actual movie. To display the movie at an appropriate size, enter a width and height in the Properties inspector. You can also enter vertical (V) or horizontal (H) spacing in the Properties inspector. Use the Align pop-up menu to align the movie on the left or right side of the page.
Like QuickTime movies, Windows Media files (which can be WMV, AVI, and other file types) can be easily embedded in Dreamweaver. You can also reset the size at which Windows Media movies will display. As with QuickTime movies, Dreamweaver does not provide easy-to-use sets of controllers for Windows Media movies.
As with QuickTime movies, you need to manually define parameters to control features like autoplay, initial volume, and whether or not a player control displays in the browser with the video.
Here are a few useful parameters for Windows media movies:
• The AUTOSTART parameter with the value set to true plays a movie automatically when the page opens. When the value is set to false, it requires the visitor to start the movie using a control.
• The DISPLAYBACKCOLOR parameter can have the value set to false (no background color) or a color (like red, blue, green, or black), or a hexadecimal value.
• The SHOWAUDIOCONTROLS parameter can have the value set to true (a volume control displays) or false (no control).
There are many versions of Windows Media Player, and they use different parameters. Although QuickTime parameters are standardized and managed by Apple, the world of Windows Media is less defined. You can use Google to search for Windows Media parameters, but you’ll have to sort through competing and conflicting sets of parameters. The bottom line is that Windows Media video will display in a visitor’s browser window in unpredictable ways. Windows Media is almost universally supported, but developers who need tight control over the display of embedded video turn to Flash Video, RealVideo, or QuickTime.
#41 Embedding Media with HTML5
As noted in the introduction to this chapter, the world of online video (and audio) is rapidly changing and even contentious. Some influential voices are arguing that HTML5—a version of HTML that is being adopted by the major browsers (including for handheld devices)—provides a more open and stable way to present online video. The MP4 video format (and the MP3 audio format) works well with this tag.
As support for HTML5 is still emerging, you probably won’t want to make HTML tags the only way you present video. But you might use them as an alternative for devices that don’t support Flash Video.
Dreamweaver CS5 as of this writing does not have menu support for the new <VIDEO> and <AUDIO> tags in HTML5. So to explore this option, we’ll have to resort, just this once, to Split view to look at and enter just a bit of coding.
I find it easy to figure out where to insert code in Split view by entering a title, like “Video,” right before I’m going to insert some video code, for example. So, I suggest if you’re not fluent in HTML, you enter Video in Design view to start this recipe, and then switch to Split view. Locate the text you entered (Video), and place your cursor after it in the code side of Split view. Press Return/Enter to start a new line, and enter code in the Code side.
First type the following:
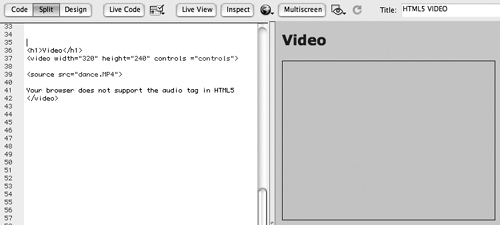
<video width="xxx" height="xxx" controls="controls">
where the video width value is the width of your video and the video height value is the height of the video (both in pixels). Use the controls code to display player controls.
Then type this:
<source src="xxx.MP4">
where xxx.MP4 is the filename for your MP4 format video.
Finally, enter:
Your browser does not support the video tag in HTML5 </video>
That last line displays text if the viewer’s browsing environment does not support HTML5.
When you click the Refresh button, a placeholder appears in Design view (Figure 41a).
Figure 41a. Embedding video with the HTML5 <VIDEO> tag.
The coding for embedding audio with HTML5 tags is similar, and it’s simpler. Enter this code, where XXX.MP3 is the name of your MP3 file (Figure 41b):
<audio src="XXX.MP3" controls="controls">
Your browser does not support the audio tag in HTML5.
</audio>
Figure 41b. Code for embedding an audio file with the HTML5 <AUDIO> tag.

Because HTML5 is not universally supported in browsing environments, be sure to preview in the environment you expect your visitors to be using (Figure 41c).
Figure 41c. Previewing an embedded audio file in a browser with support for HTML5.