
Chapter Eleven: From Illustrator to the Web
You have two basic options for Illustrator files that will be displayed in Web pages. You can save them to a Web-supported vector format, such as Flash’s SWF format, or SVG (Scalable Vector Graphics) format. Or you can save to a more widely supported raster format such as GIF, JPEG, or PNG.
If you are saving a file for the Web, all five of the previously mentioned options (SWF, SVG, GIF, JPEG, and PNG) are available from the Save for Web & Devices dialog.
Along the way, particularly when you export your vector artwork to raster formats, you’ll have to solve a number of issues: preserving the details in artwork, particularly type, and preventing “jaggies,” knocking out the background so artwork can sit on top of page backgrounds, and managing file size, among others.
In this chapter, I’ll walk you through the whole process.
#69 Saving Artwork for the Web and Devices
There are three main Web-compatible raster formats. Each has its particular uses:
• JPEG is best for online photos.
• GIF, while not suitable for photos, works well for images in which the background must be transparent, because it allows the Web-page background to show through behind the illustration.
• PNG combines good color support with transparency but is not as widely supported by browsing environments such as JPEG or GIF (as we go to print, a substantial minority of Web browsers are still using Internet Explorer 6, which does not reliably support some features of PNG images).
To save to any Web-compatible format, choose File > Save for Web & Devices to open the Save for Web & Devices dialog. Then choose a format from the Optimized File Format pop-up menu (Figure 69a).
Figure 69a. Choosing the PNG-24 preset for a Web image.

After choosing one of the preset options for exporting to a Web image, you can tweak the export settings for the particular format you chose. The following options are most essential for configuring Web graphics and are available for JPEG, GIF, and PNG formats:
• Transparency (not available for JPEG) assigns a color to “knock out” and make invisible, allowing the Web-page background color or image to show through.
• Interlacing (for GIF and PNG) or Progressive (for JPEG) allows images to “fade in” as they download to a browser, reducing the annoyance of waiting for images to appear on a page.
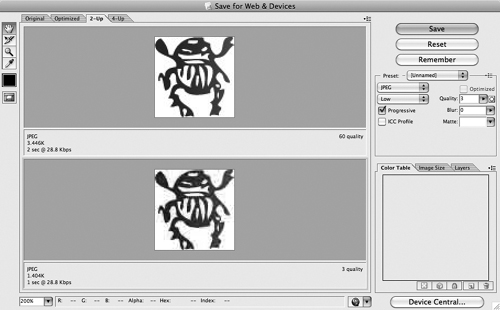
• Quality (for JPEG and Curve Quality SWF images) defines how much compression will be applied to reduce file size. Higher quality requires a larger file size. The goal is to get a quality that is acceptable with the smallest possible file size and quickest download speed. You can preview quality on the left side of the Save for Web & Devices dialog. If you choose the 2-Up or 4-Up options from the tabs at the top of the dialog, you can preview and compare file formats and compressions (Figure 69b).
Figure 69b. Previewing both a low-quality (bottom) and a high-quality (top) JPEG.
After you’ve defined Save for Web & Devices settings, click Save, and you’ll be prompted for a filename and folder.
Note
If you’re exporting type to the Web, see the next How-To, #70, “Anti-Aliasing Type for the Web.” If you want to export artwork with a transparent (invisible) background, jump to #71, “Exporting Artwork with Transparent Backgrounds.”
#70 Anti-Aliasing Type for the Web
One of the great challenges in creating artwork for the Web is dealing with the low resolution of viewing devices. Desktop and laptop computers—still the way the majority of people view Web content—have pixels per inch (ppi) resolutions of under 100, whereas even home and office printers produce output with resolutions three times that. This poses a particular challenge when creating artwork with type—fonts that look intricate and intriguing in print can degenerate into blurry and ineffective when presented digitally.
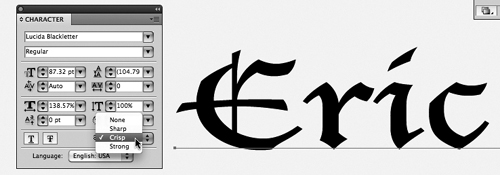
Illustrator CS5 introduces the ability to optimize the rasterization (conversion from vectors to pixel-based artwork) of type for the Web or mobile devices with anti-aliasing options that have been added to the Character panel. With type selected and the Character panel open, you can choose from Sharp, Crisp, Strong, or None (Figure 70a).
Figure 70a. Choosing an Anti-aliasing setting for selected type.
How do you know which setting to use for your selected font? You can preview instantly on the screen, and experiment with all three types of anti-aliasing. For many fonts, the differences are easy to note—particularly if you zoom in (press the Z key, which is one way to select the Zoom tool, and draw a marquee) on your type (Figure 70b).
Figure 70b. Previewing the effect of anti-aliasing: top—no anti-aliasing; bottom—Strong anti-aliasing.

Saving your artistic type for the Web while maintaining the anti-aliasing you assigned requires a bit of attention in Illustrator CS5. If you choose File > Export, select a Web-compatible raster format from the Format pop-up menu in the Export dialog (PNG or JPEG are supported), and then click Export, by default the Anti-Aliasing pop-up menu in the Options dialog will have Type Optimized (Hinted) selected, thus persevering your anti-aliasing.
#71 Exporting Artwork with Transparent Backgrounds
One option in the Save for Web & Devices window (see #69, “Saving Artwork for the Web and Devices,” for an overview) is to create a transparent color. A transparent color “knocks out” the background of artwork while saving for the Web.
To apply transparency in the Save for Web & Devices dialog, use the Transparency check box (available for PNG and GIF formats but not for JPEG). Normally, clicking the Transparency check box (Figure 71a) is sufficient for Illustrator to intelligently “guess” the background color and knock it out. The result previews in Save for Web & Devices window with a gray and white checkerboard background.
Figure 71a. Assigning transparency.

If for some reason Illustrator has difficulty identifying the background color for transparency, click on the Matte pop-up menu and choose either White or Black, and select the Transparency check box. If those options still don’t accurately knock out the background, click the Eyedropper tool in the Save for Web & Devices dialog, and click on the background of your image. Then, use the Eyedropper to sample the background color (Figure 71b).
Figure 71b. Using the Eyedropper tool in the Save for Web & Devices dialog to define a transparent background color.

#72 Exporting Illustrator Files as HTML
Illustrator’s Save for Web & Devices feature allows you to save files in Web-friendly JPEG, GIF, SWF, PNG, and other file formats. But not only does the Save for Web & Devices dialog translate your Illustrator illustrations to Web-compatible file formats, it can also save your entire document as an HTML Web page. This page can easily be opened and edited in any HTML page editor, including Adobe Dreamweaver CS4 (or any other environment for editing Web pages).
By default, Illustrator will save all objects on your page as a single illustration and then embed that single image file in an HTML Web page when you create an HTML page. If you (or a Web-design associate) will be editing your page in Dreamweaver or another Web-page editor, it is better to first slice the illustration. Slices can then be saved as individual Web-compatible images.
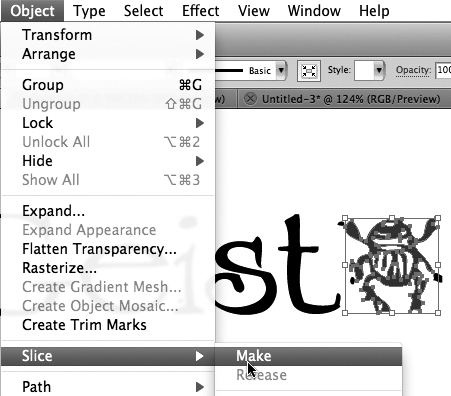
To create a slice from a selected object or objects, choose Object > Slice > Make (Figure 72a).
Figure 72a. Generating a slice from a selected object.
To create a single slice that includes more than one object, select the objects and choose Object > Slice > Create from Selection. As you generate slices, Illustrator displays a grid on the page.
When you define slices, grids appear on the artboard. Those gridlines represent table rows and columns that will generate when you save the document as an HTML page (Figure 72b).
Figure 72b. Slices are displayed on the artboard in Illustrator.

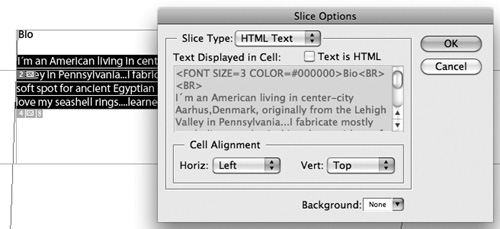
After you create a slice, you can configure it as an image slice or a text slice. Text slices (that were created by selecting text and creating a slice from that text object) export to HTML pages as editable type. To change a selected slice to a text slice, choose Object > Slice > Slice Options. Choose HTML Text from the Slice Type pop-up menu (Figure 72c). You can assign attributes like background color and horizontal and vertical alignment in the Slice Options dialog.
Figure 72c. Defining a text slice as HTML text.
#73 Defining Links in Illustrator
You can use the Slice Options dialog to define links for images (along with other attributes like alternate text and target window). With a slice selected, choose Object > Slice > Slice Options to open the Slice Options dialog.
Enter a name; this will be the name for your image file after you save your entire Illustrator file in the Save for Web & Devices window.
Enter a link target in the URL box, a target browser window in the Target box, a message that displays in the browser status bar in the Message box, and Alt text (alternate text content) in the Alt box (Figure 73a).
Figure 73a. Defining link attributes for a selected slice.
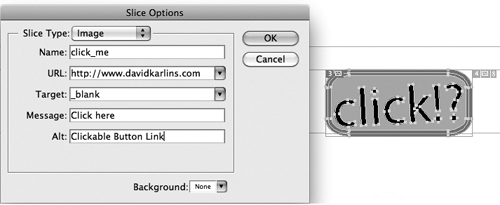
Alt text displays in a viewer’s browsing environment when the image cannot display, or is read out loud to vision-impaired visitors with special browsing setups. A link target defines whether the link opens in the same browser window (that is the default and requires no additional settings) or a new browser window (the _blank setting).
#74 Exporting Artwork to Flash SWFs
If you want to share files with a Flash developer, simply save them as AI CS5 files. But if you want to save Illustrator artwork as a Flash (SWF) file right in Illustrator, you can do that as well.
Flash SWF format is used to play (but not edit) Flash movies. SWF files have the advantage of displaying as scalable vectors online, a property not shared by traditional Web-compatible graphic formats like JPEG, PNG, or GIF.
To save an Illustrator file as a SWF, choose File > Save for Web & Devices. In the Save for Web & Devices dialog, choose SWF from the Optimized File Format pop-up menu.
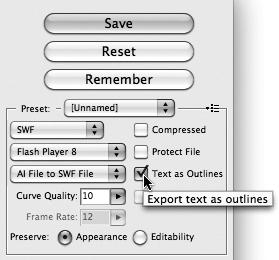
Use the Flash Player Version pop-up menu to choose which version of the Flash Player to save for. Choosing an older version makes it more likely that the SWF file can be played in browsers and on devices. Choosing the latest version ensures that every feature available is supported when your illustration is rendered on a device or in a browser. Generally speaking, Illustrator artwork can be saved to older versions of the SWF format (like 6, 7, 8, or 9) without losing any quality.
Higher Curve Quality settings preserve curves with fewer jagged edges but increase file size. The Compressed check box further reduces file size. The Preserve Appearance check box creates limited editability when the file is placed in Flash. The Protect File check box prevents the file from being opened in any application other than the Flash viewer or Flash. The Text As Outlines check box converts text to curves. Use this option for better-quality images (Figure 74a).
Figure 74a. Saving to Flash Player 8 with the highest curve quality and noneditable type.
#75 Generating Layers for Flash Animation
Layers in Illustrator can be used to separate components of your illustration. Because of Flash’s vector-based logic, it is much easier to select discrete components of an illustration in Illustrator than in a pixel-based program like Photoshop. And, so, in this highly compressed book of essentials for Web design with CS5 Design Suite, it won’t be necessary (or possible) to explore every dimension of using layers in Illustrator.
However, one really cool feature of layers, mostly unrelated to using them as a design technique, is that you can generate Flash animations straight from Illustrator by converting layers to Flash movie frames.
To do that, the more layers the better, so you can use a feature in Illustrator that automatically generates layers from paths. Do this in the Layers panel menu—choose either of the Release to Layers options (Figure 75a).
Figure 75a. Releasing artwork to sequenced animation.

When you generate layers in the Layers panel, you can either build or sequence layers. Building is better for morphing animation—animated transition between shapes. Sequencing is better for generated tweened (transitional) frames in a Flash animation.
Once you’ve generated layers, follow these steps to convert the Illustrator layers into frames of a Flash animation:
- Select File > Save for Web & Devices to open the Save for Web & Devices dialog.
- From the Optimized File Format pop-up menu, choose SWF.
- From the Type of Export drop-down menu, choose Layers to SWF Frames.
- Set Curve Quality (as noted earlier, higher Curve Quality values create more accurate curves and increase file size).
- In the Frame Rate pop-up menu, set a Frame Rate for the animation.
- Select the Loop check box to cause the Flash movie to repeat indefinitely. Deselect the check box to play the animation only once.
- Select the Compressed check box to further reduce file size (Figure 75b).
Figure 75b. Creating a looping animation from an Illustrator file.
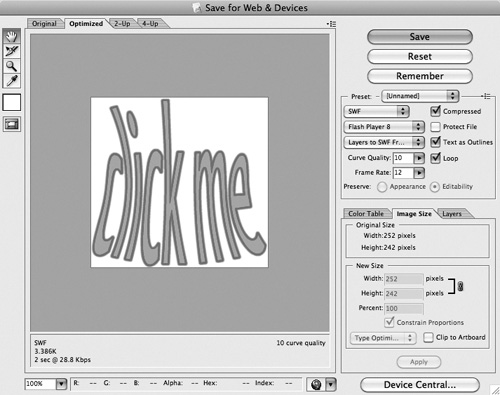
- Click the Save button in the Save for Web & Devices dialog to export the file as a Flash movie, converting layers to Flash frames.
- In the Save Optimized As dialog, navigate to the folder with your Web-site media files and enter a filename. Click Save again to save the file as a SWF (with the option of saving a SWF file) in your Web site folder.