
5: Organizing and Selecting
Lesson Overview
As your photo library grows larger it will become increasingly important that you’re able to locate your images quickly. Lightroom offers a range of options for organizing your image files before you even click the Import button—and even more once you’ve added them to your catalog. You can manage and synchronize your folders or move files between them without leaving the Library module; then apply keyword tags, flags, ratings, and labels, and group your photos in easy-to-access collections, regardless of where they’re stored.
This lesson will familiarize you with the tools and techniques you’ll use to organize, manage, and search your photo library:
• Creating a folder structure
• Moving files and synchronizing folders
• Understanding Collections
• Working with keywords and keyword sets
• Using Flags, Ratings, and Color Labels
• Adding and editing Metadata
• Using the Painter tool
• Finding and filtering files
• Reconnecting renamed and missing files
![]() You’ll probably need between one and two hours to complete this lesson.
You’ll probably need between one and two hours to complete this lesson.
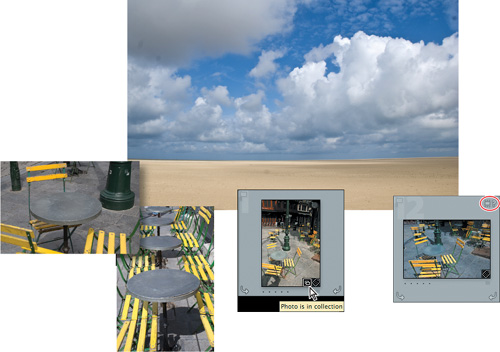
Lightroom delivers powerful, versatile tools to help you organize your image library. Use keywords, flags, labels, and ratings to sort your images, and group them into virtual collections by any association you choose. You can easily configure fast, sophisticated searches, based on practically limitless combinations of criteria, that will put exactly the photos you want at your fingertips, right when you need them.
Getting started
This lesson assumes that you are already familiar with the Lightroom workspace and with moving between the different modules. If you find that you need more background information as you go, refer to Lightroom Help, or review the previous lessons in this book.
Before you begin, make sure that you have correctly copied the Lessons folder from the CD in the back of this book onto your computer’s hard disk and created the LR3CIB Library Catalog file as detailed in “Copying the Classroom in a Book files” on page 2 and “Creating a catalog file for working with this book” on page 3.
1 Start Lightroom.
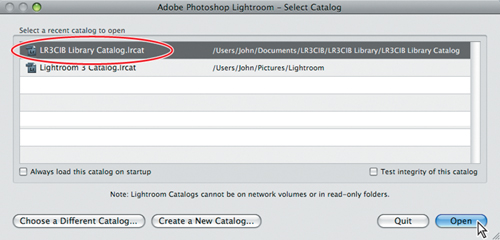
2 In the Adobe Photoshop Lightroom - Select Catalog dialog box, make sure the file LR3CIB Library Catalog.lrcat is selected under Select A Recent Catalog To Open, and then click Open.
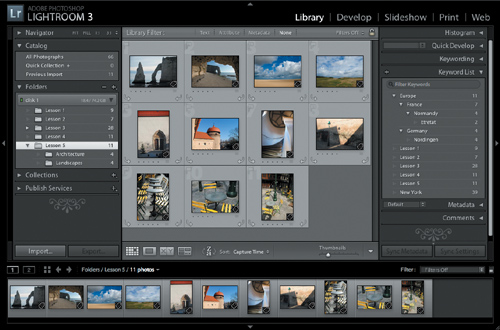
3 Lightroom will open in the screen mode and workspace module that were active when you last quit. If necessary, click Library in the Module Picker to switch to the Library module.
![]()
Importing images into the library
The first step is to import the images for this lesson into the Lightroom library.
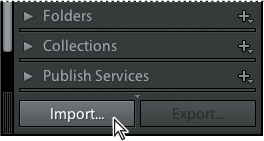
1 In the Library module, click the Import button below the left panel group.
2 If the Import dialog box appears in compact mode, click the Show More Options button at the lower left of the dialog box to see all the options in the expanded Import dialog box.

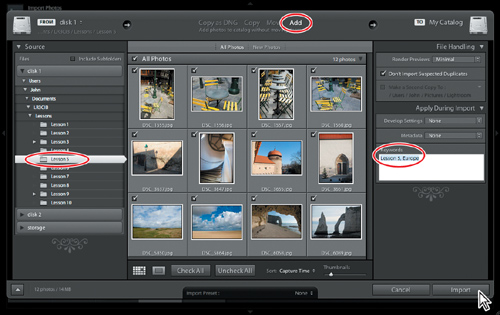
3 Under Source at the left of the expanded Import dialog box, navigate to the Lessons folder you copied into the LR3CIB folder on your hard disk, and then select the Lesson 5 folder. Ensure that all twelve images in the Lesson 5 folder are checked for import.
4 In the import options above the thumbnail previews, click Add to add the imported photos to your catalog without moving or copying them.
5 Under File Handling at the right of the expanded Import dialog box, choose Minimal from the Render Previews menu and ensure that the Don’t Import Selected Duplicates option is activated.
6 Under Apply During Import, choose None from both the Develop Settings menu and the Metadata menu and type Lesson 5, Europe in the Keywords text box. Make sure your settings are exactly as shown in the illustration below, and then click Import.
The twelve images are imported from the Lesson 5 folder and now appear in both the Grid view of the Library module and in the Filmstrip across the bottom of the Lightroom workspace.
Organizing folders
Each time you import an image, Lightroom creates a new catalog entry to record the file’s address and lists the folder in which it is stored—and the volume that contains that folder—in the Folders panel in the left panel group.
In the Folders panel, you can organize your photo library at the most basic level by rearranging files and folders on your hard disk without ever leaving the Lightroom workspace; you can create or delete folders at the click of a button and move files and folders by simply dragging them. When you use the Folders panel to move a photo between folders, Lightroom will delete the image file from its original location and update the library catalog with the file’s new address. Lightroom maintains a single catalog entry for each photo you import, so a master image cannot be duplicated in separate folders or added to the catalog twice.
Creating subfolders
In this exercise you’ll use the Folders panel to begin organizing the photos in the Lesson 5 folder into categories by separating them into subfolders. You’ll use two methods of creating a subfolder.
1 Click the Lesson 5 folder in the Folders panel; then, Ctrl-click / Command-click to select the four images of coastal landscapes in the Grid view.

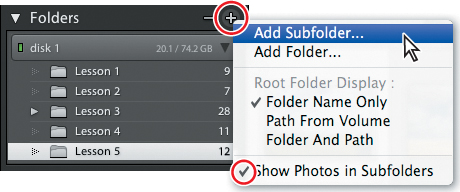
2 In the Folders panel header, click the Create New Folder button (![]() ) and choose Add Subfolder from the menu. Make sure the Show Photos In Subfolders option is activated.
) and choose Add Subfolder from the menu. Make sure the Show Photos In Subfolders option is activated.
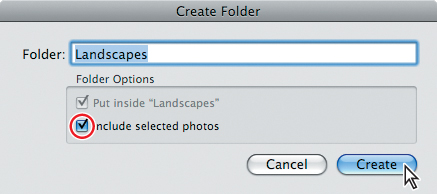
3 In the Create Folder dialog box, type Landscapes as the folder name, activate the Include Selected Photos option, and then click Create.
4 In the Folders panel, expand the Lesson 5 folder to see the Landscapes folder nested inside it. The image count for the new subfolder shows that it contains the four images you selected in step 1.

5 With the Lesson 5 folder still selected in the Folders panel, select the four photos featuring architectural details.

6 Right-click / Control-click the Lesson 5 folder and choose Create Folder Inside “Lesson 5” from the context menu. Type Architecture as the folder name, activate the Include Selected Photos option, and then click Create.
7 Click the Architecture subfolder inside the Lesson 5 folder to see the four images you selected in step 5.
Making changes to a folder’s content
When you rearrange files and folders in the Folders panel the changes are also made on your hard disk. Inversely, the Folders panel needs to be updated to reflect any changes you make to the location, name, or contents of a folder from outside the Lightroom workspace. In this exercise you’ll experience this first hand by deleting an image in Windows Explorer / the Finder.
![]() Tip: To rename a folder in the Folders panel, right-click / Control-click its name and choose Rename from the context menu. Be aware that when you rename a folder in the Folders panel, the change affects the folder on the hard disk.
Tip: To rename a folder in the Folders panel, right-click / Control-click its name and choose Rename from the context menu. Be aware that when you rename a folder in the Folders panel, the change affects the folder on the hard disk.
1 Click the Lesson 5 folder in the Folders panel.
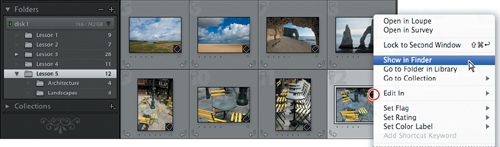
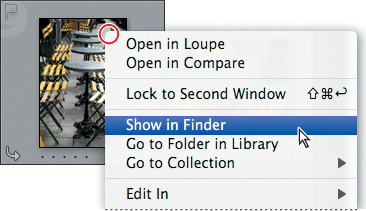
2 Right-click / Ctrl-click one of the images of chairs in the Grid view and choose Show In Explorer / Show In Finder from the context menu.
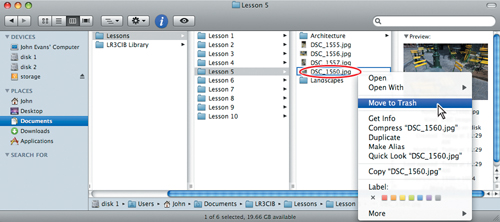
3 The Explorer / Finder window opens. Note the Architecture and Landscapes subfolders inside the Lesson 5 folder. Right-click / Ctrl-click the image file DSC_1560.jpg inside the Lesson 5 folder and choose Delete / Move To Trash from the context menu.
4 Switch back to Lightroom. In the Grid view, note that the image that you just deleted in the Explorer / Finder window now has a question mark icon in the upper right corner of its grid cell. This indicates that Lightroom still has an entry for the image in its library catalog but the link to the original file has been broken.

5 Click the question mark icon. A dialog box opens offering you the option to locate the missing file and reestablish its link to the catalog. Click Cancel.
As you deleted the file intentionally you should now remove it from the library catalog. You can remove a missing photo from your catalog by selecting its thumbnail in the Grid view or the Filmstrip and pressing Alt+Backspace / Option+Delete or by choosing Photo > Remove Photos From Catalog. Don’t remove the photo from the catalog yet—if you’ve done so already, choose Edit > Undo Remove Images. In the next exercise you’ll learn a different technique for updating the catalog by synchronizing folders.
Synchronizing folders
When you synchronize the folders in the Lightroom catalog with the folders on your hard disk you have the option to remove catalog entries for files that have been deleted, import photos that have been added to your folders, or scan for files with updated metadata.
You can specify which folders and subfolders will be synchronized and which new images you want added to your library.
1 Make sure that the Lesson 5 folder is still selected in the Folders panel.
2 Choose Library > Synchronize Folder.
![]() Tip: The Import New Photos option in the Synchronize Folders dialog box automatically imports any files that have been added to a folder without yet having been added to your image library. Optionally, activate Show Import Dialog Before Importing to choose which of those files you wish to import. Activate the Scan For Metadata Updates option to check for files with metadata that has been modified in another application.
Tip: The Import New Photos option in the Synchronize Folders dialog box automatically imports any files that have been added to a folder without yet having been added to your image library. Optionally, activate Show Import Dialog Before Importing to choose which of those files you wish to import. Activate the Scan For Metadata Updates option to check for files with metadata that has been modified in another application.
3 In the Synchronize Folder “Lesson 5” dialog box, the import options are unavailable, indicating that there have been no new photos added to the Lesson 5 folder. Activate the option Remove Missing Photos From Catalog (1), disable Scan For Metadata Updates, and then click Synchronize.
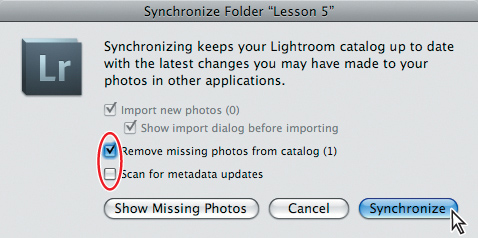
The missing image is removed from your catalog and its thumbnail is no longer displayed in the Grid view; all the links between your library catalog and the Lesson 5 folder on your hard disk have been restored.
Using collections to organize images
Although a well organized system of folders provides a good foundation for your photo library, grouping images into collections in Lightroom is a far more efficient and flexible way to classify your images—and offers many more options when you need to access them.
![]() Note: Once you’ve grouped a selection of photos as a collection you can rearrange them in the Grid view or the Filmstrip, changing the order in which they will appear in a presentation or a print layout. Your customized sorting order will be saved with the collection.
Note: Once you’ve grouped a selection of photos as a collection you can rearrange them in the Grid view or the Filmstrip, changing the order in which they will appear in a presentation or a print layout. Your customized sorting order will be saved with the collection.
A collection is like a virtual folder: a grouping of photos from your library based on your own associations rather than on the actual location of the files. A collection may contain images drawn from any number of separate folders on your hard disk. Although a single master image is located in only one folder it can be included in any number of collections. The same photo might appear in a collection of images with architectural content and also in a compilation of shots suggesting an Autumn theme; it may be listed in a collection you’ve assembled for a client presentation and in another created for a family vacation slideshow. Grouping your images as collections in your library doesn’t affect the arrangement of the files and folders on your hard disk, and removing a photo from a collection won’t remove it from the library catalog or delete it from the hard disk.
![]() Tip: Output and Publish collections are discussed further in Lesson 8, “Printing Images” and in Lesson 9, “Publishing Your Photos” respectively.
Tip: Output and Publish collections are discussed further in Lesson 8, “Printing Images” and in Lesson 9, “Publishing Your Photos” respectively.
There are three basic types of collection: Collections, Smart Collections and the Quick Collection. Any collection can also be part of an Output Collection, which links a collection (or a selection of images from that collection) to a particular print template and specific output settings. Any collection or selection of images can become a Publish collection, which keeps track of images that you’ve shared online.
The Quick Collection
The Quick Collection is a temporary holding collection; a convenient place to group images while you gather photos from different folders. You can access the Quick Collection from the Catalog panel so that you can easily return to work with the same selection of images at any time. Your images will stay in the Quick Collection until you are ready to convert your selection to a permanent collection that will then be listed in the Collections panel.
![]() Note: If the Thumb-nail Badges option is activated in the Library View Options, a photo that is included in a collection of any kind displays the collection badge (
Note: If the Thumb-nail Badges option is activated in the Library View Options, a photo that is included in a collection of any kind displays the collection badge (![]() ) in the lower right of its thumbnail.
) in the lower right of its thumbnail.
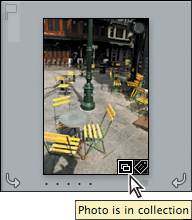
Click the badge to see a menu listing the collections in which the image is included. Select a collection from the list to switch to that collection as the image source folder.
You can create as many collections and smart collections as you wish, but there is only one Quick Collection; if there is already a selection of images in the Quick Collection, you’ll need to convert it to a standard collection, and then clear the Quick Collection before you can use it to assemble a new a new grouping. To create a new collection for images that are currently in the Quick Collection, right-click / Control-click the Quick Collection folder in the Catalog panel and choose Save Quick Collection from the context menu.
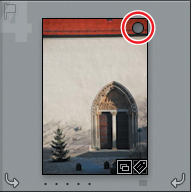
If the Quick Collection Markers option is enabled in the View Options for the Grid view, a circular marker appears in the top right corner of a thumbnail in the Grid view or the Filmstrip when you move your pointer over the image cell. You can add the image to the Quick Collection by clicking this marker.
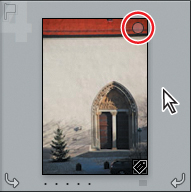
Once the photo is added to the Quick Collection the marker becomes a solid grey circle. Click the solid marker to remove the image from the Quick Collection. You can perform the same operations for a multiple selection of images by clicking the Quick Collection marker on any of the selected thumbnails.
You can also add a selected image or group of images to the Quick Collection by pressing the B key or choosing Photo > Add To Quick Collection, or remove a selected image or group of images from the Quick Collection by pressing the B key again or choosing Photo > Remove From Quick Collection.
Collections
You can create as many permanent collections as you wish. Use a collection to collate the images you need for a particular project or to group photos by subject or any other another association.
When you create a collection of images for a slideshow or a web page, all the work you do on your presentation will be saved with the collection in the catalog file. In fact, the catalog entry for a single collection can incorporate your settings from the Develop module, a slide layout and playback options applied in the Slideshow module, a gallery design you set up in the Web module, and a page layout modified in the Print module. You can also create an output collection for a print job that will include your color management and printer settings.
![]() Note: Remember that a single photo can be included in any number of collections, although the master image file is located in only one folder in your library. For this reason, grouping your images in collections is a far more versatile organizational method than sorting them into categorized folders.
Note: Remember that a single photo can be included in any number of collections, although the master image file is located in only one folder in your library. For this reason, grouping your images in collections is a far more versatile organizational method than sorting them into categorized folders.
To create a collection, choose Library > New Collection. Alternatively, click the New Collection button (![]() ) in the header of the Collections panel and choose Create Collection from the menu. Enter a name in the Create Collection dialog box and click Create. Your new collection will be added to the list in the Collections panel. You can then simply drag photos onto the listing in the Collections panel to add them to the collection.
) in the header of the Collections panel and choose Create Collection from the menu. Enter a name in the Create Collection dialog box and click Create. Your new collection will be added to the list in the Collections panel. You can then simply drag photos onto the listing in the Collections panel to add them to the collection.
Smart collections
A smart collection searches the metadata attached to your photos and gathers together all those images in your library that meet a specified set of criteria. Any newly imported photo that matches the criteria you’ve set up for a smart collection will be added to that collection automatically.
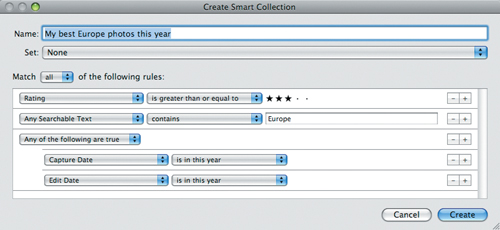
You can create a Smart Collection by choosing Library > New Smart Collection, and then specify the search criteria for your smart collection by choosing options from the menus in the Create Smart Collection dialog box.

You can add more search criteria by clicking the + button to the right of any of the rules. Hold down the Alt / Option key and click the Plus button (+) to refine a rule. In the illustration below a second rule has been added to search for images containing “Europe” in any searchable text, and then a refined rule has been added to search for images which were either captured or edited this year.
Stacking images
Another effective way of organizing images within a folder or collection is by creating stacks.
Stacks are ideal for reducing clutter in the Grid view—and the number of thumbnails you need to scroll through in the Filmstrip—by grouping similar or related photos so that only the top image in each stack is displayed. You can stack a selection of images of the same subject, a series of photos shot to test different camera settings, or action shots taken using burst mode or auto-bracketing.
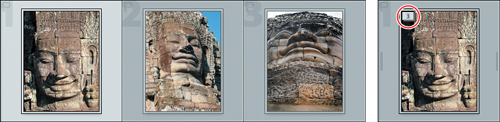
A stack can be identified in the Grid view and the Filmstrip by an icon representing a stack of photos, together with an image count, in the upper left corner of the thumbnail.
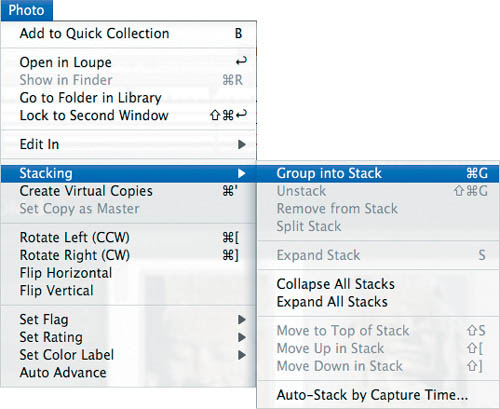
You can collapse expand or collapse the stack by clicking the stack icon; rearrange the order of the photos within the stack or specify which image appears at the top either by choosing commands from the Photo > Stacking menu or by using keyboard shortcuts.
When you’re working with a folder containing hundreds of photos from the same shoot, you can have Lightroom stack the images automatically based on capture time; you can specify the time interval between stacks so that your shots are grouped in a way that reflects the flow of the shoot.
To create a stack, select two or more images in the Grid view or the Filmstrip, and then choose Photo > Stacking > Group Into Stack.
To learn more about Stacks, please refer to Lightroom Help.
Applying Keyword tags
Perhaps the most direct way to mark your photos so that they’re easier to find later is by tagging them with keywords—text metadata attached to the image files to categorize them by subject or association.
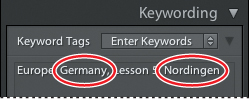
For example, the image in the illustration at the right could be tagged with the keywords Architecture and Germany, and could therefore be located by searching for either or both of those tags. If the Thumbnail Badges option is activated in the Library View Options dialog box, photos with keyword tags are identified by a keywords badge (![]() ) in the lower right corner of the thumbnail.
) in the lower right corner of the thumbnail.

You can apply keywords to your photos individually or tag an entire series of images with shared metadata in one operation, thereby linking them by association and making them easier to access amongst all the photos that make up your library. Keywords added to images in Lightroom can be read by Adobe applications such as Bridge, Photoshop, and Photoshop Elements, and by other applications that support XMP metadata.
Viewing Keyword tags
Because you applied keyword tags to the images for this lesson during the import process, the thumbnails in the Grid view and the Filmstrip are all marked with the keywords badge. Let’s review the keywords you already attached to these photos.
1 Make sure that you are still in the Grid view, and then select the Lesson 5 folder in the Folders panel.
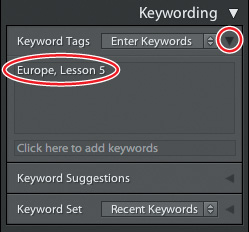
2 In the right panel group, expand the Keywording panel. If necessary, expand the Keyword Tags pane at the top of the Keywording panel. By selecting each thumbnail in the Grid view in turn you can confirm that all the images in the Lesson 5 folder share the keywords “Lesson 5” and “Europe.”
![]() Tip: Clicking the thumbnail badge of an image in Grid view will automatically expand the Keywording panel.
Tip: Clicking the thumbnail badge of an image in Grid view will automatically expand the Keywording panel.
3 Select any one of the photos in the Lesson 5 folder. In the Keyword Tags pane at the top of the Keywording pane, select the text “Lesson 5” and press the Backspace key on your keyboard to delete it.
4 Click anywhere in the Grid view, and then choose Edit > Select All or press Ctrl+A / Command+A to select all the Lesson 5 photos. In the Keyword Tags pane, the keyword “Lesson 5” is now marked with an asterisk to indicate that this tag is not shared by every image in the selection.
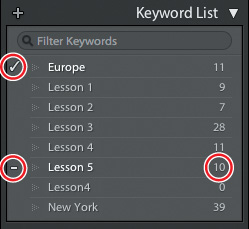
5 Expand the Keyword List panel.
In the Keyword List, a check mark in front of the keyword “Europe” indicates that this tag is shared by every image in the selection, while the tag “Lesson 5” is marked with a dash—indicating that it attached to some, but not all, of the selected images. The image count to the right of the Lesson 5 tag shows that it is shared by only ten of the eleven images.
![]() Tip: You can apply an existing keyword tag to selected images by clicking the tag in the Keyword Suggestions pane in the Keywording panel. To remove a tag from a selected photo or photos, either delete the word from the Keyword Tags pane in the Keywording panel, or click the checkbox to disable that keyword in the Keyword List panel.
Tip: You can apply an existing keyword tag to selected images by clicking the tag in the Keyword Suggestions pane in the Keywording panel. To remove a tag from a selected photo or photos, either delete the word from the Keyword Tags pane in the Keywording panel, or click the checkbox to disable that keyword in the Keyword List panel.
6 With all eleven images still selected, click the dash mark in front of the Lesson 5 tag to reinstate the deleted tag; a check mark replaces the dash and the image count for the Lesson 5 keyword increases to 11.
Adding keyword tags
You already added keywords to your images during the process of importing them into your Lightroom library. Once the images have been added to your Lightroom library, you can add more keywords by using the Keywording panel.
1 In the Folders panel, select the Architecture subfolder inside the Lesson 5 folder, and then choose Edit > Select All or press Ctrl+A / Command+A.
2 In the Keywording panel, click the grey text “Click Here To Add Keywords” in the text box below the Keyword Tags pane and type Nordingen, Germany, being sure to add the comma as shown in the illustration at the right, below.
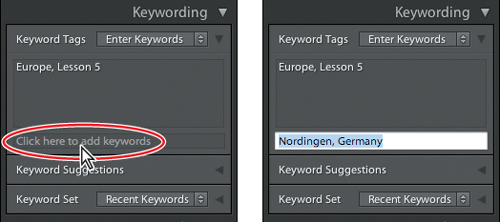
Always use a comma to separate keywords. Using a space or period will not work; Lightroom would treat both “Nordingen Germany” and “Nordingen. Germany” as a single keyword.
3 Press Enter / Return. The new keywords are listed in alphabetical order in the Keyword Tags panel and in the Keyword List panel.
4 In the Folders panel, select the Lesson 5 folder, and then choose Edit > Invert Selection to select all the images other than the four in the Architecture folder.
5 In the Keywording panel, click in the text box below the Keyword Tags pane and type France. Press Enter / Return.
6 Choose Edit > Select None or press Ctrl+D / Command+D on your keyboard.
Working with keyword sets and nesting keywords
You can use the Keyword Set pane of the Keywording panel to work with keyword sets; groups of keyword tags compiled for a particular purpose. You could create a set of keywords for a specific project, another set for a special occasion, and one for your friends and family. Lightroom provides three basic keyword set presets. You can use these sets as they are or as starting points for creating sets of your own.
![]() Tip: Keyword sets are a convenient way to have the keywords you need at hand as you work on different collections in your library. A single keyword tag may be included in any number of keyword sets. If you don’t see the Lightroom presets in the Keyword Set menu, open the Lightroom Preferences and click the Presets tab. In the Lightroom Defaults options, click Restore Keyword Set Presets.
Tip: Keyword sets are a convenient way to have the keywords you need at hand as you work on different collections in your library. A single keyword tag may be included in any number of keyword sets. If you don’t see the Lightroom presets in the Keyword Set menu, open the Lightroom Preferences and click the Presets tab. In the Lightroom Defaults options, click Restore Keyword Set Presets.
1 Expand the Keyword Set pane in the Keywording panel, if necessary, and then choose Wedding Photography from the Keyword Set menu. You can see that the keywords in the set would indeed be helpful in organizing the shots from a big event. Look at the categories covered by the other Lightroom keyword sets. You can use these as templates for your own keyword sets by editing them to suit your needs and saving your changes as a new preset.
Grouping your keywords in Keyword Sets is one way to keep your keywords organized; another handy technique is to nest related tags in a keywords hierarchy.
2 In the Keyword List panel, Ctrl-click / Command-click to select the keywords “France” and “Germany” and drag the selected tags onto the keyword “Europe.”
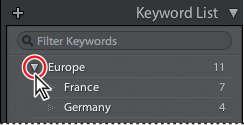
3 Click the triangle at the left of the Europe tag in the keyword list to see the France and Germany tags nested inside it.
4 In the keyword list, drag the Nordingen tag from the bottom of the keyword list onto the keyword “Germany,” and then expand the Germany tag.
5 Right-click / Control-click the keyword “France” and choose Create Keyword Tag Inside “France” from the context menu.
6 In the Keyword Tag text box, type Normandy. In the Synonyms text box just below, type Normandie. Make sure all the Keyword Tag Options are activated as shown in the illustration below, and then click Create.

Include On Export Includes the keyword tag when your photos are exported.
Export Containing Keywords Includes the parent tag when your photos are exported.
Export Synonyms Includes any synonyms associated with the keyword tag when your photos are exported.
7 Expand the keyword “France,” and then right-click / Control-click the keyword “Normandy” and choose Create Keyword Tag Inside “Normandy” from the context menu. In the Keyword Tag text box, type Etretat. Make sure all the Keyword Tag Options are activated as in step 6, and then click Create. Expand the keyword “Normandy,” so you can see all the tags in your nested hierarchy.
8 In the Folders panel, select the Landscapes subfolder inside the Europe folder, and then choose Edit > Select All or press Ctrl+A / Command+A. Drag the Normandy tag from the Keyword List panel onto any of the selected images in the Grid view.
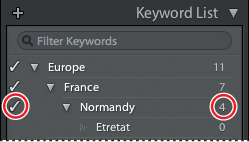
Both the check mark in front of the Normandy tag in the keyword list, and the image count to the right show that this keyword has been applied to all four selected photos.
9 In the Grid view or the Filmstrip, Ctrl-click / Command click the two flat landscape images to deselect them, leaving only the two photos featuring stone cliffs selected.

10 Drag the keyword “Etretat” from the Keyword List panel onto either of the selected images in the Grid view. The check mark in front of the Etretat tag in the keyword list, and the image count to the right show that this keyword has been applied to both of the selected photos.
Searching by keywords
Once you have taken the time to organize your images by adding keywords and other metadata such as ratings, flags, and labels, it will be very easy to set up sophisticated and detailed filters to find exactly the photo you’re looking for.
For now, we’ll look at some techniques for searching the photos in your library by keywords alone.
![]() Tip: If you find that you cannot open two panels in one of the side panel groups at the same time, right-click / Control-click the header of any panel in the group and disable the Solo Mode option in the context menu
Tip: If you find that you cannot open two panels in one of the side panel groups at the same time, right-click / Control-click the header of any panel in the group and disable the Solo Mode option in the context menu
1 In the left panel group, collapse the Navigator, Collections, and Publish Services panels if necessary, so that you can clearly see the contents of the Catalog and Folders Panels. In the Folders panel, select the Lesson 5 folder, and then choose Edit > Select None or press Ctrl+D / Command+D.
2 Use the Thumbnails slider in the Toolbar to reduce the size of the thumbnails until you can see all eleven images in the Grid view. If the Filter Bar is not already visible above the Grid view, choose View > Show Filter Bar, or press the Backslash key ().
3 In the right panel group, collapse the Histogram, Quick Develop, and Keywording panels, if necessary, so that you can clearly see the whole of the expanded Keyword List panel.
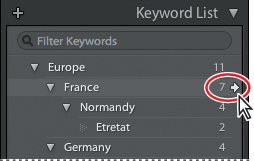
4 In the Keyword list panel, move your pointer over the entry for the keyword “France,” and then click the white arrow that appears to the right of the image count.
![]() Tip: To transfer lists of keywords between computers or share them with colleagues who are also working in Lightroom, use the Export Keywords and Import Keywords commands, which you’ll find in the Metadata menu.
Tip: To transfer lists of keywords between computers or share them with colleagues who are also working in Lightroom, use the Export Keywords and Import Keywords commands, which you’ll find in the Metadata menu.
In the left panel group, All Photographs is now selected in the Catalog panel, indicating that your entire catalog has been searched for photos with the France tag. The Metadata filter has been activated in the Filter bar at the top of the work area, and the Grid view now displays only those seven images in your library that are tagged with the keyword “France.”
5 In the Keyword column at the left of the Metadata filter pane, click the triangle to expand the France entry, and then click Normandy.

In the Grid view, only the four photos with the Normandy tag are still visible.
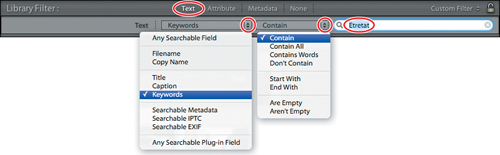
6 In the Filter bar at the top of the work area, click None to disable the Metadata filter, then choose Text from the Library Filter options.
7 In the Text filter bar, choose Keywords from the first menu and Contain from the second menu, noting the options available in each menu; then type Etretat in the text box at the right and press Enter.
![]() Tip: You can use the lock button at the right end of the Filter bar to keep your current filter settings active when you choose a different image source from the Catalog, Folders, or Collections panels.
Tip: You can use the lock button at the right end of the Filter bar to keep your current filter settings active when you choose a different image source from the Catalog, Folders, or Collections panels.
Now, only the two photos of the stone cliffs at Etretat, in Normandy, France are still displayed in the Grid view. Of course, the true power of the Library filters only comes into play when you take advantage of the various search features to set up more complex filters based on a combination of criteria—but this exercise should have given you at least a glimpse of the possibilities.
8 Disable the Text filter by clicking None in the Library Filter options in the center of the Filter bar. In the Folders panel, select the Lesson 5 folder, and then choose Edit > Select None or press Ctrl+D / Command+D.
Using flags and ratings
The Attribute filters in the Filter bar allow you to search and sort your images according to attributes such as flags and ratings.
When you choose Attribute from the Library Filter options in the Filter bar, the Filter bar expands to display controls for sorting your images by flag status, star rating, color label, copy status, or any combination of these attributes.
![]()
Flagging images
Assigning flags to sort the good images from the rejects can be a good way to begin organizing a group of photos. An image can be flagged as a pick (![]() ), a reject (
), a reject (![]() ), or left unflagged (
), or left unflagged (![]() ).
).
1 Choose Attribute from the Library filter options in the Filter bar. The Filter bar expands to show the Attribute filter controls.
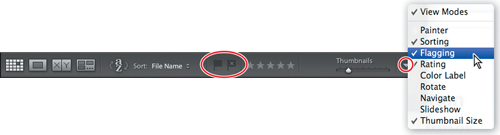
2 If the Toolbar is not already visible below the Grid view, press the T key. Click the triangle at the right side of the Toolbar and activate the Flagging tool in the menu to show the Flag As Pick and Flag As Reject buttons in the Toolbar.
![]() Tip: In the Grid and Loupe views, you’ll find tools for adding ratings, flags, and color labels in the Toolbar. In the Compare and Survey views you can change these attributes using the controls beneath the images. You can also flag, rate, or color label a selected image by using the Set Flag, Set Rating, or Set Color Label commands in the Photo menu.
Tip: In the Grid and Loupe views, you’ll find tools for adding ratings, flags, and color labels in the Toolbar. In the Compare and Survey views you can change these attributes using the controls beneath the images. You can also flag, rate, or color label a selected image by using the Set Flag, Set Rating, or Set Color Label commands in the Photo menu.
3 In the Folders panel, select the Architecture subfolder inside the Lesson 5 folder.
4 In the Grid view, select the photo of the staircase: DSC_3647.jpg. If the Flags option is activated in the Library View Options dialog box, a grey flag icon in the upper left corner of the image cell indicates that this photo is unflagged. If necessary, hold the pointer over the image cell to see the flag, or disable Show Clickable Items On Mouse Over Only in the Library View Options dialog box.

5 To change the flag status to Flagged, click the Flag As Pick button (![]() ) in the Toolbar. Note that the photo is now marked with a white flag icon in the upper left corner of the image cell.
) in the Toolbar. Note that the photo is now marked with a white flag icon in the upper left corner of the image cell.
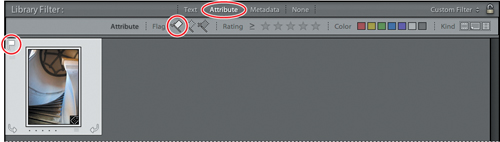
6 Click the white flag button in the Attribute Filter bar. The Grid view displays only the image that you just flagged. The view is now filtered to display only flagged images from the Architecture folder.
Lightroom offers a variety of ways to flag a photo. To flag a photo as a pick, choose Photo > Set Flag > Flagged or press the P key on your keyboard. Click the flag icon at the top left corner of the image cell to toggle between Unflagged and Pick status. To flag an image as a reject, choose Photo > Set Flag > Rejected, press the X key, or Alt-click / Option-click the flag icon in the corner of the image cell. To remove a flag from an image, choose Photo > Set Flag > Unflagged or press the U key. To set any flag status for an image, right-click / Control-click the flag icon in the corner of the image cell and choose Flagged, Unflagged, or Rejected from the context menu.
![]() Tip: You can use the Library > Refine Photos command to sort your photos quickly on the basis of their flagging status. Choose Library > Refine Photos, and then click Refine in the Refine Photos dialog box; any unflagged photos are flagged as rejects and the picks are reset to unflagged status.
Tip: You can use the Library > Refine Photos command to sort your photos quickly on the basis of their flagging status. Choose Library > Refine Photos, and then click Refine in the Refine Photos dialog box; any unflagged photos are flagged as rejects and the picks are reset to unflagged status.
7 Click the grey flag button—the flag in the center—in the Attribute Filter bar. The Grid view now displays any photos flagged as Picks and all unflagged photos, so once again we see all of the images in the Architecture folder.
8 In the Filter bar, click None to disable the Attribute filters.
Assigning ratings
A quick and easy way to sort your images as you review and evaluate them is to assign each photo a rating on a scale from one to five stars.
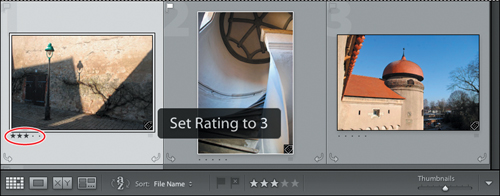
1 In the Grid view, select the image with the green street lamp: DSC_3637.jpg.
2 Press the 3 key on your keyboard. The message “Set Rating to 3” appears briefly and the photo is now marked with three stars in the lower left of its image cell.
![]() Tip: If you don’t see the star rating in the image cell, choose View > View Options and make sure Rating And Label is activated in the image cell display options.
Tip: If you don’t see the star rating in the image cell, choose View > View Options and make sure Rating And Label is activated in the image cell display options.
It’s easy to change the rating for a selected image; simply press another key between 1 and 5 to apply a new rating or press the 0 key to remove the rating altogether.
3 If necessary, click the triangle at the right of the Toolbar and make sure that the Rating controls are activated in the menu. The stars in the Toolbar reflect the rating you just applied to the selected image.
4 Click the stars in the Toolbar to change the rating. Click the current star rating to remove it.
You can also assign ratings in the Metadata panel, by choosing from the Photo > Set Rating menu, or by right-clicking / Control-clicking a thumbnail and choosing from the Set Rating submenu in the context menu.
Working with color labels
Color labeling can be a very versatile tool for organizing your workflow. Unlike flags and ratings, color labels have no predefined meanings; you can attach your own meaning to each color and customize separate label sets for specific tasks.
While setting up a print job you might assign the red label to images you wish to proof, a blue label to those that need retouching, or a green label to mark images as approved. For another project, you might use the different colors to indicate levels of urgency.
Applying Color Labels
You can use the colored buttons in the Toolbar to assign color labels to your images. If you don’t see the color label buttons, click the triangle at the right of the Toolbar and choose Color Label from the menu. You can also click the color label icon displayed in a photo’s image cell (a small grey rectangle, for an unlabeled image) and choose from the menu. Alternatively, choose Photo > Set Color Label and choose from the menu; you’ll notice that four of the five color labels have keyboard shortcuts.
To see—and set—color labels in the Grid view image cells, choose View > View Options or right-click / Control-click any of the thumbnails and choose View Options from the context menu to open the Library View Options dialog box. On the Grid View tab in The Library View Options dialog box, activate Show Grid Extras. In the Compact Cell Extras options, you can choose Label or Rating And Label from either the Bottom Label or Top Label menus. In the Expanded Cell Extras options, activate the Include Color Label checkbox.
Editing Color Labels and using Color Label Sets
You can rename the color labels to suit your own purposes and create separate label sets tailored to different parts of your workflow. The Lightroom default options in the Photo > Set Color Label menu are Red, Yellow, Green, Blue, Purple, and None. You can change the color label set by choosing Metadata > Color Label Set, and then choosing either the Bridge or Lightroom default sets, or the Review Status set.
The Review Status label set gives you an idea of how you might assign your own label names to help you keep organized. The options in the Review Status set are To Delete, Color Correction Needed, Good To Use, Retouching Needed, To Print, and None.
You can use this label set as it is or as a starting point for creating your own sets. To open the Edit Color Label Set dialog box, choose Metadata > Color Label Set > Edit. You can enter your own name for each color, and then choose Save Current Settings As New Preset from the Presets menu.
Searching by color label
In the Filter bar, click Attribute to see the Attribute filter controls. You can limit your search to a single color label by clicking just one button, or activate more than one button at once. To disable an active color label button, simply click it again. You can use the color label search buttons together with other Attribute filters, or to refine a Text or Metadata search.
The Attribute filters, including the Color Label filters, are also available in the bar above the thumb-nails in the Filmstrip.
Adding metadata
You can leverage the metadata information attached to the image files to help you organize and manage your photo library. Much of the metadata, such as capture date, exposure time, focal length and other camera settings, is generated by your camera, but you can also add your own metadata to make it easier search and sort your catalog. In fact, you did just that when you applied keywords, ratings, and color labels to your images. In addition, Lightroom supports the information standards evolved by the International Press Telecommunications Council (IPTC). This standard includes metadata entries for descriptions, keywords, categories, credits, and origins.
You can use the Metadata panel in the right panel group to inspect or edit the metadata attached to a selected image.
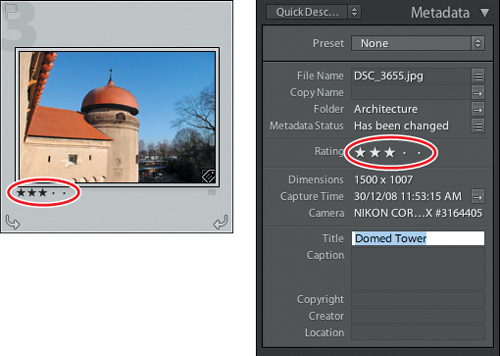
1 Select the image DSC_3655.jpg: the photo featuring a medieval city wall with a domed tower.
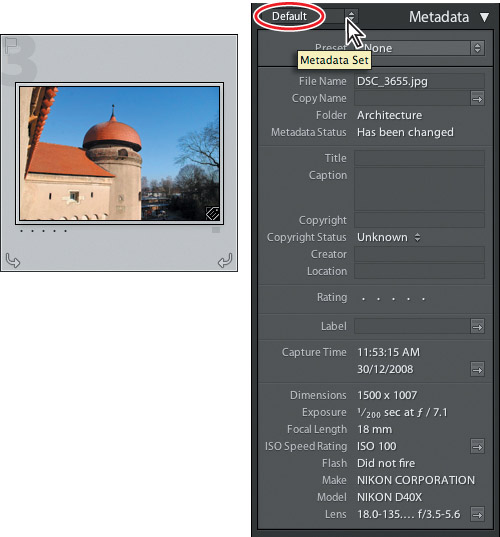
2 Expand the Metadata panel. If necessary, hide the Filmstrip or collapse the other panels in the right panel group so that you can see as much of the Metadata panel as possible. Choose Default from the Metadata Set menu in the header of the Metadata panel.
Even the default metadata set exposes a great deal of information about the image. Although most of this metadata has been generated by the camera, some of it can still be very useful in sorting your photos; you could filter images by capture date, search for shots taken with a particular lens, or easily separate photos taken on different cameras. However, the default set displays only a subset an image’s metadata.
3 Choose EXIF And IPTC from the Metadata Set menu in header of the Metadata panel. Scroll down in the Metadata panel to get an idea of the kinds of information that can be applied to an image.
4 For the purposes of this exercise, you can choose Quick Describe from the Metadata Set menu.
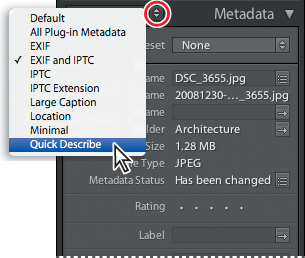
In the Quick Describe metadata set, the Metadata panel shows the File-name, Copy Name (if the image is a virtual copy), Folder, Rating, and some EXIF and IPTC metadata. You can use the Metadata panel to add a title and caption to a photo, attach a copyright notice, provide details about the photographer and the location where the photo was shot, and also change the star rating.
5 Click in the Metadata panel to assign the image a rating, and type Domed Tower in the Title text box.
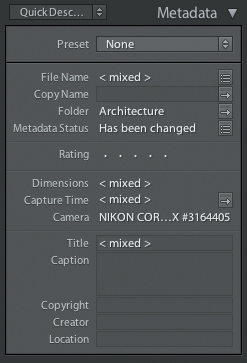
6 Control-click / Command-click the image DSC_3661 (the photo with the arched door) to add it to the selection. In the Metadata panel you can see that the folder name and the camera model are shared by both files; items not shared by both images now show the entry <mixed>. Changes made to any of the items in the metadata panel, even those with mixed values, will affect both of the selected images. This is a convenient way to edit items such as copyright details for a whole batch of images at the same time.
Storage of metadata
File information is stored using the Extensible Metadata Platform (XMP) standard. XMP is built on XML. In the case of camera raw files that have a proprietary file format, XMP isn’t written into the original files. To avoid file corruption, XMP metadata is stored in a separate file called a sidecar file. For all other file formats supported by Lightroom (JPEG, TIFF, PSD, and DNG), XMP metadata is written into the files in the location specified for that data.
XMP facilitates the exchange of metadata between Adobe applications and across publishing workflows. For example, you can save metadata from one file as a template, and then import the metadata into other files. Metadata that is stored in other formats, such as EXIF, IPTC (IIM), and TIFF, is synchronized and described with XMP so that it can be more easily viewed and managed. To find out more about Metadata, please refer to Lightroom Help.
—From Lightroom Help
Using the painter tool
Of all the features Lightroom provides to help you organize your growing image library, the Painter tool (![]() ) is the most flexible. By simply dragging the Painter tool across your images in the Grid view you can add metadata, assign keywords, labels, ratings, and flags—and even apply developing settings, rotate your photos, or add them to the Quick Collection.
) is the most flexible. By simply dragging the Painter tool across your images in the Grid view you can add metadata, assign keywords, labels, ratings, and flags—and even apply developing settings, rotate your photos, or add them to the Quick Collection.
When you pick the Painter tool up from its well in the Toolbar, the Paint menu appears beside the empty tool well. From the Paint menu you can choose which settings or attributes you wish to apply to your images.
The appearance of the Painter tool’s spray can icon changes slightly, depending on which option you choose. The illustration below shows the different spray can icons that correspond to the Paint menu options. Reading from left to right, they are: Keywords, Labels, Flag, Rating, Metadata, Settings, Rotation, and Target Collection.
![]()
In this exercise you’ll use the Painter tool to mark images with a color label.
1 Make sure that the Architecture folder is still selected in the Folders panel and that none of the images are selected in the Grid view. If you don’t see the Painter tool in the Toolbar, click the triangle at the right side of the Toolbar and choose Painter from the tools menu.
2 Click the Painter tool to pock it up from its well in the Toolbar; then choose Label from the Paint menu, and click the red color label button.
![]()
3 The Painter tool is now “loaded.” Move the pointer over any of the thumbnails in the Grid view and a red spray can icon appears.

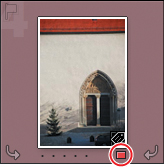
4 Click the thumbnail in the Grid view and the Painter tool applies the red label. Whether you see the color as a tint in the image cell depends on your settings in the Library View Options dialog box. If you don’t see the red color label marker (circled in the illustration at the right), choose View > Grid View Style > Show Extras.
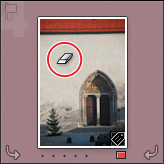
5 Move the pointer back over the same thumbnail, and then hold down the Alt / Option key and; the cursor changes from the Painter tool spray can to an eraser. Click the thumbnail with the eraser cursor and the red color label is removed.
6 Release the Alt / Option key and click the image once more—but this time drag the spray can across all four images. You’ve applied the red color tag to all the images with one stroke. Hold down the Alt / Option key again, and then remove the label from all the one of the photos with a star rating.
7 Click Done at the right side of the Toolbar, or click the Painter tool’s empty well, to drop the Painter tool and return the Toolbar to its normal state.
Finding and filtering files
Now that you’re familiar with the different techniques for categorizing and marking your photos, it’s time to see some results. Next you’ll look at how easy it is to search and sort your images once they’ve been prepared in this way. You can now filter your images by rating or label or search for specific keywords and other metadata. There are a numerous ways to find the images you need but one of the most convenient is to use the Filter bar across the top of the Grid view.
Using the Filter bar to find photos
1 If you don’t see the Filter bar above the Grid view, press the backslash key () or choose View > Show Filter Bar. In the Folders panel, select the Lesson 5 folder. If you don’t see all eleven photos, choose Library > Show Photos In Subfolders.
The Filter bar contains three filter groups: Text, Attribute, and Metadata filters. Click any of these options and the Filter bar will expand to display the settings and controls you’ll use to set up a filtered search. You can use these filters separately or combine them for a more sophisticated search.
Use the Text filter to search any text attached to your images, including filenames, keywords, captions, and the EXIF and IPTC metadata. The Attribute filter searches your photos by flag status, star rating, color label, or copy status. The Metadata filter enables you to set up to eight columns of criteria to refine your search. Choose from the menu at the right end of a column header to add or remove a column.

2 If the Text or Metadata filters are active, click None to disable them. Click Attribute to activate the Attribute filters. If any of the flag filters is still active from the previous exercise, click the highlighted flag to disable it, or choose Library > Filter By Flag > Reset This Filter.
3 In the Rating controls, click the first star to search for any image with a rating of one star or higher.
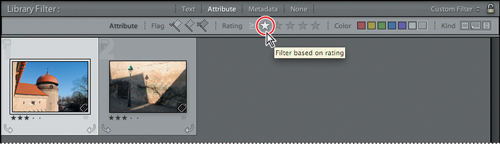
The grid view displays only the two images to which you’ve applied a star rating.
4 There are many options for refining your search. Click Text in the header of the Filter bar to add an additional filter. In the Text filter bar, open the first menu to see the search target options. You can narrow the search to Filename, Copy Name, Title, Caption, Keywords, or searchable IPTC and EXIF metadata, but for this exercise you can choose the search target Any Searchable Field. Click the second menu and choose Contains All.

5 In the search text box, type tower. Your narrowed search returns only one image in the Grid view.
6 In the Rating controls, click the first star to disable the current Rating filter or choose Library > Filter By Rating > Reset This Filter. Click Attribute in the header of the Filter bar to close the Attribute filter controls.
![]() Tip: In the search text box, add an exclamation mark (!) before any word to exclude it from the results. Add a plus sign (+) before any word to apply the “Starting With” rule only to that word. Add a plus sign (+) after a word to apply the “Ending With” rule only to that word.
Tip: In the search text box, add an exclamation mark (!) before any word to exclude it from the results. Add a plus sign (+) before any word to apply the “Starting With” rule only to that word. Add a plus sign (+) after a word to apply the “Ending With” rule only to that word.
7 In the Text filter bar, clear the search term “tower” by clicking the x icon at the right of the text box, and then type France.
The Grid view now displays only seven of the photos in the Lesson 5 folder.
8 Type a space after the word France, and then type !Normandy (note the exclamation mark). The search is narrowed to find those images with searchable text that contains the word France, but doesn’t contain the word Normandy. The Grid view now displays only three photos. Leave the Text filters set as it is for the next exercise.
Using the Metadata filter
1 Click Metadata in the header of the Filter bar to open the Metadata filter pane. Choose Default Columns from the menu at the far right of the Filter bar header.
2 Click Date in the header of the first column to see the wide range of search criteria from which you can choose for each of up to eight columns. Choose Aspect Ratio from the menu as the criteria for this column, and then choose Portrait from the Aspect Ratio options in the column. The selection in the Grid view is narrowed to two images.
3 Click Text in the header of the Filter bar to disable the Text filter. This search returns four photos from the Lesson 5 folder.
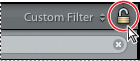
4 Click the lock icon at the right of the Filter bar header. This will lock the current filter so that it remains active when you change the image source for the search.
5 In the Catalog panel, click All Photographs. The Grid view now displays every portrait format image in your catalog.
As you can see, there are endless possibilities for combining filters to find just the image you’re looking for.
6 Click None in the Filter bar to disable all filters. Click the Lesson 5 folder in the Folders panel
Using the filters in the Filmstrip
The Attribute filter controls are also available in the header the Filmstrip. As in the Filter bar the Filter Presets menu lists filter presets and offers the option to save your filter settings as a custom preset, which will then be added to the menu.

![]() Tip: If you don’t see any filter presets in the presets menu, open Lightroom Preferences and click Restore Library Filter Presets under Lightroom Defaults on the Presets tab.
Tip: If you don’t see any filter presets in the presets menu, open Lightroom Preferences and click Restore Library Filter Presets under Lightroom Defaults on the Presets tab.
The Default Columns preset opens the four default columns of the Metadata search options: Date, Camera, Lens, and Label. Choose Filters Off to turn off all filters and collapse the Filter bar. Select the Flagged filter preset to display photos with a Pick flag. Use the Location Columns preset to filter photos by their Country, State/ Province, City, and Location metadata. The Rated filter preset displays any photos that match the current star rating criteria. Choose Unrated to see all the photos without a star rating.
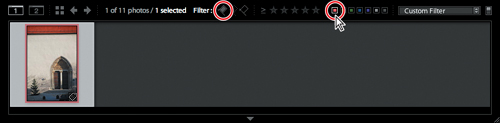
1 Choose Flagged from the Filter Presets menu at the top right of the Filmstrip. The Attribute filter bar opens above the Grid view. The Grid view and the Filmstrip show only one photo that you flagged as a pick in a previous exercise.
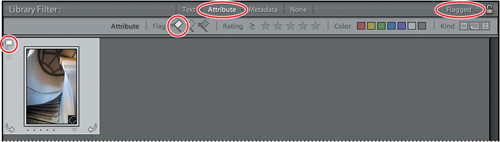
2 Click the white flag icon in the header of the Filmstrip to disable the current filter, and then click the red color label button. The Attribute filter settings change in the Filter bar above the Grid view and both the Grid view and the filmstrip display only the image that you labeled with the Painter tool.
![]() Tip: To save time and effort setting up searches, save your filter settings as a new preset. Specify criteria for any combination of Text, Attribute, and Metadata filters. Then choose Save Current Settings As New Preset from the Custom Filter menu in the Filter bar or the Filmstrip.
Tip: To save time and effort setting up searches, save your filter settings as a new preset. Specify criteria for any combination of Text, Attribute, and Metadata filters. Then choose Save Current Settings As New Preset from the Custom Filter menu in the Filter bar or the Filmstrip.
3 To disable all filters and display all the images in the Lesson 5 folder, choose Filters Off from the Filter Presets menu or click the switch at the far right of the Filmstrip’s header.
![]()
Reconnecting missing files and folders
Remember that when you import a photo into your library, Lightroom adds the image file’s name and address to the library catalog file, and displays an entry for the folder in which the photo is stored in the Folders panel.
If you rename or move a photo—or a folder—while you’re outside the Lightroom workspace the link to the catalog will be broken and Lightroom may no longer be able to locate the image file.
Lightroom will alert you to the problem by marking the thumbnail of the missing photo—or the entry for the missing folder in the Folders panel—with a question mark icon.
1 Right-click / Control-click one of the photos of yellow chairs and choose Show In Explorer / Show In Finder from the context menu.
2 In the Explorer / Finder window, change the name of the selected file to cafe_chairs.jpg. Change the name of the Landscapes folder inside the Lesson 5 folder to French Coast.

3 Back in the Grid view in Lightroom, you’ll notice the missing file icon in the upper right corner of the image cell. Click the icon, and then click Locate in the dialog box.
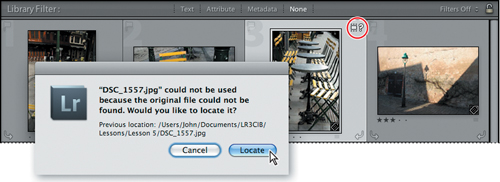
4 In the Locate file dialog box, select the renamed file and then click Select.
When you have merely moved, rather than renamed files, you can activate the Find Nearby Missing Photos option in the Locate file dialog box and Lightroom will find any other missing photos in the same folder automatically.
5 Click Confirm to verify that cafe_chairs.jpg is the correct file despite the changed name. You have now reestablished the link to your renamed file; the missing file icon no longer appears in its image cell.
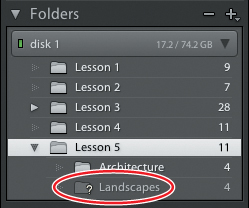
6 In the Folders panel, the Landscapes folder is now dimmed and marked with a question mark icon. Right-click Control-click the Landscapes folder; you could choose Find Missing Folder from the context menu, and then locate the renamed folder as you did for the missing file, but we’ll take this opportunity to look at a different method instead.
7 Choose Library > Find Missing Photos. A new temporary collection named Missing Photographs is created in the Catalog panel. The new collection is automatically selected and the four photos from the Landscapes folder appear in the Grid view. Select each image in turn; the missing photo icon appears on each image cell.

8 Click the missing photo icon on any of the images in the Grid view and follow the same steps you used previously. Navigating to the renamed folder and locate the selected file. This time, activate the Find Nearby Missing Photos option in the Locate file dialog box and Lightroom will find the other three missing photos in the renamed folder automatically. Click Select.
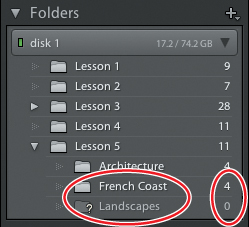
9 The renamed folder is now listed in the Folders panel. Although the missing Landscapes folder is still listed in the Folders panel, it now shows an image count of 0. Right-click / Control-click the empty Landscapes folder and choose Remove from the context menu.
10 Right-click / Control-click the Missing Photographs folder in the Catalog panel and choose Remove This Temporary Collection from the context menu.
This concludes the lesson on organizing your image library. You’ve learned about structuring your folders, sorting and grouping images into collections, and a variety of methods for tagging and marking your photos to make them easier to find by applying a range of search filters.
However, it’s worth discussing a final step that is invaluable in managing your growing library of photos: perform regular catalog backups. The library catalog contains not only your entire image database but also all the preview images and metadata, together with records of your collections and all your settings from the Develop, Slideshow, Web and Print modules. It is as important to make backups of your catalog as it is to keep copies of your image files. You’ll learn more about backing-up your library in Lesson 10, “Creating Backups and Exporting Photos.”
Before you move on to the next lesson, take a moment to refresh some of what you’ve learned by reading through the review on the next page.
Review questions
1 Can you keep multiple copies of the same master image in different folders?
2 What is a Smart Collection?
3 Why would you create a Stack?
4 What are keyword tags?
5 What are the three modes in the Filter bar?
Review answers
1 You can’t keep copies of a master image in separate folders because the same image cannot be added to the Lightroom catalog twice. Although the image must reside in a single folder, it can be included in any number of Collections.
2 A Smart collection can be configured to search the library for images that meet specified criteria. Smart collections stay up-to-date by automatically adding any newly imported photos that meet the criteria you’ve specified.
3 Stacks can be used to group similar photos and thereby reduce the number of thumbnails displayed at one time in the Grid view and the Filmstrip. Only the top image in a stack appears in the thumbnail display but the stack can be expanded and contracted by clicking the thumbnail.
4 Keyword tags are text added to the metadata of an image to describe its content or classify it in one way or another. Shared keywords link images by subject, date, or some other association. Keywords help to locate, identify, and sort photos in the catalog. Like other metadata, keyword tags are stored either in the photo file or (in the case of proprietary camera raw files) in XMP sidecar files. Keywords applied in Lightroom can be read by Adobe applications such as Bridge, Photoshop, or Photoshop Elements, and by other applications that support XMP metadata.
5 The Filter bar offers three filter groups: Text, Attribute, and Metadata filters. Using combinations of these filters you can search the image library for metadata text, filter searches by flag, copy status, rating, or label, and specify a broad range of customizable metadata search criteria.