
10: Creating Backups and Exporting Photos
Lesson overview
Lightroom makes it easy to back up and export all the data connected with your image library. You can create backup copies to external storage during import, have Lightroom schedule automatic backups of your catalog file, and perform full or incremental backups of both your photos and develop settings. Export files in a range of formats—from images optimized for on-screen viewing to archival copies.
In this lesson you’ll learn a variety of techniques to help you to manage your image library, minimize the impact of accidental data loss, and streamline your workflow:
• Backing up your catalog file
• Backing up the entire image library
• Making incremental backups
• Exporting metadata
• Exporting photos for on-screen viewing
• Exporting photos to be edited in another application
• Exporting photos for archival purposes
• Using export presets
• Setting up automated post-export actions
![]() You’ll probably need between one and two hours to complete this lesson.
You’ll probably need between one and two hours to complete this lesson.
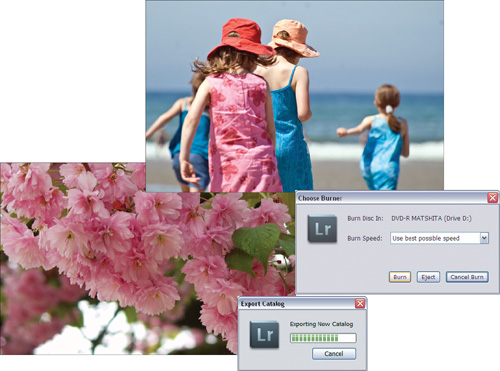
Safeguard your photographs and develop settings against loss using Lightroom’s build-in backup tools. Back up just your catalog file, or your entire photo library, complete with develop settings and copies of your master files. Export photos in different file formats for multimedia presentations, for further editing in an external image editor, as e-mail attachments, or to be burned to CD or DVD for archival purposes.
Getting started
This lesson assumes that you are already familiar with the Lightroom workspace and with moving between the different modules. If you find that you need more background information as you go, refer to Lightroom Help, or review the previous lessons in this book.
Before you begin, make sure that you have correctly copied the Lessons folder from the CD in the back of this book onto your computer’s hard disk and created the LR3CIB Library Catalog file as detailed in “Copying the Classroom in a Book files” on page 2 and “Creating a catalog file for working with this book” on page 3.
1 Start Lightroom.
2 In the Adobe Photoshop Lightroom - Select Catalog dialog box, make sure the file LR3CIB Library Catalog.lrcat is selected under Select A Recent Catalog To Open, and then click Open.

3 Lightroom will open in the screen mode and workspace module that were active when you last quit. If necessary, switch to the Library module.
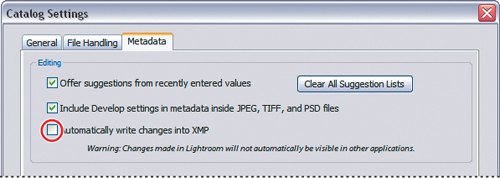
4 For the purposes of exercises to follow, we need to be sure that Lightroom won’t automatically write changes made during import into the image files’ XMP data. Choose Edit > Catalog Settings / Lightroom > Catalog Settings. On the Metadata tab, make sure that the Automatically Write Changes Into XMP option is disabled, and then close the Catalog Settings dialog box.
Importing images into the library
The next step is to import the images for this lesson into the Lightroom library.
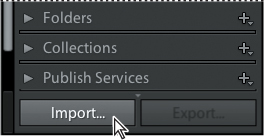
1 In the Library module, click the Import button below the left panel group.
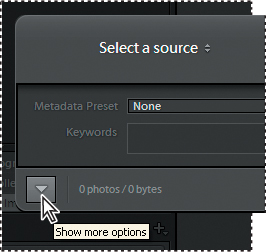
2 If the Import dialog box appears in compact mode, click the Show More Options button at the lower left of the dialog box to see all the options in the expanded Import dialog box.
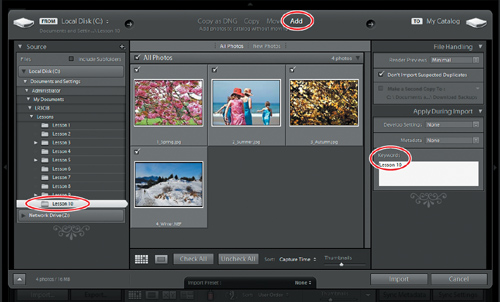
3 Under Source at the left of the expanded Import dialog box, navigate to the Lessons folder that you copied into the LR3CIB folder on your hard disk. Select the Lesson 10 folder. Ensure that all four images in the Lesson 10 folder are checked for import.
4 In the import options above the thumbnail previews, click Add to add the imported photos to your catalog without moving or copying them.
5 Under File Handling at the right of the expanded Import dialog box, choose Minimal from the Render Previews menu and ensure that the Don’t Import Selected Duplicates option is activated.
6 Under Apply During Import, choose None from both the Develop Settings menu and the Metadata menu and type Lesson 10 in the Keywords text box. Make sure your settings are exactly as shown in the illustration below, and then click Import.
The four images are imported from the Lesson 10 folder and now appear in both the Grid view of the Library module and in the Filmstrip across the bottom of the Lightroom workspace.
Preventing data loss
The importance of a good backup strategy is often only understood too late. How much damage would be done if your computer was stolen right now? How many files would be irrecoverably lost if your hard disk failed today? How much work and money would that cost you? You can’t prevent a disaster from happening but it is in your power to reduce the risks and the cost of recovery. Backing up regularly will reduce the impact of a catastrophe and save you time, effort, and money.
Lightroom delivers a range of options that make it easy to safeguard your photo library; as for the rest of the files on your computer, you really should have your own backup strategy in place.
Backing up the catalog file
The Lightroom catalog file stores a great deal of information for the photos in your library—not only the locations of the image files, but the metadata attached to them, including titles, captions, keyword tags, flags, labels, and ratings, together with all your developing and output settings. Every time you modify a photo in anyway, from renaming the file during import to color correction, retouching, and cropping—all your work is saved to the catalog file. It records the way your images are grouped and ordered in collections, and records the publishing history, slide-show settings, web gallery designs, and print layouts associated with them as well as your customized templates and presets.
Even if you have copies of your original images stored safely on removable media—unless you back up your catalog, you could still lose hundreds of hours of work in the event of a hard disk failure, accidental deletion, or a corrupted library file. You can set Lightroom to initiate a regular backup of your catalog file automatically.
1 Choose Catalog Settings from the Edit / Lightroom menu. on the General tab, choose When Lightroom Next Exits from the Back Up Catalog menu.

2 Click OK / the Close button (![]() ) to close the Catalog Settings dialog box; then quit Lightroom.
) to close the Catalog Settings dialog box; then quit Lightroom.
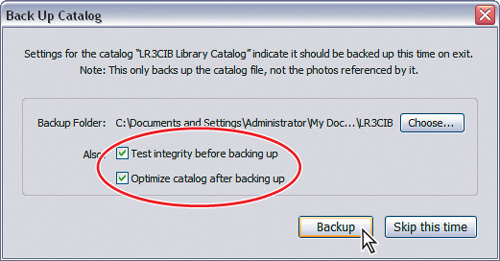
3 In the Back Up Catalog dialog box, click the Choose button to change the folder where the backed up catalog will be stored. Ideally the backup should be located on a different disk than your original catalog file; for the purpose of this exercise you can select the LR3CIB folder on your hard disk. In the Browse For Folder / Choose Folder dialog box, select the LR3CIB folder as the backup directory and click OK / Choose.
![]() Tip: To save space on your backup drive, you can either delete your older backup files or compress them. Catalog files compress very effectively; you can expect a compressed catalog to be as small as 10% of the size of the original. Make sure to decompress the file before attempting to restore your catalog from the backup.
Tip: To save space on your backup drive, you can either delete your older backup files or compress them. Catalog files compress very effectively; you can expect a compressed catalog to be as small as 10% of the size of the original. Make sure to decompress the file before attempting to restore your catalog from the backup.
4 Make sure the options Test Integrity Before Backing Up and Optimize Catalog After Backing Up are activated. It’s a good idea to keep these options activated whenever you back up your catalog; it would defy the purpose of making a backup if your original catalog file was not in good working order. Click Backup.
Each time you back up your catalog, Lightroom will create a complete copy of the catalog file in the directory you specified, inside a new folder with a name composed from the date and time of the backup.
![]() Note: Backing up the catalog file in this way does not make backup copies of the original image files or the preview images that Lightroom displays in the workspace. The previews will be regenerated as your catalog file is restored from the backup, but you’ll need to back up your original image files separately.
Note: Backing up the catalog file in this way does not make backup copies of the original image files or the preview images that Lightroom displays in the workspace. The previews will be regenerated as your catalog file is restored from the backup, but you’ll need to back up your original image files separately.
Should your catalog be accidently deleted or become corrupted, you can now restore it either by copying the backup file to your catalog folder or by creating a new catalog and importing the contents of your backup file.
To avoid inadvertently modifying your backup file, it’s preferable not to open it directly from the Lightroom File menu.
5 Start Lightroom. In the Adobe Photoshop Lightroom - Select Catalog dialog box, make sure that the file LR3CIB Library Catalog.lrcat is selected under Select A Recent Catalog To Open, and then click Open.
6 Choose Edit > Catalog Settings / Lightroom > Catalog Settings.
7 In the Catalog Settings dialog box, click the General tab and reset your preferred backup frequency by choosing from the Back Up Catalog menu.
8 Click OK / the Close button (![]() ) to close the Catalog Settings dialog box.
) to close the Catalog Settings dialog box.
Exporting metadata
The catalog is a central storage location for all the information associated with every image in your library; exporting and distributing the catalog file’s content is another strategy that will lessen the impact if your catalog file is lost or damaged. You can save a copy of the information from the catalog file that is specific to each photo back to the respective image file on your hard disk.
If you keep this exported information in sync with your catalog file—something that can be done automatically—you have what is, in effect, a distributed backup of the metadata and develop settings for each of your photos.
When a photo has changes to its metadata that have not yet been saved to the original image file—such as the keyword tag you applied to the images for this lesson during the import process—its image cell in the Grid view and the Filmstrip is marked with the Metadata File Needs To Be Updated icon (![]() ).
).
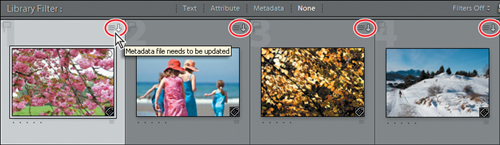
1 If you don’t see the Metadata File Needs To Be Updated icon (![]() ) in the Grid view image cells, choose View > View Options. On the Grid View tab in the Library View Options dialog box, activate the Unsaved Metadata option under Cell Icons. Click the Close button to close the Library View Options dialog box.
) in the Grid view image cells, choose View > View Options. On the Grid View tab in the Library View Options dialog box, activate the Unsaved Metadata option under Cell Icons. Click the Close button to close the Library View Options dialog box.
2 Select the first image in the Grid view. Right-click / Control-click the thumbnail and choose Metadata > Save Metadata To File from the context menu. After a brief processing time, the Metadata File Needs To Be Updated icon disappears.
3 Ctrl-click / Command-click to select the other three photos, and then click the Metadata File Needs To Be Updated icon (![]() ) in the image cell of any of the selected images. Click Save in the confirmation dialog box to update the image files on your hard disk. The Metadata File Needs To Be Updated icon disappears from each of the image cells after a brief processing time.
) in the image cell of any of the selected images. Click Save in the confirmation dialog box to update the image files on your hard disk. The Metadata File Needs To Be Updated icon disappears from each of the image cells after a brief processing time.
For files in DNG, JPEG, TIFF, and PSD format, Lightroom writes metadata into the image file itself. These formats have well-defined spaces within the file’s structure where XMP information can be stored without having any affect on the image data.
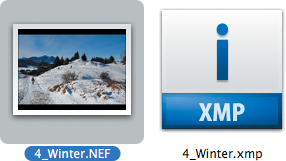
Changes made to the camera raw image amongst the lesson files, however, are written into a separate XMP sidecar file, which is stored alongside the original file. The XMP file will record all the exported metadata and develop settings associated with the image.
4 To see the XMP file, right-click / Control-click the image 4_Winter.NEF and choose Show In Explorer / Show In Finder from the context menu. In the Explorer / Finder window, the sidecar file has the same name as the selected image, followed by an .xmp file extension.
![]() Tip: On Windows, if you don’t see the file name extensions in the Explorer window, choose Tools > Folder Options and disable the option Hide Extensions For Known File Types on the View tab.
Tip: On Windows, if you don’t see the file name extensions in the Explorer window, choose Tools > Folder Options and disable the option Hide Extensions For Known File Types on the View tab.
Many camera manufactures use proprietary and undocumented formats for their Raw files, some of which become outdated as new ones appear. Because of this, storing the metadata in a separate file is the safest approach, avoiding both possible corruption of the Raw file or loss of the exported metadata.
Applications such as Adobe Bridge and the Photoshop Camera Raw plug-in can read XMP metadata and will allow you to edit it. When you edit or add to an image’s metadata in another application, Lightroom will show the Metadata Was Changed Externally icon (![]() ) above the thumbnail in the Grid view. To accept the changes and update your catalog file accordingly, choose Metadata > Read Metadata From File. To reject the changed metadata and overwrite it with the information in your catalog file, choose Metadata > Save Metadata To File.
) above the thumbnail in the Grid view. To accept the changes and update your catalog file accordingly, choose Metadata > Read Metadata From File. To reject the changed metadata and overwrite it with the information in your catalog file, choose Metadata > Save Metadata To File.
You can update the metadata for a batch of modified images—or even for the entire catalog with all its folders and collections—by selecting the images or folders to be updated and choosing Metadata > Save Metadata To File as you did with a single file in step 4. You can also configure Lightroom to export the metadata automatically whenever an image is modified. Although you might notice some slowing in performance as Lightroom writes information to the hard disk, the advantage is that you will always have an up-to-date copy of the metadata from your catalog stored either in the image files themselves or in their sidecar files.
However, XMP information exported in this way contains only the metadata attached to the individual images: keywords, flags, labels, ratings, and develop settings. It does not include higher-level data relevant to the catalog as a whole such as information relating to stacks, virtual copies, and settings used in presentations.
5 In Lightroom, choose Edit > Catalog Settings / Lightroom > Catalog Settings. In the Catalog Settings dialog box, activate Automatically Write Changes Into XMP under Editing on the Metadata tab. Click OK / the Close button (![]() ) to close the Catalog Settings dialog box.
) to close the Catalog Settings dialog box.
Backing up the library
In the first exercise you backed up your catalog without the image files. In the second you updated your images files with just part of the information stored in the catalog. In this exercise you’ll export your entire Lightroom library: images, catalog, stacks, collections—the works!
Exporting images as a catalog
When you export your photos as a catalog, Lightroom creates a copy of the catalog file and gives you the option to make copies of the master files and the image previews at the same time. You can choose to export the entire library, or just a selection of your images, as a catalog. Exporting images in this way is ideal for moving your photos together with all the associated Lightroom catalog information from one computer to another. You can use the same technique to restore your entire library from a backup after a data loss.
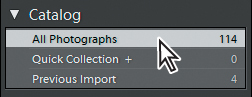
1 In the Catalog panel, click All Photographs, and then choose File > Export As Catalog.
Ideally, you should save your backup files to a different hard disk than the one that stores your catalog and the master image files—but for this exercise, you can save the backup files to the LR3CIB folder on your hard disk.
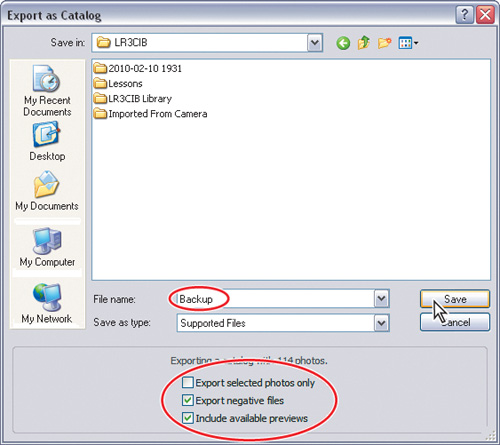
2 In the Export As Catalog dialog box, navigate to the LR3CIB folder you created on your hard disk. Type Backup in the File Name / Save As text box, disable Export Selected Photos Only and activate Export Negative Files and Include Available Previews. Click Save / Export Catalog.
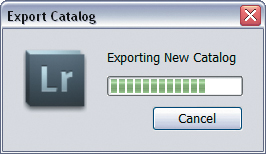
An initial progress bar is displayed while the new catalog is being created, which should only take a few seconds.
Lightroom then begins copying all the image files associated with this catalog to the new location as a background task.
3 While you wait for the export to be completed, watch the progress bar in the upper left the Lightroom workspace.
![]()
4 When the export process is complete, switch to Windows Explorer / the Finder and navigate to the LR3CIB folder. Open the new Backup folder.
![]() Note: You may see a different set of folders than is shown in the illustration, depending on which lessons you’ve already completed.
Note: You may see a different set of folders than is shown in the illustration, depending on which lessons you’ve already completed.
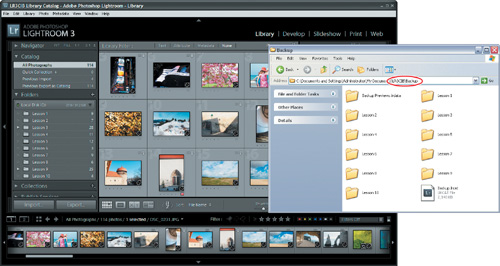
You can see that the folder structure nested inside the Backup folder replicates the arrangement of folders you see in the Folders panel. All the master images in your Lightroom library have been copied into these new folders and the file Backup.lrcat is a fully functional copy of your original catalog.
5 In Lightroom, choose File > Open Catalog. In the Open Catalog / Open dialog box, navigate to the new Backup folder inside the LR3CIB folder. Select the file Backup.lrcat, and then click Open. If the Open Catalog dialog box appears, click Relaunch. Lightroom will open the backup catalog.
6 Other than the filename in the title bar of the workspace window, this catalog will be almost indistinguishable from your original. Only some minor status information has been lost. For example, you can see that the Previous Import folder in the Catalog panel is now empty.
7 Some of your preferences have been reset to default values which may differ from the choices you’ve made for your LR3CIB catalog. Choose Edit > Catalog Settings / Lightroom > Catalog Settings. In the Catalog Settings dialog box, click the General tab. The backup frequency has been reset to the default: Once A Week, When Exiting Lightroom. Click Cancel / the Close button (![]() ) to close the Catalog Settings dialog box.
) to close the Catalog Settings dialog box.
8 Choose File > Open Recent > LR3CIB Library Catalog.lrcat to return to your original catalog. If the Open Catalog dialog box appears, click Relaunch.
9 If the Back Up Catalog dialog box appears, click Skip Now.
Doing incremental backups
In the usual course of events the majority of the images in your library will remain unchanged between backups. An incremental backup will save you time by replacing only the backup copies and catalog entries of images that have been modified since the last backup.
Although Lightroom does not have an incremental backup command, you can achieve the same effect by regularly updating your existing backup with just those files in your main catalog that have been modified since the last backup.
1 In the Folders panel, select the Lesson 10 folder. Change the star rating for one of the images in the Grid view. This will be the incremental change to your library for the purposes of this exercise.
2 Choose File > Open Recent > Backup.lrcat to switch to the Backup catalog. If the Open Catalog dialog box appears, click Relaunch.
3 Choose File > Import From Catalog. In the Import From Lightroom Catalog dialog box, navigate to the LR3CIB folder. Drill down to the LR3CIB Library/LR3CIB Library Catalog folder. Inside that folder, select LR3CIB Library Catalog.lrcat, and then click Open / Choose.
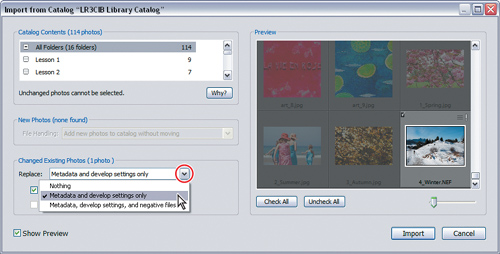
4 In the Import From Catalog dialog box, make sure the Show Preview option is activated. Choose Metadata And Develop Settings Only from the Replace menu under Changed Existing Photos. Scroll down in the Preview panel to confirm that only the image you modified in step 1 is selected for import.
![]() Note: When you’re adding new images to your backup library, choose Copy New Photos To A New Location And Import from the File Handling menu. Click the Choose button to specify your current Backup folder as the destination for the copied files.
Note: When you’re adding new images to your backup library, choose Copy New Photos To A New Location And Import from the File Handling menu. Click the Choose button to specify your current Backup folder as the destination for the copied files.
5 Click Import. You can see that the modified image has been updated with the rating you changed in the master catalog. You have just performed an incremental backup.
6 (Optional) In the Catalog panel, click All Photographs and choose Edit > Select All or press Ctrl+A / Command+A. Choose Metadata > Save Metadata To Files or press Ctrl+S / Command+S. This will export the metadata and develop settings for each photo in the backup library to the backup image file or its XMP sidecar, as an extra precaution against data loss.
7 To return to your original catalog, choose File > Open Recent > LR3CIB Library Catalog.lrcat. If the Open Catalog dialog box appears, click Relaunch.
8 If the Back Up Catalog dialog box appears, click Skip This Time.
Exporting photos
The backup techniques we have discussed so far all produce backup files that can be read only by Lightroom or another application that is capable of reading and interpreting the exported XMP metadata.
If you wish to send your work in a usable format to somebody who doesn’t have Lightroom installed on his or her computer you’ll first need to convert the images to an appropriate file format. This is comparable to saving a Word document as plain text or as a PDF document for distribution; some of the functionality is lost but at least the recipient can see what you’re working on.
Your choice of file format for the exported photos will depend on the purpose for which the images are intended. To export an image for use as an e-mail attachment intended to be viewed on screen, use the JPEG file format and minimize the file size by reducing the resolution and dimensions of the image. To export an image to be edited in another application, use the PSD or TIFF file format at full size. For archival purposes you can export the images in their original file format or convert them to DNG.
Exporting JPEG files for on-screen viewing
For this exercise, you’ll convert the images to grayscale before you export them so you’ll be able to see at a glance that your develop settings have been applied to the images as they were exported.
1 In the Folders panel, select the Lesson 10 folder. Choose Edit > Select All, and then choose Photo > Develop Settings > Convert To Black & White. If you prefer using keyboard shortcuts, press Ctrl+A / Command+A, and then press the V key on your keyboard.
2 With all four images still selected in the Grid view, choose File > Export.
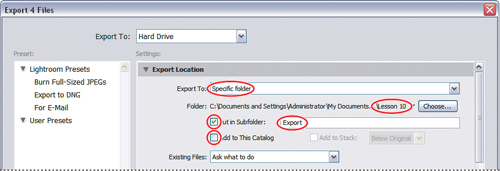
3 Under Export Location in the Export dialog box, choose Specific Folder from the Export To menu, and then click the Choose button below it to specify a destination folder (see illustration after step 4). Navigate to your Lessons folder, select the Lesson 10 folder, and click OK / Choose.
4 Activate the Put In Subfolder option and type Export as the name for the new subfolder. Disable the option Add To This Catalog.
5 Under File Naming in the Export dialog box, click the checkbox to activate the Rename To option; then, choose Filename from the menu.
6 Under File Settings, choose JPEG from the Format menu and set a Quality value of between 70% and 80%—a range that generally makes an acceptable compromise between image quality and file size. From the Color Space menu choose sRGB. The sRGB color space is a good choice for images intended to be viewed on the web—or in other circumstances where you are unsure what form of color management is used, if any at all.

7 Scroll down in the Export dialog box, if necessary, so that you can see the Image Sizing controls. Activate the Resize To Fit option and choose Width & Height from the menu. Enter 750 for both width (W) and height (H) and choose Pixels from the units menu. This will proportionally scale each image so that its longest side is 750 pixels. Activate Don’t Enlarge to avoid smaller images being upsampled. Set the Resolution to 72 Pixels Per Inch—although resolution settings are in general ignored for on-screen display. The reduction in file size is the result of reducing the total number of pixels that make up the image.

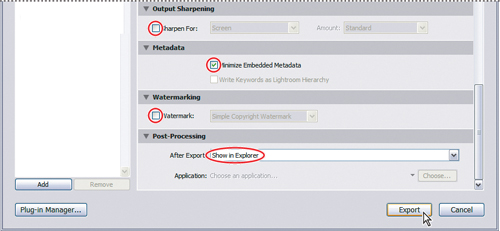
8 In the Output Sharpening settings, disable the Sharpen For option. In the Metadata options, activate only Minimize Embedded Metadata. Disable the Watermark option. Choose Show In Explorer / Show In Finder from the After Export menu under Post-Processing, and then click Export.
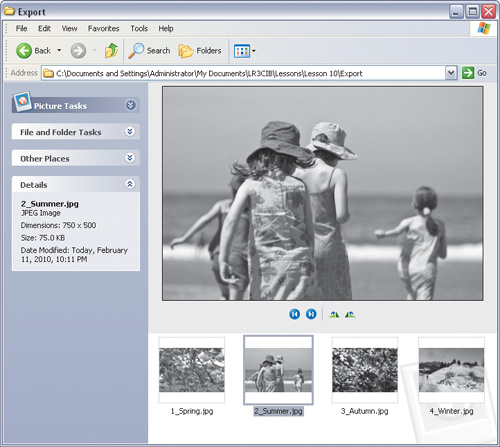
9 Watch the progress bar on the left side of the top panel in the Lightroom workspace. When the export process is complete, your Export folder inside the Lesson 10 folder will open in Windows Explorer / the Finder.
![]() Note: To have Lightroom notify you by playing a sound when the export process is complete, choose a sound from the menu under Completion Sounds on the General tab in the Preferences dialog box.
Note: To have Lightroom notify you by playing a sound when the export process is complete, choose a sound from the menu under Completion Sounds on the General tab in the Preferences dialog box.
Using export plug-ins
You can use plug-ins to extend Lightroom’s functionality.
For example, you can download and install an iPhoto plug-in that extends the options in the Export dialog box. The Lightroom iPhoto plug-in enables you to export images in your preferred file format and then import them into iPhoto as an album.
You can then take advantage of iPhoto’s close integration with the Mac OS to browse your photos from within other applications or to transfer them to an iPod or iPhone.
There are export plug-ins available to enable you upload photos directly from within Lightroom to your SmugMug, Zenfolio, or Picasa Web accounts.
Other export plug-ins let you create entire web galleries from the selected images and upload them to your FTP server. Worth mentioning are the plug-ins for PixelPost Photoblob, SlideShowPro, and IStockPhoto, to name just a few.
Search the Internet for Lightroom plug-ins or browse the Adobe Store (www.adobe.com/go/store) where you have access to thousands of plug-ins from third-party developers, either offering additional export functionality or helping you to automate tasks, customize workflows, create specialized professional effects, and more.
10 In Windows Explorer, use the Filmstrip or Thumbnail view to see a preview of the images in the folder. In the Finder, select an image in Column view or in Cover Flow to see its preview. You can see that the images are in black and white; your develop settings have been applied to the during the export process. The width of the images is 750 pixels and the file sizes are much reduced.
11 In Windows Explorer / the Finder, delete the four black and white images in the Export folder, and then return to Lightroom. Press the V key, or choose Photo > Develop Settings > Reset or to revert the images to their original colors.
Exporting as PSD or TIFF for further editing
1 In the Grid view, choose Edit > Select None, and then click to select the camera raw image, 4_Winter.NEF. In the right panel group, expand the Quick Develop panel and choose BW Creative - Cyanotype from the Saved Preset menu.
![]() Note: For the purposes of this illustration, the Saved Preset menu has been abridged; you’ll actually find the BW Creative - Cyanotype preset quite a long way further down the menu.
Note: For the purposes of this illustration, the Saved Preset menu has been abridged; you’ll actually find the BW Creative - Cyanotype preset quite a long way further down the menu.

2 Choose File > Export. In the Export dialog box, you’ll notice that all your settings from the previous exercise are still in place.
![]() Tip: To export more images using the same settings that you used for the previous export (and without calling up the Export dialog box) choose File > Export With Previous.
Tip: To export more images using the same settings that you used for the previous export (and without calling up the Export dialog box) choose File > Export With Previous.
3 In File Settings, choose TIFF from the Format menu. When saving in TIFF format, you have the option to apply ZIP data compression—a lossless form of compression—to reduce the resulting file size. Notice that AdobeRGB (1998) is automatically selected in the Color Space menu.
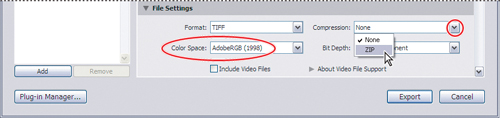
When you intend to edit an image in an external application after exporting it, you should use the AdobeRGB (1998) color profile rather than the sRGB color profile. The AdobeRGB (1998) color profile has a larger color gamut, which results in fewer colors being clipped and the original appearance of your images being better preserved. The ProPhoto RGB color gamut is even larger, capable of representing any color from the original raw image. However, to correctly display images using the AdobeRGB (1998) or ProPhoto RGB color profiles on screen you need an image editing application capable of reading these color profiles. You’ll also need to turn color management on and calibrate your computer display. Without taking these measures, your images will look bad on screen with the AdobeRGB (1998) color profile—and even worse with ProPhoto RGB.
![]() Tip: Choose your preferred external editor, file format, color space, bit depth, compression settings, and file naming options on the External Editing tab of the Preferences dialog box. In the Lightroom workspace, choose Photo > Edit In, and then choose your preferred external image editing application from the menu. Lightroom will automatically export an image in the appropriate file format, open it in the external editor, and add the converted file to the Lightroom library.
Tip: Choose your preferred external editor, file format, color space, bit depth, compression settings, and file naming options on the External Editing tab of the Preferences dialog box. In the Lightroom workspace, choose Photo > Edit In, and then choose your preferred external image editing application from the menu. Lightroom will automatically export an image in the appropriate file format, open it in the external editor, and add the converted file to the Lightroom library.
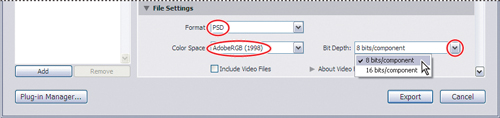
4 Choose PSD from the Format menu. Choose 8 Bits/Component from the Bit Depth menu. Unless you have a particular need to output 16 bit files as part of your workflow, 8-bit files are smaller and compatible with more programs and plug-ins, but do not preserve fine tonal detail as well as 16-bit files. Lightroom actually operates in a 16 bit color space but by the time you’re ready to export images you’ve usually already made any important corrections or adjustments that were necessary, so you won’t loose much in terms of editing capability by converting the files to 8 bits for export.
5 In Image Sizing, disable Resize To Fit; to preserve all the image information for further editing, we wish to export every pixel of the original image.
6 Leave the Output Sharpening and Metadata settings unchanged. If you have Adobe Photoshop CS2/CS3/CS4/CS5 installed on your computer, choose Open in Adobe Photoshop CS2/CS3/CS4/CS5 from the After Export menu in the Post-Processing options. Alternatively, choose Open In Other Application, and then click Choose to select your preferred image editor. Click Export.
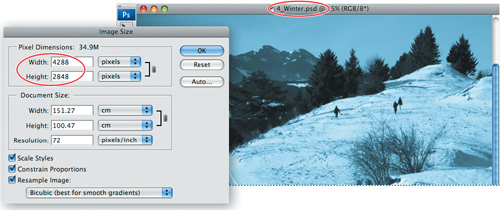
7 Wait until the export is complete and the photo has opened in the external editor. The image has been exported with the BW Creative - Cyanotype preset that you applied in the Quick Develop panel. Its dimensions are the same as those of the original Raw image—4288 by 2848 pixels.
8 Quit the external editor, delete the file from the Export folder in Windows Explorer / the Finder, and then return to Lightroom.
Exporting as Original or DNG for archiving
1 In the Grid view, make sure that the photo 4_Winter.NEF is still selected.
2 Choose File > Export. In the Export dialog box, leave the Export Location and File Naming settings unchanged.
![]() Note: When you choose to export images in DNG file format you have additional options that affect the way the DNG files are created, but the original image data remains essentially unchanged.
Note: When you choose to export images in DNG file format you have additional options that affect the way the DNG files are created, but the original image data remains essentially unchanged.
3 In File Settings, choose Original from the Format menu. Note that there are now no other File Settings, Image Settings, or Output Sharpening options available; Lightroom will export the original image data unaltered.
4 In the Post-Processing options, choose Show In Explorer / Show In Finder from the After Export menu; then, click Export.

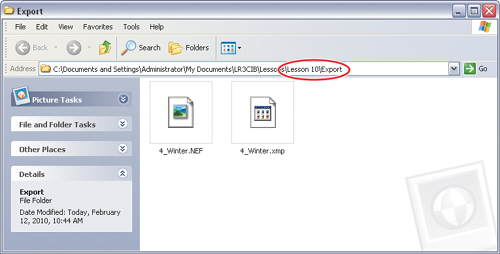
5 Wait until the export process completes and the Export folder inside the Lesson 10 folder opens in Windows Explorer / the Finder. In the Windows Explorer / Finder window, note that an XMP sidecar file has been saved together with the copy of the original RAW image. This XMP sidecar file contains editing settings and any additional metadata, such as the rating you applied to the image.
6 In Windows Explorer / the Finder, delete both files from the Export folder, and then return to Lightroom.
Using export presets
Lightroom provides presets for commonly performed export tasks. You can use a preset as is or as a starting point for creating your own.
If you find yourself performing the same operations over and over again you should create your own presets to automate your workflow.
1 In the Grid view, select one of the other images in the Lesson 10 folder and then choose File > Export.
2 In the list of presets on the left side of the Export dialog box, choose For E-Mail from the Lightroom Presets.
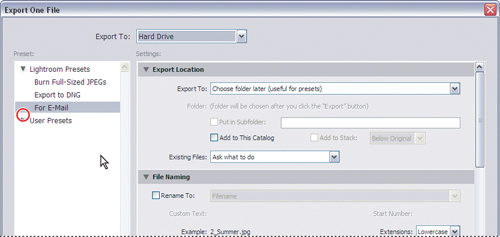
3 Note the export location settings associated with this preset. Under Export Location, choose Specific Folder from the Export To menu, and then click the Choose button, if necessary, to reinstate the Lesson 10 / Export folder as the destination. Make sure the Put In Subfolder option is activated, and then type To E-Mail as the name for the new subfolder.
4 Examine the rest of the settings associated with this preset. With the current File Settings, an exported file will be an sRGB JPEG file with a Quality setting of 50%. Under Image Sizing, the exported image is set to be resized so that its longest side will be scaled down to 640 pixels. In the Metadata options Minimize Embedded Metadata is activated, and under Post-Processing, Show In Explorer / Show In Finder is selected from the After Export menu. These are all reasonable settings for images to be viewed as email attachments. If you prefer different settings for any of the options, adjust them now.
5 In the list of presets on the left side of the Export dialog box, click to select the Burn Full-Sized JPEGs export preset.
6 Note the changes in the export settings. The Export Location settings are no longer available; CD / DVD is now selected in the Export To menu at the top of the Export dialog box, instead of Hard Drive. Under File Settings, the JPEG Quality setting has been set to 100%.
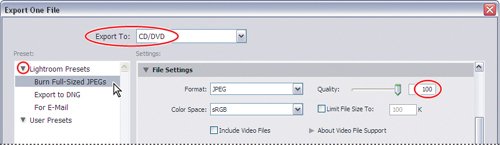
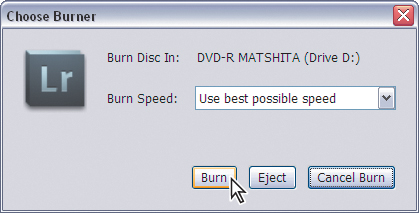
7 Scroll down in the Export dialog box to examine all the preset options. Under Image Sizing, the Resize To Fit option is disabled. In the Metadata options, Minimize Embedded Metadata is disabled. You can adjust any of the settings in the preset if you wish. Note that for this preset there are no Post-Processing options; If you go ahead and click the Export button, Lightroom will automatically open the Choose Burner / Burn Disc dialog box, where you can nominate your disk burner and specify the burn speed before clicking Burn.
Setting up post-processing actions
You can streamline your export workflow by setting up an automated post-processing action. For example, when you export an image to be used as an e-mail attachment, you could have Lightroom automatically launch your e-mail application and prepare a new message with the exported image attached.
1 Choose For E-Mail from the Lightroom Presets. Set up the Export Location as you did in step 3 on the previous page. Adjust the other settings to your liking.
2 In the Post-Processing options, choose Go To Export Actions Folder Now from the After Export menu.

Lightroom opens a Windows Explorer / Finder window with the Export Actions folder already selected. The next step in setting up your automated export is to place a shortcut or alias for your e-mail application into this folder.
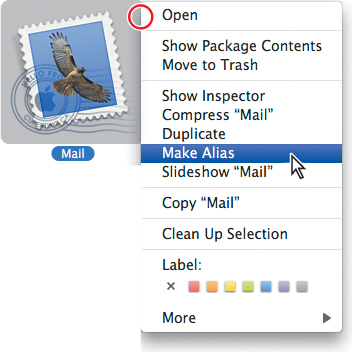
3 Open a second Windows Explorer / Finder window and navigate to the folder containing your e-mail application. Right-click / Control-click the e-mail application, choose Create Shortcut / Make Alias from the context menu, and then drag the new shortcut or alias into the Export Actions folder. When you’re done, return to the Export dialog box in Lightroom.
4 In the Post-Processing settings, choose the new shortcut or alias to your e-mail application from the After Export menu.

With the current settings you could export an image as a small JPEG file and Lightroom would automatically launch your e-mail application and open a new message with the image already attached. But first, there’s one more step that can help automate the process even further.
Creating user presets
You can save your customized export settings as a new user preset. Export presets are always available from the File menu (File > Export With Preset) where you can start your export without having to open the Export dialog first.
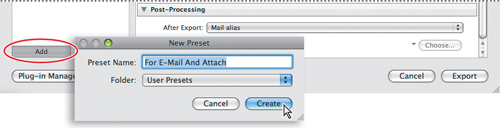
1 Click the Add button in the lower left corner of the Export dialog box. In the New Preset dialog box, type For E-Mail And Attach as the name for your new preset, choose User Presets from the Folder menu, and then click Create.
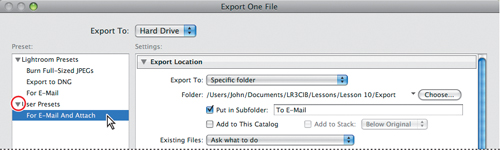
In the Export dialog box, your new preset is now listed under User Presets.
2 Click Cancel to close the Export dialog box without exporting any images.
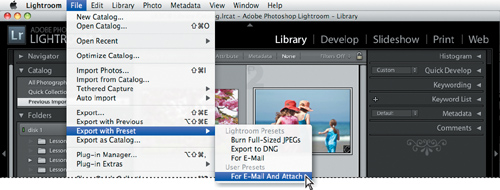
3 Select one or more images in the Grid view and choose File > Export With Preset > For E-Mail And Attach.
The export process will begin immediately. When exporting is complete, your e-mail application will be launched automatically and will open a new message with your exported photo or photos already attached; all you need a to do is to enter the recipient’s e-mail address and you’re ready to send.
Review questions
1 What are the two basic components of your photo library that need to be backed up?
2 How can you move a selection of images or your entire image library with all the associated catalog information from one computer to another?
3 How can you do an incremental backup of your photo library?
4 How would you choose between file formats for exporting your photos?
5 What is a post-processing action?
Review answers
1 The two basic components of the image library are the original image files (or master files) and the library catalog file, which records all the metadata and the complete editing history for every image in the library as well as information about collections, user templates and presets, and output settings.
2 On one computer, use the Export As Catalog command to create a catalog file together with copies of the original images and the available previews. On the other computer, use the Import From Catalog command.
3 Once you have created a full backup of the library using Export As Catalog, you can switch to the backup catalog regularly and use the Import From Catalog command to update it. You can configure the import settings so only those images that have been modified since the last backup are imported from the main catalog. In this way, you can keep your existing backup catalog updated incrementally—avoiding the more time consuming process of making a full new backup.
4 The appropriate choice of a file format depends on the intended use of the exported images. To export images for on-screen viewing as e-mail attachments, you’d use the JPEG file format and minimize the file size. To export an image to an external image editing application you’d use PSD or TIFF and export the image at full size. For archival purposes, export the images in their original format or convert them to DNG.
5 A post-processing action is a preset that can help to automate your workflow. You can choose a preset that will automatically burn your images to a CD or DVD after export, or one that will launch your e-mail application and attach your exported images to a new message. You can save your own action presets, which will be listed beside the Lightroom presets in the Export dialog box.