2: Introducing the Workspace
Lesson overview
Whether you prefer to use menu commands, keyboard shortcuts, or buttons and sliders—whether you use a small screen or a large one, one monitor or two—you can customize the flexible Lightroom workspace to suit the way you work. Customize each of the modules individually so that you always have your favorite tools and controls at hand, arranged just the way you like them.
To help familiarize you with the Lightroom workspace, this lesson will focus on the interface elements and skills that are common to all the workspace modules:
• Toggling between screen modes
• Adjusting the workspace layout
• Showing and hiding panels and panel groups
• Collapsing or expanding panels
• Changing and customizing view modes
• Working with a second display
• Personalizing the workspace
• Choosing interface options
• Using keyboard shortcuts
![]() You’ll probably need between one and two hours to complete this lesson.
You’ll probably need between one and two hours to complete this lesson.
Make working with Lightroom even more pleasurable, and ultimately more productive, by personalizing the workspace so that you always have your favorite tools at hand. Lightroom streamlines your workflow, allowing you to move eff ortlessly between the diff erent modules and viewing modes and freeing you up to spend less time in front of the computer and more time behind the lens!
Getting started
Before you begin, make sure that you have correctly copied the Lessons folder from the CD in the back of this book onto your computer’s hard disk and created the LR3CIB Library Catalog file as detailed in “Copying the Classroom in a Book files” on page 2 and “Creating a catalog file for working with this book” on page 3.
1 Start Lightroom.
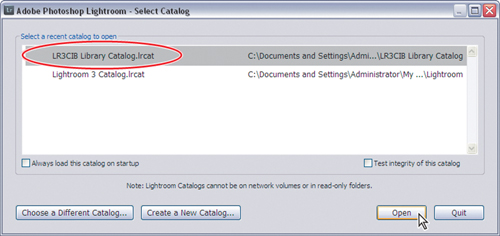
2 In the Adobe Photoshop Lightroom - Select Catalog dialog box, make sure the file LR3CIB Library Catalog.lrcat is selected under Select A Recent Catalog To Open, and then click Open.
3 Lightroom will open in the screen mode and workspace module that were active when you last quit. If necessary, click Library in the Module Picker to switch to the Library module.

Importing images into the library
The first step is to import the images for this lesson into the Lightroom library.
1 Choose File > Import Photos.
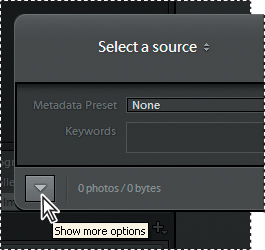
2 If the Import dialog box appears in compact mode, click the Show More Options button at the lower left of the dialog box to see all the options in the expanded Import dialog box.
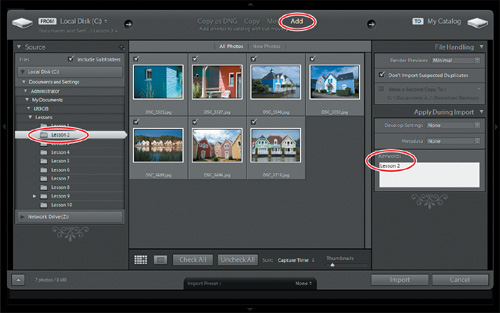
3 Under Source at the left of the expanded Import dialog box, navigate to the Lessons folder that you copied into the LR3CIB folder on your hard disk. Select the Lesson 2 folder. Ensure that all seven images in the Lesson 2 folder are checked for import.
4 In the import options above the thumbnail previews, click Add to add the imported photos to your catalog without moving or copying them.
5 Under File Handling at the right of the expanded Import dialog box, choose Minimal from the Render Previews menu and ensure that the Don’t Import Selected Duplicates option is activated.
6 Under Apply During Import, choose None from both the Develop Settings menu and the Metadata menu and type Lesson 2 in the Keywords text box. Make sure your settings are exactly as shown in the illustration below, and then click Import.
7 If necessary, press the F6 key to show the Filmstrip across the bottom of the Lightroom workspace.

Thumbnails of the seven Lesson 2 images appear in the Grid view of the Library module and in the Filmstrip. You’re now ready to start the exercises in this lesson.
Toggling screen modes
Lightroom can operate in any of three screen modes. In the default mode the workspace appears inside a regular document window that you can resize and position as you like on your screen. In the other two modes, the workspace expands to fi ll the entire screen—either with or without a menu bar—maximizing the space available for working with images. You can switch between screen modes at any time.
![]() Note: Whether you are running Lightroom on Windows or Mac OS, the workspace looks almost identical—any variations are simply due to the diff erent user interface conventions on each platform.
Note: Whether you are running Lightroom on Windows or Mac OS, the workspace looks almost identical—any variations are simply due to the diff erent user interface conventions on each platform.
1 Choose Window > Screen Mode > Normal to ensure that you are in the default screen mode.
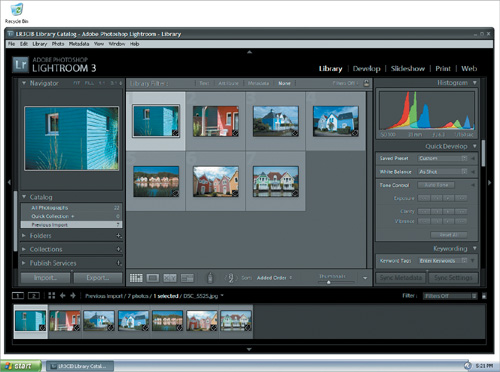
Normal screen mode on Windows.
In Normal screen mode on Windows, the Lightroom workspace appears inside an application window with the menu bar just below the window’s title bar.
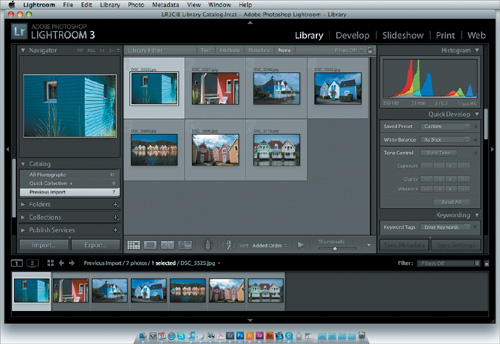
Normal screen mode on Mac OS.
In Normal screen mode on Mac OS, the Lightroom workspace appears inside a document window with the menu bar across the top of the screen.
2 Choose Window > Screen Mode > Full Screen With Menubar.
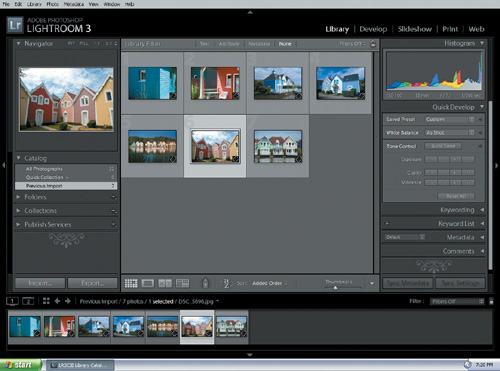
Full Screen With Menubar screen mode on Windows.
In Full Screen With Menubar screen mode on Windows, the Lightroom workspace expands to fill the screen with the menu bar across the top of the screen and the Windows task bar across the bottom.
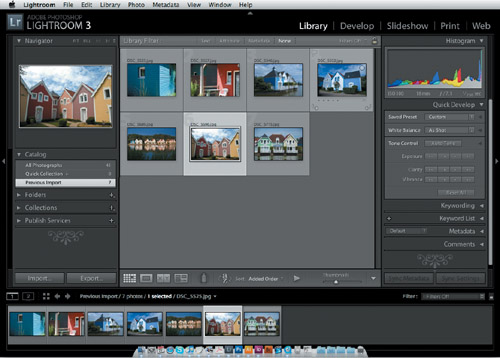
Full Screen With Menubar screen mode on Mac OS.
In Full Screen With Menubar screen mode on Mac OS, Lightroom expands to fill the screen with the menu bar across the top of the screen and the Dock—if not currently hidden—at the bottom.
3 Choose Window > Screen Mode > Full Screen.
In Full Screen mode on Windows, the Lightroom workspace fills the entire screen with both the menu bar and the Windows task bar hidden.
In Full Screen mode on Mac OS, the Lightroom workspace fills the entire screen with both the menu bar and the Dock hidden.
![]() Tip: In Full Screen mode, the menu bar appears when you move the pointer to the top edge of the screen, allowing access to menu commands.
Tip: In Full Screen mode, the menu bar appears when you move the pointer to the top edge of the screen, allowing access to menu commands.
4 Press Alt+Ctrl+F / Option+Command+F to return to Normal screen mode.
5 Choose Window > Screen Mode > Full Screen And Hide Panels, or use the keyboard shortcut Shift+Ctrl+F / Shift+Command+F.
6 In Grid view, double-click any of the thumbnails to enter Loupe view.
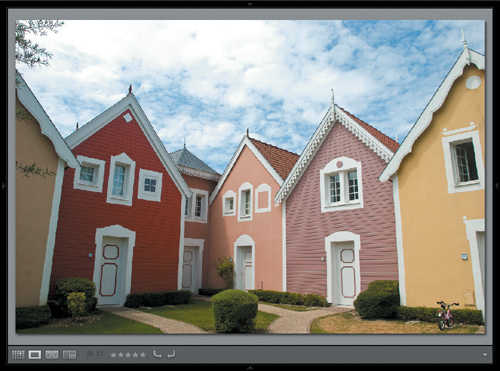
A variant of the Full Screen mode, Full Screen And Hide Panels is ideal for viewing an image as large as possible in Loupe view. By pressing T on your keyboard you can even hide the Toolbar below the work area, so that you see nothing but your photo. You’ll learn more about showing and hiding panels later in this lesson.
7 Press F on your keyboard. This is the keyboard shortcut for Window > Screen Mode > Next Screen Mode. Press F repeatedly to cycle through the three screen modes. As you switch between the screen modes, you’ll notice that the panels around the work area remain hidden.
8 To reveal all hidden panels, press Shift+Tab once or twice. If the Toolbar is hidden, press T to show it.
9 Press Alt+Ctrl+F / Option+Command+F to return to Normal screen mode.
Adjusting the workspace layout
Working With the application window On Windows
In Normal screen mode on Windows, you can resize and reposition the application window just as you are used to doing with other applications.
1 Move the pointer to any edge of the window. When the pointer changes to a horizontal or vertical double-arrow icon, you can drag the window’s edge.
2 Move the pointer to any corner of the application window. When the pointer changes to a diagonal double-arrow (![]() ), you can drag the corner.
), you can drag the corner.
3 Click the Maximize button (![]() ), located beside the Close button (x) at the right of the title bar; the application window expands to fill the entire screen, though you are still in Normal screen mode with both the title bar and the menu visible. While the window is maximized, it’s no longer possible to resize it as you did in steps 1 and 2, or reposition it by dragging the title bar.
), located beside the Close button (x) at the right of the title bar; the application window expands to fill the entire screen, though you are still in Normal screen mode with both the title bar and the menu visible. While the window is maximized, it’s no longer possible to resize it as you did in steps 1 and 2, or reposition it by dragging the title bar.
4 Click the Restore Down button (![]() ) to return to the previous window size.
) to return to the previous window size.
Working with the application window on Mac OS
1 In Normal screen mode on Mac OS, resize the application window by dragging its lower right corner.
2 Click the green Zoom button (![]() ), located beside the Close and Minimize buttons at the left of the title bar. The application window expands to fill the screen. Click the Zoom button again to return to the previous window size.
), located beside the Close and Minimize buttons at the left of the title bar. The application window expands to fill the screen. Click the Zoom button again to return to the previous window size.
3 Reposition the application window on your screen by dragging the title bar.
Using a secondary display
If you have a second monitor connected to your computer, you can use it to display an additional view that is independent of the module and view mode currently active on your main monitor. Choose between Grid, Loupe, Compare, and Survey views for your secondary display. You also have the option to display a secondary view in a window that can be resized and repositioned rather than filling the second screen.
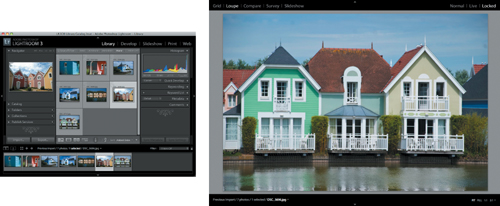
If you have only one monitor connected to your computer, you can open the additional display in a separate window that you can resize and reposition as you work.
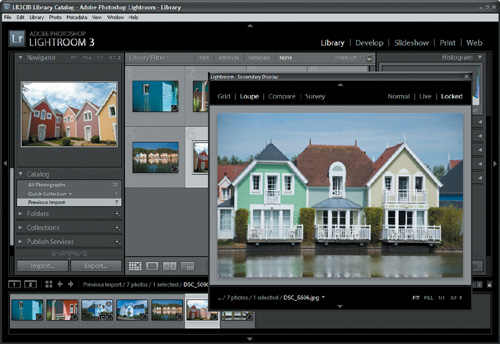
1 To open a separate window—whether you’re using one or two monitors—click the Use Second Monitor / Show Second Window button ![]() , located at the upper left of the Filmstrip.
, located at the upper left of the Filmstrip.
2 In the top panel of the secondary display, click Grid or press Shift+G.
![]() Tip: You can use keyboard shortcuts to change the view in the secondary display—Shift+G for Grid, Shift+E for Loupe, Shift+C for Compare, and Shift+N for Survey. If the second window is not already open, you can use these keyboard shortcuts to quickly open it in the desired viewing mode.
Tip: You can use keyboard shortcuts to change the view in the secondary display—Shift+G for Grid, Shift+E for Loupe, Shift+C for Compare, and Shift+N for Survey. If the second window is not already open, you can use these keyboard shortcuts to quickly open it in the desired viewing mode.
3 Use the Thumbnails slider in the lower right corner of the secondary display to change the size of the thumbnail images. Use the scrollbar on the right side, if necessary, to scroll to the end of the Grid view.
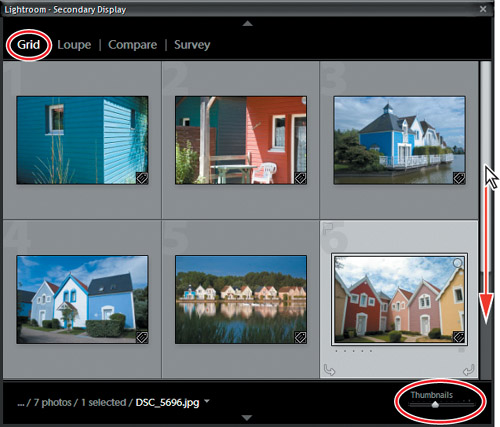
The Grid view in the secondary display shows the same images as the Grid view and the Filmstrip in the main application window. The source indicator and menu on the left side of the lower panel work the same way as they do in the Filmstrip, and the top and bottom panels can be hidden and shown, just as they can in the main window. You’ll learn more about working with panels later in this lesson.
4 In the secondary display, select an image from the grid, and then click Loupe in the top panel. Make sure that Normal is selected in the view mode picker at the right of the top panel.
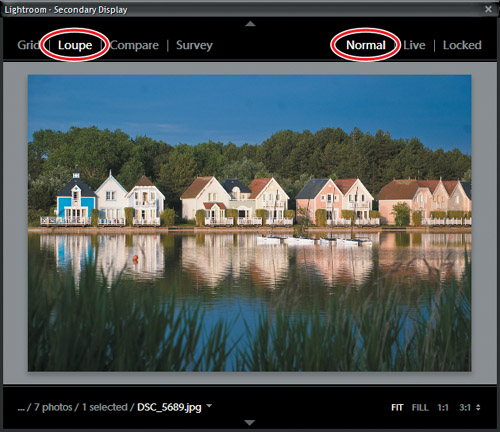
When the secondary display is in Normal mode, the Loupe view displays the active image from the Grid view and Filmstrip in the main display.
5 Use the left and right arrow keys on your keyboard to select either the previous or next photo in the Filmstrip. The new selection becomes the active image and the secondary display is updated accordingly.
![]() Note: If your secondary display is open in a window rather than on a second screen, you may need to click inside the main window or on its title bar to change the focus of any keyboard input.
Note: If your secondary display is open in a window rather than on a second screen, you may need to click inside the main window or on its title bar to change the focus of any keyboard input.
6 In the secondary display, click Live in the view mode picker at the right of the top panel.
In Live mode, the secondary display shows the image that is currently under your pointer in either the Filmstrip, Grid, Loupe, Compare, or Survey view in the main window. You can set a different zoom level for the secondary display by choosing from the menu at the lower right of the secondary window.
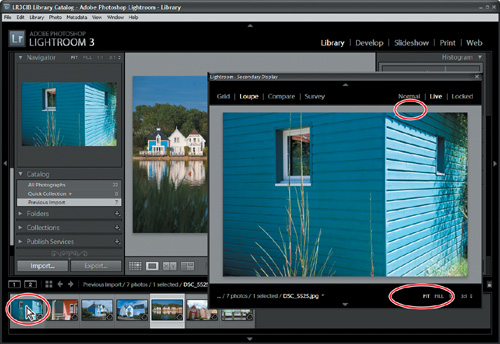
7 Select an image in the Filmstrip, and then click Locked in the view mode picker in the top panel of the secondary window. The current image will now remain fixed in the secondary display until you switch back to Normal or Live mode—regardless of the image displayed in the main window.
8 Change the zoom level for the secondary display by choosing from the options at the right of the lower panel: click Fit, Fill, or 1:1, or choose a zoom ratio from the menu at the far right.
9 Drag the zoomed image to reposition it in the secondary window, and then click the image to return to the previous zoom level.
10 (Optional) Right-click / Control-click the image to choose a different background color or texture from the context menu. These settings will apply to the secondary display independently of the options chosen for the main window.
11 Choose Compare from the view picker in the top panel of the secondary window. In the main window, select two or more images—either in the Grid view or in the Filmstrip.
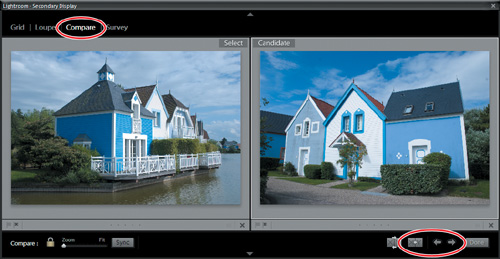
The image in the left pane of the Compare view is the Select image; the image in the right pane is the Candidate. You can change the candidate image by clicking the Select Previous Photo button ![]() or the Select Next Photo button
or the Select Next Photo button ![]() . If you selected more than two images, only images from the selection are considered as candidates. To replace the Select image with the current Candidate, click the Make Select button
. If you selected more than two images, only images from the selection are considered as candidates. To replace the Select image with the current Candidate, click the Make Select button ![]() .
.
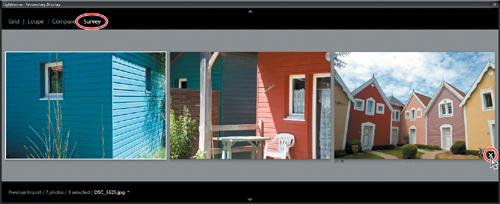
12 In the main window, select three or more images—either in the Grid view or in the Filmstrip, and then click Survey in the top panel of the second window. Use the Survey view to compare more than two images at the same time. (See illustration on next page.) To remove an image from the Survey view, move the pointer over the unwanted image and click the Close button (x) that appears in the lower right corner of the image. You’ll learn more about the Compare and Survey views later in this book.
13 Close the secondary display by disabling the menu option Window > Secondary Display > Show, or by clicking the Close button (x) (Windows) / ![]() (Mac OS).
(Mac OS).
Resizing panels
You can customize the layout of the Lightroom workspace to suit the way you work or make more space for the task at hand by adjusting the width of the side panel groups and the height of the Filmstrip panel, or by hiding any of these elements.
1 Move the pointer over the right edge of the left panel group; the pointer changes to a horizontal double-arrow cursor. Drag to the right and release the mouse button when the panel group has reached its maximum width. The central work area contracts to accommodate the expanded panel group. You might use this arrangement to maximize the Navigator preview.
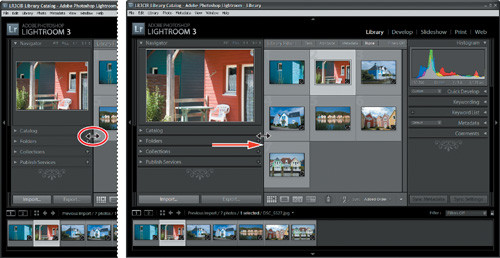
2 Click Develop in the Module Picker to switch to the Develop module. You’ll notice that the left panel group returns to the width it was when you last used the Develop module.
Lightroom remembers your customized workspace layout for each module independently, so that the workspace is automatically rearranged to suit the way you like to work for each stage in your workflow as you move between modules.
3 Press Alt+Ctrl+Up Arrow / Option+Command+Up Arrow to return quickly to the previous module.
4 In the Library module, drag the right edge of the left panel group to return the group to its minimum width.
5 Move the pointer over the top edge of the Filmstrip panel; the pointer changes to a vertical double-arrow cursor. Drag the top edge down until the Filmstrip reaches its minimum height.
The work area expands to fill the available space. This arrangement increases the screen space available for the Grid view when you’re selecting photos, or for reviewing images in the Loupe, Compare and Survey views.

6 Switch to the Develop module. The Filmstrip remains unchanged as you move between modules. Whichever module you switch to, the Filmstrip will remain at its current height until you resize it.
7 Move the pointer over the top edge of the Filmstrip panel; the pointer changes to a vertical double-arrow cursor. Double-click the top edge of the Filmstrip to reset the panel to its previous height; then switch back to the Library module.
![]() Note: For the side panel groups, double-clicking the border will produce a different result. This is discussed in the next section, “Showing and hiding panels or panel groups.”
Note: For the side panel groups, double-clicking the border will produce a different result. This is discussed in the next section, “Showing and hiding panels or panel groups.”
8 Drag the top border of the Filmstrip to its maximum height. The thumbnails are enlarged and, if necessary, a scrollbar appears along the bottom of the Filmstrip. Scroll to view all the thumbnails.
9 Double-click the top edge of the Filmstrip with the vertical double-arrow cursor to reset the panel to its previous height.
![]() Note: You can’t change the height of the top panel, but you can hide or reveal it as you wish.
Note: You can’t change the height of the top panel, but you can hide or reveal it as you wish.
Showing and hiding panels or panel groups
As you’ve seen, one way of making more space for your work area is to resize the side panel groups and the Filmstrip. Another way is to completely hide panels from view. You can hide any of the panels surrounding the work area in the workspace. In some screen modes Lightroom even hides the title bar, the menu bar, and the Windows task bar or the Mac OS Dock.
1 To hide the left panel group, click the Show / Hide Panel Group icon ![]() in the left margin of the workspace window. The panel group disappears and the arrow icon is reversed.
in the left margin of the workspace window. The panel group disappears and the arrow icon is reversed.
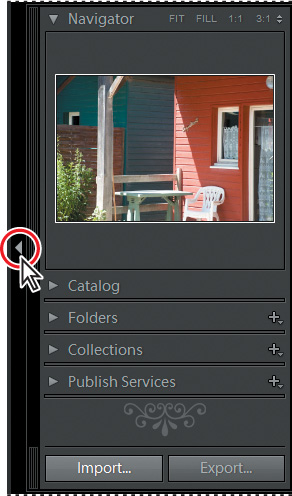
2 Click the reversed Show / Hide Panel Group icon to reveal the left panel group.
![]() Tip: You don’t need to be accurate when you click the Show / Hide Panel Group icons. In fact, you can click anywhere in the workspace margins to hide and show panels.
Tip: You don’t need to be accurate when you click the Show / Hide Panel Group icons. In fact, you can click anywhere in the workspace margins to hide and show panels.
You can use the arrows in the top, right, and bottom margins of the workspace to show and hide the top panel, the right panel group, and the Filmstrip.
3 Disable the menu option Window > Panels > Show Left Module Panels or press the F7 key to hide the left panel group. To show the group again, press F7 or choose Window > Panels > Show Left Module Panels. Disable the menu option Window > Panels > Show Right Module Panels or press the F8 key to hide the right panel group. To show the group again, press F8 or choose Window > Panels > Show Right Module Panels.
4 Disable the menu option Window > Panels > Show Module Picker or press the F5 key to hide the top panel. To show it again, press F5 or choose Window > Panels > Show Module Picker. To hide the Filmstrip, press the F6 key or disable the menu option Window > Panels > Show Fimstrip. To show it again, press F6 or choose Window > Panels > Show Filmstrip.
5 To hide or show both side panel groups together, press the Tab key or choose Window > Panels > Toggle Side Panels. To hide or show the side panel groups, the top panel, and the Filmstrip together, press Shift+Tab, or choose Window > Panels > Toggle All Panels.
![]() Tip: On Mac OS, some function keys are assigned to specific operating system functions by default. If pressing a function key in Lightroom does not work as expected, either press the fn key (not available on all keyboard layouts) together with the respective function key, or change the keyboard behavior in the system preferences. Lightroom offers even more options for showing and hiding panels or panel groups; you can have them show and hide automatically in response to the movements of the pointer.
Tip: On Mac OS, some function keys are assigned to specific operating system functions by default. If pressing a function key in Lightroom does not work as expected, either press the fn key (not available on all keyboard layouts) together with the respective function key, or change the keyboard behavior in the system preferences. Lightroom offers even more options for showing and hiding panels or panel groups; you can have them show and hide automatically in response to the movements of the pointer.
6 Right-click / Control-click the Show / Hide Panel Group icon ![]() in the left margin of the workspace window. Choose Auto Hide & Show from the context menu.
in the left margin of the workspace window. Choose Auto Hide & Show from the context menu.
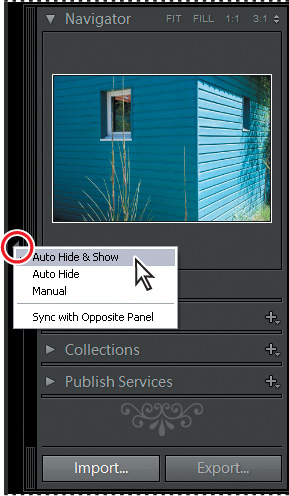
7 Hide the left panel group by clicking the Show / Hide Panel Group icon ![]() . Move the pointer over the icon, or anywhere in the left margin of the workspace. The left panel group automatically slides into view, partly covering the work area. You can click to select catalogs, folders, and collections; the left panel group will remain visible as long as the pointer remains over it. Move the pointer outside the left panel group and it will disappear again. To show or hide the left panel group regardless of the current panel settings, press the F7 key.
. Move the pointer over the icon, or anywhere in the left margin of the workspace. The left panel group automatically slides into view, partly covering the work area. You can click to select catalogs, folders, and collections; the left panel group will remain visible as long as the pointer remains over it. Move the pointer outside the left panel group and it will disappear again. To show or hide the left panel group regardless of the current panel settings, press the F7 key.
8 Right-click / Control-click the Show / Hide Panel Group icon ![]() in the left margin of the workspace window and choose Auto Hide from the context menu. Now the panel group disappears when you are done with it and does not reappear when you move the pointer into the workspace margin. To show the left panel group again, click in the workspace margin, or press the F7 key.
in the left margin of the workspace window and choose Auto Hide from the context menu. Now the panel group disappears when you are done with it and does not reappear when you move the pointer into the workspace margin. To show the left panel group again, click in the workspace margin, or press the F7 key.
9 To turn off automatic show and hide, right-click / Control-click the Show / Hide Panel Group icon ![]() in the left margin of the workspace and choose Manual from the context menu.
in the left margin of the workspace and choose Manual from the context menu.
10 To reset the left panel group to its default settings, activate Auto Hide & Show in the context menu. If necessary, press the F7 key or the F8 key to show the left and right panel groups.
Keep it in mind that Lightroom remembers your customized panel layout for each module independently, including your preferred show and hide options, so you can set these options differently to suit the way you like to work in each module. The options you choose for the Filmstrip and the top panel, however, remain unchanged as you move between modules.
Working with the left and right panel groups
Up to this point in our lesson, we’ve dealt with the left and right panels only as groups. Now you’ll learn to work with the individual panels within the groups.
Expanding and collapsing panels
1 If you are not already in the Library module, switch to it now. Create more space to work with the side panel groups by hiding both the top panel and the Filmstrip. (See step 4 in the previous exercise.)
In the Library module, the left panel group contains the Navigator, Catalog, Folders, Collections, and Publish Services panels. Each panel within a group can be expanded to show its content or collapsed so that only the panel header is visible. A triangle next to the panel name indicates whether a panel is expanded or collapsed.
![]() Tip: You don’t need to be accurate when you click the triangle. Clicking anywhere in the panel header will do, as long as you don’t click any other control that might be located in the header, such as the Plus icon (+) in the header of the Collections panel.
Tip: You don’t need to be accurate when you click the triangle. Clicking anywhere in the panel header will do, as long as you don’t click any other control that might be located in the header, such as the Plus icon (+) in the header of the Collections panel.
2 To expand a collapsed panel, click the triangle next to its name; the triangle turns downward and the panel expands to show its content. Click the triangle again to collapse the panel.
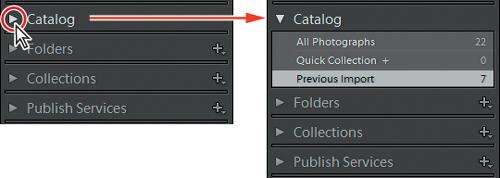
Folders within a panel—such as the Smart Collections folder in the Collections panel—can be expanded and collapsed by clicking the triangle next to the folder name, or by double-clicking the folder header.
3 Panels that are currently expanded and fully visible in the panel group show a check mark in front of their names in the Window > Panels menu. Choose a panel from that menu and toggle its display status.
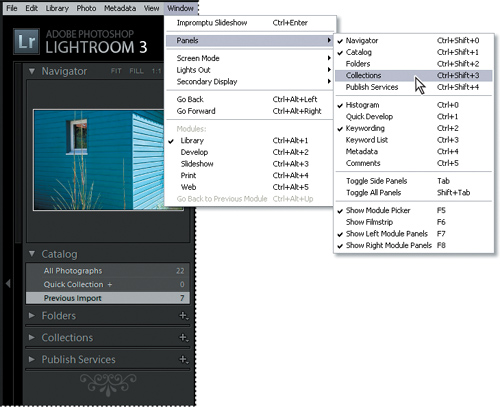
4 In the Window > Panels menu, look at the keyboard shortcuts for expanding and collapsing the individual panels. For the panels in the left group, the keyboard shortcuts begin with Ctrl+Shift / Control+Command followed by a number. The panels are numbered from the top down, so you press Ctrl+Shift+0 / Control+Command+0 for the Navigator panel, Ctrl+Shift+1 / Control+Command+1 for the Catalog panel, and so on. For the panels in the right group, the keyboard shortcuts begin with Ctrl / Command followed by a number. Press Ctrl+0 / Command+0 to collapse the Histogram panel. Press the same keyboard shortcut again to expand it. These keyboard shortcuts may be assigned to different panels in another workspace module, but this should not be too confusing if you remember that the panels are always numbered from the top of the group, starting at 0.
You can expand and collapse all panels (except the topmost in each group) with one command, or have all the panels other than the one you’re working with (and the top panel in the group) close automatically. The top panel in each group has a special role and is not affected by these commands.
![]() Tip: You can also right-click / Control-click the empty area below the last panel to bring up this context menu.
Tip: You can also right-click / Control-click the empty area below the last panel to bring up this context menu.
5 To collapse all panels in either of the side groups, right-click / Control-click the header of any panel other than the top panel in the group, and then choose Collapse All from the context menu. The top panel remains unaffected.
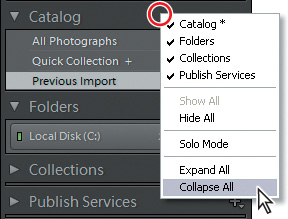
6 To expand all panels in either side group, right-click / Control-click the header of any panel—other than the top panel in each group—and choose Expand All from the context menu. Once again, the top panel remains unaffected.
7 To close all the panels in a group other than the one you’re working with, right-click / Control-click the header of any panel—other than the top panel in the group—and choose Solo mode from the context menu. Only one panel will remain open. The triangles next to the panel names change in appearance, from solid to dotted, when Solo mode is activated. Click the header of a collapsed panel to expand it. The previously expanded panel collapses automatically.
![]() Tip: To quickly activate or disable Solo mode Alt-click / Option-click the header of any panel.
Tip: To quickly activate or disable Solo mode Alt-click / Option-click the header of any panel.
Hiding and showing panels
If you use some panels in a group less often than others, you can hide them from view to create more space to expand the remaining panels in the group.
1 To hide all the panels in a group other than the topmost, right-click / Control-click the header of any panel and choose Hide All from the context menu. All the panels in the group are now hidden, except the Navigator panel at the top.
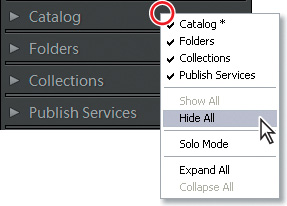
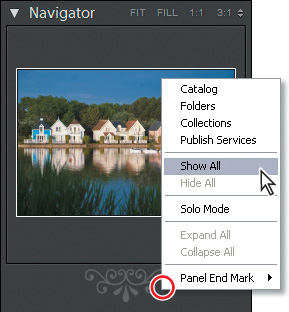
2 To show all panels, right-click / Control-click inside the empty space below the visible panels and choose Show All from the context menu.
3 To show or hide an individual panel, choose it from the same context menu. Panels that are currently visible have a checkmark in front of their names.
Customizing the appearance of the panel groups
By default, Lightroom displays an ornament—the panel end mark—below the bottom panel in each group. You can select any of the designs that come preinstalled in Lightroom, change the panel end mark to one of your own design, or choose not to display a panel end mark at all.
1 Right-click / Control-click inside the empty space below the panels. Choose an ornament from the Panel End Mark submenu in the context menu, or select None.
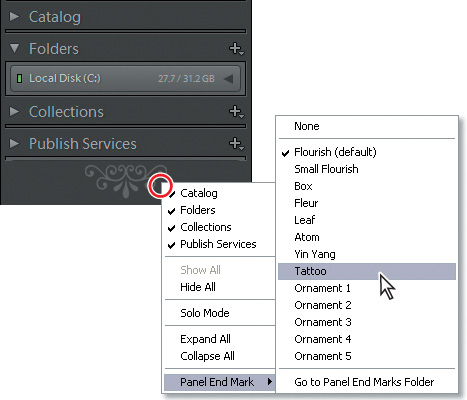
The same panel end mark is used for both side panel groups in all the modules. To use your own PDF, JPEG, GIF, PNG, TIFF, or PSD image, place it in the Panel End Marks Folder. To find the Panel End Marks Folder, choose Go To Panel End Marks Folder from the Panel End Mark submenu. The names of any images you place in the Panel End Marks folder will appear grouped below the pre-installed end marks in the menu. The panel end marks that come pre-installed in Lightroom are no more than 56 pixels high, but you can use a taller image if you wish. If you image is too wide, Lightroom will automatically scale it to the width of the panel. Your end mark design may contain transparent pixels.
You can also change the panel end mark—and the size of the font used in the panels—in the Preferences dialog box.
2 Choose Edit > Preferences / Lightroom > Preferences. In the Preferences dialog box, click the Interface tab.
You’ll find the End Mark and Font Size menus in the Panels options. The End Marks menu offers the same options you saw in step 1. From the Panel Font Size menu you can choose either Small (the default) or Large, although the difference is subtle. Changes to the font size will take effect next time you launch Lightroom.
3 Without making any changes, click Cancel / the Close button ![]() to close the Preferences dialog box.
to close the Preferences dialog box.
Working with the main display area
The main display area—the work area—in the center of the application window is where you select, sort, and compare the images in your library, and preview the work in process as you make adjustments and create presentations. The work area serves different purposes in each of the Lightroom workspace modules. The Library and Develop modules offer a choice of view modes to suit a range of tasks, from organizing and sharing your collections to editing the individual photos. In the Slideshow, Print, and Web modules, the work area presents a working preview of your projects and presentations.
View modes
In the Library module, you may see the Filter bar across the top of the work area, as shown in the illustration below. You can use filters to limit the photos that are displayed in the Grid view and the Filmstrip to those that have been assigned a specified star rating or flag status, or contain particular metadata content. You’ll learn more about the using the Filter bar controls in Lesson 5, “Organizing and Selecting.”
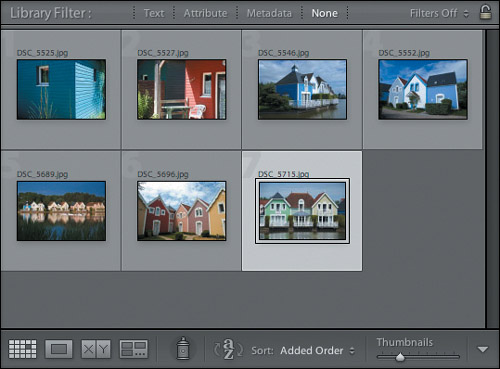
Across the bottom of the work area is the Toolbar. The Toolbar is common to all the workspace modules but contains different tools and controls for each.
1 If you’re not already in the Library module, switch to it now.
2 If the Filter bar is not already visible at the top of the work area, show it by pressing the backslash character () on your keyboard or by activating the menu option View > Show Filter Bar. Press backslash again or disable the menu option View > Show Filter Bar to hide it.
3 If the Toolbar is not already visible, press T to show it. Press T again to hide it.
4 Switch to the Develop module. If the Toolbar is not already visible, press T to show it. Switch back to the Library Module. In the Library module the Toolbar is still hidden from step 3; Lightroom remembers your Toolbar setting for each module independently. Press T to show the Toolbar in the Library module.
5 Double-click an image in Grid view to switch to Loupe view. The Loupe view is available in both the Library and Develop modules, but the controls available in the Loupe view Toolbar differ for each of these modules.
6 You can hide or show individual tools by choosing their names from the menu at the right end of the Toolbar. Tools that are currently visible in the Toolbar have a checkmark in front of their names.
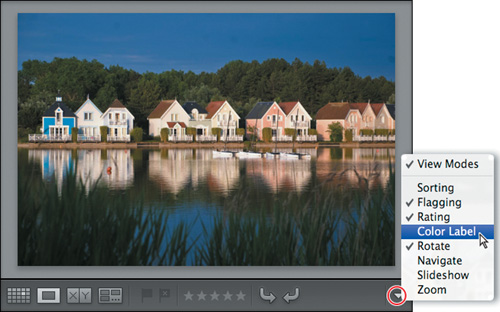
![]() Tip: If you have selected more tools than can be displayed in the width of the Toolbar, you can hide either of the side panel groups to increase the Toolbar’s width, or disable tools that you don’t need at the moment.
Tip: If you have selected more tools than can be displayed in the width of the Toolbar, you can hide either of the side panel groups to increase the Toolbar’s width, or disable tools that you don’t need at the moment.
In Loupe view, you can view your images at different levels of magnification. The zoom controls in the top right corner of the Navigator panel in the left panel group enable you to switch quickly between preset magnification levels. You can choose from Fit, Fill, 1:1, or choose another option from a menu of 8 zoom ratios.
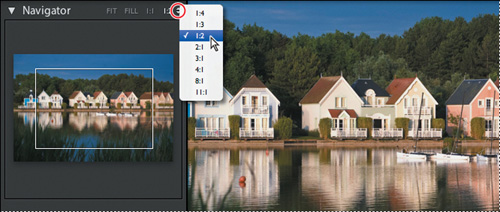
You can toggle between zoom levels by choosing View > Toggle Zoom View, or pressing Z on your keyboard. To better understand the Toggle Zoom View command, you should be aware that the magnification controls in the Navigator panel are organized into two groups: Fit and Fill are in one group, and the zoom ratio settings are in the other. The Toggle Zoom View command toggles between the magnification levels last used in each group.
7 Click Fit in the zoom controls in the top right corner of the Navigator panel. Now click the 1:1 control. Choose View > Toggle Zoom View, or press Z. The zoom setting reverts to Fit. Press the Z key; the zoom setting reverts to 1:1.
8 Click Fill in the zoom controls in the top right corner of the Navigator panel. Now choose a zoom ratio from the menu at the far right of the Navigator panel header; we used 2:1. Click the image in the Loupe view. The zoom setting reverts to Fill. In Loupe view, clicking the image is equivalent to pressing the Z key, or choosing View > Toggle Zoom View, except that the zoomed view of the image will be centered on the area you clicked.
9 While the view is magnified, drag the zoom rectangle in the Navigator preview, or drag in the Loupe view to change the image area currently visible in the work area. At higher zoom levels you may find using the Navigator panel more convenient, while dragging the image in the Loupe view is better suited to working at lower zoom levels.
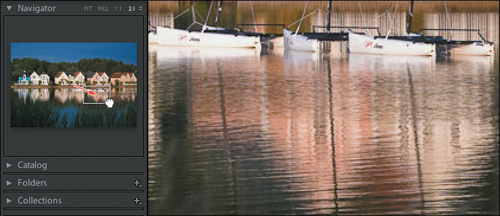
10 Press the Home key to position the zoom rectangle in the top left corner of the image; then press the Page Down key repeatedly to scroll through the magnified image one section at a time. When you reach the bottom of the image the zoom rectangle jumps to the top of the next column. To start in the lower right corner of the image, press the End key; then use the Page Up key. This feature can be very helpful when you wish to inspect the entire image in close detail.
The zoom controls and the Navigator panel work the same way for the Loupe view in both the Library and Develop modules.
The other two view modes, Compare view and Survey view, will be covered in Lesson 4, “Reviewing,” and Lesson 6, “Developing and Editing.”
Grid and Loupe view options
You can customize the information Lightroom displays for each image in the Grid and Loupe views. Choose your preferences from the many options in the Library View Options dialog box. For Loupe view and the thumbnail tooltips you can activate two sets of options, and then use a keyboard shortcut to switch between them.
1 Press G to switch to Grid view in the Library module.
2 Choose View > View Options. The Library View Options dialog box will appear with the Grid View tab already selected. Position the Library View Options dialog box so you can see some of the images in the Grid view.
3 Disable the Show Grid Extras option in the top left corner of the Grid View tab. This will disable most of the other options.
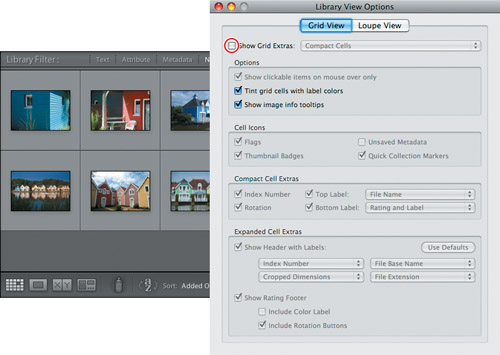
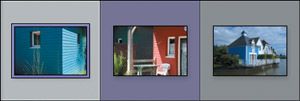
4 The only options still available are Tint Grid Cells With Label Colors and Show Image Info Tooltips. If they are not already activated, click the checkboxes for both of these options. As the images have not yet been assigned color labels, activating the first option has no visible effect in the Grid view. Right-click / Control-click any thumbnail in the Grid view—you can do this while the Library View Options dialog box is open—and choose a color from the Set Color Label menu. A color-labeled image that is currently selected will show a thin colored frame around the thumbnail; a color-labeled image that is not selected has a tinted cell background.
5 Position the pointer over a thumbnail in the Grid view or the Filmstrip; a tooltip appears. In Mac OS you’ll need to click anywhere in the Lightroom workspace window to bring it to the front before you can see the tooltips. By default, the tooltip will display the file name, capture date and time, and the cropped dimensions. You can specify the information to be displayed in the tooltip by choosing from the Loupe View options.
6 On Mac OS, if the Library View Options dialog box is now hidden behind the main application window, press Command+J to bring it back to the front.
7 Activate the Show Grid Extras option and choose Compact Cells from the menu beside it. Experiment with each setting to see its effect in the Grid view display. Activate and disable the settings for Options, Cell Icons, and Compact Cell Extras. Position the pointer over the various icons in the image cells to see tooltips with additional information.

8 Under Compact Cell Extras, click the Top Label menu to see the long list of choices available. For some choices, such as Title or Caption, nothing will be displayed until you add the relevant information to the image’s metadata.
9 Now choose Expanded Cells from the Show Grid Extras menu. Experiment with the options under Expanded Cell Extras to see the effects in the Grid view. Click any of the Show Header With Labels menus to see the many choices available to customize the information that is displayed in the cell headers.
10 Click the Loupe View tab. The work area switches from Grid to Loupe view so you can preview the effects of the changes you’ll make in the Library View Options dialog box.
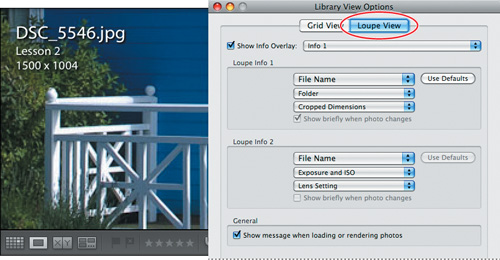
For the Loupe view, you can activate the Show Info Overlay option to display image information in the top left corner of the view. Choose items from the menus in Loupe Info 1 and Loupe Info 2 to create two different sets of information, and then choose either set from the Show Info Overlay menu. When you choose an information item such as Capture Date And Time, Lightroom extracts those details from the image metadata. If the image’s metadata does not contain the specified information, nothing will be displayed for that item. For both the Grid and Loupe view options you can choose the information item Common Attributes, which will display the flagged status, star rating and color label for each image.
You can reset either group to its default state by clicking the Use Defaults button. Activate the Show Briefly When Photo Changes option to show the info overlay for only a few seconds when a new image is displayed in the Loupe view. Activate the Show Message When Loading Or Rendering Photos option to display a notification in the lower part of the view while the image preview is updated. It is recommended that you keep this option activated so that you don’t inadvertently make judgments about the quality of an image before the update is complete.
11 Click the Close button (x) / ![]() ) to close the Library View Options dialog box.
) to close the Library View Options dialog box.
12 You can choose which of the two information sets will be displayed by choosing an option from the View > Loupe Info menu, or by pressing the I key to cycle the info overlay through Loupe Info 1, Loupe Info 2, and its disabled state.
13 Switch to the Grid view. From the View > Grid View Style menu you can choose whether or not to display additional information, using either the Compact Cells layout or the Expanded Cells layout. Press the J key to cycle through the Compact Cells layout, with and without additional information, and the Expanded Cells layout.
Dimming lights
Lightroom gives you the option to darken the workspace so that you can focus on the image or images with which you’re working. In the Library and Develop modules, everything is dimmed or darkened except your selected photos. In the other three modules, everything except the presentation preview in the work area is dimmed or darkened. All tools and controls will still work in the Lights Dim or Lights Off modes—if you can find them! You could pick up the crop tool for example, and then switch to either the Lights Dim or Lights Off mode to help you concentrate on achieving the best result.
1 To dim the lights, press the L key or choose Window > Lights Out > Lights Dim.
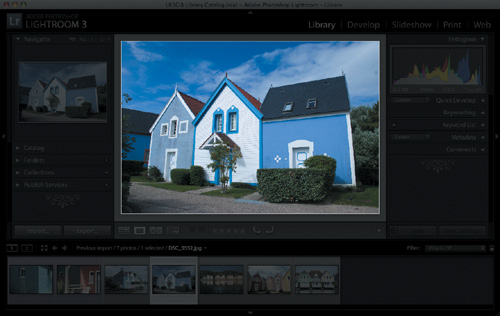
2 If you’re in the Grid view, double-click an image to switch to Loupe view. Click the image to switch between zoom levels. If you can see the Filmstrip, click to select a different image. Switch to a different module. If you remember the keyboard shortcuts they can really come in handy now.
3 To darken the workspace around the image completely, press the L key again or choose Window > Lights Out > Lights Off—if you can still see the menu bar.
4 To return to the normal display mode, press the L key a third time, or choose Window > Lights Out > Lights On.
Lightroom achieves the dimming and darkening effects by means of a black overlay applied to the interface—at a default opacity of 80% for Lights Dim and 100% for Lights Off. You can choose instead to have the workspace fade to white or a shade of grey. This might be useful, for example, if your images contain a lot of black or dark colors. You can also adjust the level of opacity for the Lights Dim mode so that you can still see the controls if necessary.
5 To change the Lights Out screen color or to adjust the opacity for the Lights Dim mode, choose Edit > Preferences / Lightroom > Preferences. In the Preferences dialog box, click the Interface tab and choose a new opacity value from the Dim Level menu in the Lights Out options. From the Screen Color menu, choose white or a shade of grey.

6 Click OK / the Close button ![]() to close the Preferences dialog box, and press the L key repeatedly to see your new settings in effect. Return to step 5 to modify your settings or reinstate the defaults.
to close the Preferences dialog box, and press the L key repeatedly to see your new settings in effect. Return to step 5 to modify your settings or reinstate the defaults.
Personalizing the identity plate
If you’re using Lightroom to make presentations to clients on your computer, or if you’d simply like to personalize the workspace, you can change the graphic that is displayed as an identity plate in the top panel.
1 If the top panel is not currently visible, press the F5 key on your keyboard, or choose Window > Panels > Show Module Picker.
2 Choose Edit > Identity Plate Setup / Lightroom > Identity Plate Setup. Position the Identity Plate Editor dialog box so you can see both the dialog box and the identity plate in the top panel.
3 If not already selected, activate the Use A Styled Text Identity Plate option. Then activate the Enable Identity Plate option. You’ll notice an immediate change in the appearance of the identity plate.
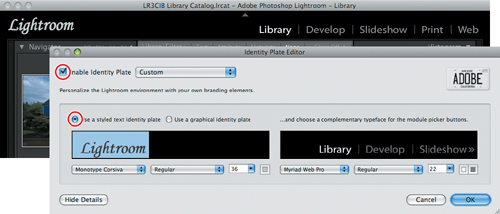
![]() Note: If your Identity Plate Editor dialog box differs from the one shown in the illustration—apart from the name used in the text box on the left—click the Show Details button in the lower left corner.
Note: If your Identity Plate Editor dialog box differs from the one shown in the illustration—apart from the name used in the text box on the left—click the Show Details button in the lower left corner.
To personalize the identity plate, you can either use styled text or place a graphic of your choice. If you wish, you can also change the typeface and text color used for the Module Picker at the other end of the top panel to better suit your design.
4 Select the text in the text box and replace it with your own.
![]() Tip: You can use more than one typeface, font style, size, or color in your identity plate text. Simply select a portion of your text and make the desired changes.
Tip: You can use more than one typeface, font style, size, or color in your identity plate text. Simply select a portion of your text and make the desired changes.
5 Press Ctrl+A / Command+A to select your new text, and choose a typeface, font style, and font size from the menus beneath the text box. Use your company’s corporate typeface or your own favorite—not necessarily mutually exclusive choices. Click the color box beside the font size menu and choose a new color from the Colors palette. Keep an eye on how your choices look in the top panel. Click OK to apply your changes or Cancel to reject them.

![]() Tip: If your text is too long to be fully visible in the text box, either resize the dialog box or reduce the font size until you’ve finished editing.
Tip: If your text is too long to be fully visible in the text box, either resize the dialog box or reduce the font size until you’ve finished editing.
6 (Optional) You can also change the typeface, font style, and font size used for the text in the Module Picker to better suit your new identity plate design. There is a second set of controls in the Identity Plate Editor dialog box for this purpose. Click the first color box to change the color used to highlight the name of the active module and the second to change the color used for the others.
7 To use an image as your identity plate, Choose Edit > Identity Plate Setup / Lightroom > Identity Plate Setup. In the Identity Plate Editor dialog box, activate the Use A Graphical Identity Plate option, and then click Locate File. In the Locate File dialog box, navigate to your Lesson 2 folder, select the file Identityplate.png, and click Choose.
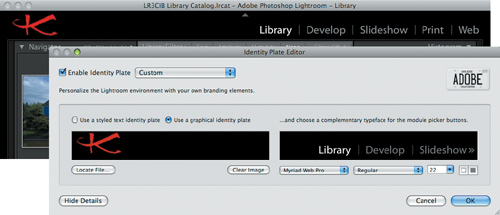
![]() Note: On Windows, you can choose a JPEG, PNG, GIF, BMP, or TIFF image for your graphical identity plate. The image can contain transparent pixels and should not be more than 48 pixels in height. On Mac OS, images in PSD or PDF format are also supported and the image height can be up to 57 pixels.
Note: On Windows, you can choose a JPEG, PNG, GIF, BMP, or TIFF image for your graphical identity plate. The image can contain transparent pixels and should not be more than 48 pixels in height. On Mac OS, images in PSD or PDF format are also supported and the image height can be up to 57 pixels.
8 (Optional) You can save several identity plate setups as presets that can be easily accessed for different situations. Choose Save As from the Enable Identity Plate menu, enter a name for your identity plate preset and click Save. Your identity plate presets will appear in the Enable Identity Plate menu.
9 Disable the Enable Identity Plate option, and then click OK to close the Identity Plate Editor dialog box.
Keyboard shortcuts
Press Ctrl+/ (Windows) / Command+/ (Mac OS) to see a list of keyboard shortcuts for the currently active module. When you’re done reviewing the keyboard shortcuts, click to dismiss the list.
This concludes your introduction to the Lightroom workspace. You’ve learned how to switch between the different screen and view modes and how to arrange the workspace layout to suit the way you work in each module. You know how to hide, show, collapse, or expand panels and panel groups, how to customize the Toolbar, and how to use a secondary display. Finally, you have personalized the Lightroom workspace with your own identity plate. Before you move on to the next lesson, take a minute or two to read through the review questions and answers on the following pages.
Review questions
1 How would you view an image at the largest size possible on your screen?
2 How do you adjust the size of the thumbnail images in the Grid view, the Navigator panel, and the Filmstrip?
3 What are the keyboard shorcuts to show or hide the four panels that surround the Lightroom workspace?
4 What do you do if you can’t see the tool you’re looking for in the Toolbar?
5 How can you personalize the Lightroom interface?
Review answers
1 In the Grid view, double-click the image thumbnail to enter the Loupe view. Choose Window > Screen Mode > Full Screen And Hide Panels, or use the keyboard shortcut Shift+Ctrl+F / Shift+Command+F. A variant of Full Screen mode, Full Screen And Hide Panels is ideal for viewing an image at the largest size possible on your display. Press the T key to hide the Toolbar, leaving nothing on screen but your photo.
2 To change the size of the Grid view thumbnails on your main screen, use the Thumbnails slider in the Toolbar. In Grid view on a secondary display use the slider in the lower right corner of the window. The thumbnail images in the Navigator panel and the Filmstrip are resized automatically as you resize the left panel group or the Filmstrip.
3 The keyboard shortcuts to show or hide the top panel, the Filmstrip, the left panel group, and the right panel group are F5, F6, F7, and F8, respectively.
4 Check what module and view mode you are in. The Toolbar contains different tools for different views and modules. Click the triangle at the right of the Toolbar and activate the missing tool in the tools menu. If the tool is activated and you still can’t see it, there may be too many active tools to fit across the Toolbar. Disable tools you are not using in the tools menu and they will be removed from the Toolbar.
5 Lightroom offers several options to personalize the interface:
• You can change the identity plate, the graphic that is displayed at the left corner of the top panel. You can either use styled text or place your own graphic.
• It’s also possible to change the typeface and text color used for the Module Picker at the other end of the top panel to better suit your new identity plate.
• You can customize the panel end mark displayed in the left and right panel groups. Choose from the preinstalled designs or use one of your own.
• You can set the color and texture of the background that shows behind the images in many of the working views.
• Set the level of opacity for the Lights Dim modes in the Preferences dialog box.
• Show or hide different workspace panels to suit different tasks. Set panels to show and hide automatically. You can arrange the workspace differently in each of the Lightroom modules so that when you switch between modules, your tools are always set out the way you like them.

