8: Printing images
Lesson overview
The Lightroom Print module offers all the tools you’ll need to quickly prepare any selection of images from your library for printing.
You can print a photo singly or repeated at different sizes on the same sheet, or create an attractive layout for multiple images. Add borders, text, and graphics, and then adjust settings for print resolution, sharpening, paper type, and color management with just a few clicks.
In this lesson, you’ll explore the Print module as you become accustomed to the steps in the printing workflow:
• Selecting and grouping your photos
• Choosing a layout template
• Creating a custom print template
• Creating a Custom Package print layout
• Adding borders and a background color
• Adding an identity plate
• Adding text
• Specifying print settings and printer driver options
• Saving print settings as an output preset
![]() You’ll probably need between one and two hours to complete this lesson.
You’ll probably need between one and two hours to complete this lesson.
Whether you need to print a contact sheet or a fi ne art mat, Lightroom makes it easy to achieve professional results with a choice of highly customizable layout templates.
Getting started
This lesson assumes that you are already familiar with the Lightroom workspace and with moving between the different modules. If you find that you need more background information as you go, refer to Lightroom Help, or review the previous lessons in this book.
Before you begin, make sure that you have correctly copied the Lessons folder from the CD in the back of this book onto your computer’s hard disk and created the LR3CIB Library Catalog file as detailed in “Copying the Classroom in a Book files” on page 2 and “Creating a catalog file for working with this book” on page 3.
1 Start Lightroom.
2 In the Adobe Photoshop Lightroom - Select Catalog dialog box, make sure the file LR3CIB Library Catalog.lrcat is selected under Select A Recent Catalog To Open, and then click Open.
3 Lightroom will open in the screen mode and workspace module that were active when you last quit. If necessary, click Library in the Module Picker to switch to the Library module.

Importing images into the library
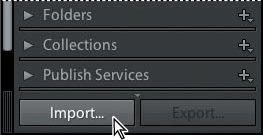
The first step is to import the images for this lesson into the Lightroom library.
1 In the Library module, click the Import button below the left panel group.
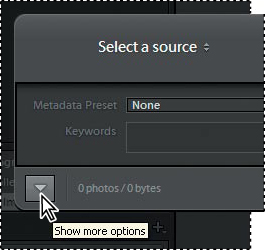
2 If the Import dialog box appears in compact mode, click the Show More Options button at the lower left of the dialog box to see all the options in the expanded Import dialog box.
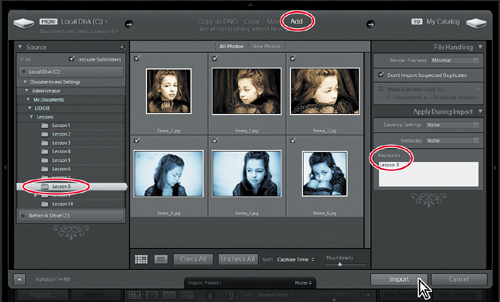
3 Under Source at the left of the expanded Import dialog box, navigate to the Lessons folder that you copied into the LR3CIB folder on your hard disk. Select the Lesson 8 folder. Ensure that all six images in the Lesson 8 folder are checked for import.
4 In the import options above the thumbnail previews, click Add to add the imported photos to your catalog without moving or copying them.
5 Under File Handling at the right of the expanded Import dialog box, choose Minimal from the Render Previews menu and ensure that the Don’t Import Selected Duplicates option is activated.
6 Under Apply During Import, choose None from both the Develop Settings menu and the Metadata menu and type Lesson 8 in the Keywords text box. Make sure your settings are exactly as shown in the illustration below, and then click Import.
The six images are imported from the Lesson 8 folder and now appear in both the Grid view of the Library module and in the Filmstrip across the bottom of the Lightroom workspace.
Creating a new collection
It’s a good idea to group the images for your print job as a collection so that you can easily retrieve them even if they’re actually stored in different folders on your hard disk. Grouping your images in a collection has other advantages: you can make consistent adjustments across all the images, rearrange their display order, and add or remove images. You can use the temporary Quick Collection in the Catalog panel, or create a new collection that will appear in the Collections panel.
1 Select all six images for this lesson by pressing Ctrl+A / Command+A or choosing Edit > Select All.
2 In the left panel group, click the New Collection icon (+) in the header of the Collections panel and choose Create Collection from the menu.
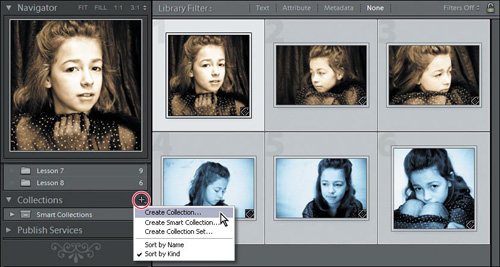
3 In the Create Collection dialog box, type My Prints in the Name box and choose None from the Set menu. Under Collection Options, activate Include Selected Photos and disable Make New Virtual Copies; then click Create.
The new collection is now listed in the Collections panel.

![]()
![]() Tip: To delete a collection, right-click / Control-click its name in the Collections panel and choose Delete from the context menu.
Tip: To delete a collection, right-click / Control-click its name in the Collections panel and choose Delete from the context menu.
4 Click Print in the Module Picker to switch to the Print Module.

About the Lightroom Print module
In the Print module you’ll find tools and controls for each step in the printing workflow. Organize your photos, choose a template and refine the layout, add borders, text, or graphics, and adjust the output settings; everything you need is at your fingertips.
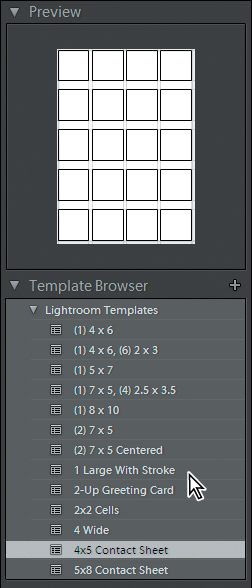
In the Print module’s left panel group are the Preview and Template Browser panels. By moving the pointer over the list of templates in the Template Browser you can see a thumbnail preview of each layout displayed in the Preview panel. The left panel group also contains the Collections panel for easy access to your images.
You can select the photos you wish to print in the Filmstrip. When you choose a new template from the list, the Print Editor view—at center-stage in the work-space—will be updated to show how the selected photos look in the new layout.
You’ll use the controls in the right panel group to customize your layout template and to specify output settings.
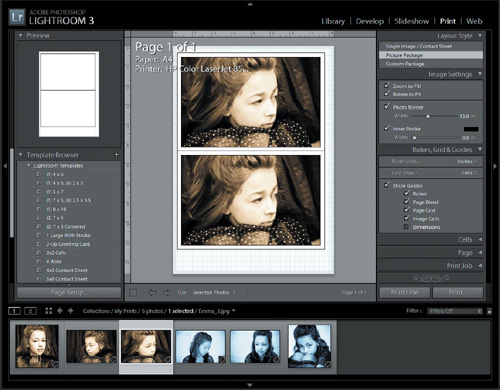
The Template Browser contains templates of three distinct types: Single Image / Contact Sheet layouts, Picture Package layouts, and Custom Package layouts.
Four of the first twelve preset Lightroom templates in the menu are Picture Package layouts, which repeat a single image at a variety of sizes on the same page. The other eight are Single Image / Contact Sheet layouts, which can be used to print multiple photos at the same size on a single sheet. Single Image / Contact Sheet layouts are based on an adjustable grid of image cells. They range from contact sheets with many cells to single-cell layouts such as the Fine Art Mat and Maximize Size templates. The Custom layout templates further down the menu enable you to print multiple images at any size on the same page. All of the templates can be customized; you can save your modified layouts as user-defined templates, which will be listed in the Template Browser.
The suite of panels you see in the right panel group will vary slightly, depending on which type of template you have chosen. The Layout Style panel at the top of the group indicates which type of template you’re working with.
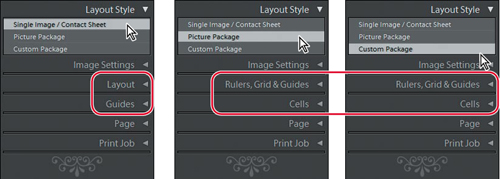
The controls in the Image Settings panel enable you to add borders and to specify the way in which your photos are fitted to their image cells. For a Single Image / Contact Sheet template, you can use the Layout panel to adjust the margins, cell size and spacing, and to change the number of rows and columns that make up the grid. Use the Guides panel to show or hide a selection of layout guides. For a Picture Package or Custom package template, you’ll modify your layout with the Rulers, Grid & Guides panel and the Cells panel. You can use the Page panel to watermark your printed images and to add text, graphics, or a background color to your layout. In the Print Job panel you can set print resolution, print sharpening, paper type, and color management options.
The photos in your collection are displayed in the Filmstrip across the bottom of the workspace, where you can select images for printing and drag their thumbnails to change the order in which they will appear in a multiple-image layout.
About layout styles and print templates
The Template Browser offers a wide choice of preset Lightroom print templates that differ not only in basic layout but may also include a variety of design features such as borders and overlaid text or graphics.
Templates may also differ in their output settings: the print resolution setting for a contact sheet will be lower than the resolution set for a template designed for producing finished prints.
You can save time and effort setting up your print job by selecting the print template that most closely suits your purpose. In this exercise you’ll be introduced to the different types of template and use the panels in the right panel group to examine the characteristics of each layout.
1 In the left panel group, make sure that the Preview and Template Browser panels are expanded. If necessary, drag the top border of the Filmstrip down so that you can see as many as possible of the templates in the Template Browser. In the right panel group, expand the Layout Style panel and collapse the others.
2 Choose Edit > Select None, and then select just one of the images in the Filmstrip. The Print Editor view at the center of the workspace is updated to display the selected photo in the current layout.
3 If necessary, expand the Lightroom Templates folder inside the Template Browser panel. Move the pointer slowly over the list of preset templates to see a preview of each layout in the Preview panel.
4 Click the second template in the Template Browser: “(1) 4 × 6, (6) 2 × 3.” The new template is applied to the image in the Print Editor view. Look at the Layout Style panel in the right panel group. You’ll see that the Layout Style panel indicates that this template is a Picture Package layout. In the Template Browser, click the sixth Lightroom template “(2) 7 × 5.” The Layout Style panel indicates that this is also a Picture Package layout.
5 Now choose the ninth preset template in the Template Browser: “2-Up Greeting Card.” The Layout Style panel indicates that the template “2-Up Greeting Card” is a Single Image / Contact Sheet layout, and the Print Editor view at the center of the workspace displays the new template.
6 In the Layout Style panel, click Picture Package. The Print Editor view is updated to display the last selected Picture Package layout: “(2) 7 × 5.” Click Single Image / Contact Sheet in the Layout Style panel and the Print Editor view returns to the last selected Single Image / Contact Sheet layout: “2-Up Greeting Card.”
As you move between the Single Image / Contact Sheet and Picture Package layout styles you’ll notice that a different suite of control panels become available in the right panel group. Panels common to both layout styles may differ in content.
7 In the right panel group, expand the Image Settings panel. In the Layout Style panel, click Picture Package and expand the Image Settings panel again. Toggle between the Picture Package and Single Image / Contact Sheet layouts and notice how the options available in the Image Settings panel change.
You can see that the selected photo fits to the image cell differently for each of these templates. In the Picture Package layout “(2) 7 × 5,” the Zoom To Fill option is activated in the Image Settings panel so that the photo is zoomed and cropped to fill the image cell. In the Single Image / Contact Sheet “2-Up Greeting Card,” the Zoom to Fill option is disabled and the photo is not cropped. Take a moment to examine the other differences in the Image Settings panel.

(2) 7 × 5 template
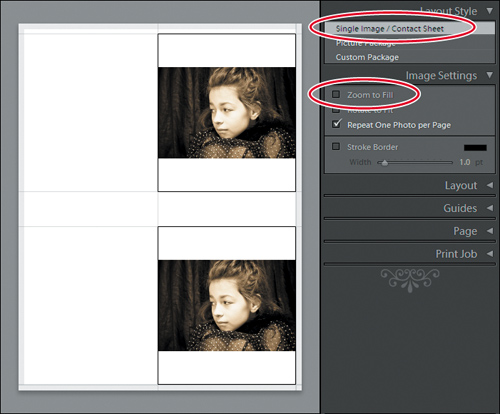
2-Up Greeting Card template
8 Select the Single Image / Contact Sheet layout style. Look at the page count at the right of the Toolbar below the Print Editor view: it reads “Page 1 of 1.” Press Ctrl+A / Command+A or choose Edit > Select All to select all six images in the collection. The page count in the Toolbar now reads “Page x of 6.” The template “2-Up Greeting Card” is now applied to all six photos, resulting in a print job of six pages. Use the navigation buttons at the left the Toolbar to move between the pages and see the layout applied to each image in turn.

![]() Tip: You can also navigate your multi-page print document by using the Home, End, Page Up, Page Down, and left and right arrow keys on your keyboard, or choosing from the navigation commands in the Print menu.
Tip: You can also navigate your multi-page print document by using the Home, End, Page Up, Page Down, and left and right arrow keys on your keyboard, or choosing from the navigation commands in the Print menu.
9 For the last step in this exercise, collapse the Image Settings panel and expand the Print Job panel. You’ll notice that in the Print Job panel, the Print Resolution for the “2-Up Greeting Card” template is set to 240 ppi. Select the template “4×5 Contact Sheet” in the Template Browser. The Print Resolution option in the Print Job panel is disabled and the Draft Mode Printing option is activated.
Selecting a print template
Now that you’ve explored the Template Browser, it’s time to choose the template that you will customize in the next exercise.
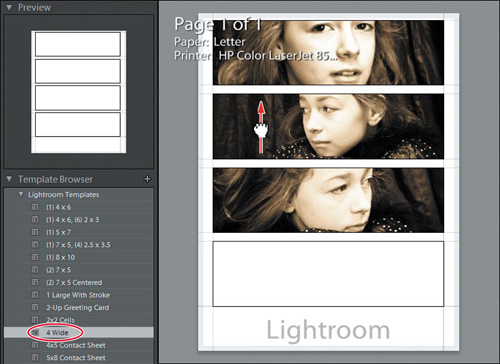
1 In the Template Browser, click the template “4 Wide.” If you have customized your default identity plate, you may want to uncheck the Identity Plate option in the Page panel for now.
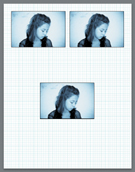
2 Choose Edit > Select None. In the Filmstrip, select the images Emma_1.jpg, Emma_2.jpg, and Emma_3.jpg. The Images will be arranged in the template in the same order in which they appear in the Filmstrip. Drag the images inside their grid cells to reposition them as shown in the illustration below.
![]() Tip: By default, each photo will be centered in its own image cell. To expose a different portion of an image that is cropped by the boundaries of its cell, simply drag the photo to reposition it within its image cell.
Tip: By default, each photo will be centered in its own image cell. To expose a different portion of an image that is cropped by the boundaries of its cell, simply drag the photo to reposition it within its image cell.
Specifying the printer and paper size
Before you customize the template, you’ll need to specify the paper size and page orientation for your print job. Doing this now may save you the time and effort of readjusting the layout later.
1 Choose File > Page Setup.
2 In the Print Setup / Page Setup dialog box, choose the desired printer from the Name / Format For menu.
3 From the Paper Size menu, choose Letter (8.5 × 11 In.) / US Letter. Choose the portrait format option as Orientation, and then click OK.
![]() Tip: Lightroom automatically scales your photos in the print layout template to fit the paper size you have specified. In the Print Setup / Page Setup dialog box, leave the scale setting at the default 100% and let Lightroom fit the template to the page—that way, what you see in the Print Editor view will be what you’ll get from your printer.
Tip: Lightroom automatically scales your photos in the print layout template to fit the paper size you have specified. In the Print Setup / Page Setup dialog box, leave the scale setting at the default 100% and let Lightroom fit the template to the page—that way, what you see in the Print Editor view will be what you’ll get from your printer.
Customizing print templates
Having established the overall layout of your print job, you can use the controls in the Layout panel to fine-tune the template so that the images fit better to the page.
Changing the number of cells
For the purposes of this exercise, we need only three of the four preset image cells.
1 If necessary, expand the Layout panel in the right panel group. Under Page Grid, drag the Rows slider to the left or type 3 in the text box to the right of the slider.
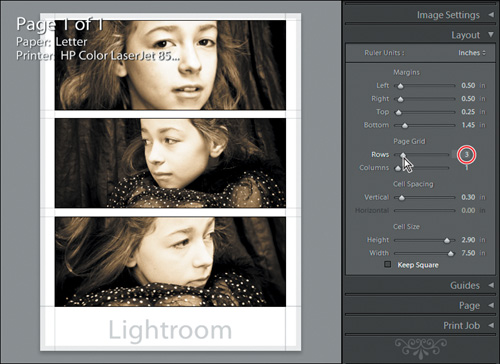
2 Experiment with the Margins, Cell Spacing, and Cell Size sliders—making sure to undo (Ctrl+Z / Command+Z) after each change. Activate the Keep Square option below the Cell Size sliders. The Cell Width and Cell Height sliders are locked together at the same value. Disable the Keep Square option.
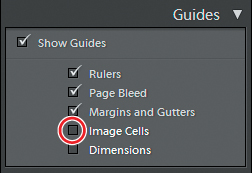
3 The black lines you might see around the photos are merely guides indicating the image cell boundaries; they will not appear on your printed page. These guides are helpful while you’re adjusting the cell size and spacing but they’ll be distracting when you add printable borders to your layout in the next exercise. If necessary, expand the Guides panel below the Layout panel and disable the Image Cells option; then collapse the Layout and Guides panels.
Modifying the page layout of a print template
Layout controls for single image / Contact sheet and Picture Package templates
Depending on which type of print template you are working with, you’ll find a slightly different suite of panels in the right panel group. The Image Settings, Page, and Print Job panels are available for all template types but the controls for modifying the page layout differ. If you’ve chosen a Single Image / Contact Sheet template, you’ll customize your layout using the Layout and Guides panels. For a Picture Package template, you’ll use the Rulers, Grids & Guides panel and the Cells panel. For Custom Package layouts you’ll also use the Rulers, Grids & Guides panel and the Cells panel—where you’ll find a few minor differences from the options offered in the same panels for a Picture Package.
Picture Package templates and Custom Package layouts and are not grid-based so they are very flexible to work with; you can arrange the image cells on the page either by simply dragging them in the Print Editor view or by using the controls in the Cells panel. You can resize a cell using the width and height sliders or simply drag the handles of its bounding box. Add more photos to your layout with the Cells panel controls or Alt-drag / Option-drag a cell to duplicate it and resize it as you wish.
Lightroom provides a variety of guides to help you adjust your layout. Guides are not printed: they appear only in the Print Editor view. To show or hide the guides, activate Show Guides in the Guides panel, or choose View > Show Guides (Ctrl+Shift+H / Command+Shift+H). In the Guides panel you can specify which types of guides will be displayed in the Print Editor view.
note: The Margins and Gutters guides and Image Cells guides—available only for Single Image / Contact Sheet layouts—are interactive; you can adjust your layout directly by dragging the guides themselves in the Print Editor view. When you move these guides, the Margins, Cell Spacing and Cell Size sliders in the Layout panel will move with them.
Using the Layout panel to modify a Contact sheet / grid layout
Ruler Units sets the units of measurement for most of the other controls in the Layouts panel and for the Rulers guide in the Guides panel. Click the Ruler Units setting and choose Inches, Centimeters, Millimeters, Points or Picas from the menu. The default setting is Inches.
margins sets the boundaries for the grid of image cells in your layout. Most printers don’t support borderless printing, so the minimum value for the margins is dependent on the capabilities of your printer. Even if your printer does support borderless printing, you may first need to activate this feature in the printer settings before you can set the margins to zero.
Page grid specifies the number of rows and columns of image cells in the layout. The grid can contain anything from one image cell (Rows: 1, Columns: 1) to 225 image cells (Rows: 15, Columns: 15).
Cell spacing and Cell size settings are linked so that changes you make to one will affect the other. The Cell Spacing sliders set the vertical and horizontal spaces between the image cells in the grid; the Cell Size controls change the height and width of the cells. The Keep Square option links the height and width settings so that the image cells remain square.
Using the guides panel to modify a Contact sheet / grid layout
Rulers are displayed across the top and at the left of the Print Editor view. If Show Guides is activated, you can also show the rulers by choosing View > Show Rulers (Ctrl+R / Command+R). To change the ruler units, click the setting in the Layout panel.
Page Bleed shades the non-printable edges of the page, as defined by your printer settings.
margins and gutters guides reflect the Margins settings in the Layout panel; in fact, dragging these guides in the Print Editor view will move the respective sliders in the Layout panel.
image Cells shows a black border around each image cell. When the Margins and Gutters guides are not visible, dragging the Image Cells guides in the Print Editor view will change the Margins, Cell Spacing, and Cell Size settings in the Layout panel.
Dimensions displays the measurements of each image cell in its top left corner, expressed in whatever units of measurement you have chosen for the Ruler Units.
Using the rulers, grids & guides panel to modify a Picture Package layout
Rulers shows the rulers and lets you set the units of measurement just as you would in the Layout panel when you’re working with a Contact Sheet / Grid template.
Grid displays a grid guide behind the image cells in the Print Editor view. As you drag the cells, you can have them snap to each other or to the grid (or turn the snap behavior off) by choosing Cells, Grid, or Off from the Snap menu options. The grid divisions are affected by your choice of ruler units.
note: The snap behavior helps you to position the image cells accurately on the page. If you accidentally overlap your photos, Lightroom will let you know by showing a triangular yellow warning icon (!) in the top right corner of the page.
Bleeds and Dimensions are the Picture Package equivalents of the Page Bleed and Dimensions guides.
Using the Cells panel to modify a Picture Package layout
Add To Package offers six preset image cell sizes that can be placed in your layout at the click of a button. You can change which of the presets is assigned to each button by clicking its menu triangle. The default presets are standard photo sizes but you can edit them if you wish.
new Page adds a page to your layout, though Lightroom automatically adds pages if you use the Add to Package buttons to add more photos than fit on a page. To delete a page from your layout, click the red X in its upper left corner of the page in the Print Editor view.
auto Layout optimizes the arrangement of the photos on the page for the fewest cuts.
Clear Layout removes all the image cells from the layout.
Adjust Selected Cell lets you change the height and width of an image cell using sliders or numerical input.
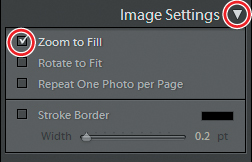
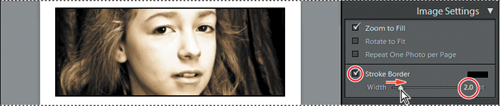
Creating stroke and photo borders
For our Single Image / Contact Sheet layout, the Image Settings panel offers options that affect the way your photos are fit to the image cells, and a control for adding borders. In this exercise you’ll add a stroke border around each of the three images and adjust the width of the stroke.
1 Expand the Image Settings panel. For the 4 Wide template, the Zoom To Fill option is activated. This means that our photos are cropped in height to fit the proportions of the image cells.
![]() Tip: You can change the color of the border by clicking the Stroke Border color swatch and choosing a color from the Color Picker.
Tip: You can change the color of the border by clicking the Stroke Border color swatch and choosing a color from the Color Picker.
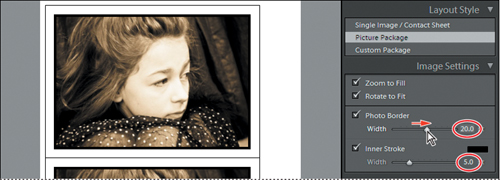
2 Click the checkbox to activate the Stroke Border option, and then drag the Width slider to the right or type 2.0 in the text box to the right of the slider. For your reference, 72 points (pt) are one inch.
3 In the Layout Type panel, click Picture Package. If necessary, expand the Image Settings panel. For a Picture Package template, the Image Settings panel offers two controls for borders. An Inner Stroke border is the Picture Package equivalent of a Stroke Border. Use the Photo Border control to specify the width of a blank frame between the edge of each photo and the boundary of its image cell.
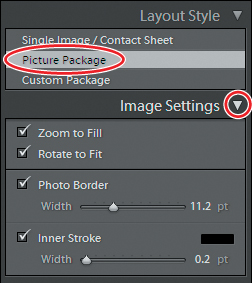
4 Experiment with the Inner Stroke and Photo Border settings.
5 In the Layout Type panel, click Single Image / Contact Sheet to return to your modified 4 Wide template; then collapse the Image Settings panel.
Using the Rotate To Fit Option
By default, Lightroom will place photos so that they are upright within their image cells. The Rotate To Fit option in the Image Settings panel will override this behavior so that your photos are rotated to match the orientation of the image cells. For presentation layouts you would not wish to have images displayed in different orientations on the same page but in some situations this feature can be very helpful and save on expensive photo paper too! The Rotate To Fit option is particularly useful when you wish to print photos in both portrait and landscape formats on the same sheet, as large as possible and without wasting paper, as shown in the illustration on the right.
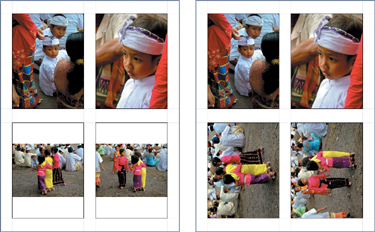
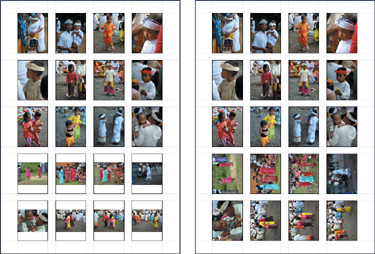
Another situation where you might choose to use the Rotate To Fit setting is when you are printing contact sheets. As you can see in the next illustration, Rotate To Fit enables you to see all the photos at the same size regardless of the image orientation.
Customizing your identity plate
In the Page panel you have the option add an identity plate or text to your print layout. You can quickly edit your identity plate or add photo info, captions, page numbers, or crop marks to your prints. To begin with, you’ll modify the identity plate to suit our sepia-toned images.
1 Expand the Page panel; then click the checkbox to activate the Identity Plate option. Click the triangle in the lower right corner of the identity plate preview pane and choose Edit from the menu.
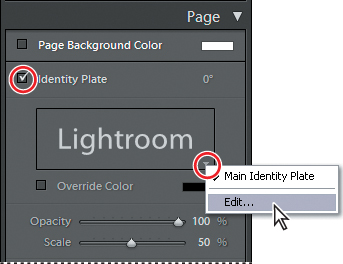
2 In the Identity Plate Editor dialog box, activate the Use A Styled Text Identity Plate option. Choose Arial, Regular, and 36 point from the font menus. At this point, you could also change the default color for the identity plate text by clicking the color swatch to the right of the font size menu; we choose a light gray. Select the text in the text box and type Manneken Photography (or a name of your own choice); then click OK.
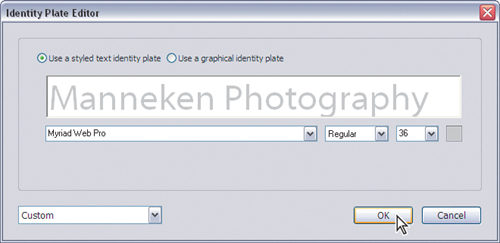
![]() Tip: If your text is too long to be fully visible in the text box, either resize the dialog box or reduce the font size until you’ve finished editing.
Tip: If your text is too long to be fully visible in the text box, either resize the dialog box or reduce the font size until you’ve finished editing.
3 In the Page panel, drag the Scale slider to the right so that the identity plate text is the same width as the image. You can also scale the identity plate by clicking it in the Print Editor view and dragging the handles of its bounding box.

![]() Tip: By default the identity plate will be oriented horizontally. This setting (0˚) is indicated at the top right of the Identity Plate pane in the Page panel. To re-orient your identity plate on the page, click on the 0˚ indicator and choose 90˚, 180˚, or −90˚ from the menu. To move your identity plate, simply drag it in the Print Editor view.
Tip: By default the identity plate will be oriented horizontally. This setting (0˚) is indicated at the top right of the Identity Plate pane in the Page panel. To re-orient your identity plate on the page, click on the 0˚ indicator and choose 90˚, 180˚, or −90˚ from the menu. To move your identity plate, simply drag it in the Print Editor view.
4 Now you’ll change the color of the identity plate. Click the Override Color checkbox to set the color of the identity plate for this layout only—without affecting the defined color settings for the identity plate.
5 Click the Override Color swatch to open the Color Picker. Set the RGB values: R: 60%, G: 45%, B: 20%, and then click outside the Color Picker to close it. The color of the identity plate is now matched to the sepia tones of the photos.
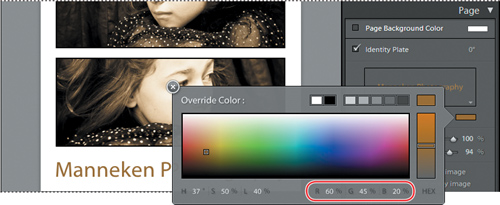
![]() Tip: If you see a hexadecimal value displayed in the lower right corner of the Color Picker rather than RGB values, click RGB below the color slider.
Tip: If you see a hexadecimal value displayed in the lower right corner of the Color Picker rather than RGB values, click RGB below the color slider.
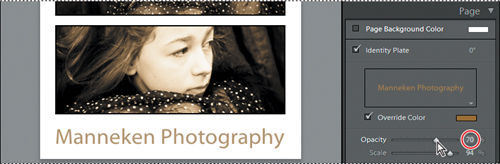
6 In the Identity Plate pane, use the Opacity slider or type 70 in the text box beside it to set an opacity value of 70% for the identity plate. This feature can be particularly effective if you wish to position your identity plate over an image.
Printing captions and metadata information
In this exercise, you will add a caption and metadata information—in this case, sequence numbers for the images—to your print layout using the Page panel and the Text Template Editor.
1 At the bottom of the the Page panel, click the checkbox to activate the Photo Info overlay option; then choose Edit from the menu to the right. Most of the other options in the Photo Info menu are drawn from the images’ existing metadata.
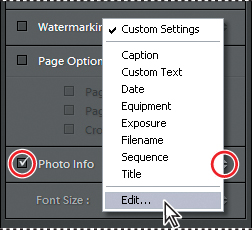
The text Template Editor enables you to access and edit the metadata embedded in your image files, and then to save your template as an easy-to-access preset.
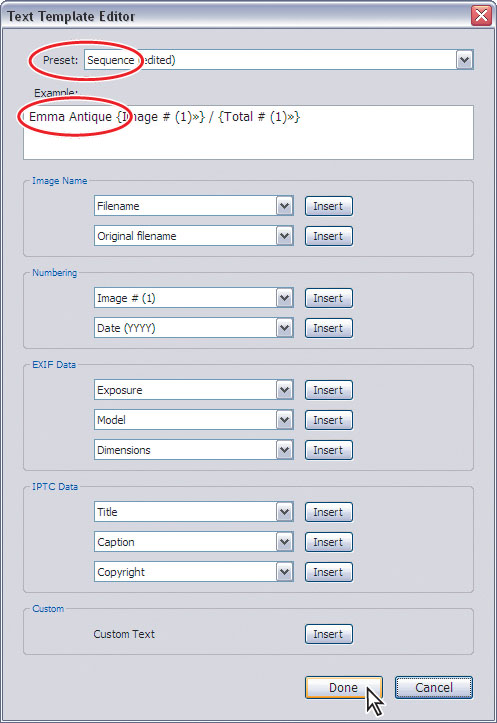
2 In the Text Template Editor, choose Sequence from the Preset menu.
3 Click to place an insertion cursor just before the first token in the Example text box and then type Emma Antique. Be sure to add a space between your text and the first token. Click Done to close the Text Template Editor. The images in the Print Editor view are now captioned and numbered.
![]() Tip: You’ll find more detailed information on the Text Template Editor in the section “Using the Text Template Editor” in Lesson 7, “Creating Slideshows.”
Tip: You’ll find more detailed information on the Text Template Editor in the section “Using the Text Template Editor” in Lesson 7, “Creating Slideshows.”
4 Click the triangle beside Font Size at the bottom of the Page panel and choose 12 pt from the menu; then collapse the Page panel.

Saving your customized print template
Having started with a preset print template, you’ve created your own page design by modifying the layout and adding borders, an identity plate, and captions to the images. You can now save your customized layout for future use.
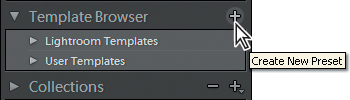
1 Click the Create New Preset button (+) in the header of the Template Browser panel header, or choose Print > New Template.
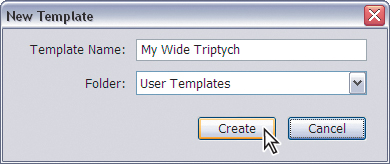
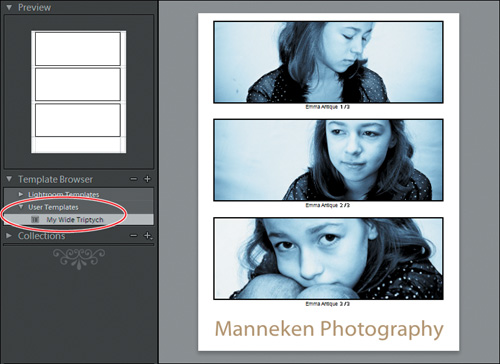
2 In the New Template dialog box, type My Wide Triptych in the Template Name text box. By default, new templates are saved to the User Templates folder. For this exercise, accept the default User Templates as the destination folder and click Create.
3 Your saved template appears in the User Templates folder in the Template Browser panel where you can access it quickly for use with a new set of images. With your new template selected in the Template Browser, select the last three images in the Filmstrip.
Creating a Custom Package print layout
If you prefer to create your own page layout from scratch, without using any of the Lightroom print layout templates as a starting point, you can use the Custom Package option in the Layout Style panel.
1 In the Layout Style panel, click Custom Package. If you clicked the print layout template Custom (2) 4 × 6 in the Template Browser earlier in the lesson, the page layout you see in the Print Editor view may already contain two 4 × 6 image cells. Delete the existing image cells by clicking inside each cell and pressing the Delete key on your keyboard.
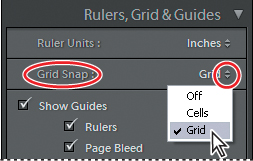
2 Click the double tri-angle beside Grid Snap and choose Grid from the menu. This will make it easier to arrange the images in your print layout.
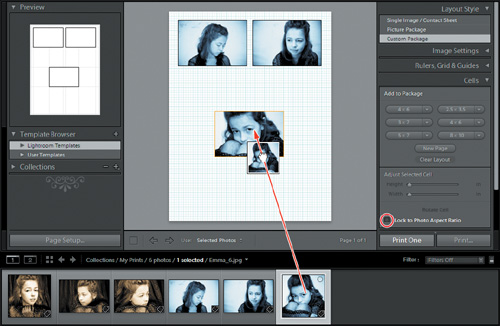
3 Choose Edit > Select None to deselect all the images in the Filmstrip, and then drag the image Emma_4.jpg from the Filmstrip to the Print Editor view, positioning it on the page as shown in the illustration.
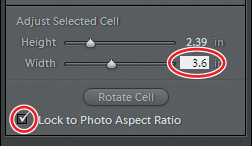
4 Expand the Cells panel and make sure that the Lock To Photo Aspect Ratio option is activated. In the Adjust Selected Cell controls, click the Width value and type 3.6; then press Enter / Return.
5 Hold down the Alt / Option key and drag the image in the Print Editor view to produce a copy. Repeat the process to produce a second copy, and then drag the images to position them on the page as shown in the illustration.
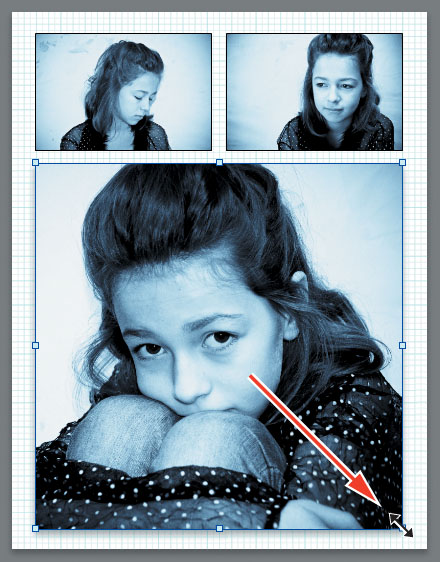
6 Drag the image Emma_5.jpg from the Filmstrip and drop it onto the photo at the top right of your layout.
7 Disable the Lock To Photo Aspect Ratio option at the bottom of the Cells panel.
8 Drag the image Emma_6.jpg from the Filmstrip and drop it onto the photo in the center of your layout.
With the Lock To Photo Aspect Ratio option disabled, the image Emma_6.jpg—which is in a square format—is cropped to fit the existing image cell.
9 Click the check box to activate the Lock To Photo Aspect Ratio option at the bottom of the Cells panel so that the image cell is resized to fit this photo’s square aspect ratio.
10 Drag the image Emma_6.jpg in the page layout and use the corner handles of its bounding box to position and scale the photo as shown in the illustration.
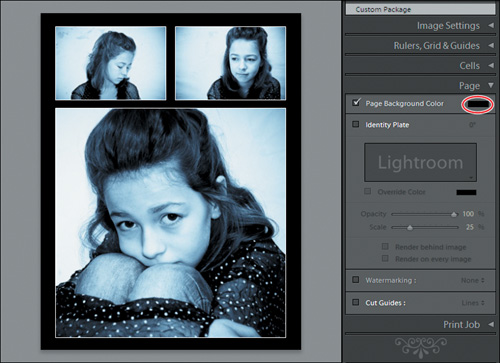
Changing the page background color
In Lightroom 3, you can apply a background color to your print layout.
To save on printer ink, you may prefer not to print a page with large areas of bold color or black in the background on your home printer, but when you’re ordering professional prints this can be a striking choice.
1 Expand the Page panel in the right panel group and activate the Page Background Color option.
2 Click the Page Background Color color swatch to open the Color Picker.
3 Move the pointer over the row of color swatches at the top of the Color Picker and use the eyedropper to sample the black swatch. Click the Close button (x) or click outside the Color Picker to close it.
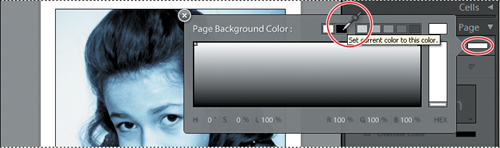
The new color appears in the Page Background Color color swatch and in the page preview in the Print Editor view.
Configuring the output settings
The final step before you’re ready to print your layout is to adjust the output settings in the Print Job panel.
1 Expand the Print Job panel in the right panel group.
From the Print To menu at the top of the Print Job panel you can choose to send the job directly to your printer or generate a JPEG file, which you can print later or send out for professional printing. The controls in the Print Job panel vary slightly depending on which option is selected in the Print To menu.
2 Choose Printer from the Print To menu at the top of the Print Job panel.
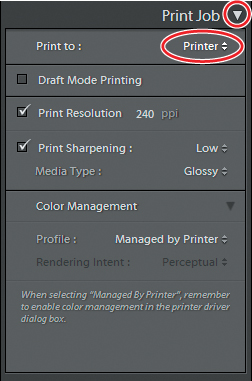
Activating the Draft Mode Printing option will disable the other options in the Print Job panel. Draft Mode Printing results in high speed output at a relatively low quality, which is an efficient option for printing contact sheets or for assessing your layout before you commit it to high quality photo paper. The 4 × 5 Contact Sheet and the 5 × 8 Contact Sheet templates are preset for Draft Mode Printing.
![]() Note: The terms “print resolution” and “printer resolution” have different meanings. “Print resolution” refers to the number of printed pixels per inch (ppi); “printer resolution” refers to the capability of the printer, called dots per inch (dpi). A printed pixel of a particular color is created by patterns of tiny dots of the few ink colors available.
Note: The terms “print resolution” and “printer resolution” have different meanings. “Print resolution” refers to the number of printed pixels per inch (ppi); “printer resolution” refers to the capability of the printer, called dots per inch (dpi). A printed pixel of a particular color is created by patterns of tiny dots of the few ink colors available.
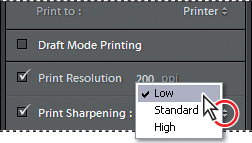
The Print Resolution setting that is appropriate for your print job depends on the intended print size, the resolution of your image files, the capabilities of your printer, and the quality of your paper stock. The default print resolution is 240 ppi, which generally produces good results. As a rule of thumb, use a higher resolution for smaller, high quality prints (around 360 ppi for letter size). You can use a lower resolution setting for larger prints (around 180 ppi for 16˝ × 20˝) without compromising too much on quality.
3 The Print Resolution control has a range of 72 ppi to 480 ppi. For this exercise, type 200 in the Print Resolution text box.

Images tend to look less sharp on paper than they do on screen. The Print Sharpening options can help to compensate for this by increasing the crispness of your printed output. You can choose between Low, Standard, and High Print Sharpening settings, and specify a Matte or Glossy Media Type. You won’t notice the effects of these settings on screen so it’s useful to experiment by printing at different settings to familiarize yourself with the results.
![]() Note: The purpose of the Sharpening feature in the Develop module is to compensate for blurriness in the original photo, while Print Sharpening improves the crispness of printed output on a particular paper type.
Note: The purpose of the Sharpening feature in the Develop module is to compensate for blurriness in the original photo, while Print Sharpening improves the crispness of printed output on a particular paper type.
4 If it’s not already selected, choose Low from the Print Sharpening menu.
Using color management
Printing your digital images can be challenging: what you see on screen is not always what you get on paper. Lightroom is able to handle a very large color space but your printer may operate within a much more limited gamut.
In the Print Job panel, you can choose whether to have Lightroom handle color management or leave it up to your printer.
Color managed by your printer
The default Color Management setting in the Print Job panel is Managed By Printer. This can be the easiest option and, given the continuing improvement of printing technology, will generally produce satisfactory results.
![]() Note: For Draft Mode Printing, color management is automatically assigned to the printer.
Note: For Draft Mode Printing, color management is automatically assigned to the printer.
In the Print Setup / Print dialog box (File > Print Settings), you can specify the paper type, color handling, and other print settings. On Windows, click Properties in the Print Setup dialog box to access additional printer specific settings.
![]() Note: The options available in the Print Setup / Print dialog box may vary depending on your printer.
Note: The options available in the Print Setup / Print dialog box may vary depending on your printer.

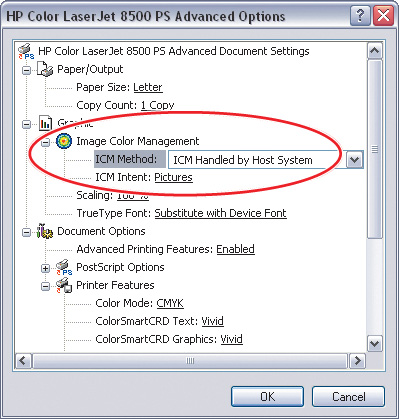
If you choose Managed By Printer, enable the ICM Method for Image Color Management (Windows) or activate the ColorSync option in the Color Management settings for the printer driver software (Mac OS) so that the correct profile is applied before printing. Depending on the printer driver software, you can usually find the color settings in the Print Document dialog box under Setup / Properties / Advanced (Windows), or in the menu below the Presets in the Print dialog box (Mac OS).
![]() Tip: If you choose a custom printer color profile rather than Managed By Printer from the Profile menu in the Color Management panel, make sure color management is turned off in the printer driver software; otherwise, your photos will be color managed twice, and the colors might not print as you expect them to.
Tip: If you choose a custom printer color profile rather than Managed By Printer from the Profile menu in the Color Management panel, make sure color management is turned off in the printer driver software; otherwise, your photos will be color managed twice, and the colors might not print as you expect them to.
Color management controlled by Lightroom
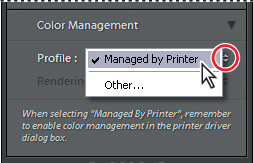
Letting your printer manage color may be acceptable for general printing purposes but to achieve really high quality results it’s best to have Lightroom do it. If you choose this option you can specify a printing profile tailored to a particular type of paper or custom inks.
1 In the Print Job panel, choose Other from the Color Management Profile menu.
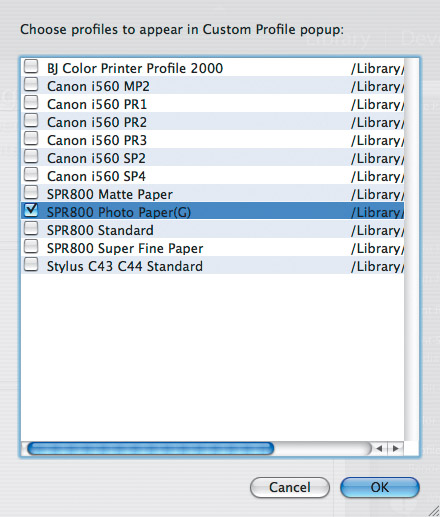
You can choose this option when the profile you want isn’t listed in the Profile menu. Lightroom searches your computer for custom printer profiles, which are usually installed by the software that came with your printer. If Lightroom is unable to locate any profiles, choose Managed By Printer and let the printer driver handle the color management.
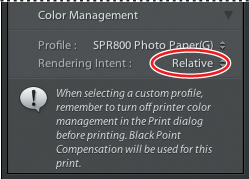
2 Depending on your printer and paper stock, choose one or more printer profiles. In this illustration a profile for the Epson Stylus Pro R800 using glossy photo paper has been selected. Each profile you choose will be added to the Profile menu under Color Management in the Print Job panel for easy access next time you print.
Once you’ve chosen a printer profile from the Profile menu, the Rendering Intent options are activated in the Print Job panel. The color space of an image is usually much larger than that within which most printers operate, which means that your printer may not be able to accurately reproduce the colors you see on screen. This may result in printing artifacts such as posterization or banding in color gradients as the printer attemptsas they are and shifts to deal with out-of-gamut colors. The Rendering Intent options help to minimize these problems. You can choose between two settings:
• Perceptual rendering aims at preserving the visual relationship between colors. The entire range of colors in the image will be re-mapped to fit within the color gamut your printer is able to reproduce. In this way, the relationships between all the colors are preserved but in the process even colors that were already in-gamut may be shifted as the out-of-gamut colors are moved into the printable range. This may mean that your printed image will be less vivid that it appeared on screen.
• Relative rendering prints all the in-gamut colors as they are and shifts out-of-gamut colors to the closest printable colors. Using this option means that more of the original color of the image is retained but some of the relationships between colors may be altered.
In most cases the differences between the two rendering methods are quite subtle. As a general rule, perceptual rendering is the best option for an image with many out-of-gamut colors and relative rendering works better for an image with only a few. However, unless you are very experienced it may be hard to tell which is which. The best policy is to do some testing with your printer. Print a very colorful, vivid photo at both settings and then do the same with a more muted image.
3 For the purposes of this exercise, choose Relative rendering as the muted tones of these images are very unlikely to be outside the printable range.
Saving print settings as an output collection
Your layout is ready to print. You can now save your print settings as an output collection to use for another print job. You’ll be able to add photos to the collection later and the same output settings will be applied automatically.
An output collection is different from a normal photo collection. A photo collection is merely a grouping of images to which you can apply any template or output settings you wish. An output collection links a photo collection (or a selection of images from that collection) to a particular template and specific output settings.
For the sake of clarity: an output collection also differs from a custom template. A template includes all your settings but no images; you can apply the template to any selection of images. An output collection links the template and all its settings to a particular selection of images.
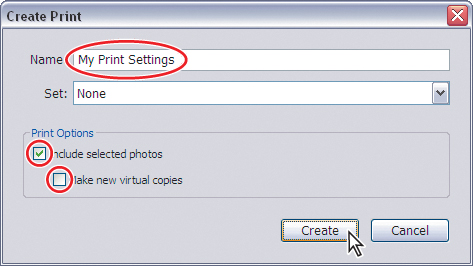
1 Now that you’ve saved your layout as a user template, selected the images you wish to print in the layout, and specified print settings, click the Create New Collection button (+) in the header of the Collections panel and choose Create Print from the menu.
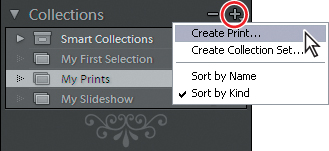
2 In the Create Print dialog box, type My Print Settings as the name for your print output collection.
3 Activate the option Include Selected Photos / Include Referenced Photos and disable Make New Virtual Copies; then click Create.
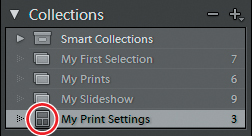
4 Your new output collection is now listed in the Collections panel. Note that your output collection has an icon representing a page layout, whereas an image collection is indicated by an icon representing a stack of photos.
![]() Tip: For more detailed information, please refer to the Lightroom Help topic “Save print settings as an output collection.”
Tip: For more detailed information, please refer to the Lightroom Help topic “Save print settings as an output collection.”
Printing your job
1 Click the Print button at the bottom of the right panel group or choose File > Print.
2 Verify the settings in the Print dialog box and click OK / Print to print your page, or click Cancel to close the Print dialog box without printing.
Clicking the Print One button will send your print job to the printer queue without opening the Print dialog box. This is useful if you print repeatedly using the same settings and don’t need to confirm or change any settings in the Print dialog.
To achieve the best results when you print, calibrate and profile your monitor regularly, always verify that print settings are specified correctly, and use quality papers. However, there is no substitute for experience. Experiment with a variety of settings and options—and if at first you do succeed, consider yourself very lucky!
Working with 16 Bit Output on Mac Os 10.5
If you are running Mac OS 10.5 (Leopard) and are using a 16-bit printer, you can activate the 16 Bit Output setting in the Print Job panel. This will result in less image degradation and color artifacts in files that have been extensively edited.
For detailed information on working with 16-bit output, consult the documentation for your printer or check with your output center.
Review questions
1 How can you quickly preview the preset print templates, and how can you see how your photos will look in each layout?
2 Which type of template would you choose to create a layout with a single photo repeated at various sizes on the same sheet, and how can you check which type of template you have chosen?
3 When you’re working with the Print Setup / Page Setup dialog box, why is it better to leave the Scale setting at 100%?
4 For what purposes is Draft Mode Printing appropriate?
Review answers
1 Move the pointer over the list of templates in the Template Browser to see a thumbnail preview of each layout displayed in the Preview panel. Select your images in the Filmstrip and choose a template from the list; the Print Editor view shows how your photos look in the new layout.
2 Picture Package layouts repeat a single image at a variety of sizes on the same page. The Layout Style panel indicates whether a layout selected in the Template Browser is a Picture Package template or a Single Image / Contact Sheet template.
3 Lightroom automatically scales your photos in the print layout template to fit the specified paper size. Changing the scale in the Print Setup / Page Setup dialog will result in the layout being scaled twice so your photos may not print at the desired size.
4 Draft Mode Printing results in high speed output at a relatively low quality, which is an efficient option for printing contact sheets or for assessing your layout before you commit it to high quality photo paper. The contact sheet templates are preset for Draft Mode Printing.