Chapter Five. Using Effects and Filters
In the early days of animation, animators used shortcuts to create special effects without having to draw them by hand. For example, the movie camera that photographed the frames of animation could be set to over-expose part of each frame, giving the impression of bright light.
Similarly, Flash has some premade effects that you can use in your movie. These effects come in three types: Timeline Effects, filters, and blending modes. As you’ll see in this chapter, each type of effect does things that the others can’t, and each has its drawbacks. Knowing how these effects work can open your imagination to ideas that you might not have thought of otherwise.
Applying Timeline Effects
The Timeline Effects feature was originally added to Flash as a way for beginners to do simple animation without having to master the concepts of keyframes and tweening. If you’re like most beginners, however, you’ll find Timeline Effects to be less intuitive than the animation techniques you learned in Chapter 4. Most people use Timeline Effects not as shortcuts to learning Flash, but as tools for creating complex effects more quickly than they could with the standard animation process.
When you apply a Timeline Effect to an object, the object changes its appearance. The change may be instantaneous, or it may take place over time (Figure 45a).
Figure 45a. This object has had the Transform effect applied to it with a duration of five frames.

Flash offers eight Timeline Effects sorted into three categories.
• Assistants: Copy to Grid, Distributed Duplicate
• Effects: Blur, Drop Shadow, Expand, Explode
• Transform/Transition: Transform, Transition
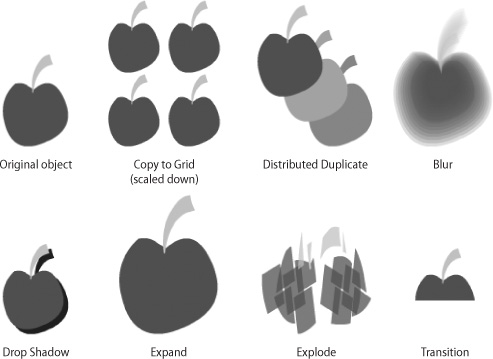
Figure 45b shows what these effects look like. For more details on each effect, see #46.
Figure 45b. Typical results of most of the Timeline Effects are illustrated here. (The Transform effect is shown in Figure 45a.)
Here’s how you apply a Timeline Effect to an object:
1. Right-click (Windows) or Control-click (Mac) an object on the Stage. The object can be of any type, so long as it isn’t tweened and doesn’t already have a Timeline Effect applied to it.
2. From the contextual menu, choose Timeline Effects > Category name > Effect name.
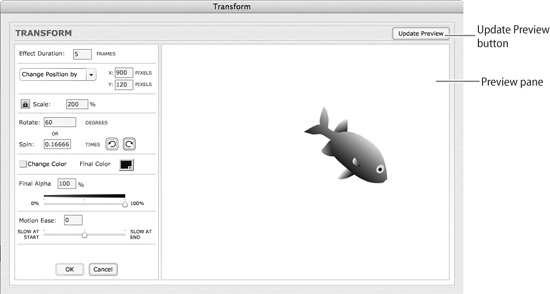
A dialog box appears with a set of controls on the left and a preview pane on the right (Figure 45c). The preview pane displays a looping animation showing what the selected object will look like when the Timeline Effect is applied.
Figure 45c. When you choose a Timeline Effect, you’ll see a dialog box similar to this one. The controls on the left differ for each Timeline Effect. (The dialog box shown here is for Transform.)
3. Use the controls to modify the settings for the effect. (See #46 for more information.)
Note that changing a setting doesn’t automatically change the animation in the preview pane. To see how your new settings alter the Timeline Effect, click the Update Preview button above the window.
4. Click OK. Several things happen:
• In the Timeline, the selected object is moved to a new layer. The name of the new layer is the chosen Timeline Effect followed by a number—for example, Drop Shadow 1. (If the selected object was on a layer by itself, that layer is renamed.)
• If the Timeline Effect takes place over a number of frames, Flash inserts those frames after the selected object’s keyframe. Regardless of whether the Timeline Effect contains animation, it appears in the Timeline as a series of regular frames, not as a tween.
• In the Library, two new symbols appear. The first is a symbol containing your selected object. It’s named effectSymbol (followed by a number, if there’s more than one), and it’s inside the Effects folder. The second is a symbol containing both the effectSymbol and the chosen Timeline Effect. Its name is the Timeline Effect followed by a number.
The changes to the Library may be slightly different than what’s described here, depending on the type of object you selected and the Timeline Effect you chose.
• On the Stage, the selected object appears the way it looked in the Timeline Effect preview pane. If the Timeline Effect you applied takes place over time, you can watch the animation by scrubbing through the Timeline or previewing or testing the movie.
Modifying Timeline Effects
Whether you’re applying a new Timeline Effect or editing one that’s already been applied, you’ll have to deal with a different set of controls for each effect. Here’s a brief description of each effect and some notes about what you’ll find in its dialog box:
• Copy to Grid. Use this assistant to arrange copies of the selected object in an array. You can specify the number of rows and columns and the spacing between them. This effect is instantaneous; it can’t be spread over a series of frames.
• Distributed Duplicate. This assistant causes copies of the selected object to extend outward in a straight line. You can specify the number of copies and incrementally transform their spacing, size, color, and opacity. There’s no direct way to specify the angle along which the copies are aligned, but you can change the angle indirectly by changing the X and Y values for Offset Distance (Figure 46a).
Figure 46a. On the left, the Distributed Duplicate effect with default Offset Distance settings of X=25 and Y=25. On the right, the same effect with the X value changed to –25.

You can spread the Distributed Duplicate transition over a series of frames by entering a number in the Offset Start Frame field. The duration of the effect, in frames, is the Offset Start Frame number multiplied by the number of copies.
• Blur. This effect causes the selected object’s edges to feather gradually. You can specify the amount of the blur (how far the feathered edge extends), the resolution of the blur (how many steps are contained within the feathered edge), and the direction of movement in which the feathered edge extends. Blur is most convincing when applied to an object without any strokes. You can specify the number of frames over which the blurring takes place: The greater the number of frames, the smoother the blur.
• Drop Shadow. As you might expect, this effect gives an object a drop shadow. You can specify the shadow’s color, opacity, and offset. The drop shadow is uniform; you can’t change its settings over a series of frames.
• Expand. Use this effect to make the object gradually increase or decrease in size. You can specify whether you want the object to expand, contract, or alternate between the two to create a pulsing effect. Unlike the other Timeline Effects, Expand can’t be applied to editable paths. The settings for this effect are unusually obscure, so they’re covered separately in a sidebar called “Expanding on ‘Expand.’”
• Explode. In this effect an object is broken into fragments that scatter and fade away over the number of frames that you specify (Figure 46b). You can specify the direction of the scattering and the distance the fragments travel. (The dialog box refers to the fragments’ trajectory as an arc, but it’s more of a V-shape.) You can also adjust the fragments’ gradual changes in size, orientation, and opacity. It’s best to keep the Final Alpha slider at 0 percent: With a higher setting, the fragments fade to the specified opacity by the time they reach the vertex of the V, and if the setting is 50 percent or higher, they fade in again.
Figure 46b. This is what the Explode effect looks like. The dashed arrows show the V-shaped path that the fragments follow.

• Transform. This effect allows you to transform the selected object‘s size, position, orientation, color, and opacity, just as you would with an ordinary motion tween. Although the transformation usually takes place over a number of frames, you can make it happen instantaneously by entering 1 in the Effect Duration field.
• Transition. This effect causes the selected object to fade or wipe in or out. You can specify the duration and pacing of the transition as well as the direction of the wipe.
Applying Filters
Filters, like Timeline Effects, are a way to add special effects to your movie. They’re easier to use than Timeline Effects, and they don’t add as much to your file size. However, they’re less versatile: While Timeline Effects can be applied to nearly every kind of object, filters can be applied only to text and to instances of button and movie-clip symbols.
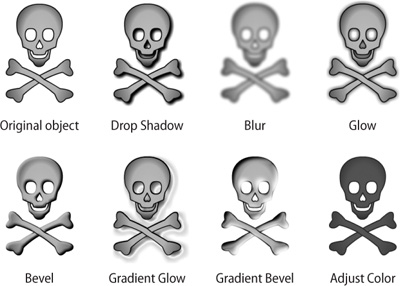
Flash offers seven filters: Drop Shadow, Blur, Glow, Bevel, Gradient Glow, Gradient Bevel, and Adjust Color. Drop Shadow and Blur are also Timeline Effects. The filter versions of these effects look better and offer more options than the Timeline Effect versions, so use the filters when possible.
To apply a filter:
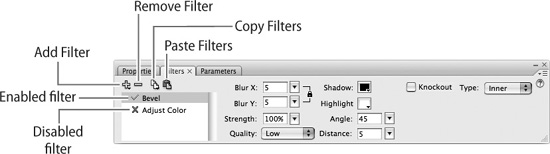
1. Click the Filters tab at the upper-left corner of the Property inspector to bring up the Filters panel (Figure 47a).
Figure 47a. The Filters panel, with controls for the Bevel filter.
2. Select one or more text objects or symbol instances on the Stage. If any are objects that can’t have filters applied to them, such as instances of graphic symbols, the Filters panel displays a message telling you so. Change your selection as necessary.
3. Click the Add Filter icon (a plus sign) and choose a filter from the pop-up menu. The selected objects on the Stage show the filter’s effects.
4. Use the controls on the Filters panel to modify the settings for the filter. As you do so, the selected objects on the Stage update in real time.
You can add multiple filters to a single object. Each time you add a filter, it appears in the list in the left pane of the Filters panel. To remove a filter, select it and click the Remove Filter icon (a minus sign).
You can temporarily disable a filter without removing it by clicking the green check mark to the left of the filter name. To enable a disabled filter, click the red X.
You can copy filters, along with their settings, from one object to another by using the Copy Filters and Paste Filters icons.
Most of the filter names are self-explanatory. You can see the effects of each filter in Figure 47b, and you can learn about their controls in the “Filterpedia” sidebar. The two that you may find unfamiliar are Gradient Glow and Gradient Bevel.
Figure 47b. The typical effects of the seven filters.
• Gradient Glow. This filter is almost identical to the Drop Shadow filter. The only significant difference is that while a drop shadow must be a uniform color, Gradient Glow allows you to make a multicolor shadow. You do this by using a gradient slider similar to the one in the Color panel (see #10).
• Gradient Bevel. Like the standard Bevel filter, Gradient Bevel gives an object a three-dimensional appearance by adding a highlight to one edge and a shadow to the opposite edge. The difference between them is that Bevel allows you to choose independent colors for the highlight and shadow, while Gradient Bevel requires both colors to be part of a single gradient.
In the gradient sliders for both of these filters, you’ll see a color tab with a gray plus sign on it. This tab can have its color changed, but it can’t be moved.
If you like the settings you’ve made for a particular filter and you think you might want to use them again, you can save them as a preset by choosing Presets > Save As from the Add Filters menu. After you’ve named the preset and clicked OK, the preset will appear at the bottom of the Presets submenu.
Animating Filters
By default, a filter stays the same as long as an object remains in the Timeline. You can use tweening to animate a filter, allowing it to change over time like a Timeline Effect.
When you apply a filter to an object in any keyframe of a motion tween, Flash applies the same filter in the other keyframes of the tween. (It doesn’t keep the settings, however. Numerical controls such as Strength, Distance, and Blur are set to 0.) You can adjust the filter’s settings in one keyframe without affecting the other keyframes. Flash tweens the filter’s settings in the same way it tweens other characteristics of the object (Figure 48).
Figure 48. Flash tweens a filter’s settings—in this case, the Glow filter.

Tweening filters can sometimes get messy. When you apply a filter to an object in one keyframe of a tween, Flash doesn’t warn you that it’s applying that filter in the other keyframes. If you then copy and paste a filter from one keyframe to another, you may end up with multiple copies of the filter in all the keyframes. It’s a good idea to check the left pane of the Filters panel now and then to be sure your objects haven’t accumulated unnecessary filters.
If you find filters you don’t need, cleaning them up is fairly simple. When you remove a filter from an object in one keyframe of a tween, Flash removes the corresponding filters in the other keyframes.
Using Blending Modes
A blending mode isn’t a special effect in itself, but rather a tool for creating striking color effects quickly. Many design and animation problems can be solved simply by choosing the right blending mode.
To understand blending modes, consider what happens when you place one object on top of another: If it’s opaque, the upper object blocks the view of the lower object. You can apply a blending mode to the top object to reveal all or part of the bottom object (Figure 49a).
Figure 49a. Here is a sampling of the blending modes available in Flash. Only five are shown; most can’t be represented effectively in black and white.
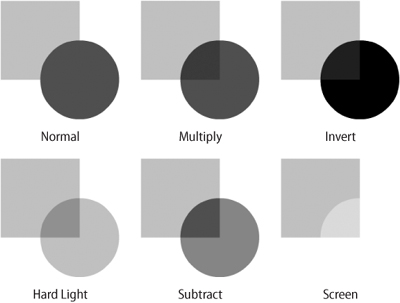
Blending modes are usually described as an interaction between a blend color (the one on top) and a base color (the one underneath). If the overlapping objects are multicolored, each area of blend color interacts with the base color directly beneath it. Each blending mode is essentially a mathematical formula that determines how the colors interact.
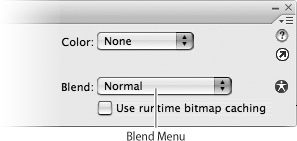
To apply a blending mode, select a movie-clip instance on the Stage, preferably one that has another movie clip partially or totally beneath it. A pop-up menu labeled Blend appears in the lower-right side of the Property inspector (Figure 49b). Choosing a blending mode from the menu applies it to the selected object.
Figure 49b. This menu appears in the Property inspector when a movie-clip instance is selected on the Stage.
Blending modes work equally well whether the two objects are on different layers or are stacked on the same layer. The only limitation is that both objects must be instances of movie clips; if they’re not, the Property inspector won’t display the Blend menu. If you want to blend a different kind of object—text, for example—convert it to a movie clip.
Each blending mode has a technical description that you can read in Flash Help. However, only the most technically minded people find these descriptions useful in predicting what a blend will look like. Instead, when a blend is needed, most people try out all of the blending modes and see what happens. As you get more experienced, you’ll know which modes are most likely to be useful for a particular pair of objects.
The Alpha and Erase blending modes deserve special attention because they’re designed especially for masking. The masking feature in Flash (see #41) is limited to masks with hard edges, but the Alpha and Erase blending modes allow you to make masks with soft edges.
The symbol names here are just suggestions; you can call them whatever you want.
1. Create a movie-clip symbol containing anything at all—for example, animation, a drawing, a bitmap, or text. This is the content that’s going to be masked, so name the symbol m_masked.
2. Drag an instance of m_masked from the Library to the Stage.
3. Select the instance of m_masked and choose Modify > Convert to Symbol. (Obviously m_masked is already a symbol, but this step nests the instance inside a new symbol.) In the Convert to Symbol dialog box, click the Movie Clip radio button, name the symbol m_sandwich, and click OK.
4. Double-click m_sandwich in the Library to put it into editing mode. The symbol’s Timeline should have one layer and one keyframe containing an instance of m_masked. Lock the layer.
5. Add a new layer above the existing layer on m_sandwich’s Timeline. Flash inserts a blank keyframe.
6. With the blank keyframe selected, use the Rectangle tool to make a rectangle slightly larger than the content in m_masked. Fill the rectangle with the standard black-and-white radial gradient (the one that appears on all of the color menus in Flash). The filled rectangle will cover up the instance of m_masked, but that’s okay.
7. Select the rectangle’s fill. The radial gradient is now available for editing in the Color panel.
8. Click the white color tab on the gradient slider in the Color panel.
9. Just above the gradient slider is an Alpha control set to 100 percent. Use the slider or type in a value to bring Alpha down to 0 percent.
10. Deselect the rectangle on the Stage. You can now see m_masked through the transparent portion of the gradient.
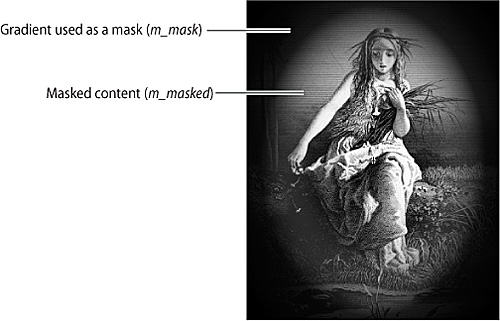
11. Using the gradient slider and/or the Gradient Transform tool, modify the gradient so that it neatly frames m_masked (Figure 49c).
Figure 49c. The movie clip m_mask, on the top layer, frames the content in m_masked, on the bottom layer.
12. Deselect the rectangle on the Stage. You can now see m_masked through the white portion of the gradient.
13. Reselect the rectangle and choose Modify > Convert to Symbol to convert it to a movie clip. Name the movie clip m_mask.
14. The rectangle (now an instance of m_mask) should still be selected. From the Blend menu in the Property inspector, choose Erase.
The mask disappears temporarily, but that’s OK. The Erase blending mode has invisibly “erased” the areas of m_masked that are covered by the more opaque portions of the mask.
15. Click Scene 1 on the breadcrumb trail to return to the main Timeline. The instance of m_sandwich should still be on the Stage.
16. Select the instance of m_sandwich if it’s not already selected. From the Blend menu in the Property inspector, choose Layer.
The content of m_masked is now framed by a soft-edged mask. If you wish, you can put some sort of background behind it to complete the effect (Figure 49d).
Figure 49d. A cloud-filled background completes the effect. The Layer blending mode applied to m_sandwich allows the background to show through.