
Chapter Seven. Working with Sound
Animation and sound go together like pie and ice cream. No matter how appealing your animation is, it won’t engage your audience nearly as well unless you back it up with appropriate music and add some well-chosen sound effects.
Flash can’t create or record sound, and its sound-editing ability is minimal. If you want to add music or other sounds to a Flash movie, you either have to record it yourself or use prerecorded sounds from CDs or the Web. Either way, you’ll almost always want to use a sound-editing program to adjust the length, volume, and quality of the sound. The cost of sound-editing software ranges from free (Audacity, an open-source program downloadable from www.sourceforge.net) to thousands of dollars (Digidesign’s Pro Tools, the choice of most audio professionals). A good intermediate choice is Adobe Soundbooth, a new member of the Creative Suite that can export files compatible with ActionScript.
Once you’ve imported your sound files, Flash takes care of the rest. You can play multiple audio tracks at once, synchronize sound to animation in a variety of ways, and even apply effects such as fades and pans. Best of all, you can do these things using the techniques you’re already familiar with: inserting keyframes, setting compression levels, and using the Property inspector to modify instances.
Importing Audio Files
To import a sound file, choose File > Import > Import to Library, navigate to the file you want to import, and click Open (Windows) or Import to Library (Mac). There are no options and no dialog boxes; the file appears immediately in the Library. If you select the filename in the Library, you see a visual representation of the sound—called a waveform—in the viewing pane (Figure 58a). To hear the sound, click the Play button above the waveform.
Figure 58a. Because this is a stereo sound file, two waveforms display in the Library’s viewing pane. For a mono sound, only one waveform would appear.

Choosing Import to Stage instead of Import to Library makes no difference. Either way, the audio file is imported to the Library. (Since a sound isn’t visible, it can’t appear on the Stage.)
On its own, Flash can import only three audio file formats: WAV (Windows), AIFF (Mac), and MP3 (both platforms). If your computer has QuickTime installed, Flash can import WAV and AIFF on both platforms, along with a few other specialized formats such as Sun AU.
Of the audio formats that Flash imports, only MP3 is compressed: It uses a combination of lossless and “lossy” compression (see #55) to squeeze high-quality audio into a relatively small file. If a particular sound is available in a variety of formats, it’s generally best to import one of the uncompressed formats (such as WAV or AIFF) because for uncompressed sounds, Flash does its own compression when it generates a SWF file. If a sound is already compressed, Flash leaves it alone. The compression that Flash performs is usually preferable because it’s optimized for Flash Player.
Like bitmaps, sounds add considerably to the size of the SWF file. Although the sound compression in Flash works well, it’s even more effective if you have a smaller file to begin with. Here are suggestions for using your sound-editing software to prepare files for Flash:
• Convert stereo sounds to mono. Because it contains two audio channels, a stereo file is twice the size of an equivalent mono file.
• Downsample your sounds to the lowest acceptable sampling rate. Music usually doesn’t sound good at rates below 22 kHz, but sound effects can often be brought down to 11 kHz with adequate quality.
• Save your sounds at a lower bit rate. You’ll probably want a 16-bit file for most music, but 8 bits is usually sufficient for speech and sound effects.
• Edit out unneeded parts of sound files. If you’re experienced at sound editing, you may be able to extract part of an instrumental track and edit it to loop seamlessly, which gives you a much smaller file than using the whole track—and most of your audience won’t notice. At least trim off the few seconds of silence at the beginning and end of many music tracks.
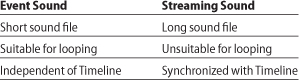
Comparing Event Sounds with Streaming Sounds
Flash divides sounds into event sounds and streaming sounds. The difference isn’t inherent in the sounds themselves; you can use any sound file either as an event sound or a streaming sound. The difference is in how Flash Player handles them when it plays a SWF file.
When you open a Flash movie in a Web browser, Flash Player streams the movie: It downloads just enough of the SWF file to begin playing it, and then continues to download the file while the movie plays. All the elements of the movie—paths, bitmaps, text, sounds, video, and so on—download in the order they appear in the Timeline.
Because sounds tend to have large file sizes, they’re sometimes not fully downloaded by the time the playhead reaches them in the Timeline. Event sounds and streaming sounds behave differently in this situation.
If an event sound is still downloading at the time it’s needed in the movie, the movie pauses to let the download continue and then resumes when the sound file has downloaded completely. If a streaming sound isn’t fully downloaded, it begins to play and continues to download behind the scenes, just as the full SWF file does. Therefore, a general rule is that short, fast-downloading sound files work better as event sounds, while longer sound files work better as streaming sounds.
An exception to that rule applies to looping sounds. Any sound that’s intended to loop—that is, to play multiple times in a row—should be designated as an event sound regardless of how long or short it is. That’s because no matter how many times it plays in a movie, an event sound downloads only once. If you were to loop a streaming sound, the sound would have to download anew each time it repeats, seriously wasting bandwidth.
A final difference is the way the sounds behave in the Timeline. An event sound works like a movie clip: Once it begins to play, it continues until it’s explicitly stopped, even if the SWF file ends in the meantime. A streaming sound works more like a graphic symbol: It plays in synchronization with the Timeline. When the SWF file ends, a streaming sound ends too.
Because they’re in frame-by-frame lockstep with the Timeline, streaming sounds are suitable for situations where exact synchronization between animation and sound is important—for example, in scenes with lip-synced dialog, or when the animated action has to match the precise beat of a music track.
Table 7.1 sums up the criteria for deciding whether a sound file should be treated as an event sound or a streaming sound:
Some of these criteria may contradict each other. For example, if a sound file is long but intended to loop, should it be an event sound or a streaming sound? How about if it needs to loop, but also to be in sync with the Timeline?
There’s no right answer in situations like these. Test the movie both ways and see which way it performs better. You can easily switch a sound from event to streaming and back again with no impact on the rest of the movie.
Putting Sounds in the Timeline
Once you’ve imported a sound file to the Library, follow these steps to put it in your movie:
1. Create a new layer for the sound in the Timeline. Although this isn’t strictly necessary—technically, a sound can share a layer with animation—putting each sound on its own layer is preferable.
2. Insert a keyframe where you want the sound to begin.
3. With the new keyframe selected, either:
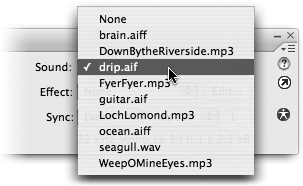
• Choose the name of the sound file from the Sound menu in the Property inspector (Figure 60a).
Figure 60a. The Sound menu lists all the sound files that are in the Library. Choose one to place that sound in the selected keyframe.
or
• Drag an instance of the sound file from the Library onto the Stage. The sound can’t be seen on the Stage, but it does appear in the Timeline.
In either case, the sound’s waveform appears in the layer, beginning in the designated keyframe (Figure 60b).
Figure 60b. This Timeline shows sounds beginning at frames 1 and 37. (It’s fine to have two sounds on the same layer, as long as they’re sequential.)

When you attach a sound to a blank keyframe, the circle in the keyframe remains white. A black circle indicates the presence of objects on the Stage, not the presence of sound.
4. With the keyframe still selected, choose either Event (to make the sound an event sound) or Stream (to make it a streaming sound) from the Sync menu in the Property inspector.
The other two options on the Sync menu, Stop and Start, are explained in step 7 and in #61, respectively.
5. To add an effect to the sound, such as a fade or a pan from one channel to the other, choose the effect you want from the Effect menu just above the Sync menu.
6. For event sounds only: If you want the sound to repeat a fixed number of times, choose Repeat from the menu to the right of the Sync menu, then enter the desired number of repeats in the next field to the right. (The default setting, Repeat 1 just plays the sound once.)
If you want the sound to loop endlessly, choose Loop instead of Repeat.
7. If you want the sound to end at a particular frame, select that frame in the Timeline and choose Insert > Timeline > Blank Keyframe (or press F7).
That’s sufficient to end a streaming sound, but an event sound requires an extra step: With the new blank keyframe still selected, choose Stop from the Sync menu in the Property inspector. Doing so explicitly stops the sound, which—since it’s independent of the Timeline—would otherwise continue to play regardless of how many frames are assigned to it.
Managing Looping Sounds
As you’ll remember from #35, the default behavior of a SWF file is to loop. If you have a looping sound within a looping SWF file, the result can be chaotic.
Consider, for example, the Timeline shown in Figure 61a. Assume that the waveform represents a 15-frame-long event sound that’s set to loop. Here’s what happens when you play the movie’s SWF file:
Figure 61a. The sound that begins in frame 6 is a looping event sound that’s 15 frames long.

1. At frame 1, the animation begins.
2. At frame 6, the sound begins. Because it’s an event sound and therefore independent of the Timeline, it will loop continuously unless something stops it.
3. At frame 21, the sound repeats.
4. At frame 22, the animation ends. The movie loops back and plays again from frame 1.
5. At frame 6, the sound begins. However, the sound that began at frame 21 during the first run of the movie is still playing. There are now two instances of the sound playing at the same time.
From here on, every time the movie repeats, a new instance of the sound is added to the others that are already looping, with their start times staggered by seven frames. The result is an endless (and unbearable) stack of sound upon sound.
The way to avoid this problem is to use a special type of event sound called a start sound. Before it begins to play, a start sound checks whether any other instances of the same sound are already playing. If so, it stays silent.
To convert a sound to a start sound, select the keyframe in which the sound begins and choose Start from the Sync menu in the Property inspector.
For this example, let’s imagine that the sound beginning in frame 6 is now a start sound. When we play the movie, steps 1 through 4 are the same as before. However, in step 5, the start sound detects that another instance is already playing, and so it doesn’t play. The result is a single looping sound rather than cacophony.
Synchronizing Sound to Animation
By default, Flash Player plays every frame of a SWF file, no matter how long it takes. Because some frames take longer to download, or make extra demands on the computer’s processor, Flash movies often don’t play at a steady rate.
The speed variations in a movie’s playback are usually too subtle to notice. The addition of sound, however, adds an extra challenge. Sound—and music in particular—demands a fixed, steady playback speed. Speedups, slowdowns, and gaps are unacceptable. For this reason, one of Flash Player’s top priorities is to make sure that sound plays back smoothly and without interruption, regardless of what’s happening on the Stage.
This policy has different consequences for event sounds than for streaming sounds. While an event sound plays back at a steady rate, the visual portion of the movie continues to speed up and slow down according to the demands of each frame. As a result, an event sound and the rest of the Timeline line up only at one point: the keyframe in which the sound begins to play. After that, the sound and the action may drift apart fairly quickly.
For this reason, event sounds are best used in situations where extended synchronization isn’t needed. In the case of a car collision, for example, it’s important that the crash sound starts at the same moment as the impact shown on the Stage, but after that, it doesn’t matter how precisely the sounds of buckling metal and shattering glass match the animation.
When playing back streaming sounds, however, Flash Player uses a different strategy. A streaming sound is locked to the Timeline frame by frame, so that, for example, a character’s speech and mouth movements are synchronized; it wouldn’t be acceptable for the character’s mouth to be ending one sentence while the voice has gone on to the next. Since sound playback takes priority, Flash skips animation frames wherever necessary to keep the sound and the action in sync. The price for precise synchronization is occasional jumps in the animation.
Because of these differences, syncing with event sounds and with streaming sounds demands different strategies on your part. When you’re working with event sounds, the best approach is to do the animation first and add the sound later. You can scrub through the movie and see exactly where a rock hits the water, then insert a keyframe at that point to trigger the sound of the splash.
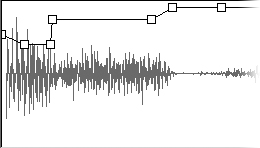
When you’re working with streaming sounds, it’s often preferable to create the soundtrack first and then create animation to match it. For example, if you want a character’s dance movements to match the rhythm of a piece of music, put the music in the Timeline first. By looking at the waveform, you can see where each beat of the music falls (Figure 62a). You can then pace the animation so that the keyframes for each movement coincide with the musical beats.
Figure 62a. Once you find the steady rhythm in the waveform for a piece of music, you can insert keyframes in another layer to match the animation to the beat.

Setting Sound Properties
As with bitmaps (see #55), Flash allows you to set properties individually for each sound file you import. There’s no need to do this for every sound file, however; Flash pays attention to a sound file’s properties only if it’s used as an event sound. For streaming sounds, Flash uses the global sound settings in Publish Settings (see #77).
To open the Sound Properties dialog box, select a sound file in the Library and either double-click its icon or click the Properties icon at the bottom of the Library panel (Figure 63a).
Figure 63a. Most of the elements in the Sound Properties dialog box are similar to those in the Bitmap Properties dialog box.
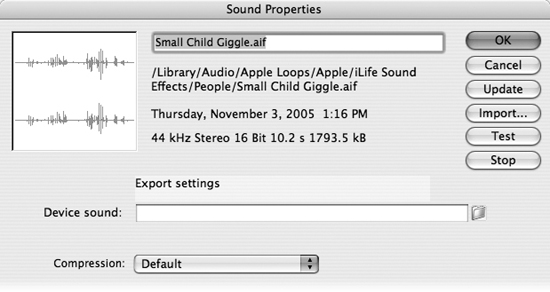
The first option in the dialog box, “Device sound,” applies only to mobile devices using the Flash Lite player (a stripped-down version of the standard Flash Player). If you’re creating Flash movies to be viewed on traditional computers, you can ignore this field.
The second option, Compression, is more important. This menu determines how Flash will compress the sound for inclusion in the movie’s SWF file. The menu choices are:
• Default. This choice tells Flash to apply the global compression settings in Publish Settings. (If the sound file is used only as a streaming sound, Flash will do that anyway.) Since event sounds should be as small as possible for quick download, you’ll usually want to apply more than the default amount of compression to them.
• ADPCM. This is an old-style form of compression that’s included mainly for compatibility with early versions of Flash Player. It’s sometimes effective for very short sounds, but in most other cases, MP3 compression yields better results.
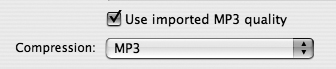
• MP3. Whether you’re compressing sound effects, music, or speech, MP3 will almost always give you the highest quality with the lowest file size. If you choose MP3 compression for a file that’s already in MP3 format, a check box labeled “Use imported MP3 quality” appears above the menu (Figure 63b). Deselecting the check box allows Flash to recompress the file, which may result in reduced sound quality.
Figure 63b. This check box appears only if MP3 is selected in the Compression menu, and only for a sound file that’s already in MP3 format.
• Raw. This means no compression at all. If file size isn’t important in your movie—if it’s an animated cartoon that will go on a DVD, for example—uncompressed sound will give you the best quality. But if you’re creating movies for the Web, Raw is not practical.
• Speech. Like ADPCM, this is an old form of compression that’s usually inferior to MP3. Use it only for movies that need to be compatible with Flash Player version 3 or earlier.
Choosing any of these menu items causes additional settings to display at the bottom of the dialog box. Since MP3 is the most common choice, we’ll look at those settings, but the explanations here can be applied to other forms of compression as well.
For files that were already in MP3 format when you imported them, the following options appear only if you deselect the “Use imported MP3 quality” check box.
• Preprocessing. The “Convert stereo to mono” check box is selected by default, but it can be deselected for bit rates of 20 kbps (kilobits per second) or more. Use stereo sound only when necessary; as mentioned in #58, it can double the size of the SWF file.
• Bit rate. This setting is different from the bit-rate setting in most sound-editing programs, which determines how much information is used to describe each sound sample. In Flash, bit rate refers to how many kilobits (1,000 bits) of sound information that Flash Player has to process each second. Higher bit rates yield higher sound quality, but they also yield larger SWF files and possibly reduced performance. The default of 16 kbps is usually the lowest bit rate that’s acceptable for music.
• Quality. A setting of Fast reduces processing time at the expense of sound quality; Best does the opposite; and Medium compromises between the two. In most cases, the Quality setting doesn’t matter very much; the difference in processing time generally isn’t noticeable, and neither is the difference in quality.
At any time, you can click the Test button to play your sound with the current compression settings. The text at the bottom of the dialog box will tell you the predicted file size and the degree of compression. As with bitmaps, you have to use trial and error to find the best trade-off between file size and quality.
Editing Sounds
It’s highly recommended that you edit your sound files in a real sound-editing program before you import them to Flash. However, Flash does offer some elementary tools for modifying sounds. To get to them, select a keyframe that contains a sound in the Timeline, then click the Edit button in the Property inspector, located to the right of the Effects button.
There’s no way to edit a sound file globally in Flash; you can edit only instances of sounds in the Timeline. Editing one instance has no effect on the others.
An Edit Envelope dialog box appears, revealing the sound-editing controls (Figure 64a). The dialog box is accurately labeled Edit Envelope rather than Edit Sound because you can’t change the content of the sound file; all you can do is change the size and shape of the metaphorical container that holds it.
Figure 64a. The Edit Envelope dialog box offers the basic controls that you’d find in any sound-editing program.

The dialog box displays the sound’s waveform in two panes: The upper pane represents the computer’s left sound channel; the lower pane represents the right channel. If the sound is stereo, the waveforms in the two panes are different; if it’s mono, they’re the same.
A time scale runs between the two panes. By clicking either of the two icons at the lower-right corner of the dialog box, you can control whether the scale displays seconds or frames. To trim unwanted material at the beginning or end of the sound, slide the Time In and Time Out markers along the scale.
The portions of the sound that you cut out with the Time In and Time Out markers will be excluded from the SWF file. Trimming your sounds down to what’s absolutely necessary is one of the best ways to reduce a movie’s file size.
The horizontal black line above each waveform is called the envelope line; it controls the volume of the sound. You can reduce the overall volume by using the handles to drag each envelope line downward. To adjust the volume differently for different parts of the waveform, click anywhere along either of the envelope lines to create new handles (Figure 64b). Adding a handle to one line automatically adds a corresponding handle to the other.
Figure 64b. You can smooth out a sound by reducing the volume of the louder portions and boosting the volume of the softer portions.
Some commonly used envelope patterns, such as fading in and fading out, can be chosen from the Effects menu. (It’s identical to the Effects menu in the Property inspector.) Choosing an effect causes the handles and envelope lines to jump to the appropriate positions—but any manual editing that you’ve done will be wiped out in the process. Going in the other direction is fine; you can use an effect as a starting point and then tweak it manually.
Adding Sounds to Buttons
As we discussed in #27, users expect some sort of feedback when they click a button. The feedback can be visual (a change in color, for example), but the addition of a confirming click or a beep is especially satisfying to most users.
To attach a sound to a button:
1. Import an appropriate sound file to the Library. The most effective button sounds are less than half a second in length and have no empty space at the beginning of the sound file.
2. Double-click a button symbol in the Library or on the Stage to place it in editing mode. You’ll see the familiar four-frame timeline (Figure 65a).
Figure 65a. To make a button beep or click, attach an event sound to a keyframe in the Down cell.

3. Click the Insert Layer icon to add a new layer to the timeline.
4. Select the Down cell of the new layer and press F6 or F7 to insert a keyframe.
5. Drag an instance of the button sound to the Stage, or select its name from the Sound menu in the Property inspector.
6. Choose Event from the Sync menu. (A button sound should always be an event sound.)
7. Click Scene 1 in the breadcrumb trail to exit symbol-editing mode.
8. Choose Control > Enable Simple Buttons and test the button.
Although it’s technically possible to attach a sound to the Over state as well, it’s best to avoid doing so (except perhaps as part of a game). Users generally find it annoying to have a button make noise when they roll over it.