
Chapter Eight. Working with Video
Video has become one of the most popular features in Flash. This is partly because of the growth in high-speed access to the Internet—more than 70 percent of active U.S. Internet users now have broadband connections—but it’s also because Flash video is so easy to use. Flash video works identically on any computer that has a recent version of Flash Player. And because Flash video can be controlled by ActionScript, any developer can easily create a custom video player that fits the look and style of a particular Flash movie. It’s no wonder that popular video sites such as YouTube and MySpaceTV use Flash Video (aka FLV) as their delivery format. This chapter gives you the basics of getting video into your Flash movie and making it playable on the Web.
Getting Familiar with Digital Video
To work effectively with video in Flash, it’s helpful to know a few things about digital video in general.
Fundamentally, all digital video is a succession of bitmapped images, each visible for a fraction of a second (Figure 66a). As with animation, the slight changes from one frame of video to the next give the illusion of motion. The differences between video file formats have to do with how the bitmaps are compressed and stored.
Figure 66a. Each frame of digital video is a bitmapped image. Because displaying so many bitmaps so quickly requires a powerful processor and a fast hard drive, it’s only recently that most home computers have become capable of playing full-screen, full-motion video.

The most familiar video formats on the Web are QuickTime (MOV), Windows Media (WMV), and Real Media (RM). Each requires its own player, and although all are cross-platform, QuickTime has closer ties to the Mac, and Windows Media to the PC. Many Web sites make their video content available in multiple formats, because there’s no way to predict which player (or players) a user might have.
Having the right player isn’t necessarily enough. Nearly every video file online uses some sort of compression to keep the file size manageable. There are many different compression schemes, each of which is embodied in a file called a compressor/decompressor—a codec for short. Some codecs are built into the standard video players, but others have to be installed separately. If a video file is created using a certain codec, it can be viewed only with that codec.
To get around these obstacles, Flash introduced its own proprietary video format, Flash Video (FLV). Video files in any other format have to be converted to FLV for Flash to use them (see #67). Unlike QuickTime, which offers a choice of about 20 codecs, FLV uses only two codecs: Sorenson Spark (which requires Flash Player 7 or later) and On2 VP6 (which requires Flash Player 8 or later).
This uniformity allows FLV to come close to being a universal Web video format. Flash Player is installed on nearly all Macs and PCs, and Adobe supports a version for Linux as well. Because the player software is the same, Flash video looks and acts the same way on each platform.
Unlike MOV, WMV, and RM files, each of which can be viewed in its respective player, FLV files can’t be opened directly in Flash Player. An FLV file has to be either embedded in or linked to a SWF file.
Importing Video Files
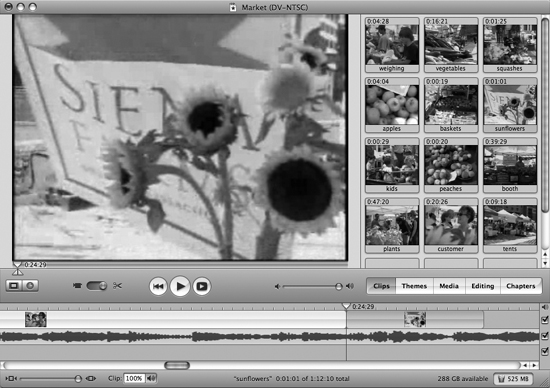
As with audio files, it’s best to edit your video files before importing them into Flash. As you’ll see in #69, Flash does have some rudimentary video-editing features, but you can accomplish much more in a program such as Apple iMovie or Microsoft Windows Movie Maker (Figure 67a).
Figure 67a. Your computer already has video-editing software: iMovie (shown here) on the Mac, or Windows Movie Maker on the PC.
Save your edited video with the least compression allowed by your software and disk space—if possible, with no compression at all. Flash does its own compression when you import the video file, and recompressing already compressed video degrades image quality.
Flash can’t import video on its own; it needs help from other software. On a Mac, you must have QuickTime 7 or later; in Windows, you must have DirectX 9 or later. Because of this dependence, Flash imports different video formats on each platform. On a Mac, it accepts files in AVI, DV, MPEG, and MOV format; on a PC, it accepts files in AVI, MPEG, WMV, and ASF format. If you have QuickTime installed on your PC, Flash will import the Mac file formats as well.
You’re already familiar with the import dialog boxes that Flash uses with certain types of vector and bitmap files. Because video is so much more complex, Flash gives you not just a dialog box, but a whole series of dialog boxes—collectively known as the Video Import wizard—that guide you through importing a video file.
To begin the process, choose File > Import > Import Video. You could also choose Import to Stage or Import to Library; if you select a video file to import, Flash recognizes it and launches the Video Import wizard.
The first screen of the Video Import wizard asks you to locate the file you want to import. Select a file on your computer or a file that you’ve uploaded to your Web server, then click Next (Windows) or Continue (Mac).
That’s the easy part. Since the rest of the Video Import wizard requires more detailed information, the remaining screens will be covered as separate topics.
Choosing a Deployment Method
The second screen of the Video Import wizard asks you how you want to deploy your video. Deploy is an odd word in this context; what the wizard really wants to know is where you plan to put the video file. The options are:
• Progressive download from a Web server. This is the most common choice. Your video remains in a separate file; Flash converts it to FLV format and links it to the SWF file. You upload both files to your Web server. When a user plays your SWF file, Flash Player treats it like a streaming sound: It downloads just enough of the video file to begin playing it and continues to download the file behind the scenes (Figure 68a).
Figure 68a. In the “skinned” version of the video player (see #71), a progress bar indicates how much of a video file has been downloaded.

• Stream from Flash Video Streaming Service; Stream from Flash Media Server. The word streaming can be used loosely to describe files that begin to play while still downloading—we’ve used it that way in this book. Strictly speaking, however, streaming requires two-way communication between the server and the client computer. For true streaming of Flash video, you need Flash Media Server, which monitors the speed of the Internet connection and adjusts the stream’s data rate accordingly; it also responds to commands such as fast forward, rewind, and seek. Large organizations often have their own Flash Media Server, in which case “Stream from Flash Media Server” is the appropriate choice; individuals and organizations who have accounts with a hosted streaming service should choose “Stream from Flash Video Streaming Service.”
• As mobile device video bundled in SWF. This option is for video that’s intended to be played on a mobile device (such as a cell phone) using the Flash Lite player.
• Embed video in SWF and play in timeline. In older versions of Flash, video was stored in the Library, dragged to the Timeline, and played from inside the SWF file, just like bitmaps and sounds. Now that streaming and progressive download are available, this option is not used much, but it’s still a convenient way to handle short video clips.
• Linked QuickTime video for publishing to QuickTime. Not all Flash movies are intended for the Web. Some are animation or special-effects sequences that will be included in a film or video; some are self-contained animated cartoons made for broadcast or distribution on DVD. In those cases, the finished movie is exported to a QuickTime file rather than SWF, and linked video files can be in QuickTime format rather than FLV.
When you’ve made your choice, click Next (Windows) or Continue (Mac).
If you’ve chosen “Embed video in SWF and play in timeline,” the Video Import wizard takes you to the Embedding dialog box, which is covered in #69. If you’ve chosen another option, you can skip to #70, which deals with the Encoding dialog box.
Choosing Embedding Options
Adobe discourages the embedding of video in Flash movies, and for good reasons: Embedded video bloats the SWF file, has to be downloaded in its entirety before it can be played, and frequently has audio synchronization problems. It also demands a lot of memory, and if the user’s computer doesn’t have it, Flash Player may crash. To minimize these problems, Adobe recommends that embedded video be limited to clips less than 10 seconds long.
However, there are also some good reasons to embed video. Embedded video is easy to work with: Each frame of video corresponds to a frame in the Timeline (Figure 69a), allowing you to synchronize events in your movie to the action in the video without using ActionScript (see #70). You don’t have to remember to upload multiple files to your Web server, because everything is contained in a single SWF file. Best of all, Flash offers editing features for embedded video that aren’t available for the other deployment methods.
Figure 69a. When you put your video in the Timeline, you can synchronize animation to it just as you would with a streaming sound (see #62). Unlike streaming sounds, however, embedded video doesn’t stream; it has to be fully downloaded before it can play.

The Embedding screen in the Video Import wizard offers these options:
• Symbol type. If you choose Embedded Video, your imported video is stored in the Library as a video file. You can, however, choose to import the video as a movie clip or graphic symbol. Importing it as a movie clip allows the video to play independently of the main Timeline (see #28). There’s no real advantage to importing it as a graphic symbol.
• Audio track. The default choice is Integrated, which means that the video and its audio track are in a single file. The other option is Separate, which brings in the video and audio as separate items in the Library. Keeping the audio track separate allows you to do cutaways (letting the audio in a scene continue while the video cuts briefly to something else), but it also makes you responsible for keeping the video and audio synchronized.
• Place instance on stage; Expand timeline if needed. When these options are selected (as they are by default), Flash puts the imported video both on the Stage and in the Library. It places the video in a keyframe in the Timeline and inserts enough frames to play the video. If you deselect “Place instance on stage,” the video file is imported only to the Library.
• Embed the entire video. This option is self-explanatory.
• Edit video first. If you choose “Edit video first” and click Next (Windows) or Continue (Mac), you’re taken to a simple editing screen (Figure 69b). You can click the Add icon in the left pane to create differently named clips and give each one its own start and end points, effectively turning one video file into several. Use the In and Out markers to designate the beginning and end of each clip, then click “Update clip” to apply the edits.
Figure 69b. This convenient but little-known “editing studio” is available only for embedded video.

After you’ve made your choices, click Next (Windows) or Continue (Mac) to go to the encoding screen.
Setting Encoding Options
Before Flash can convert your video file to the Flash Video (FLV) format, it needs input from you: for example, which codec you want to use, how much compression you want to apply, and at what frame rate you want the video to play. Applying these settings as the video is converted to FLV format is known as encoding the video. You supply the necessary information on the Encoding screen of the Video Import wizard.
If the file you’re importing is already in FLV format, the Video Import wizard will skip this step.
The easiest way to specify encoding options is to use the Profiles menu (Figure 70a). Each profile is a bundle of video and audio settings designed to fit a particular audience. For example, if your Web site is aimed at frugal families, many of whom have old computers and dial-up connections, you might choose the Flash 7-Modem Quality profile. If your Web site is directed at corporate executives, you might go for the Flash 8-High Quality profile.
Figure 70a. The Profiles menu in the Video Import wizard displays these profiles, each intended for a different audience.

You can modify the settings in any of these profiles by clicking the Video or Audio tab. The settings include:
• Video. You can choose between the Sorensen Spark codec or the On2 VP6 codec. If your video was created with a transparent background, as is possible in Adobe After Effects, you have to use the On2 VP6 codec and check “Encode Alpha Channel” to preserve the transparency.
• Frame rate. For best quality, the encoded video should have the same frame rate as the original video file. (This is the default choice, and is the only choice if you chose “Embed video in SWF” as your deployment option.) To make your video less processor-intensive, you can choose a lower frame rate.
• Quality and Max[imum] data rate. If your intended audience has fast computers and broadband Internet connections, you can choose High; if they are more likely to have dial-up connections, you should choose Low. Medium is a good compromise for general audiences (Figure 70b). Each quality setting puts a different data rate into the “Max data rate” field. If you wish, you can enter your own data rate; doing so changes the Quality setting to Custom.
Figure 70b. A frame of video is shown at low quality (left), medium quality (center), and high quality (right).

• Keyframe placement and Keyframe interval. Keyframe has a different meaning in digital video than it does in animation: It refers to a complete frame of video that’s used as a reference point for temporal compression. (See “Compression Digression” in #66.) The more keyframes you have in your video, the better it will look—but having fewer keyframes reduces the file size. The default is Automatic, which gives Flash permission to decide how many keyframes there should be and where to put them. This is almost always the best option, but you can specify a fixed interval by choosing Custom for “Keyframe placement” and entering a number of frames in “Keyframe interval.”
• Audio. You can’t choose an audio codec; MP3 compression is the only option. You can, however, set a bit rate (see #63).
Although the video encoder that’s built into Flash is easy to use, its features are limited. If you want more options—such as a choice of audio codecs—you can use a third-party program such as Sorensen Squeeze to do your encoding.
The last two tabs in the Encoding dialog box allow you to set cue points and to crop or resize the video. Cue points are invisible markers that you can insert anywhere in the video. You can use ActionScript to assign events to these cue points, so that things can happen on the Stage in sync with the action of the video. Cropping and resizing are self-explanatory, but as previously mentioned, it’s better to do these things in your video-editing program.
When you’re finished with the Encoding dialog box, click Next (Windows) or Continue (Mac).
If you’ve chosen “Embed video in SWF and play in timeline” as your deployment method, you’re at the end of the process. When you click Finish, your video file is imported to the Library, and placed on the Stage and in the Timeline if appropriate.
If you’re using one of the other deployment methods, your next stop is the Skinning screen.
Choosing a Skin for the Video Player
The FLVPlayback component—known informally as the video player—is what displays your video on the Stage. Normally, to use the interface components that come with Flash, you have to write ActionScript (see Chapter 11). In this case, however, no scripting is required; all you have to do is choose a skin for the player.
Skin is a somewhat misleading term. Applying a skin to an object usually means changing its outward appearance only; its functionality remains the same. In this case, however, your choice of skin determines what the player is able to do.
The Video Import wizard’s Skinning screen lets you choose from 34 different skins. They vary by size, type of video controls, and where they’re positioned in relation to the video (Figure 71a). Each skin is itself a Flash movie.
Figure 71a. Each skin is named for what it does. For example, SkinOverPlaySeekStop.swf indicates that the control bar is superimposed over the video rather than placed beneath it, and that the player has Play, Seek, and Stop controls.
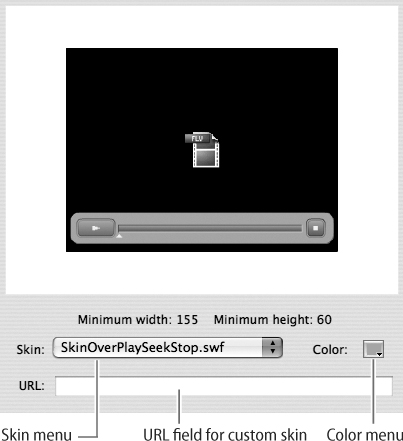
To the right of the Skin menu is a standard Flash color menu from which you can choose a skin color. A preview window lets you see the skin and use its controls, but your video doesn’t appear there, and the controls don’t have any effect.
Some advanced Flash users design their own skins instead of using the ones supplied by Flash. (Designing a custom skin is not a trivial task; it’s not something you should try until you’re very familiar with Flash and ActionScript.) To use a custom skin, enter the URL of its SWF file in the field below the menus.
If you don’t want your movie’s audience to interact with the video, you can choose None from the Skin menu, allowing the video to appear on the Stage as a plain rectangle with no controls.
When you’ve selected a skin, click Next (Windows) or Continue (Mac). You’re taken to a screen that summarizes your encoding decisions. Click Finish, and Flash encodes your video, bringing the import process to an end. In the folder where your FLA file resides, you’ll now find an FLV file containing your video. If you’ve chosen a skin for the video player, the skin’s SWF file is added to the folder when you test or publish the movie. You’ll have to upload both of these new files to your Web server.
Using a Video Clip in Your Movie
After you’ve imported and encoded a video file, you’ll find a new item in the Library: the video file itself, if you’ve embedded the video; or the FLVPlayback component, if you’ve chosen another deployment method. Both of these items work like other “symboloids”: You can drag multiple instances to the Stage or embed them in symbols; you can use the Free Transform tool to scale, rotate, or skew those instances (Figure 72a); you can even motion-tween instances. (Actually, motion-tweening the FLVPlayback component doesn’t work, but if you embed the video player in a movie clip, you can motion-tween an instance of the movie clip.)
Figure 72a. A video instance can play normally even if it’s been scaled, rotated, or skewed.

However, the rule that you learned in childhood applies: Just because you can do something doesn’t mean you should do it.
Watching video—not to mention starting and stopping it—is difficult when the video is rotated, skewed, or moving around the Stage. More important are the technical limitations: Playing back video in a Flash movie puts a big load on the computer’s processor; playing back video that’s been transformed or animated can challenge even a powerful computer. It’s best just to put the video somewhere on the Stage and leave it there.
If you must animate or transform a video instance, you can reduce its demand on the user’s computer by keeping the video’s frame rate low and its dimensions small. Scaling down the video on the Stage doesn’t help; you have to import it already scaled down, using the crop/resize feature on the Encoding tab of the Video Import wizard (see #70).
If you haven’t embedded your video, you can change some characteristics of the video player by using a panel called the Component Inspector. For example, the default behavior of the FLVPlayback component is to start playing the video as soon as an instance of the player appears on the Stage. In some cases, however, you may want the video to remain paused until the user clicks Play. To make that change, select the video player on the Stage and choose Window > Component Inspector. On the Parameters tab of the Component Inspector (Figure 72b), change the value of the “autoPlay” parameter from true to false. But do this only if your video player has a skin with a Play button; otherwise, there’s no way for the user to start the video.
Figure 72b. The Component Inspector displays parameters and values for a selected instance of any component—in this case, the FLVPlayback component.

Some of the parameters in the Component Inspector call for technical expertise, but others are easy to change. For example, use the skin parameter to change the player’s skin; use the skinBackground Color or skinBackgroundAlpha parameter to change the color or opacity of the skin; and use the volume parameter to set the initial volume of the video’s audio track. (To do this, enter a number between 0 and 1, where 0 represents silence and 1 represents full volume.) If you move the FLV file that’s linked to the player, use the source parameter to tell Flash where to find it.
Updating Video Files
Once you’ve encoded your video file as Flash Video, you can’t make any more changes in it. No video-editing program works directly on FLV files—not even Adobe Premiere Pro. If you want to change anything in the video, you have to open the original video file in the editing program of your choice, resave it in its original format, and re-encode it for Flash.
If your movie uses a linked FLV file, you can accomplish this without having to redo anything in your movie:
1. Use the Video Import wizard or an external program, such as QuickTime Pro or the Flash Video Encoder, to convert the revised video file to FLV format.
2. In your movie, select the video player on the Stage and use the source parameter in the Component Inspector to replace the original file with the new one.
or
Outside of Flash, go to the folder where the old FLV file resides and replace it with the new FLV file, making sure to keep the same filename. Flash will use the new file without knowing that anything has changed.
If your movie uses embedded video, the process is slightly different:
1. When you edit the video file, save the revised version to the same folder as the original, and give it the same filename. In other words, overwrite the original. (You’ll probably want to make a backup copy of the original first.)
2. In the Library, double-click your embedded video file to open the Video Properties dialog box (Figure 73a).
Figure 73a. The Update button in the Video Properties dialog box replaces embedded video with a new version, so long as the new version has the same filename as the old one.
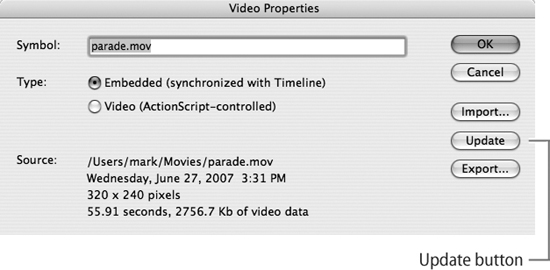
3. Click the Update button in the dialog box. Flash replaces the embedded video with the new version.
Using the Flash Video Encoder
The Flash Video Encoder is a separate application that’s installed on your hard drive when you install Flash. Like the Video Import wizard, the Flash Video Encoder converts files in a variety of formats to FLV. Unlike the Video Import wizard, it can convert multiple files at once, in a process called batch encoding.
To use it:
1. Locate the Flash Video Encoder application—it’s in the same folder as Flash. Double-click its icon to launch the program. (In Windows, you can also launch it from the Start menu.)
The Flash Video Encoder window appears (Figure 74a).
Figure 74a. This is the upper portion of the Flash Video Encoder window.

2. Drag one or more video files into the window’s list area, or click the Add button to navigate to the files that you want to convert.
3. From the list, select one or more files to which you want to apply the same encoding settings. To select multiple files, click the first one and Control-click (Windows) or Command-click (Mac) the additional ones.
4. Click Settings. A Flash Video Encoding Settings dialog box appears, allowing you to choose a profile and/or modify individual settings. (The dialog box is identical to the Encoding screen in the Video Import wizard—see #70.)
5. Click OK to apply the settings to the selected files.
6. Repeat steps 3 through 5 to assign settings to any remaining files. Files to which you don’t assign settings will use the defaults.
7. Click Start Queue. The Flash Video Encoder converts the files one by one, giving you progress reports in the lower portion of the window. As each file is converted, the new FLV file is placed in the same folder as the original.
When the batch is complete, all the files in the list will have green check marks next to them.
8. Files on the list don’t disappear, even when you quit the Flash Video Encoder and open it again. To remove files manually, select them and click Remove.