Chapter Six. Importing Artwork
Flash has a versatile set of drawing tools, but they may not always be enough to meet your needs. Perhaps you’re not very good at drawing from scratch, and you find it helpful to bring in outside images and trace them. Perhaps you prefer the tools in Fireworks or Illustrator and want to create your drawings in those programs. Perhaps you want to use bitmapped images such as photographs or scanned artwork.
These are some of the reasons that Flash lets you import artwork in a variety of vector and bitmap formats. In many cases, you can even modify the artwork in Flash. Thanks to the program’s ever-expanding import capabilities, you can be an animator without drawing a single stroke.
Taking Advantage of Creative Suite Integration
Before you can import artwork, you first have to figure out what you want to import. You may need to sort through hundreds of files on your hard drive, preview them in Photoshop or Illustrator, rate their suitability, and gather together the ones you decide to use.
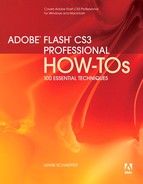
Doing these things has become easier now that Flash is part of Adobe Creative Suite. In the File menu you’ll see a new command called Browse. Choosing this command brings up an attractive, flexible, easy-to-use file manager/viewer (Figure 50a). This new file-management tool, called Bridge, isn’t part of Flash; it’s a separate program that’s accessible from the File menu in nearly every Creative Suite application. Bridge is the glue that ties the suite together.
Figure 50a. This is the default Bridge workspace. Like the Flash workspace, it can be reconfigured in different ways for different purposes.
A separate book could be written just on using Bridge. (In fact, several have been.) Instead of trying to describe everything it can do, we’ll just mention the simplest features—the ones you can use right away:
• You can navigate to any folder on your computer or network and see thumbnails of nearly all the visual content—not just bitmapped images and vector drawings, but even video files and PDFs.
• You can select any of the thumbnails and see what’s inside it without opening the file. A preview panel at the upper-right corner of the Bridge window lets you view artwork and even watch movies and animation. (The viewer doesn’t support FLA files, but it can preview SWF files.)
• A Metadata panel below the viewer gives you information about the selected file, including its name, type, creation date, and size. Depending on the type of file and where it came from, there may be other information as well, such as who took a photo and what kind of camera it was taken with.
• If you find a file that you want to import into Flash, you can drag it from the Bridge window directly onto the Flash Stage. The appropriate Import dialog box appears, just as if you had chosen File > Import from the menu (see #51).
Creative Suite includes another “meta-application” besides Bridge: Version Cue, a workflow manager designed for multiuser environments. It ensures, for example, that if one person is editing a FLA file, nobody else can edit the same file at the same time. Setting up and maintaining a Version Cue server is usually the job of computer professionals, which puts it outside the scope of this book.
When you begin to import files, you’ll see that membership in Creative Suite has given Flash another benefit: Adobe has begun to integrate Flash with Illustrator and Photoshop, making it possible to move artwork from one program to another with minimal loss of information or functionality. (Import options for those programs are covered in #51 and #52.) The eventual goal is to make Flash, Photoshop, Bridge, and the other members of Creative Suite seem as if they’re all parts of a single program.
Importing from Adobe Illustrator
Although the drawing tools in Flash are easy for beginners to learn, many experienced artists and designers prefer to create their vector drawings in Illustrator. Now that Adobe has bundled Flash and Illustrator in the Creative Suite, using the two programs together is easier than it’s ever been.
The usual ways to bring Illustrator artwork into Flash are to copy and paste directly from Illustrator, or to save it in Adobe Illustrator (AI) format and import it into Flash.
Let’s look at the copy-and-paste technique first. You can select individual objects or entire layers from an Illustrator document and choose Edit > Copy to copy the selection to the computer’s clipboard; then switch to Flash and choose Edit > Paste in Place or Edit > Paste in Center. A dialog box appears with the following options:
• Paste as bitmap. This option causes all the copied material to be pasted into Flash as a single bitmapped image. This is the simplest option; it places only one object on the Stage and one item in the Library. However, pasting as a bitmap means losing all the advantages of vector objects—for example, you can no longer reshape paths or select individual anchor points.
• Paste using AI File Importer preferences. This option preserves most of the attributes of the copied artwork. Editable paths and text remain editable; Illustrator symbols become Flash symbols; masks remain masks. You can go to Edit > Preferences (Windows) or Flash > Preferences (Mac) and select AI File Importer to determine how Flash handles specific types of objects—for example, whether text objects are imported as editable text or vector paths.
The remaining two options are available only if you’ve chosen “Paste using AI File Importer preferences.”
• Apply recommended import settings to resolve incompatibilities. This option determines how Flash handles objects with attributes that it doesn’t support, such as Illustrator’s Distort & Transform or 3D effects. If you choose this option, Flash converts these objects as simply as possible to bitmaps or groups of drawing objects. If you don’t choose this option, Flash maintains the editability of the imported objects by converting them to complex, multilayered symbols. Either way, the objects maintain the same appearance that they had in Illustrator (Figure 51a).
Figure 51a. On the left, a simple path in Illustrator with the 3D effect applied. In the center, the same path pasted into Flash using the “Apply recommended import settings...” option; it’s been converted to a bitmap. On the right, the path pasted without using that option; it’s become a group of subgroups nested within more subgroups.

• Maintain layers. If the artwork you’re pasting has multiple layers, choosing this option preserves those layers in Flash. The drawback is that Flash does this by ignoring the layers and keyframes already in the Timeline: No matter what keyframe is selected at the time you paste, Flash creates new layers and pastes the artwork into frame 1. If you don’t choose this option, your pasted artwork comes in on a single layer, but you can paste it into any keyframe on any existing layer.
The other technique is to save your Illustrator artwork as an AI file and import the file into Flash. This technique gives you more control than you get with copying and pasting.
In Flash, choose File > Import > Import to Stage and navigate to the AI file that you want to import. When you click Open (Windows) or Import (Mac), a large Import to Stage dialog box appears.
The left pane shows a hierarchical list of every layer and sublayer in the AI file. Each is accompanied by a check box that indicates whether it will be imported to Flash. All the check boxes are initially selected, but you can deselect them for layers or sublayers that you want to exclude.
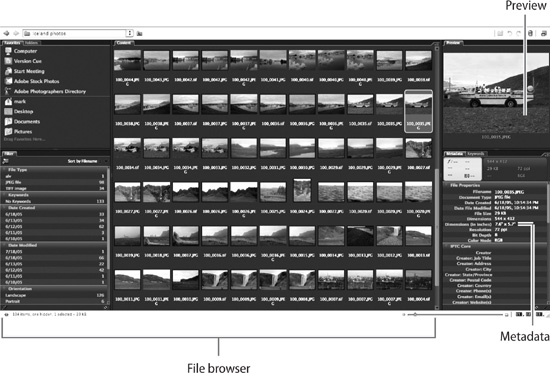
When you click any item in the left pane, the right pane offers a list of possible import options for that item. Each has an option already selected; if you don’t want to look at every item, you can accept those default choices. In most cases, the items you’ll want to look at are those that have a warning icon (an exclamation mark in a yellow triangle) to their right. The icon indicates that the layer or sublayer contains features that Flash doesn’t support (Figure 51b). To see a list of those problem items, click the Incompatibility Report button below the left pane.
Figure 51b. This is the upper portion of the Import to Stage dialog box. An incompatible item is selected in the left pane; the right pane shows the recommended import option.
The bottom area of the dialog box provides a series of options:
• Convert layers to. This menu offers three choices. Two of them, Flash Layers and Single Flash Layer, do the same things as “Maintain layers” in the Paste dialog box. The third choice, Keyframes, converts Illustrator layers to a series of keyframes in a Flash layer.
If you don’t like the drawing tools in Flash, you can do frame-by-frame animation in Illustrator. Draw each frame on a separate layer, then import the AI file to Flash by selecting Keyframes in the “Convert layers to” menu. In Flash, you can refine the animation and add tweens.
• Place objects at original position. This option causes the location of the imported artwork to have the same relationship to the Flash Stage as it had to the Illustrator artboard. (It’s similar to choosing Edit > Paste in Place as opposed to Edit > Paste in Center.)
• Set Stage size to same size as Illustrator artboard. This option is self-explanatory.
• Import unused symbols. Use this option to put all of the symbols from the Illustrator Symbols panel into the Flash Library, regardless of whether they’ve been used on Illustrator’s artboard.
• Import as a single bitmap image. This option is the same as the “Paste as bitmap” option in the Paste dialog box.
Directly below Import to Stage in the Edit > Import submenu is the Import to Library option. It does the same things as Import to Stage, except that it doesn’t place the imported artwork on the Stage or in the Timeline. Instead, it creates a symbol in the Library with the same name as the AI file and puts the imported artwork inside it.
Another way to import an AI file (or any file) is to drag it directly onto the Flash Stage from a folder or your computer’s desktop. The Import to Stage dialog box appears just as if you had chosen File > Import > Import to Stage.
Importing from Adobe Photoshop
Importing Photoshop (PSD) files to Flash used to be a one-step process with no options: Everything in a PSD file was converted to a single-layer bitmap. Now that Flash and Photoshop are Creative Suite members, that’s no longer the case. Although Flash doesn’t edit bitmaps very well, it can identify some of the non-bitmapped elements of a PSD file and keep them editable.
Choose Edit > Preferences (Windows) or Flash > Preferences (Mac) and click the PSD File Importer category. (These preference settings, along with those for the AI File Importer, are new to Flash.) Although the default settings are to import Photoshop files as bitmaps, you’ll see that there are now options to preserve the editability of layer styles, text, and vector paths (Figure 52a).
Figure 52a. If you want to preserve the editability of the non-bitmapped parts of a PSD file, use these preference settings instead of the defaults.

These new import capabilities are not quite as comprehensive as they seem. When Flash refers to “layer styles,” it really means blending modes. Real Photoshop layer styles (such as Drop Shadow and Outer Glow) are flattened into bitmaps when imported to Flash. Even text and vector paths—which normally remain editable after import—are rasterized in Flash if layer styles have been applied to them in Photoshop.
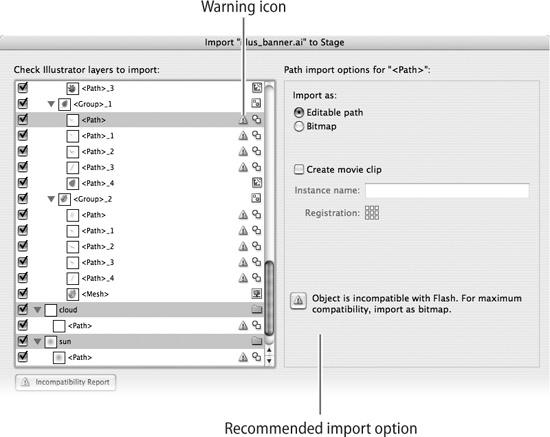
On the positive side, Flash recognizes and preserves Photoshop layers and layer groups (formerly called layer sets). It also preserves transparency in PSD files (Figure 52b).
Figure 52b. Anything that appears against a gray-and-white checkerboard in Photoshop (left) will have a transparent background when imported into Flash (right).
The procedure for importing PSD files is the same as that for importing AI files (see #51). When you choose File > Import > Import to Stage and navigate to a PSD file, Flash opens an Import to Stage dialog box with a list of layers, allowing you to choose an import option for each layer. (These individual import options can override the ones you set in Preferences.)
One significant difference from importing AI files is the ability to merge layers when importing PSD files. In the Import to Stage dialog box, you can select multiple layers by clicking the first layer and Command-clicking (Windows) or Control-clicking (Mac) additional layers. When two or more layers have been selected, a Merge Layers button becomes available below the left pane. Clicking that button causes the selected layers to become dimmed and a specialized layer labeled Merged Bitmap to take their place. If you change your mind, you can select the Merged Bitmap layer and click the Merge Layers button (which is now labeled Separate).
It’s possible to copy and paste from Photoshop directly into Flash, but with severe limitations. Copying and pasting works only with bitmaps, not with vector paths or text. Flash doesn’t recognize transparency, layers, blending modes, or other non-bitmap elements when you copy and paste.
Importing from Adobe Fireworks
Because they’re both former Macromedia products, Flash has a much closer relationship with Fireworks than it has with Illustrator or Photoshop. In many ways, Flash and Fireworks behave as if they’re a single program.
Unlike Photoshop and Illustrator files, Fireworks files can contain multiple frames (for animation) or multiple pages (for Web publishing). Both of these features are preserved in Flash. In fact, copying and pasting from Fireworks to Flash preserves nearly all attributes of the pasted artwork; so does importing a Fireworks PNG file into Flash. In either case, an Import Fireworks Document dialog box with a few simple options appears:
• Import as a single flattened bitmap. Any aspects of the artwork that would otherwise have been editable in Flash—such as layers, text, and vector paths—are reduced to pixels. If the file contains multiple frames or pages, only the first is imported. Choosing this option causes the others in the dialog box to become unavailable.
• Import [Page #]. This option allows you to choose which page of a multipage file you want to import. You can choose a single page or all pages. If you import all pages, each page comes in as a separate movie clip.
• Into. This option lets you specify whether the imported artwork will be placed in the currently selected keyframe or whether Flash will create a new layer for it. This option is similar to the “Maintain layers” option in the Paste AI to Stage dialog box (see #51).
• Objects. This option provides two choices: “ Import as bitmaps to maintain appearance” has the same effect as “Import as a single flattened bitmap” (above), except that layers from the Fireworks file are preserved. “Keep all paths [or text] editable” preserves full editability.
• Text. This option has the same choices as Objects.
If you want to edit imported AI or PSD files, you have to return to Illustrator or Photoshop to edit the artwork there, and then reimport it to Flash. With Fireworks PNG files, that’s not always necessary. Here’s the easiest method for round-trip editing between Flash and Fireworks:
1. Import a Fireworks PNG file to Flash by choosing File > Import > Import to Stage, or by dragging the PNG file icon onto the Stage.
2. In the Import to Stage dialog box, choose “Import as a single flattened bitmap.” This option makes the artwork uneditable in Flash, but that’s OK—you’ll be doing your editing in Fireworks.
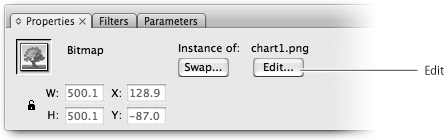
3. When you’re ready to edit the Fireworks artwork, select it on the Stage. An Edit button appears in the Property inspector (Figure 53a).
Figure 53a. When you select a Fireworks bitmap on the Stage, this button appears in the Property inspector.
4. Click the Edit button. Fireworks launches, if it’s not already running. The PNG file corresponding to the imported bitmap opens in Fireworks. (See “Side Trip” for more information about this step.)
Near the top of the Fireworks editing window, you’ll see an Editing from Flash icon and a Done button (Figure 53b).
Figure 53b. This bar appears in the Fireworks editing window when round-trip editing from Flash is in process.

5. Modify the artwork in any way you want, then click the Done button.
Flash comes back to the foreground. Your revised version of the bitmapped artwork has replaced the previous version on the Stage. Behind the scenes, Fireworks automatically saves the revised PNG file.
Importing from Other Sources
Although the Import feature in Flash is geared primarily for Illustrator, Photoshop, and Fireworks, Flash can import several other formats, including:
• DXF. This vector file format is used by AutoCAD and other computer-aided drawing applications. Flash imports DXF files that fit a narrow set of criteria: They must be coded in ASCII rather than binary; they must be 2D rather than 3D; and they must use the AutoCAD 10 file format. Once imported into Flash, DXF files are fully editable.
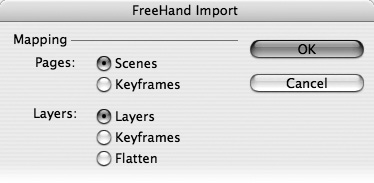
• FH7 through FH11. Although Adobe has stopped developing and marketing FreeHand (which competed with Illustrator), it still includes support for FH files in Flash. When you import an FH file, Flash opens a FreeHand Import dialog box (Figure 54a). All FreeHand features are preserved when the file is imported.
Figure 54a. Although the options in the FreeHand Import dialog box are worded slightly differently, they function almost identically to those in the dialog boxes for AI and Fireworks imports.
• BMP, GIF, JPEG, PNG. Flash imports these common bitmap file formats, but without offering any import options. The Import to Stage dialog box doesn’t appear, and the PSD and AI File Importer preferences don’t apply.
• TIFF, TGA. Flash doesn’t import files in these formats directly, but if QuickTime 4 or later is installed on your computer (as it is on all Macs and many PCs), Flash will use it as a translator for these and a few more obscure formats. You don’t have to do anything special; Flash handles the QuickTime translation behind the scenes.
Setting Bitmap Properties
Bringing a bitmap into Flash is easy, but using the bitmap effectively is more difficult. Unlike vector drawings, bitmaps suffer a loss in quality every time they’re scaled or rotated. In addition, bitmap files tend to contain more information than equivalent vector-based files, which makes them less suitable for animation. Adding bitmaps to a movie can significantly increase the size of the SWF file and put a heavy load on the computer’s processor.
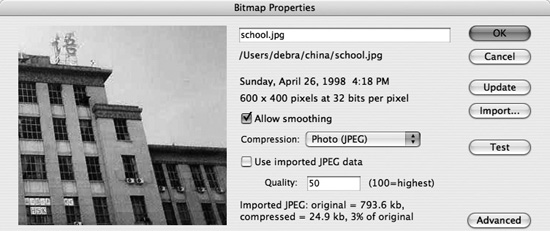
You can minimize these problems by fine-tuning each bitmap’s properties. Select a bitmap in the Library and either double-click its icon or click the Properties icon at the bottom of the Library panel (see #29). Either way, the Bitmap Properties dialog box appears (Figure 55a).
Figure 55a. The Bitmap Properties dialog box is where you change the smoothing setting and compression options for each imported bitmap.
If the bitmap looks rough or ragged when it’s been resized or rotated on the Stage, you can select the “Allow smoothing” check box. Nearly every bitmap—except, perhaps, for very small ones—looks better with smoothing applied. The trade-off is that animating a smoothed bitmap requires more work from the processor than animating an unsmoothed bitmap, so it’s possible that the playback performance of your movie will suffer.
An unwieldy bitmap file size can be dealt with by applying compression. Flash lets you choose between two types: lossless and photo, which is more commonly known as JPEG compression. Lossless compression squeezes the file’s information into a smaller space with no loss in quality. It’s effective on bitmaps that have large areas of flat color, such as diagrams or cartoons. For images that have many colors or gradients, such as paintings or photographs, JPEG compression is more effective. It shrinks the file size by deleting nonessential information.
JPEG compression is the type you’ll probably use most frequently. JPEG offers varying degrees of image quality, on a scale from 0 to 100. As image quality increases, so does file size. Your challenge is to find the ideal quality setting for each bitmap: the point on the scale at which the file size is as small as it can be without a significant sacrifice of image quality. There’s no right or wrong quality level; it’s entirely a matter of judgment.
Here’s how you set the JPEG compression level:
1. In the Bitmap Properties dialog box, choose Photo (JPEG) from the Compression menu.
2. If the imported bitmap has a .jpg or .jpeg file extension, it’s already compressed. If you’re satisfied with the level of compression, skip to step 6. Otherwise, deselect the “Use imported JPEG data” or the “Use document default quality” check box. A Quality field appears with a default setting of 50.
3. Type a different number into the Quality field. Click the Test button to try out the setting.
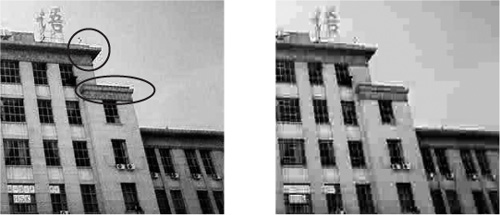
4. Look at the preview pane on the left side of the dialog box to see what effect the quality setting has on the bitmap. If you see blocky or muddy areas, the quality is too low (Figure 55b).
Figure 55b. An optimal level of JPEG compression (left) may include some minor flaws, such as a bit of fuzziness around sharp edges. If you see obvious blockiness or muddiness (right), the compression level is too high.
Look also at the text at the bottom of the dialog box. It shows you the original file size, the compressed file size, and their relationship expressed as a percentage. In most cases, if the compressed file size is more than 5 percent of the original, the quality is too high.
5. Repeat steps 3 and 4 as many times as necessary to find the best balance of quality and file size.
6. Click OK to close the Bitmap Properties dialog box.
Breaking Apart Bitmaps
Flash treats bitmaps much like it does symbols. Once a bitmap is in the Library, you can drag as many instances as you like to the Stage, and you can motion-tween those instances just as you would instances of symbols.
In some cases, you may want to convert bitmaps to symbols. For example, if you want to apply a blending mode to a bitmap, you have to turn it into a movie clip first.
In other cases, however, you may want to do the opposite: Make a bitmap behave more like an editable path than like a symbol. To do this, select the bitmap on the Stage and choose Edit > Break Apart.
Breaking apart a bitmap allows you to do two things to it that you couldn’t do otherwise: You can select portions of the bitmap, and you can turn the bitmap into a fill for a path.
• Selecting. If you’ve used Photoshop or similar programs, you know that you can use a variety of tools to select different portions of a bitmap. The same is possible in Flash, albeit on a more primitive level. You can use the Selection tool to select rectangular areas (Figure 56a), or the Lasso tool to select irregular areas.
Figure 56a. By drawing a marquee with the Selection tool, you can select a rectangular portion of a broken-apart bitmap. (Flash highlights the selected area with a dot screen.)
Flash even has an equivalent to Photoshop’s Magic Wand tool. If you select the Lasso tool and look at the options area at the bottom of the toolbar, you’ll see a Magic Wand icon. Directly below it is the Magic Wand Settings icon, which opens a dialog box in which you can set the wand’s tolerance. The Magic Wand allows you to select contiguous areas of similar color with a single click (Figure 56b).
Figure 56b. Clicking a black pixel with the Magic Wand causes that and all contiguous black pixels to be selected.

Once you’ve selected a portion of a bitmap, you can move, transform, delete, or change the color of the selected area.
• Converting to a fill. If you click a broken-apart bitmap with the Eyedropper tool, a tiny thumbnail of the bitmap appears in the Fill Color control. Any path you create at that point will be filled not with a color or a gradient, but with an instance of the bitmap (Figure 56c).
Figure 56c. The Paintbrush tool, which can make only fills, is being used here to “paint” a new instance of the bitmap.

To scale, rotate, or skew a bitmap fill, or to change its position in relation to the filled object, use the Gradient Transform Tool (see #10).
Autotracing Bitmaps
Given the drawbacks of bitmaps in Flash—large file sizes, poor scalability, and limited editability—it might seem like a good idea to convert your bitmaps to vector drawings. Doing this, however, is not as straightforward as it sounds. In real life, there are no outlines: Photographs typically contain soft-edged shapes, blurriness, noise, and subtle gradations of color.
Originally, the only way to “vectorize” a bitmapped image was to trace it by hand, figuring out where each new outline should go. Since then, some programs have automated the process: The software guesses where the edges are by looking for boundaries between differently colored groups of pixels, then it draws paths along those edges. This process is generally known as autotracing.
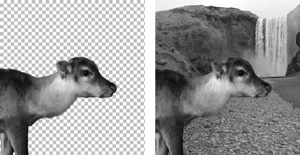
The autotracing feature built into Flash is good, but it’s far from perfect. A bitmapped image—especially a photograph—that’s been converted to vectors never looks like the original image, but more like an Andy Warhol silkscreen (Figure 57a). Still, in some cases, that may be the look you want.
Figure 57a. The original photograph (left) is autotraced with a low color threshold (center) and a high color threshold (right).

To convert a bitmap to a vector drawing, select it on the Stage and choose Modify > Bitmap > Trace Bitmap. A Trace Bitmap dialog box appears, containing four settings for you to specify.
• Color Threshold. This should be a number between 1 and 500. A low number produces an image with lots of color variation and a large file size; a high number produces an image with fewer colors, a posterized appearance, and a smaller file size.
• Minimum Area. This number should be between 1 and 1000. This is the number of pixels that Flash looks at to determine the average color of an area. A low number produces a more detailed image with a large file size; a high number produces a “blobbier” image with a smaller file size.
• Curve Fit. This setting determines how Flash will draw outlines. The tightest fit (Pixels) results in a very precise, detailed image, but the file size may be greater than that of the original bitmap. The loosest fit (Very Smooth) yields an image that looks like it was drawn in a moving car, but its file size is much smaller.
• Corner Threshold. This setting determines the degree to which jagged outlines will be smoothed. Choosing the Many Corners option produces a sharper image with a larger file size; choosing Few Corners produces a softer image with a smaller file size.
As with compression, there’s no hard-and-fast formula for determining the proper settings. Every image is different, and you have to experiment with different combinations of settings to see what works best in each case.
This process of trial and error has become much easier now that a Preview button has been added to the Trace Bitmap dialog box. Each time you change the settings, you can click Preview to see what the autotraced image will look like on the Stage.