Chapter Nine. Publishing and Exporting
Converting a Flash movie into a format suitable for public consumption is called publishing. Effective publishing requires that you know as much as possible about your movie’s likely viewers: What kind of computers are they likely to have? How fast are their Internet connections? What version of Flash Player can you expect them to have? The answers to questions like these help you choose the most appropriate output options for a movie. Those options—called Publish Settings—are stored in the movie’s FLA file.
Flash also has the capacity to convert movies—or single frames—into a variety of file formats through a process called exporting. The advantage of exporting over publishing is that more file formats are available; the disadvantage is that export settings are not saved in the FLA file.
The emphasis of this chapter will be on publishing for the Web, although we’ll also look briefly at other distribution media.
Choosing a Publishing Format
The first step in publishing a movie is deciding how you plan to distribute it. Will the movie be posted on the Web, burned to a DVD, e-mailed, displayed continuously on a public kiosk, or presented to your audience in some other way? Each distribution method requires a suitable file format.
To select a distribution format for your movie, choose File > Publish Settings. In the Publish Settings dialog box, click the Formats tab (if it’s not selected already) and select one or more of the following formats:
• Flash (.swf); HTML (.html). Both of these options are selected by default, because most Flash movies are published for the Web. See #76 for an explanation of how SWF and HTML files work together on a Web site.
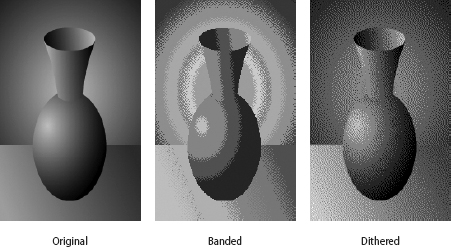
• GIF image (.gif). Before Flash, most animation on the Web was in GIF format. Unlike SWF files, GIF files don’t require a plug-in; any Web browser can play an animated GIF. The drawbacks are that the GIF format doesn’t work very well with photos or gradients (Figure 75a); it doesn’t support sound; and its file sizes are often impractically large because each frame is a separate bitmap. Nevertheless, GIF is still used occasionally for short, simple animations. Flash allows an entire movie to be saved as an animated GIF or a single frame to be saved as a static GIF.
Figure 75a. A GIF file supports only 256 colors. If an object contains more colors than that, it will appear banded when converted to GIF format. You can avoid banding by choosing one of the Dither options, which allow Flash to simulate missing colors by interspersing dots of available colors.
• JPEG image (.jpg); PNG image (.png). For information on these single-image bitmapped formats, see #83.
• Windows projector (.exe); Macintosh projector. These are Flash movies in the form of stand-alone, executable files. For more information, see #81.
• QuickTime with Flash track (.mov). This special type of QuickTime file is covered in #82.
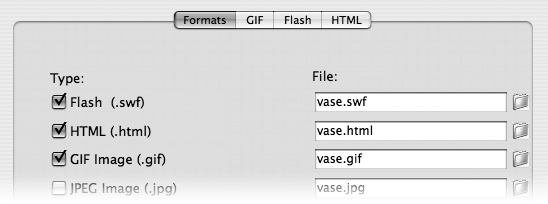
Each format has options that you can set by clicking the appropriate tab at the top of the Publish Settings dialog box (Figure 75b). We’ll cover options for SWF and HTML files; you can learn about the others from the Flash Help system.
Figure 75b. The leftmost tab in Publish Settings is always Formats. The remaining tabs vary according to which file formats you’ve selected.
By default, published files are saved in the same folder as the FLA file they’re generated from. To specify a different name or location for a file, use the File field to the right of each format in Publish Settings.
Linking SWF Files to HTML Files
Standard Web pages are coded in HTML, which can be created in a text-editing program, because HTML consists of plain text. Elements such as graphics, video, and Flash movies aren’t part of the HTML file; they’re uploaded separately to the Web server. The HTML code includes pointers to those external files that tell the browser where and how to display them on the page.
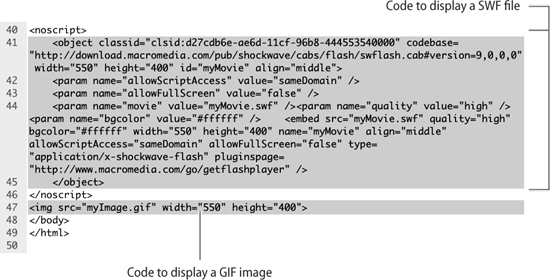
When you publish a SWF file, Flash creates an HTML file containing the code needed to display the Flash movie in a browser. The exact content of this file depends on the HTML options you choose in Publish Settings (see #78). Even at the default settings, the code isn’t trivial: Although a still image can be placed on a page with a single HTML tag, a SWF movie requires a paragraph’s worth of HTML to play reliably (Figure 76a).
Figure 76a. This HTML file illustrates the complexity of the code needed to display a Flash movie as compared to a still image.
The Web page created by the Flash HTML file is a bare-bones affair: All it does is show your movie against a solid-color background. If you want other content to appear on the Web page, you have three options:
• Add more HTML code to the file that Flash created, either by hand or by using the Web-page editing program of your choice.
• Copy the necessary code from the Flash HTML file and paste it into another Web page that has the content you want. (This option requires some familiarity with HTML.)
• If you have Dreamweaver, use it to create your Web page. When you import the SWF file, Dreamweaver automatically inserts the HTML code to play it, making the Flash HTML file unnecessary.
Adjusting the Flash Publish Settings
If you’ve chosen Flash and HTML as your file formats in Publish Settings, you’ll see a tab for each file type at the top of the dialog box. Clicking the tabs allows you to set options for both files: The HTML options will be covered in #78; the Flash options are covered here. In both cases, we’ll look only at the most significant options; you can read about the others in the Help panel.
• Version. Each time Flash Player has been updated, it’s taken a while for the new version to catch on. To make your movie available to the largest possible audience, you may want to publish a SWF file that’s compatible with earlier versions of the player. The Version menu lets you choose how far back that compatibility will go. The catch is that earlier versions of the player don’t support the features in later versions of Flash—for example, if your movie uses the blending modes introduced in Flash 8, those effects will disappear if you publish your movie in Flash 7 format.
It’s best to set a target Flash Player version before you start building your movie. If you try to use a feature that isn’t supported in that version, Flash gives you a warning (Figure 77a). However, if you go back to the Version menu and choose an earlier version of the Player after you’ve begun to develop your movie, unsupported features will disappear with no warning.
Figure 77a. An alert box appears if you try to use a feature that isn’t supported by the version of Flash Player that you’ve targeted.

• Load order. If a movie downloads slowly to a user’s computer, this menu lets you decide in what order the layers in the Timeline will appear on the Stage. If you choose “Bottom up,” the background layers load first; if you choose “Top down,” the foreground layers load first. Your choice matters only if you expect members of your audience to have dial-up connections.
• ActionScript version. You can choose ActionScript 1.0, 2.0, or 3.0 (see #84). Early versions of the player may not support higher levels of ActionScript. ActionScript 3.0, the latest version, works in Flash Player 9 only.
• Options. Under most circumstances, you’ll want to select these two options if the player version you’ve targeted supports them: “Protect from Import” stops other Flash users from importing your SWF file and using your work without permission; “Compress movie” uses lossless compression to reduce the size of the SWF file. Several of the other options that relate to debugging ActionScript will be covered in #94.
• JPEG quality. This slider sets default image compression quality for the movie. It doesn’t override the individual settings that you made under Bitmap Properties (see #55).
• Audio stream. These settings are similar to those you set for event sounds in #63, but they apply to all the streaming sounds in the movie.
• Audio event. These settings apply to event sounds that you didn’t set compression rates for in Sound Properties. If you select “Override sound settings,” they’ll apply to all event sounds, regardless of whether you set their compression rates individually.
Adjusting the HTML Settings
Most of the settings that affect your Flash movie’s appearance are contained not in the SWF file, but in the HTML file to which the SWF file is linked (see #76). Some of these settings—particularly those involving dimensions, alignment, and scale—interact in unintuitive ways.
The HTML settings are:
• Template. This menu allows you to choose the underlying HTML code that Flash will modify according to your settings. The default template, “Flash only,” displays your Flash movie on an empty Web page, as described in #76. Most of the other templates offer minor variations for special situations.
• Dimensions. This menu allows you to specify the dimensions of the rectangular frame in which your movie is displayed in the Web browser window. (Flash refers to this as a window, but we’ll call it a frame to distinguish it from the browser window.) The default choice is Match Movie, which means that the frame will be the same size as your movie. The other choices are Pixels, which allows you to specify exact dimensions for the frame, and Percent, which allows you to specify the frame size as a percentage of the size of the browser window, so it resizes along with the browser window.
Note that these settings apply to the frame, not to the movie itself. Keeping that distinction in mind will make the alignment and scale settings easier to understand.
• Playback. These options control the behavior of your movie rather than its appearance. For example, the Loop option is selected by default, and you can deselect it if you want the movie to play once and stop. However, the “Loop” and “Paused at start” options are controlled much more reliably by ActionScript than by HTML. (One reason is that ActionScript commands continue to work if the SWF file is separated from the HTML file.) The “Display menu” option determines whether the user can right-click the movie to see a contextual menu, but the menu doesn’t allow the user to do much besides zoom in and out.
• Quality. These settings control the trade-off between playback speed and image quality. The lower settings favor faster playback; the higher settings sacrifice playback speed in favor of better appearance. The default choice, High, is suitable in most situations, but the most appropriate setting will depend on the content of your movie and on the computers used by your target audience.
• Window Mode. Choosing Transparent Windowless from this menu causes the background of the Stage to become transparent, allowing other content on the HTML page (such as a background pattern) to show through. Because this feature doesn’t work reliably in all browsers, most Flash developers stay with the default choice, Window, which leaves the movie’s background opaque.
• HTML Alignment. This menu determines how the frame in which the movie appears is positioned in relation to the other content on the Web page.
• Scale. This menu works with the Dimensions options. It controls how the movie adapts to frame dimensions that are different from the size of the original movie (Figure 78a). “Show all” and “No border” both assure that the movie always maintains its original aspect ratio (width to height). If the aspect ratio of the frame is different from that of the movie, “Show all” adapts by using letterbox-type borders, while “No border” crops part of the movie. In contrast, “Exact fit” causes the movie to adopt the aspect ratio of the frame, even if this distorts the image. The “No scale” setting is similar to “No border,” but it keeps the movie from scaling even if the size of the frame changes dynamically.
Figure 78a. The Scale settings determine how a movie adapts to a frame whose dimensions are different from those of the movie.
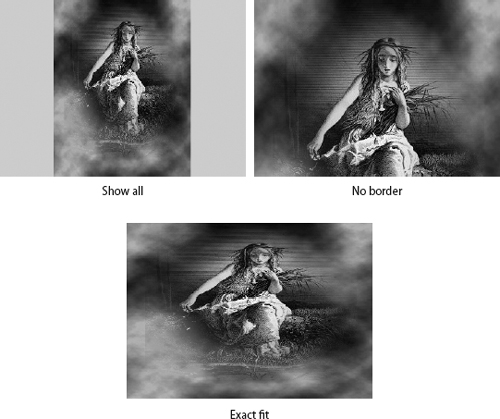
• Flash Alignment. This setting comes into play if the dimensions of the frame are smaller than those of the movie and Scale is set to “No border” or “No scale,” causing the movie to be cropped. Flash Alignment determines which area of the movie remains visible. For example, in the “No border” illustration in Figure 78a, Flash Alignment is set to Top Left.
Previewing and Publishing a Movie
Once you’ve adjusted the Publish Settings, you can publish your movie by clicking the Publish button at the bottom of the Publish Settings dialog box. Alternatively, you can click OK to store the settings in the FLA file, then publish the movie later by choosing File > Publish.
Flash has a Publish Preview feature, but its name is misleading: It might more accurately be called Publish Postview. There’s no way to see what your published movie is going to look like without actually publishing it. When you choose File > Publish Preview and pick a file type (Figure 79a), Flash responds in the same way as it would to File > Publish—that is, it publishes the movie—but then it goes one step further: It opens the published file in a suitable application so you can look at it. If you’ve published an HTML file, Flash loads it into your default browser; if you’ve published a QuickTime file, Flash opens it in QuickTime Player. If you don’t like what you see, you can modify the movie or the parameters in the Publish Settings dialog and publish it again; the new files will overwrite the old ones.
Figure 79a. The choices available in the Publish Preview submenu depend on which file formats you’ve selected in Publish Settings.

By default, published files are saved to the same folder as the original FLA file. Assuming you’ve published your movie for the Web, you’ll end up with at least two new files (SWF and HTML), but you may find a third file as well: a JavaScript file called AC_RunActiveContent.js. (For information on this file, see the sidebar “Active Discontent.”) In addition, if your movie includes imported video, there may already be two files in the folder: an FLV file containing the video, and a SWF file containing the skin you selected for the video player (see #71). All of these files—except, of course, the FLA file—have to be uploaded to your Web server for the movie to work properly.
Using Flash Detection
Ever since Flash came into being, its developers have grappled with the problem of how to handle users who don’t have the latest version of Flash Player or who don’t have the player at all. What happens when such a user comes to a Web site with Flash content?
Early versions of Flash left this problem to the individual user; later versions experimented with various ways to detect the existence and version number of the player. No form of Flash detection turned out to be foolproof. The latest implementation of Flash detection in CS3 still isn’t foolproof—for example, it works only with Flash Player 4 and later—but it’s much more reliable than earlier attempts.
To implement Flash detection:
1. In Publish Settings, select SWF and HTML as your file formats.
2. Click the Flash tab and choose the version of Flash Player that you targeted (see #77).
3. Click the HTML tab and choose a template.
4. Directly below the Template menu, select the Detect Flash Version check box.
5. In the Version field underneath, fill in the version of Flash Player that you’re targeting. (The minor revision numbers are optional.)
6. Publish the movie. You’ll get a SWF file, an HTML file, and an AC_RunActiveContent.js file as usual.
7. Open the HTML file in a text editor or Web-editing program, and scroll down to the line that says var alternateContent = 'Alternate HTML content should be placed here.'(Figure 80a).
Figure 80a. The alternate content is highlighted in this view of the published HTML code.
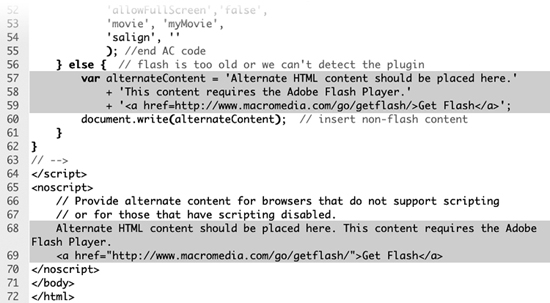
There are three lines of text, each enclosed in single quotation marks and joined to the others by a plus sign. These lines of text are what will be seen by a user who has the wrong version of Flash Player, or doesn’t have the player at all. By default, the text provides a link for downloading the latest version of the player, but you can substitute whatever content you want. (You can add more lines if you’re careful to follow the same syntax.)
8. Scroll down further, until you get to the line that says // Provide alternate content for browsers that do not support scripting.
Below that comment, there’s another copy of the alternate content that you saw in step 7 (although not in quotation marks this time). This text is what will be seen by a user whose browser has JavaScript turned off.
As before, you can leave the alternate content as it is or replace it with your own.
9. Save the file and upload it to your Web server along with the SWF file, the JavaScript file, and any other necessary files.
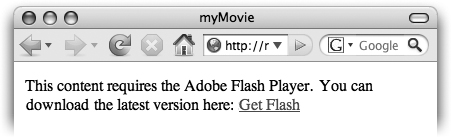
Your setup of Flash detection is complete. Except in rare cases, users who visit your Web page with the appropriate version of Flash Player will see your movie; others will see the alternate content (Figure 80b).
Figure 80b. By default, users who have the wrong version of Flash Player see this text in the browser window, but you can substitute your own content.
Creating a Projector
A projector is a hybrid executable file (or application) that combines a SWF file and Flash Player. Regardless of whether the viewer’s computer has Flash Player installed, double-clicking a projector causes the embedded movie to play.
To create a projector, select Windows Projector or Macintosh Projector on the Formats tab in the Publish Settings dialog box. (The Windows version won’t work on a Mac, nor vice versa.) No extra tabs appear, and there are no options to select. When you publish the movie, the projector appears in the same folder as the FLA file.
Because most computers have Flash Player installed, projectors aren’t needed very often. Their large file size (at least 2 MB for Windows, and nearly 10 MB for Mac) makes them unsuitable for use on the Web. They’re most often used for distributing Flash movies on CD-ROM.
Projectors become more useful when they’re combined with ActionScript. Many people who aren’t professional programmers use Flash as a tool for developing applications: They do the programming in ActionScript and output the result as a projector. Just as double-clicking the Flash icon launches Flash, double-clicking a projector icon initiates whatever the projector has been programmed to do, even if that has nothing to do with animation (Figure 81a).
Figure 81a. This desktop clock/timer was built in Flash, programmed in ActionScript, and published as a projector.

Publishing a QuickTime Movie
Flash can output two kinds of QuickTime files. A traditional QuickTime file, in which Flash animation and sound are converted to standard video and audio tracks, is available through File > Export > Export Movie. This type of file is appropriate for burning to a DVD or importing to a video-editing program.
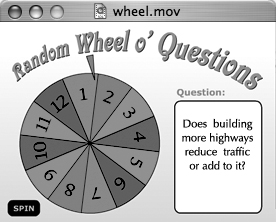
In Publish Settings, a newer type of format is available: a QuickTime file with a Flash track that’s essentially an embedded SWF file. The Flash track doesn’t support features beyond Flash 5, but all the distinctive features of a SWF file are preserved, including scalable vector paths, streaming sounds, and interactivity (Figure 82a).
Figure 82a. All the properties of a SWF file are preserved when it’s converted to a Flash track in a QuickTime file. The QuickTime movie shown here has no video or audio track, just a Flash track.
Follow these steps to publish a movie in QuickTime format.
1. In Publish Settings, select “Flash (.swf),” “HTML (.html),” and “QuickTime with Flash track” as your file formats.
2. Click the Flash tab and choose Flash Player 5 from the Version menu. Modify the other settings as needed, just as you would for an ordinary SWF file (see #77).
3. To include the QuickTime file in a Web page, click the HTML tab and choose QuickTime from the Template menu. Leave the other settings alone; they have no effect when you publish a QuickTime file.
4. Click the QuickTime tab and adjust any or all of the following settings:
• Dimensions. You can select Match Movie or fill in custom dimensions in pixels.
• Alpha; Layers. These menus affect how the Flash track interacts with other visible tracks in the QuickTime file. When you publish the movie in Flash, there are no other visible tracks, but you can add tracks later—video, text, or graphics, for example—in an editing program such as QuickTime Pro.
• Streaming sound. If “Use QuickTime compression” is selected, all the sounds in your Flash movie are mixed into a single QuickTime audio track with attributes that you can set, such as compression and bit rate. If it’s not selected, the sounds remain part of the Flash track.
• Controller. You can decide whether you want the user to have control over playing, stopping, and rewinding the movie.
• Playback.“Loop” and “Paused at start” are identical to the similarly named options on the HTML tab. “Play every frame” mutes the sound so that QuickTime Player does not have to skip frames to keep the video in sync with the audio.
• File. If “Flatten (Make self-contained)” is selected, the Flash track is embedded in the QuickTime file. If it isn’t selected, the QuickTime file is linked to an external SWF file that must be present for the Flash content to play.
5. Click Publish to publish the movie or OK to save the settings.
Exporting Still Images
Standard Web browsers can display images in the JPEG, GIF, and PNG formats, but unlike GIFs, JPEG and PNG files can’t contain animation. If you save your movie as JPEG or PNG, the resulting file will contain only the frame at which the playhead is positioned at the time you export.
Although Flash offers the choice of exporting or publishing, single frames often look better when exported than when published. For example, publishing GIF or PNG files with transparent backgrounds doesn’t work properly, but exporting the same images is problem-free.
The ability to export a single frame is handy if you want to include portions of your animation in printed material. Also, it allows you to substitute a still image for an animation in Web browsers that don’t have the Flash plug-in (see #80).
Each file format has different strengths and weaknesses:
• GIF. As noted in #75, GIF has trouble with continuous-tone images; it’s better suited to technical or cartoon-style drawings that have sharp edges and areas of flat color. Unlike JPEG, however, GIF supports transparency: If you select the Transparent option, the background color of the Stage drops out.
• JPEG. As you saw in #55, JPEG compression can store full-color images in amazingly small files. Apart from that, however, the JPEG file format doesn’t have much going for it: It doesn’t hold color very accurately, and anything more than moderate compression introduces obvious artifacts.
• PNG. PNG is a robust, multipurpose format that combines the best aspects of all the others: It supports full color, masking, and transparency, and it’s capable of very good compression. Unfortunately, support for its features is still spotty: Flash doesn’t implement compression in PNG files, and some browsers still don’t support PNG transparency.
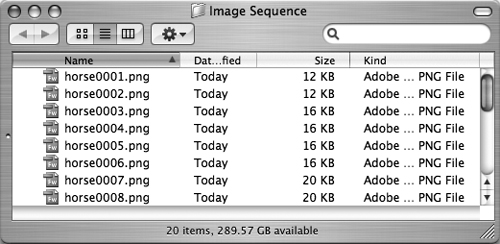
Although the JPEG and PNG file formats don’t support multiple frames, as GIF does, it is possible to export a Flash movie as an image sequence, in which all the movie frames are saved as a series of serially numbered files in the bitmap format of your choice. (Figure 83a). You’ll find this option under Export > Export Movie (not, as you might guess, under Export Image). Image sequences are especially useful when you want to enhance each frame individually in Photoshop and then reassemble the movie. Many video-editing programs, including Adobe Premiere Pro, recognize image sequences and import them as continuous video clips.
Figure 83a. When you export an image sequence, each frame is saved to an individual file.