
Chapter One. Exploring the Flash Interface
If you’re a first-time user of Flash, it may take you some time to get used to its sometimes quirky user interface. But even if you’ve used Flash before, you’ll find that formerly routine tasks now have to be handled differently. In the wake of its 2006 acquisition of Macromedia (the developer of Flash and other Web-related applications), Adobe implemented a redesigned, common interface for all its products. Programs as different as Flash, Photoshop, and Premiere Pro now look similar and work in similar ways.
This first chapter will take you through launching Flash, customizing it, and preparing for a project. It’s tempting to skip these steps and to dive into creating a movie, but you’ll find that taking the time to configure your workspace and organize your files helps you use Flash more comfortably and efficiently.
If you’re new to Flash, it’s helpful to keep in mind that Flash began as an animation program for the Web. Therefore, several of its interface elements have names drawn from the world of film: A Flash file is called a movie (regardless of whether anything in it actually moves); the area where the visual elements of the movie are assembled is called the Stage; the incremental steps by which a movie’s action takes place are called frames (like the frames on a strip of film); and long movies are sometimes divided into segments called scenes. Even if you plan to use Flash as a programming environment or as an interface-development tool, it’s still important to see how these more advanced capabilities relate to the animation features.
Starting Flash
The first time you launch Flash, you’ll encounter a Software Setup screen (Figure 1a). In order to use the software, you have to enter your serial number no more than 30 days after installation. If the number you’ve entered is valid, a green check mark will appear.
Figure 1a. This setup screen appears the first time you launch Flash. If you don’t have your serial number handy, you can use the program without it for up to 30 days.

When you click the Next button, you’re taken to the Activation screen. Your copy of Flash won’t work unless you activate it. If you are connected to the Internet, Flash will handle this automatically; if not, you have the option of activating by phone.
If you’ve installed Flash as part of a suite, such as Adobe Creative Suite 3 Web Standard, you may not have to activate Flash: Activating one product in the suite automatically activates all of the others.
Once Flash has been activated, the standard Welcome screen appears (Figure 1b). This screen offers shortcuts for tasks that users typically want to do when they start Flash, such as opening a previously saved file or creating various kinds of new files.
Figure 1b. The Welcome screen appears by default anytime you launch Flash, or anytime you have no files open in Flash.

The shortcuts on the Welcome screen that you’re likely to use most are in the Create New column: Flash File (ActionScript 3.0) and Flash File (ActionScript 2.0). Clicking either of these commands opens a new Flash document. If you’re relatively new to Flash or to interactive scripting, ActionScript 2.0 is the preferred choice. If you have experience with object-oriented programming and you’re ready to learn the latest version of the ActionScript scripting language, choose ActionScript 3.0. (For more information on the differences between ActionScript versions, see #84.) If you plan to use Flash strictly for its animation capabilities, and you don’t plan to include any interactivity in your movie, then it doesn’t matter which option you select.
Clicking Flash File (Mobile) launches Adobe Device Central, a program-within-a-program that simplifies creating Flash movies for handheld devices such as cell phones and personal digital assistants. Although this is a new feature in Flash CS3, it’s not within the scope of this book.
The Create from Template column is useful for those who aren’t yet ready to build interactive Flash movies from scratch. It offers a variety of movie templates in which the design and interactive elements are in place, so that all you have to add are the text and graphics.
Working with Panels and Docks
The flexible workspace in Flash can be arranged in many different ways, depending on the kind of project you’re working on and the environment you’re comfortable with. Five basic interface elements will almost always be visible: the toolbar, the Timeline, the Stage, the panels, and the Property inspector. Although those five elements have the same functions that they did in earlier versions of Flash, their appearance and behavior have changed noticeably in Flash CS3 (Figure 2a).
Figure 2a. These are the five basic elements of the Flash CS3 user interface, shown in their default layout.

The toolbar (sometimes called the Tools panel) contains the tools you’ll need to create and edit the visual elements of a Flash movie. The toolbar is now a single column, which leaves more room onscreen for the Timeline and Stage. If you prefer the two-column layout, you can toggle between single and double columns by clicking in the gray area above the toolbar.
In either layout, roll your pointer over each tool to learn the name of that tool and its keyboard shortcut. (You’ll become more familiar with the contents of the toolbar when you get to Chapter 2, “Using the Drawing Tools.”)
The Timeline is where you’ll map out how the elements of your movie change over time. Directly below it is the Stage, where you’ll create, edit, and arrange the shapes, images, video clips, and elements that make up the visual portion of your movie (Figure 2b).
Figure 2b. The Timeline and Stage have changed very little since earlier versions of Flash.
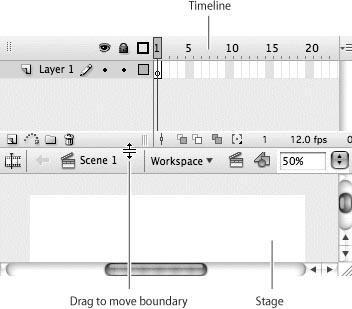
By default, the Timeline and the Stage share a single window. You can change how much of the window the Timeline occupies by using your pointer to drag their common boundary up and down.
If you wish, you can separate the Timeline from the Stage by clicking the gripper in its upper-left corner (Figure 2c) and dragging the Timeline away. When you do so, the Timeline becomes a dockable panel. (You’ll read about docking panels on the next page.)
Figure 2c. This double column of dots represents a gripping surface that you can use to drag the Timeline away from the Stage.
The Property inspector (sometimes called the Properties panel) is located below the Stage. The Property inspector is context-sensitive, meaning that it displays different information depending on where you’ve most recently clicked (Figure 2d). Whenever you need to change options or settings for tools, frames, or an entire movie, the Property inspector is where you’ll usually do it.
Figure 2d. The Property inspector.

Panels—the new name for what used to be called palettes—are where you’ll find the resources you’ll need for accomplishing more advanced tasks in Flash.
A group of panels is held in place by a rectangular container called a dock. Although Flash has only one dock by default, you can create as many additional docks as you like, all anchored to the left or right edge of the screen. A dock can be deleted, but never moved.
Within a dock, individual panels can be expanded or collapsed by clicking the light gray area above each panel (Figure 2e). You can also change two panels’ relative sizes by dragging the boundary between them.
Figure 2e. Above, a panel expanded; below, the same panel collapsed.

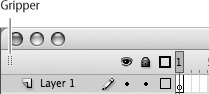
If you need a panel that’s not currently available, you can choose its name from the Window menu. If the panel was in a dock the last time it was closed, it will reappear in that dock. Otherwise, it will appear in a free-floating window. You can grab the panel by the light gray area at the top (Figure 2f) and drag it toward an existing dock.
Figure 2f. A floating window being dragged toward a dock.
As you near the dock, a vertical blue line appears. If you drop the panel now, it will park itself in a new dock adjacent to the old one. If you continue to drag the panel onto an existing dock, a series of horizontal blue lines will appear. Each line shows where in the stack the dragged panel would land if you were to drop it immediately.
By clicking the dark gray area at the top of any dock, you can collapse all the panels in that dock to icons. Clicking an icon expands it into a panel; clicking again collapses it.
Configuring Your Workspace
Any combination or arrangement of Flash windows and panels is referred to as a workspace. When you first launch Flash CS3, its default workspace (shown in Figure 2a) is rather minimal, so you’re likely to want to modify it. As you work with Flash, you may find that there are certain panels you want to have available all the time, or that a certain arrangement of windows and docks feels most comfortable. If you develop a workspace that you’re fond of, you can save it by choosing Window > Workspace > Save Current.
At any time, you can retrieve that saved workspace by choosing it from the Window > Workspace menu. You can delete or rename saved workspaces by choosing Window > Workspace > Manage and using the controls there.
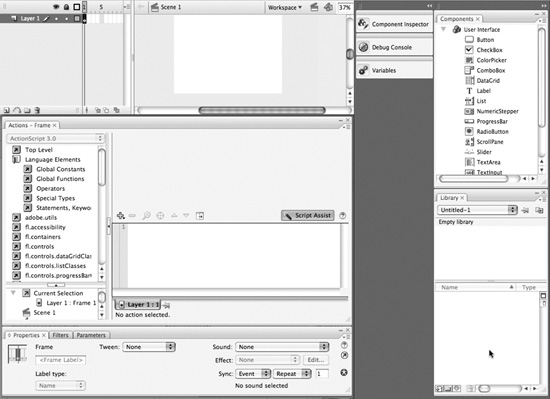
Unlike its suitemate Photoshop, Flash CS3 doesn’t come with any extra workspace presets to choose from. You’ll probably want to come up with your own collection of specialized workspaces—for example, one for drawing, one for animating, and one for coding ActionScript (Figure 3a).
Figure 3a. A sample specialized workspace for coding ActionScript. Notice that this workspace contains a much smaller Stage, and no drawing-related panels at all.

In the Mac version of Flash, the Workspace menu includes a command called Maximize Mode. When you choose this command, the title bar above the Timeline vanishes, leaving more room onscreen. The area behind the windows and panels also turns solid gray, which allows the Mac version of Flash to behave more like Flash on a Windows PC, without the desktop showing through the cracks (Figure 3b).
Figure 3b. The workspace from Figure 3a as it looks when Maximize Mode is turned on.
Setting Movie Properties
When you create a new, blank Flash movie, the first thing you’ll want to do is to set the Movie Properties (also called the Document Properties)—a collection of fundamental settings that affect the entire movie.
There are two ways to set the Movie Properties: You can either choose Document from the Modify menu, thus opening the Document Properties dialog box (Figure 4a); or you can click on a blank area of the Stage to bring up a similar set of properties in the Property inspector. Either way, before you do anything else you’ll want to set these properties: Title, Description, Dimensions, Background color, Frame rate, and Ruler units.
Figure 4a. This is the Document Properties dialog box with its default settings.

Title and Description: These properties are examples of metadata, information stored in a file that gives information about that file. Filling in these fields is optional, but it’s a good idea if you plan to put your Flash movie on the Web.
Dimensions: This property determines the height and width of the Stage. Since most Flash movies are designed to be viewed onscreen, it’s common practice to specify movie dimensions in pixels rather than in inches or points.
The default dimensions of 550 by 400 pixels are arbitrary. Make your movie’s dimensions as large or as small as you think appropriate. The only time you’ll need to pay special attention to the dimensions is when you’re using Flash to produce animation for video. In that case, the video editing program will specify what the dimensions of the movie should be—typically 720 by 486 pixels.
There are two shortcuts, represented by the radio buttons to the right of the label Match. (The third button resets the default dimensions.) Printer sets the movie’s dimensions to match the printable area of your currently selected printer, and Contents makes the movie’s dimensions match the dimensions of whatever’s on the Stage. Think carefully before you make your selection. Although it’s simple to change the dimensions later, it’s much more difficult to modify your movie to fit the new settings.
Background color: This property determines what color the Stage will be. Whatever color you choose will show through on all unoccupied areas of the Stage. For information on picking a color, see #9.
Frame rate: The significance of the frame rate is explained in #31. Frame rate is a measure of how fast your movie progresses. For now, it’s enough to know that 12 to 15 frames per second (fps) is typical for Flash movies that are posted on the Web, and that 30 fps (or, more precisely, 29.97 fps) is the standard for animation created for video use.
Ruler units: This property doesn’t affect the movie, but only affects how the movie and its contents are measured in Flash. If you’ve specified the movie’s dimensions in pixels, it’s usually good to set ruler units to pixels as well.
If you want to make these new Document Properties the default settings for future movies, click the Make Default button at the lower-left corner of the dialog box. Note that the text you enter for Title and Description are not saved with the default settings; you have to enter new metadata for each new movie you create.
Using Function Keys and Keyboard Shortcuts
Because creating a Flash movie can be time-consuming, it’s helpful to find ways to speed up the process. One of the best ways is to master the built-in keyboard shortcuts that let you execute Flash commands with a single keystroke instead of having to choose each one from a menu.
The most common Flash tasks can be accomplished by use of function keys (those keys at the top of your keyboard labeled F1, F2, and so on). There are several function keys—F5, F6, and F7, for example—that are vital for creating animation and therefore should become a part of your vocabulary. (The specific uses of these keys are explained in Chapter 4, “Creating Animation.”)
Using the function keys in Flash is often a problem for Mac users. Mac OS X reserves some function keys for its own use, and those keys don’t work properly in Flash. The most commonly affected keys are F9 through F12, which the operating system uses to control Apple features such as Dashboard and Exposé. This is especially frustrating in the case of the F9 key, which in Flash is used to open some commonly used panels.
There are two ways to get around this problem. The first is to go into Mac OS X System Preferences and remap the Dashboard and Exposé features to a different set of keystrokes. The second is to go into Flash and remap its F9 through F12 features. Since this is a book about Flash, we’ll look at the second alternative.
To remap keyboard shortcuts in Flash:
1. Choose Edit > Keyboard Shortcuts (Windows) or Flash > Keyboard Shortcuts (Mac). You’ll see the Keyboard Shortcuts dialog box (Figure 5a).
Figure 5a. The Keyboard Shortcuts dialog box.

The “Current set” menu should be set to Adobe Standard copy, which is the default set of keyboard shortcuts for Flash CS3.
2. To the right of the “Current set” menu, there is a row of four buttons. Click the first button, Duplicate Set. (The original Adobe Standard set can’t be modified.)
You’ll see a Duplicate dialog box, with a default name (“Adobe Standard copy”) filled in.
3. Either accept the default name by clicking OK, or type a new one and click OK.
The “Current set” menu now displays the name of your duplicate set.
4. If you know the name of the command whose keyboard shortcut you want to modify, locate it by choosing the appropriate list of commands from the Commands menu, then make your selection from one of the submenus (Figure 5b).
Figure 5b. The submenus in the Commands menu correspond to the Flash menus on which those commands appear.

If you want to know which command a particular key combination is assigned to, you’ll have to search through every submenu within the command lists. You’re looking for a particular keystroke (for example, Shift-F9, which opens the Color panel).
5. Highlight the desired command.
The Description field defines the command, while the Shortcuts field shows the currently applied keystroke. The same keystroke appears in the “Press key” field.
6. Highlight the keystroke in the “Press key” field, then press the key (or key combination) that you want to replace it with.
If a “This keystroke is already assigned” error message appears, keep trying key combinations until you find one that’s open.
7. Click OK.
The Keyboard Shortcuts dialog box closes, and the new keyboard shortcut takes effect.
If you just want to learn the existing keyboard shortcuts, look in the standard Flash menus. For each command that has a keyboard shortcut, the keystroke appears to the right of the command.
Organizing Your Files
Flash is capable of saving and exporting a number of different file types, including QuickTime movie files, animated GIF files, projector files, and more. No matter what sort of work you’re doing in Flash, there are two types of files you’ll use: FLA, usually pronounced flah, and SWF, usually pronounced swiff (Figure 6a).
Figure 6a. FLA files and SWF files can be recognized by their icons. The icon for a FLA file is on the left; that for a SWF file is on the right.

FLA is a proprietary Flash authoring file format. A FLA file contains all the information Flash needs to create and modify your movie: vector shapes, symbols, uncompressed images and sounds, Timeline information, text, uncompiled ActionScript code, and so on. For this reason, FLA files tend to be large, sometimes in the hundreds of megabytes.
To generate a FLA file, you open or create a movie in Flash and then choose File > Save (or File > Save As). The only way to view or edit a FLA file is to open it in Flash.
SWF is the Flash Player file format. A SWF file contains only the essential data needed to display your movie, and the remaining information is highly compressed. A FLA file of many megabytes may yield a SWF file of only a few kilobytes. Although the size of the FLA file doesn’t matter (as long as it fits on your hard drive!), your goal in creating a Flash movie should always be to end up with as small a SWF file as possible. You’ll learn some tricks for decreasing the size of SWF files in Chapter 2, “Using the Drawing Tools.”
You generate a SWF file by opening a FLA file in Flash and either testing (see #35) or publishing the movie (see #79). To modify a SWF file, you’ll have to open its corresponding FLA file in Flash, make your changes, and generate a new SWF file to replace the old one. With some minor exceptions, SWF files can’t be edited; they can only be played.
SWF is an open format: Although it originated with Flash, many programs other than Flash can create SWF files, and some non-Adobe programs can play them, such as Apple’s QuickTime player.
If you plan to include Flash movies on a Web site, you’d upload SWF files. FLA files are strictly for your own use (Figure 6b).
Figure 6b. When a Flash movie appears on a Web page, what you’re seeing is a SWF file, not a FLA.

As with all computer work, you should save your FLA files frequently while you’re working on them. Instead of choosing File > Save each time you save your FLA file, it’s a much better idea to choose File > Save As and give each new version of the file an incremental name (for example, mymovie01.fla, mymovie02.fla, and so on). You’ll avoid overwriting earlier versions of your files, and you’ll have a variety of different stages that you can return to if you wish.