
Let's start with the circle. You probably already know that digital SLRs tend to get dust on their sensors after a while. Combine this with small apertures and you have visible dust on your images, most likely in brightly lit areas such as a blue sky. Frequently, the piece of dust is round, so we'll use the circle to get rid of it.

Add a Heal/Clone Layer and select the circle tool (Circle Clone 1). The mouse pointer turns to a crosshair to help you aim. Simply click in the center of the spot. Don't worry if the circle is too large or too small. We deal with that soon. The moment you click on your image, a circle region is created. This has two areas, the main area and the feather area. Because you are using it on a Heal/Clone Layer, a second circle region is created, from which image information is copied. This circle is colored red and can be dragged around with the mouse. Now find a nice spot of blue sky to cover up the spot of dust. Refer to the following screenshot:
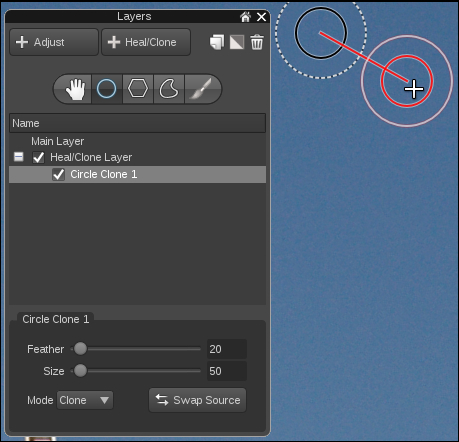
In case the circle is too small or too large, use the Size slider to adjust it. Feather is the area around the region and can be large or small. A large feather lets the regions blend in with their surroundings smoothly because it creates a smooth fade between region and image. A small feather creates a sharp and distinct boundary. We control the size of the feather with the Feather slider. Results vary with the image you are editing, so make sure to try out different values when covering image flaws. If you feel like experimenting, try Swap Source. This will clone the contents of the original circle to the red circle, thus effectively duplicating the spot of dust.
Tip
In case you don't like dragging sliders, you can control the Size and Feather slider with the scroll wheel of your mouse, too. Simply put the mouse pointer right into the region to increase or decrease the size by turning the wheel. Put the mouse pointer into the feather area of the region to increase or decrease the feather.
Let us look at one more case to show the power of the Heal/Clone Layer. Sometimes, especially if you are photographing concerts, you have no control over what happens in the background. You might be able to crop the image to cut out distractions, but sometimes this isn't enough. As shown in the following screenshot, have a look at the bottom-left:

The back of the other musician rather ruins the portrait, don't you agree? Let's create a heal/clone region to get rid of it. This time, though, a circle won't do. As the shape is edgy and not round, we can use a polygon region.
Activate the polygon tool with the click of a button and then create the outline of the region with single clicks.
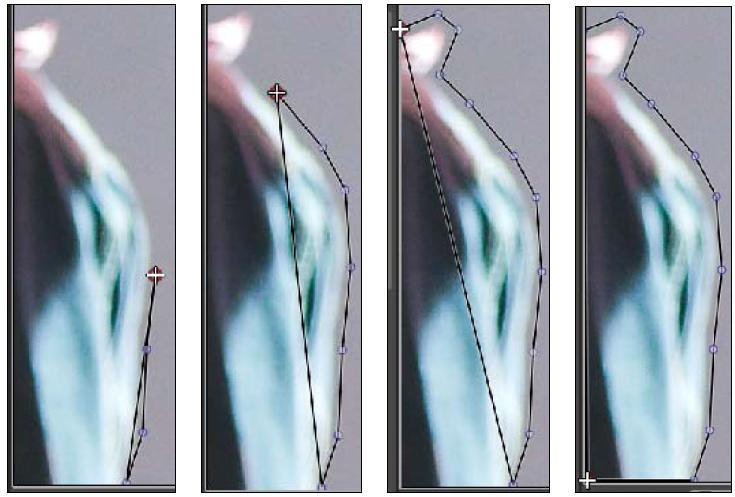
For specifying the last point of the region, you have to double-click on that final point. Don't worry if your region is too small or too large. Once it is complete (after the final point), you can move the points by clicking on them and dragging them where they should be. By the way, the curve tool works just the same; it just sports round lines between each point instead of straight ones with the polygon tool. Also, the feather works just the same as with the circle tool.
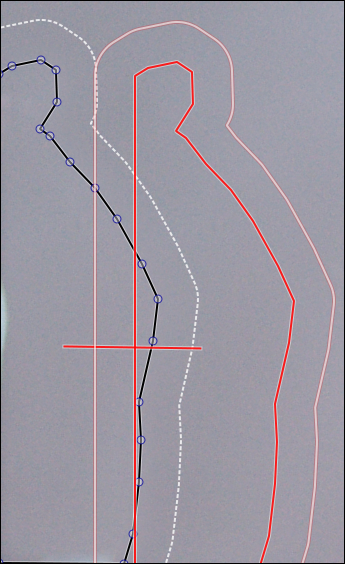
As you can see, the two parts of the clone region can overlap without problem. Now that the distraction is gone, the portrait is saved.

You may notice that the circle region has two mode settings: Clone and Heal. Heal can be used to heal differently colored spots in bigger colored areas. For example, a black spot in a blue sky. In principle, the tool should be able to find out the major color present in the region (blue sky) and change the minor color (black spot), thus healing it. However, I have frequently noticed that simply cloning a part of the sky to get rid of dust spots works better. The Heal setting often did no more than smudging the offending image area. Your mileage may vary, though.