
If you work with lots of plugins, you'll notice that the user interface will sort them into tabs called Plugins 1, Plugins 2, Plugins 3, and so on. This doesn't look nice and can be a nuisance because it hinders your workflow.
Luckily you can completely adjust the tools and the tabs they are placed on according to your liking. This means that you can add plugins to the default tabs as well, placing, for example, everything that works on image details on the Details tab. Unfortunately, this can not be done from within AfterShot Pro, but must be done manually by creating a special file called customToolsUI.txt in the settings folder of AfterShot Pro.
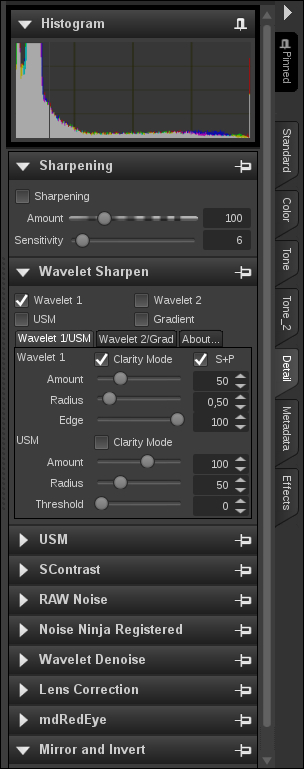
The syntax of the file is straightforward. Have a look at a small section of the one I use. It creates the Details tab, as shown in the preceding screenshot:
Detail, Dtl, Advanced/Sharpen.ui
Detail, Dtl, sph.waveletsharpen
Detail, Dtl, com.roland65.USM
Detail, Dtl, com.roland65.SContrast
Detail, Dtl, Advanced/RAWNoise.ui
Detail, Dtl, Advanced/NoiseNinjaRegistered.ui
Detail, Dtl, NoiseNinjaStandard.ui
Detail, Dtl, sph.waveletdenoise
Detail, Dtl, Advanced/LensCorrection.ui
Detail, Dtl, name.deindl.mdRedEyes
Detail, Dtl, MirrorInvert.ui
The first part in each line is the long or normal name of the tab in which the tool will be added. After this follows the short name of the tab, which will be used when there is not enough screen estate left to display the long name. The last part of each line is the tool or plugin identifier. Advanced/Sharpen.ui is AfterShot Pro's sharpening tool. It has to be mentioned, because if a customToolsUI.txt file is present when AfterShot Pro starts, only the items mentioned in it will be loaded into the user interface. This way, you can also make sure that tools you never need don't bother you anymore. Simply don't include them in your customToolsUI.txt.
You can find the necessary identifiers in the logfile that AfterShot Pro creates when it starts. It is called AfterShotPro.log and resides in your AfterShot Pro settings folder. Open it with a text editor and you will find a section that shows the plugins:
Name: Wavelet Sharpen3
Identifier: sph.waveletsharpen
   Version: 1.34.0
      Path: <User Home>/Plugins/Wavelet Sharpen3.afplugin
There it is. The identifier of the Wavelet Sharpen plugin is sph.waveletsharpen.
Now all that is left to do is open a text editor and start adjusting the interface to your workflow. You can use my customToolsUI.txt file as a starting point. It includes all the tools AfterShot Pro comes with and my installed plugins organized in a way that makes sense to me and is reproduced in the appendix.
Tip
Don't forget that you have to close AfterShot Pro before creating or updating your customToolsUI.txt. Otherwise, there might be unwanted side effects.
Also, if you are wondering how to install plugins in first place, simply select File and Import Plugin.... Then navigate to the downloaded file and select it. AfterShot Pro will either ask you about installing it or, in case of the plugin being an updated version of one that is already installed, it will ask you about updating it. Confirm with OK and the plugin will be installed.