
Chapter 5
Conjuring and Embellishing an Android App
In This Chapter
![]() Creating an app with check boxes and other widgets
Creating an app with check boxes and other widgets
![]() Making the app do something
Making the app do something
![]() Finding bugs in your app (not that there are any, of course)
Finding bugs in your app (not that there are any, of course)
When I set out to learn something, I follow a “ready, set, go” approach. I don’t “go” right into the detailed technical manuals. Instead, I get ready by examining the simplest example I can find. I work with a Hello World scenario like the one in Chapters 3 and 4 of this minibook. Then (… and here’s where this chapter fits in …) I do some probing and poking; I explore some possibilities; I peek around corners; I try some experiments. These are my initial “ready, set” steps.
When I’m firm on my feet, I do the kind of stuff you do in Books III through VI. I “go.” If you feel confident, “go” directly to Book III. But if you want more “ready, set” material, march on into this chapter.
Dragging, Dropping, and Otherwise Tweaking an App
A general guideline in app development tells you to separate logic from presentation. In less technical terms, the guideline warns against confusing what an app does with how an app looks. The guideline applies to many things in life. For example, if you’re designing a website, have artists do the layout and have geeks do the coding. If you’re writing a report, get the ideas written first. Later, you can worry about fonts and paragraph styles. (Melba, you’re this book’s copy editor. Do you agree with me about fonts and styles?)
The literature on app development has specific techniques and frameworks to help you separate form from function. But in this chapter, I do the simplest thing — I chop an app’s creation into two sets of instructions. The first set is about creating an app’s look; the second set is about coding the app’s behavior.
Creating the “look”
To add buttons, boxes, and other goodies to your app, do the following:
-
Launch Android Studio.
If you followed the steps in Chapter 3 of this minibook, you created a skeletal Android Project. Maybe you finished by choosing File ⇒ Close Project, or maybe you simply quit the Android Studio app.
-
If you didn’t choose Close Project (or if you didn’t even quit the Android Studio app), you see the project from Chapter 3 in Android Studio’s main window. Select File ⇒ Close Project.
The Android Studio’s Welcome screen appears.
-
In the Welcome screen, select Create New Project and then follow the remaining steps to create a project as in Chapter 3.
In this section’s listings and figures, I name the app
01_05_01. I put the app in a package namedcom.allmycode.p01_05_01.When you’re finished creating a brand-new project, it appears in Android Studio’s main window.
-
In the new project’s
app/res/layoutbranch (in the main window’s Project tool window), double-clickactivity_main.xml. The Project tool window appears on the left side of Android Studio’s main window. The Project tool window has several different views, including the Project view, the Packages view, and the Android view. When you create a new project, the Android view appears by default. So if you’re looking for the Project tool window, look for the word Android in a drop-down list in the main window’s upper left corner. The tree that’s immediately below this drop-down list is the Project tool window. (If you don’t see anything like this, try clicking the 1: Project tool button on the very left edge of the main window.) For more information about this, see Book II, Chapter 1.
As a result, Android Studio’s Designer tool displays the contents of
activity_main.xml. The Designer tool has two modes: design mode for drag-and-drop visual editing, and Text mode for XML code editing. So the bottom of the Designer tool has two tabs — a Design tab and a Text tab. -
Click the Design tab.
In Design mode, most of the Designer tool is taken up by the palette — a list of layouts, widgets, and other things that you can drag onto your app’s screen — and the preview screen. (See Figure 5-1.)
 If you don’t see the palette, look for a little Palette button on the left edge of the Designer tool. If you click that button, the palette should appear.
The next several steps guide you through the creation of the app shown in Figure 5-1.
- In the palette’s Widgets group, click to select CheckBox.
-
Click your mouse in the preview screen.
A check box appears where you clicked in the preview screen.
Instead of clicking twice, you can drag and drop from the palette to the preview screen. You don’t need to do two separate clicks. -
Repeat Steps 6 and 7.
Now your app has two check boxes. Don’t fuss too much about the positions of the two check boxes. Sure, it’s good if the check boxes don’t overlap. (If they do, you can drag one of the check boxes within the preview screen, but in my experience, dragging things in the preview screen doesn’t always give you what you want.)
With or without dragging, don’t put much effort into making the layout look nice. You’ll beautify the layout in Chapter 6 of this minibook.
- From the palette’s Widgets group, put a Button on the preview screen.
- Again from the palette’s Widgets group, put a Large Text element on the preview screen.
-
Double-click the first check box in the preview screen.
As a result, a pop-up menu appears. (See Figure 5-2.)
- In the field labeled text, type Pepperoni. (See Figure 5-3.)
-
Repeat Steps 11 and 12 a few times. Change the text entry of each component in the preview screen so that it looks like what you see in Figure 5-1.
 You might type
 Show(with mostly lowercase letters) in the text field for the button. Even so, newer Android devices will display the word SHOW (with all uppercase letters) on the face of the button. (Refer to Figure 5-1.) Some older devices will display Show. (See Figure 5-6.) To force lowercase letters onto the face of a button, start by selecting the button in the Preview screen. Look for the little filter icon in the upper right corner of the Properties panel in the Designer tool. Click that icon so that it appears to be pressed downward. This exposes some properties that aren’t normally displayed (some “expert” properties). Look for the textAllCaps property and put a check mark in that property’s check box. If you’d rather fuss with Java code, then ignore my instructions about the Properties panel and look for the setTransformationMethodmethod in Android’s documentation. - Choose File ⇒ Save All to save your work so far.
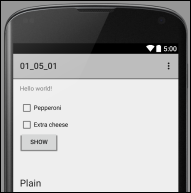
Figure 5-1: You want to create this app.
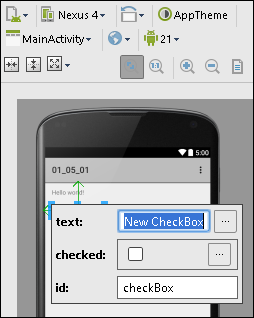
Figure 5-2: Changing the properties of a check box.
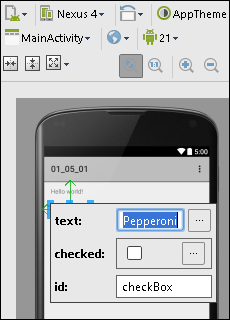
Figure 5-3: Changing the text that labels a check box.
With this section’s steps, you edit your app visually. Behind the scenes, Android Studio is editing the text in your app’s activity_main.xml document. You can see what changes Android Studio has made to your app’s activity_main.xml document by selecting the Text tab at the bottom of Android Studio’s editor. The activity_main.xml document is reproduced in Listing 5-1.
Listing 5-1: The activity_main.xml Document
<RelativeLayout
xmlns:android="http://schemas.android.com/apk/res/android"
xmlns:tools="http://schemas.android.com/tools"
android:layout_width="match_parent"
android:layout_height="wrap_content"
android:paddingBottom="@dimen/activity_vertical_margin"
android:paddingLeft="@dimen/activity_horizontal_margin"
android:paddingRight="@dimen/activity_horizontal_margin"
android:paddingTop="@dimen/activity_vertical_margin"
tools:context=".MainActivity">
<TextView
android:id="@+id/textView"
android:layout_width="wrap_content"
android:layout_height="wrap_content"
android:text="@string/hello_world"/>
<CheckBox
android:id="@+id/checkBox"
android:layout_width="wrap_content"
android:layout_height="wrap_content"
android:layout_alignParentStart="true"
android:layout_alignParentLeft="true"
android:layout_alignParentTop="true"
android:layout_marginTop="37dp"
android:checked="false"
android:text="Pepperoni"/>
<CheckBox
android:id="@+id/checkBox2"
android:layout_width="wrap_content"
android:layout_height="wrap_content"
android:layout_alignParentStart="true"
android:layout_alignParentLeft="true"
android:layout_alignParentTop="true"
android:layout_marginTop="76dp"
android:checked="false"
android:text="Extra cheese"/>
<Button
android:id="@+id/button"
android:layout_width="wrap_content"
android:layout_height="wrap_content"
android:layout_alignParentStart="true"
android:layout_alignParentLeft="true"
android:layout_below="@+id/checkBox2"
android:text="Show"
android:onClick="onButtonClick"/>
<TextView
android:layout_width="wrap_content"
android:layout_height="wrap_content"
android:textAppearance=
"?android:attr/textAppearanceLarge"
android:text="Plain"
android:id="@+id/textView2"
android:layout_alignParentTop="true"
android:layout_marginTop="214dp"
android:layout_alignParentLeft="true"
android:layout_alignParentStart="true"/>
</RelativeLayout>
Whenever you want, you can change the look of your app by directly editing the text in activity_main.xml.
In Listing 5-1, the file activity_main.xml is modified from its original version. It’s formatted to fit your page. In addition, the text in Listing 5-1 comes from my clicking and dragging within Android Studio’s preview screen. Your own clicking and dragging might result in some different code. Finally, some of the text in Listing 5-1 appears differently in the Android Studio editor. Instead of @string/hello_world (the text in the activity_main.xml file), you see Hello world! in Android Studio’s editor. And instead of @dimen/activity_horizontal_margin and @dimen/activity_vertical_margin, you see 16dp in Android Studio’s editor. To find out why the editor messes with your view of the activity_main.xml file’s contents, visit Chapter 4 in this minibook.
Coding the behavior
Assuming you’ve followed the instructions in the section “Creating the ‘look,’” what’s next? Well, what’s next depends on your app’s minimum SDK version.
For minimum SDK version 4 or higher (Android 1.6 and beyond)
Android 1.6 introduced a cool android:onClick attribute that streamlines the coding of an app’s actions. Here’s what you do:
- Follow the steps in this chapter’s “Creating the ‘look’” section.
-
Make note of the labels on the branches in the Component tree.
The Component tree is on the right side of Android Studio’s main window (to the right of the preview screen). Notice the labels on the branches of the tree. Each element on the screen has an id (a name to identify that element). In Figure 5-4, the ids of the screen’s elements include checkBox, checkBox2, and textView2.
Android Studio assigns ids automatically, and you can change these ids if you wish. But in this example, I recommend accepting whatever you see in the Component tree. But before proceeding to the next step, make note of the ids in your app’s Component tree. (They may not be the same as the ids in Figure 5-4.)
- In the preview screen, select the SHOW button. (Refer to Figure 5-1.)
-
Look for the Properties panel on the right side of the Designer tool. (See Figure 5-5.) In the Properties panel, change the
onClickentry’s value toonButtonClick.Actually, you can change the entry’s value to anything you want, as long as it forms a valid Java method name.
-
Inside the
app/javabranch of the Project tool window, double-clickMainActivity.Of course, if you didn’t accept the default activity name (
MainActivity) when you created the new project, then double-click whatever activity name you used. In the Project tool window, the MainActivitybranch is located in a branch that’s labeled with your app’s package name (com.example.somethingorother). That package name branch is directly in thejavabranch, which is, in turn, in theappbranch.When you’re finished with your double-clicking, the activity’s code appears in Android Studio’s editor.
-
Modify the activity’s code, as shown in Listing 5-2.
The lines that you type are set in boldface in Listing 5-2.
In Listing 5-2, I assume that the branches on your app’s Component tree have the same labels as the tree pictured in Figure 5-4. In other words, I assume that your app’s check boxes have the ids checkBoxandcheckBox2, and that your Large Text element has the idtextView2. If your app’s widgets have different ids, change the code in Listing 5-2 accordingly. For example, if your first check box has the idcheckBox1, change your firstfindViewByIdcall tofindViewById(R.id.checkBox1).

Figure 5-4: The Component tree.

Figure 5-5: Changing an object’s onClick property.
Listing 5-2: A Button Responds to a Click
package com.allmycode.p01_05_01;
import android.app.Activity;
import android.os.Bundle;
import android.view.Menu;
import android.view.MenuItem;
import android.view.View;
import android.widget.CheckBox;
import android.widget.TextView;
public class MainActivity extends Activity {
CheckBox pepBox, cheeseBox;
TextView textView;
@Override
protected void onCreate(Bundle savedInstanceState) {
super.onCreate(savedInstanceState);
setContentView(R.layout.activity_main);
pepBox = (CheckBox) findViewById(R.id.checkBox);
cheeseBox = (CheckBox) findViewById(R.id.checkBox2);
textView = (TextView) findViewById(R.id.textView2);
}
public void onButtonClick(View view) {
StringBuilder str = new StringBuilder("");
if (pepBox.isChecked()) {
str.append("Pepperoni “);
}
if (cheeseBox.isChecked()) {
str.append("Extra cheese");
}
if (str.length() == 0) {
str.append("Plain");
}
textView.setText(str);
}
// You don’t have to add any code below this point
@Override
public boolean onCreateOptionsMenu(Menu menu) {
getMenuInflater().inflate(R.menu.menu_main, menu);
return true;
}
@Override
public boolean onOptionsItemSelected(MenuItem item) {
int id = item.getItemId();
if (id == R.id.action_settings) {
return true;
}
return super.onOptionsItemSelected(item);
}
}
Concerning the code in Listing 5-2, a few words of explanation are in order:
Finding the check boxes and the text element
In Listing 5-2, the statement
pepBox = (CheckBox) findViewById(R.id.checkBox);
finds the first check box that you create in the steps in the section “Creating the ‘look.’”
Wait a minute! What does it mean to “find” a check box, and how does a statement in Listing 5-2 accomplish that task? Figure 5-7 illustrates the situation.

Figure 5-7: Connecting XML code with Java code.
When you do the stuff in the earlier section “Creating the ‘look,'” you end up with a file like the one in Listing 5-1. This file contains the lines
<CheckBox
android:id="@+id/checkBox"
. . .
android:text="Pepperoni"/>
The Pepperoni check box’s XML code contains a cryptic @+id/checkBox attribute. Android Studio sees this @+id/checkBox attribute, and takes it as an instruction to add a line to your app’s R.java file:
public final class R {
public static final class id {
public static final int checkBox=0x7f050003;
Because of this Java code, the name R.id.checkBox stands for the number 0x7f050003.
So, if you look again at Figure 5-7, you see how a line of Java code says the following:
Look for something that has id number 2131034115. Treat whatever you find as if it’s a check box, and from here on, in this Java code, refer to that thing by the name
pepBox.
This is how Android connects a widget that you create in the Designer tool with a name in your app’s Java code.
In Listing 5-2, the lines
cheeseBox = (CheckBox) findViewById(R.id.checkBox2);
textView = (TextView) findViewById(R.id.textView2);
serve the same purpose for two of the other widgets that you added using the Designer tool.
 The characters
 0x7f050003 might not look much like a number but, in a Java program, the characters 0x7f050003 form the hexadecimal representation of what we ordinarily call 2131034115. If this number 2131034115 for a little check box seems arbitrary, then don’t worry. It’s supposed to be arbitrary. Android Studio generates the R.java file automatically from the things that you name in places like Listing 5-1. All the numbers in the R.java file are arbitrary. There’s no reason for them not to be arbitrary.
Responding to a button click
The onButtonClick method in Listing 5-2 fulfills the promise that you make in Step 4 of this section’s instructions. Setting the button’s onClick property to onButtonClick gets Android Studio to add the attribute android:onClick="onButtonClick" to the button’s start tag in activity_main.xml. As a result, Android calls your onButtonClick method whenever the user clicks the button.
In Listing 5-2, the first line of the method
public void onButtonClick(View view)
is the method’s heading. Below the heading comes all the instructions to be performed whenever the user clicks the button. Here’s what the instructions in Listing 5-2 tell Android to do when the user clicks the button:
Create an empty string.
If the pepBox is checked,
add "Pepperoni " to the string.
If the cheeseBox is checked,
add "Extra cheese" to the string.
If the string’s length is still 0,
add "Plain" to the string.
Set the textView’s text to whatever is in the string.
In Android, any widget that appears on the device’s screen is a kind of View. So in the method’s heading, the view parameter is whatever object the user clicked. (Yes, you put the word Button in the name onButtonClick. But that doesn’t mean that the thing the user clicked is a button. Instead of onButtonClick, you could have named this method uqKgwlsdif. It wouldn’t mean that the item being clicked is a Kgwlsdif!)
In Listing 5-2, you don’t use the method’s view parameter, but the parameter is available nonetheless. In a more elaborate app, you might write instructions that say
if the view is the checkBox
do one thing
if the view is checkBox2
do something else
if view is the button
do yet another thing
If you don’t put a View parameter in your click-handling method, Android doesn’t respond to the click.
You must put the word public in the onButtonClick method’s heading. If you don’t declare onButtonClick to be public, Android does nothing when a user clicks the button. The code that tries to call onButtonClick isn’t a subclass of your activity and isn’t in the same package. So, if your event-handling method isn’t public, your efforts are thwarted.
 I confess. I’m getting ahead of myself with all this talk about Java methods, parameters, and such. To read more about Java methods, see Book II, Chapter 2.
For any minimum SDK version
No matter what Android version you plan to use, this section’s instructions get your app to respond to button clicks. You may never create an app whose minimum SDK is less than 4. Even so, the techniques in this section involve a very commonly used Java idiom. And many Android developers avoid using the onClick attribute (the previous section’s technique). That technique sidesteps some issues having to do with the long-term maintenance of big Android projects. So to start right off with the most professional way of responding to button clicks, read on.
- Follow the steps in this chapter’s “Creating the ‘look’” section.
-
Modify the activity’s code, as shown in Listing 5-3.
The lines that you type are set in boldface in Listing 5-3.
- Run the app.
Listing 5-3: Event Handling (the Traditional Java Way)
package com.example.myapplication;
import android.app.Activity;
import android.os.Bundle;
import android.view.Menu;
import android.view.MenuItem;
import android.view.View;
import android.view.View.OnClickListener;
import android.widget.Button;
import android.widget.CheckBox;
import android.widget.TextView;
public class MainActivity extends Activity
implements OnClickListener {
CheckBox pepBox, cheeseBox;
TextView textView;
@Override
protected void onCreate(Bundle savedInstanceState) {
super.onCreate(savedInstanceState);
setContentView(R.layout.activity_main);
pepBox = (CheckBox) findViewById(R.id.checkBox);
cheeseBox = (CheckBox) findViewById(R.id.checkBox2);
textView = (TextView) findViewById(R.id.textView2);
((Button) findViewById(R.id.button))
.setOnClickListener(this);
}
public void onClick(View view) {
StringBuilder str = new StringBuilder("");
if (pepBox.isChecked()) {
str.append("Pepperoni “);
}
if (cheeseBox.isChecked()) {
str.append("Extra cheese");
}
if (str.length() == 0) {
str.append("Plain");
}
textView.setText(str);
}
@Override
public boolean onCreateOptionsMenu(Menu menu) {
getMenuInflater().inflate(R.menu.menu_main, menu);
return true;
}
@Override
public boolean onOptionsItemSelected(MenuItem item) {
int id = item.getItemId();
if (id == R.id.action_settings) {
return true;
}
return super.onOptionsItemSelected(item);
}
}
Listing 5-3 uses Java’s traditional event-handling pattern. The button registers your activity as its click-event listener. Your activity declares itself to be an OnClickListener and makes good on this click-listener promise by implementing the onClick method.
You can program any of Java’s well-known variations based on the event-handling pattern in Listing 5-3. For example, you can create a separate class to implement the OnClickListener interface, or you can implement the interface with an inner class.
A Bit of Debugging
In a perfect world, you wake up refreshed and energetic every morning. Every app you write runs correctly on the first test. Every word you write in Android Application Development All-in-One For Dummies, 2nd Edition is le mot juste.
But the world isn’t perfect. And often the first test of a new application forms a disappointing splat on your emulator’s screen. So the next few sections contain some useful debugging techniques.
Try it!
To get a handle on Android debugging, follow these instructions:
-
Create a new Android project.
To cook up this section’s figures and listings, I named the project
01_05_04. I named the packagecom.allmycode.p01_05_04. -
Add a Large Text element to your project’s
activity_main.xmllayout.For details, see the section “Creating the ‘look.’”
After adding a Large Text element, the preview screen looks like the one in Figure 5-8, and Android Studio’s Component tree contains a
textView2branch. -
Open the new project’s
MainActivityfor editing.The activity’s
onCreatemethod looks like this:protected void onCreate(Bundle savedInstanceState) {super.onCreate(savedInstanceState);setContentView(R.layout.activity_main);} -
Add two statements to the
onCreatemethod, as in Listing 5-4.The statements that you add are set in bold type.
You can type import android.widget.TextView near the top of your code. But you can also get Android Studio to add this line automatically. To do so, follow the instructions in the sidebar “Make Android Studio do the work.” -
Run your app.
Your app comes crashing down with a big 01_05_04 Has Stopped message. You click the message’s OK button and give up in despair. Or …
-
Look at the lower portion of Android Studio’s main window for a Logcat panel.
The Logcat panel displays the running emulator’s log. (See Figure 5-9.)
The Logcat panel is located in the Logcat tab, which is, in turn, part of the Android tool window. (Refer to Figure 5-9.) If you don’t see the Logcat panel, click the Android tool button at the bottom of the main window. Doing so exposes (or hides) the Android tool window. In the Android tool window, click the Logcat tab. (And, while you’re at it, make a mental note about the Android tool button’s having nothing to do with the Android view in the Project tool window!) -
In the Logcat panel, look for a Java stack trace.
The Java stack trace (plus a few of additional lines in the log) looks like the text in Listing 5-5.
A log file always contains more information than you need. But if you look for the most recent bunch of words, you find the trace that you need.
-
In the stack trace, look for lines relating directly to the code in your app.
The stack trace shows which methods were calling which other methods when your app crashed. In this onslaught of details, you find a few lines containing names from your application — lines such as
at com.allmycode.p01_05_04.MainActivity.onCreate(MainActivity.java:19)Above that line, you see the words
java.lang.NullPointerException.So your app caused a
NullPointerExceptionat line 19 of theMainActivity.javafile. -
In Android Studio’s editor, find the offending line in your app’s code.
In this section’s example, the guilty line is
textView.setText("Oops!")in your code’sMainActivityclass. The Logcat panel’s text contains hyperlinks. For example, in the message in Step 8, the text MainActivity.java: 19is a hyperlink. Click that link in the Logcat panel and Android Studio’s editor jumps straight to the relevant line of code. To make Android Studio’s editor display line numbers, choose File ⇒ Settings on Windows or Android Studio ⇒ Preferences on a Mac. Under IDE Settings ⇒ Editor ⇒ Appearance, put a check mark in the Show Line Numbers check box. -
Figure out what part of the offending code might cause the error shown in the stack trace.
Unfortunately, this step isn’t always easy. You may need to make several guesses, try several possible solutions, or seek advice on some online forums.
Anyway, like a chef on a cooking show, I can quickly whip out a ready-made solution. When you call
textView.setText, you get aNullPointerException. SotextViewisnull. The problem in Listing 5-4 is the placement of the call tofindViewById.Until you set the activity’s Content view, the app knows nothing about
R.id.textView2. So, in Listing 5-4, callingfindViewByIdbefore callingsetContentViewleads to disaster. To fix the problem, swap two statements as follows:setContentView(R.layout.main);TextView textView =(TextView) findViewById(R.id.textView2);

Figure 5-8: A layout containing a new text element.
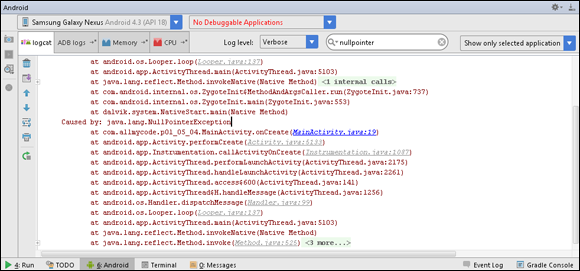
Figure 5-9: The Logcat panel.
Listing 5-4: A Misguided Attempt to Add a TextView to an Activity
// THIS IS BAD CODE!
protected void onCreate(Bundle savedInstanceState) {
super.onCreate(savedInstanceState);
TextView textView =
(TextView) findViewById(R.id.textView2);
setContentView(R.layout.activity_main);
textView.setText("Oops!");
}
Listing 5-5: Messages in the Logcat Pane
05-16 22:38:56.951 15403-15403/? D/dalvikvm: Late-enabling CheckJNI
05-16 22:38:57.025 15403-15403/com.allmycode.p01_05_04
D/AndroidRuntime: Shutting down VM
05-16 22:38:57.033 15403-15403/com.allmycode.p01_05_04
W/dalvikvm: threadid=1: thread exiting with uncaught exception
(group=0x41c8a700)
05-16 22:38:57.040 15403-15403/com.allmycode.p01_05_04
E/AndroidRuntime: FATAL EXCEPTION: main
java.lang.RuntimeException: Unable to start activity ComponentInfo
{com.allmycode.p01_05_04/com.allmycode.p01_05_04.MainActivity}:
java.lang.NullPointerException
at android.app.ActivityThread.performLaunchActivity(ActivityThread.ja
at android.app.ActivityThread.handleLaunchActivity(ActivityThread.jav
at android.app.ActivityThread.access$600(ActivityThread.java:141)
at android.app.ActivityThread$H.handleMessage(ActivityThread.java:125
at android.os.Handler.dispatchMessage(Handler.java:99)
at android.os.Looper.loop(Looper.java:137)
at android.app.ActivityThread.main(ActivityThread.java:5103)
at java.lang.reflect.Method.invokeNative(Native Method)
at java.lang.reflect.Method.invoke(Method.java:525)
at com.android.internal.os.ZygoteInit$MethodAndArgsCaller.run(ZygoteI
at com.android.internal.os.ZygoteInit.main(ZygoteInit.java:553)
at dalvik.system.NativeStart.main(Native Method)
Caused by: java.lang.NullPointerException
at com.allmycode.p01_05_04.MainActivity.onCreate(MainActivity.java:19
at android.app.Activity.performCreate(Activity.java:5133)
at android.app.Instrumentation.callActivityOnCreate(Instrumentation.j
at android.app.ActivityThread.performLaunchActivity(ActivityThread.ja
at android.app.ActivityThread.handleLaunchActivity(ActivityThread.jav
at android.app.ActivityThread.access$600(ActivityThread.java:141)
at android.app.ActivityThread$H.handleMessage(ActivityThread.java:125
at android.os.Handler.dispatchMessage(Handler.java:99)
at android.os.Looper.loop(Looper.java:137)
at android.app.ActivityThread.main(ActivityThread.java:5103)
at java.lang.reflect.Method.invokeNative(Native Method)
at java.lang.reflect.Method.invoke(Method.java:525)
at com.android.internal.os.ZygoteInit$MethodAndArgsCaller.run(ZygoteI
at com.android.internal.os.ZygoteInit.main(ZygoteInit.java:553)
at dalvik.system.NativeStart.main(Native Method)
More than one way to skin a Logcat
With some clever use of Android’s log, you can increase your chances of finding the source of an error.
Read your device’s log file
If you connect a device to your development computer, you can see the device’s log file in Android Studio’s Logcat pane. But sometimes it’s more convenient to view the log file right on the device. For example, you might want to debug an app when you’re using it on the road.
The Google Play Store has apps to help you view your device’s log file. I use an app called CatLog, but other apps might work well for you, too.
Filter the output
Android’s logging has six levels. The levels, in decreasing order of seriousness, are ASSERT, ERROR, WARN, INFO, DEBUG, and VERBOSE. In general, only an ASSERT or ERROR entry is a showstopper. All other entries (WARN, INFO, and so on) are just idle chatter.
Android Studio’s Logcat panel has a Log Level drop-down list. (Refer to Figure 5-9.) You select a level to filter out entries of lesser severity. For example, if you select the Error option, the Logcat pane displays only entries with levels ASSERT or ERROR.
You can filter entries in other ways. For example, to the right of the Log Level drop-down list, there’s a little search field. (Refer to Figure 5-9.) If you type Null in that field, you see only the messages containing the word Null. In particular, you see messages containing the term NullPointerException — a very common error in Java programming. (Unfortunately, this filtering is of little help with the text in Listing 5-5, because the text in Listing 5-5 consists of only four messages, each beginning with 05-16, which stands for May 16. Only the last of the four messages contains the term NullPointerException, but that last message is about 30 lines long! Nonetheless, filtering for text can be very useful.)
In the upper-right corner of Figure 5-9, a drop-down list displays the text Show only selected application. This means that only messages pertaining to your com.allmycode.p01_05_04 package appear in the Logcat panel. You can see other messages by selecting No Filters in that drop-down list.
You can also select the drop-down list’s Edit Filter Configuration option. When you do, you see a dialog box that offers more choices for filtering messages. (See Figure 5-10.) You can filter by Log Tag and by PID. You can pile additional criteria on top of existing filters by clicking the plus sign in the upper-right corner of the dialog box.

Figure 5-10: The Create New Logcat Filter dialog box.
Every Logcat message has a tag. In Listing 5-5, the first three messages have the tag art, and the remaining two messages' tags are AndroidRuntime. (You get used to finding these tags if you spend enough time staring at Logcat messages.) If you type the letter a in the Log Tag field in Figure 5-10, you see several suggested tags, including ActivityManager, AlarmMessengerService, AndroidRuntime, and art.
In addition to its tag, every Logcat message belongs to one of the Android operating system’s processes, and every process has its own process identification number (PID). All the messages in Listing 5-5 come from the process whose PID is 15403. That’s because, when I ran the 01_05_04 app to create Listing 5-5, the 01_05_04 app’s process had PID 15403. (The next time I run the same 01_05_04 app, its PID is likely to be different.) To filter out all messages except those from process 15403, type 15403 in the PID field in the Create New Logcat Filter dialog box. (Once again, this does little good for the text in Listing 5-5. But filtering by PID can, at times, be very useful.)
Write to the log file
What? You don’t trust my diagnosis of the problem in Listing 5-4? “Is textView really null?” you ask. You can peek at your program’s variables with the Debug tool window, but for a quick answer to your question, you can write to Android’s log file.
In Listing 5-4, add the following code before the textView.setText("Oops!") statement:
if (textView == null) {
Log.i("READ ME!", "textView is null");
} else {
Log.i("READ ME!",
"-->" + textView.getText().toString());
}
The Log class’s static i method creates an entry of level INFO in Android’s log file. In this example, the entry’s tag is READ ME!, and the entry’s message is either textView is null or the characters displayed in the textView. When you run the app, you can check the Logcat pane to find out what this entry tells you.
By convention, a log entry’s tag is the name of the class in which the log is created. For example, if your class’s name is MainActivity, the first parameter of Log.i is the string "MainActivity". In this section, I don’t follow that formula. But, if other developers are involved in your project, coding conventions are very important.
Using the debugger
I have a confession to make. I’m not like most developers. Most developers use debugging tools to analyze behaviors in their code. I don’t. I add logging statements to my code (the way you do in the earlier section “Write to the log file”). I do this because, for me, debugging tools don’t make my life simpler. Debuggers give me too much information about a run of my app. Debuggers make my life more complicated.
Real developers make fun of people like me, and they’re probably correct in doing so. But I don’t care. I just continue sending messages to Android’s Logcat and, when it’s my duty to do so, I write in my books about debuggers — and this is one of those times when duty calls …
-
Follow the steps in this chapter’s “Try it!” section.
When you do, you have a buggy Android app.
-
With
MainActivity.javashowing in the editor, click to the left of thetextView.setText("Oops!")statement (in the editor’s border).When you do, Android Studio adds a red circle icon to the editor’s border. (See Figure 5-11.) This icon represents a breakpoint — a place where your app will pause its run. During the pause, you can examine variables' values, change variables' values, and do other useful things.
-
In Android Studio’s main menu, choose Run ⇒ Debug ‘app'.
When you do, you see all the stuff that you’d see if you had chosen Run ‘app'. Choosing Debug instead of Run doesn’t change much until execution reaches the statement with the breakpoint. But when execution reaches the
textView.setText("Oops!")statement, the Debug tool window appears. (See Figure 5-12.) Using Run ⇒ Debug ‘app' instead of Run ⇒ Run ‘app' can make your app run very slowly. Don’t use Run ⇒ Debug ‘app' routinely. Use Run ⇒ Debug ‘app' only when you need Android Studio’s debugging tool.In the Debugger tab of the Debug tool window, you see a list of variables in your app’s Java code. You may have to fish around for the variable that’s giving you trouble. (You might have to expand the
thisbranch of the tree in the Variables panel.) But in Figure 5-12, the situation is simpler. The value oftextViewisnull. That’s trouble, and it requires correcting. (To find out how to correct this problem, visit this chapter’s “Try it!” section.

Figure 5-11: A breakpoint.

Figure 5-12: The Debug tool window.
In the previous set of instructions, Android’s debugger points immediately to the cause of my app’s crash. (After writing this set of instructions, I’m wondering if my prejudice against debuggers is warranted.)
While I’m on a roll with debugging, I think I’ll try a few more tricks.
-
In an Android app’s
MainActivity.javafile, replace theonCreatemethod with the following code:@Overrideprotected void onCreate(Bundle savedInstanceState) {super.onCreate(savedInstanceState);setContentView(R.layout.activity_main);int i = 7;int j = plusOne(i);}int plusOne(int i) {int temp = i;temp++;return temp;}I set the new code (the code that you should add) in boldface type.
- Click to the left of the
int i = 7line to add a breakpoint at that line. -
In Android Studio’s main menu, choose Run ⇒ Debug ‘app'.
The Debug tool window opens and the Variables panel appears in the tool window. The variable
idoesn’t appear in the list because Android hasn’t yet executed the statement containing the breakpoint.Before proceeding to the next step, notice that the breakpoint statement,
int i = 7, is highlighted in the editor. -
Hover over the icons above the Variables panel. One of these icons displays a small pop-up menu containing the words Step Over. Click this icon in order to step to the next statement.
In this case “step to the next statement” means executing the
int i = 7statement. After clicking the icon, the variableiappears in the Variables panel. (See Figure 5-13.) The variable’s value is7.Notice how the statement after the breakpoint,
int j = plusOne(i), is highlighted in the editor. -
One of these icons displays a small pop-up menu containing the words Step Into. Click this Step Into icon.
Step Into means that, if the current statement contains a Java method call, pause the app’s execution at the first statement inside the body of that method. The current statement contains a call to the
plusOnemethod, so Android goes into the body of theplusOnemethod and pauses at theint temp = istatement. -
Click Step Over again.
After doing so, the current statement becomes
temp++, and the Variables panel displays thetempvariable. (See Figure 5-14.) -
Click Step Over again.
Android executes
temp++, so in the Variables panel, the value oftempchanges to8.At this point, I don’t want you to keep clicking Step Over. If you kept clicking, Android would return from the
plusOnemethod call, and back in theonCreatemethod, the value of thejvariable would become8. That would be fine. But just for fun, let’s mess with the value oftempinstead. -
Right-click (or on a Mac, Ctrl-click) the
tempitem in the Variables panel.A contextual menu appears.
-
In the contextual menu, select Set Value.
An Edit field appears next to the
tempvariable in the Variables panel. -
In the edit field, type the number 42, and then press Enter.
As a result, the
tempvariable’s value changes to be42. -
Click Step Over two more times.
When you do, Android finishes executing the
plusOnemethod and assigns the value returned from theplusOnecall (the number 42) to the variablej. The variablej, with its value42, appears in the Variables panel.
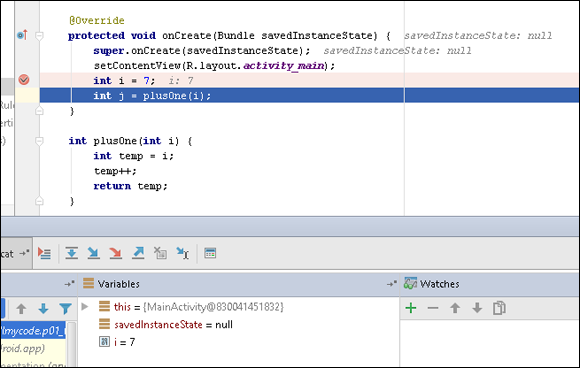
Figure 5-13: The variable i appears.
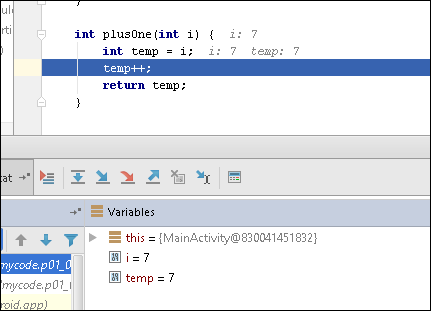
Figure 5-14: The variable temp appears.