Chapter 2
Menus, Lists, and Notifications
In This Chapter
![]() Building options menus and context menus
Building options menus and context menus
![]() Connecting lists with activities
Connecting lists with activities
![]() Adding notifications to the status bar
Adding notifications to the status bar
Sure, I wish I were down at my favorite cheap restaurant, ordering something that a gourmet would never eat. Alas, I am not. As much as I would prefer to talk about menus dealing with food, I’m actually going to talk about menus inside an Android application!
All about Menus
Android provides several ways for you to add menus to your applications. With Android’s help, you can add the following types of menus:
-
Options menu: An activity’s options menu is the activity’s main menu. On a device running Android 3.0 or greater, the options menu is a bunch of icons on the activity’s action bar. The action bar normally appears across the top of the activity screen. (See Figure 2-1.)
On a pre-Honeycomb device, items in the options menu appear when the user presses the Menu key. (See Figure 2-2.)
-
Context menu: A context menu is a list of menu items. The list appears when a user long-presses something. (See Figure 2-3.)
Context menus come in two flavors — the floating context menu (Figure 2-3) and the contextual action mode (Figure 2-4).
- Pop-up menu: A pop-up menu is a list of menu items that appears when the user taps a widget (a text view, an image, or whatever) on the activity’s screen. The pop-up menu appears near the widget that the user taps. Figure 2-5 shows a pop-up menu that’s associated with an image widget.
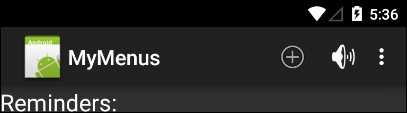
Figure 2-1: The action bar (on Honeycomb or later).
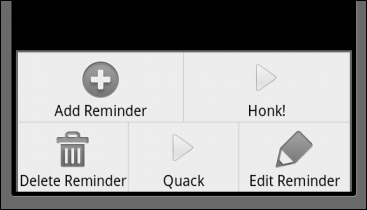
Figure 2-2: An options menu on Gingerbread (or earlier).

Figure 2-3: A floating context menu.
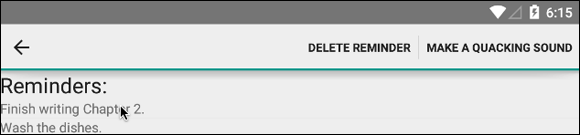
Figure 2-4: A context menu with contextual action mode.
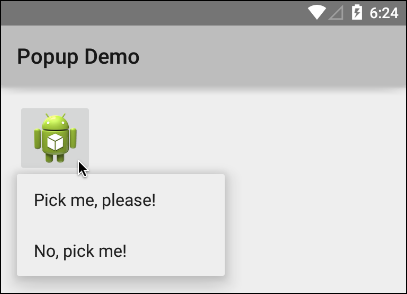
Figure 2-5: A pop-up menu.
In this chapter, you create options menus, context menus, pop-up menus, and some other fun things.
Creating an Options Menu
The action bar back in Figure 2-1 contains four elements:
-
On the left is the app icon.
The app icon identifies your application. The same icon (along with your app’s text label) appears no matter which of your app’s activities is showing.
-
The plus sign and volume icons are called action icons or action items.
When the user presses an action icon, the activity takes some action. (This isn’t surprising. What else would you expect something called an “action item” to do? Of course, it’s up to you, the developer, to write code that makes the action happen.) The look and number of these icons vary from one activity to another. Some activities have lots of action items; other activities have no action items.
-
The three dots aligned vertically are called the overflow icon or action overflow.
When the user presses this icon, Android shows a list with some additional action icons. (See Figure 2-6.) When the user presses one of these additional action icons, the activity takes some action. (Again, it’s up to you, the developer, to write code to make this happen.) You use the overflow when there are too many actions to fit individually in the action bar, or when some actions aren’t important enough to appear on their own in the action bar.
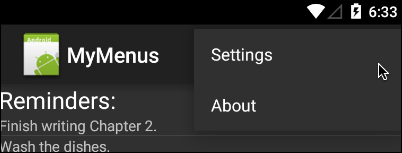
Figure 2-6: Some overflow items.
Starting with Android’s Ice Cream Sandwich version, you can put more complicated things (called action views) in your app’s action bar. For example, Figure 2-7 shows a search view inside the action bar.
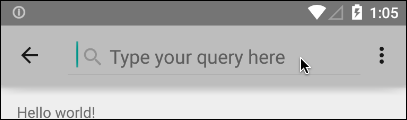
Figure 2-7: A search view in the action bar.
You can use Java code or an XML document to create a menu. If you use XML, your document lives in a res/menu directory. The preferred method of creating menus is to define menus through XML. This helps separate the menu definition from the actual application code.
Defining the XML file
When you create a new project, Android Studio creates a res/menu directory containing a menu_main.xml file. Listing 2-1 contains the menu_main.xml file for Figures 2-1 and 2-6.
Listing 2-1: Description of a Menu
<?xml version="1.0" encoding="utf-8"?>
<menu xmlns:android=
"http://schemas.android.com/apk/res/android">
<item android:id="@+id/menu_insert"
android:icon="@android:drawable/ic_menu_add"
android:title="@string/menu_insert"
android:showAsAction="ifRoom|withText" />
<item android:id="@+id/make_noise"
android:icon=
"@android:drawable/ic_lock_silent_mode_off"
android:title="@string/honk"
android:showAsAction="ifRoom|withText" />
<item android:id="@+id/settings"
android:title="Settings" />
<item android:id="@+id/about"
android:title="About"/>
</menu>
The values @android:drawable/ic_menu_add and @android:drawable/ic_lock_silent_mode_off are built-in Android icons. You don’t have to provide these bitmaps in your res/drawable folders. The icon comes with the Android SDK in the android.R.drawable class.
 All resources in the
 android.R class are available for you to use in your application and are recommended because they give your application a common and consistent user interface and user experience with the Android platform. To view other resources available to you, peruse the android.R documentation here: http://developer.android.com/reference/android/R.html.
In Listing 2-1, the attribute android:showAsAction="ifRoom|withText" tells Android two things:
-
ifRoom: Show this icon in the action bar if there’s room for it.If there isn’t enough room, reveal this icon when the user presses the overflow icon.
-
withText: Show this item’s title in the action bar if there’s room for it.If there isn’t enough room, don’t show the title.
Compare Figure 2-1 with Figure 2-8. In Figure 2-8, I turn the device from portrait to landscape orientation. Because the landscape screen is much wider, the two titles appear in the action bar.

Figure 2-8: Titles appear when there’s enough room.
 The vertical line character (
|) between ifRoom and withText is called the pipe character. In Java, the pipe character performs the or operation between the bits in its two operands. In binary, the value of ifRoom is 001, and the value of withText is 100. So the value of ifRoom|withText is 101. (The middle bit is 0 because that middle bit isn’t 1 in either 001 or 100.) When your app runs, Android interprets 101 as “yes” to ifRoom; “yes” to withText
. (If the middle bit were 1, Android would interpret the 1 as “yes” to always.)
In addition to ifRoom and withText, you can use the following values:
-
always: Show the icon on the action bar whether there’s room or not.If there isn’t enough room, the screen is very ugly.
-
never: Don’t show the icon on the action bar, even if there’s room.Reveal this icon in the overflow list only. The skeletal app that Android Studio creates has a Settings item, and this item’s
showAsActionvalue isnever. -
collapseActionView: When there’s no room for the entire action view, shrink the view so that it’s represented by an icon.This value applies to action views such as the search view in Figure 2-7.
Listing 2-1 is very nice, but the menu_main.xml file in Listing 2-1 isn’t enough to put icons in your app’s action bar. For that, you need to inflate the XML file. That’s why Android Studio adds the following method to your app’s main activity.
@Override
public boolean onCreateOptionsMenu(Menu menu) {
getMenuInflater().inflate(R.menu.menu_main, menu);
return true;
}
When you inflate an XML document, Android turns the XML code into something resembling Java code (a Java object, perhaps).
In the preceding code, you get a MenuInflater that’s capable of inflating menus from XML resources. Then you inflate the XML code to get a real live Java object.
 When you implement the
 onCreateOptionsMenu method, you must return either true or false. If you return false, Android doesn’t display your menu! How rude!
Handling user actions
In the section entitled “Defining the XML file,” you create a menu and display it on your app’s action bar. Now you want to perform some type of action when it’s clicked. To do this, add the method in Listing 2-2 to your app’s main activity.
Listing 2-2: Responding to a Menu Item Click
@Override
public boolean onOptionsItemSelected(MenuItem item) {
switch (item.getItemId()) {
case R.id.menu_insert:
createReminder();
return true;
case R.id.make_noise:
MediaPlayer mediaPlayer =
MediaPlayer.create(this, R.raw.honk);
mediaPlayer.start();
return true;
case R.id.settings:
// TODO: Write code to display settings
return true;
case R.id.about:
// TODO: Write code to display "about" info
return true;
}
return super.onOptionsItemSelected(item);
}
In your onOptionsItemSelected method, you do the old switcheroo to find out exactly which item the user clicks. You match the clicked item’s ID with the ID of the items in your menu’s XML document. In this example, your menu has four items. One item creates a reminder, and the others are placeholders. (In this example app, the make_noise, settings, and about items simply show you how to deal with menus. Nothing that’s the least bit useful happens when the user clicks those items.)
To get Listing 2-2 to compile, you still have to define the createReminder method, but in the meantime, you can add a sound to your project. To add a sound, first create a res/raw folder and then copy an MP3 file into that res/raw folder. After renaming the file honk.mp3, you’re ready to make some noise.
The method in Listing 2-2 returns true. This true value tells Android that you’ve finished handling the user’s selection. If you return false, Android passes the selection event to whatever other code might be waiting for it.
Creating a reminder
The method in Listing 2-3 responds to a call in Listing 2-2. You add Listing 2-3's code to your project’s main activity.
Listing 2-3: Calling an Activity to Create a New Reminder
private static final int ACTIVITY_CREATE = 0;
private void createReminder() {
Intent intent =
new Intent(this, ReminderEditActivity.class);
startActivityForResult(intent, ACTIVITY_CREATE);
}
The createReminder method starts an instance of ReminderEditActivity. The startActivityForResult call allows you to get a result back from the ReminderEditActivity. In this app, you use the result to repopulate a list with the newly added reminder.
 For straight talk about the
 startActivityForResult method, see Book III, Chapter 1.
Listing 2-4 contains an embarrassingly simple ReminderEditActivity class.
Listing 2-4: Creating a Reminder
package com.allmycode.menus;
import android.app.Activity;
import android.content.Intent;
import android.os.Bundle;
import android.view.View;
import android.widget.EditText;
public class ReminderEditActivity extends Activity {
EditText editText;
@Override
public void onCreate(Bundle b) {
super.onCreate(b);
setContentView(R.layout.reminder_edit);
editText = (EditText) findViewById(R.id.editText1);
}
public void onPostButtonClick(View view) {
Intent intent = new Intent();
intent
.putExtra("reminder_text", editText.getText().toString());
setResult(Activity.RESULT_OK, intent);
finish();
}
}
When the user clicks a button, the ReminderEditActivity sets its result and finishes its run. The result comes from the activity’s EditText widget.
To add an additional activity to an app, right-click (or on a Mac, Ctrl-click) the package’s branch in the Project tool windows. In the resulting context menu, select New ⇒ Activity ⇒ Blank Activity. When you do this, Android Studio adds a Java class to your project and adds an <activity> element to your project’s AndroidManifest.xml file. You can bypass these steps and create a Java class on your own. The new Java class might even extend Android’s Activity class. But if you don’t do New ⇒ Activity ⇒ Blank Activity, you must edit the XML document and type your own <activity> element. If you forget (and, believe me, I’ve forgotten), your new activity doesn’t start, and your app crashes.
My no-nonsense layout for the activity in Listing 2-4 is shown in Listing 2-5. The activity’s screen is shown in Figure 2-9.
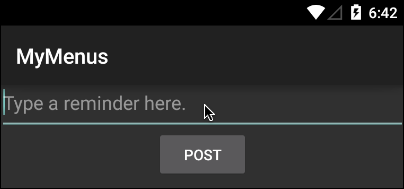
Figure 2-9: Adding a reminder.
Listing 2-5: A Layout for the Activity in Listing 2-4
<?xml version="1.0" encoding="utf-8"?>
<LinearLayout xmlns:android=
"http://schemas.android.com/apk/res/android"
android:orientation="vertical"
android:layout_width="match_parent"
android:layout_height="match_parent"
android:gravity="center_horizontal">
<EditText android:layout_height="wrap_content"
android:id="@+id/editText1"
android:layout_width="match_parent"
android:hint="Type a reminder here.">
<requestFocus></requestFocus>
</EditText>
<Button android:layout_height="wrap_content"
android:id="@+id/button1"
android:layout_width="wrap_content"
android:text="@string/post"
android:onClick="onPostButtonClick"></Button>
</LinearLayout>
Putting the new reminder in a list
To do what is spelled out in this section’s title — putting the new reminder in a list — add the code in Listing 2-6 to your project’s main activity.
Listing 2-6: Using Another Activity’s Result
ListView listView;
ArrayList<String> listItems = new ArrayList<String>();
ArrayAdapter<String> adapter;
@Override
public void onCreate(Bundle savedInstanceState) {
super.onCreate(savedInstanceState);
setContentView(R.layout.activity_main);
listView = (ListView) findViewById(R.id.listView1);
adapter =
new ArrayAdapter<String>(this,
R.layout.my_list_layout, listItems);
listView.setAdapter(adapter);
}
@Override
protected void onActivityResult(int requestCode,
int resultCode, Intent intent) {
if (resultCode == RESULT_OK) {
listItems.add(intent
.getStringExtra("reminder_text"));
adapter.notifyDataSetChanged();
}
}
The code in Listing 2-6 refers to two new resources — namely, R.id.listView1 and R.layout.my_list_layout. The first is a ListView widget. You create it by adding a <ListView> element to your main activity’s layout file. The following element works just fine:
<ListView android:id="@+id/listView1"
android:layout_height="wrap_content"
android:layout_width="match_parent">
</ListView>
The R.layout.my_list_layout resource in Listing 2-6 is new and different. This layout describes an item in the list view. Android uses this layout many times (as many times as there are items in the list view). So, if you’re creating this app as you read along, create a res/layout/my_list_layout.xml file, and put the code from Listing 2-7 into the file.
Listing 2-7: The res/layout/my_list_layout.xml File
<?xml version="1.0" encoding="utf-8"?>
<TextView xmlns:android=
"http://schemas.android.com/apk/res/android"
android:id="@+id/identView"
android:layout_width="wrap_content"
android:layout_height="wrap_content">
</TextView>
According to the code in Listing 2-7, each list view item has its own text view.
With the Android SDK, you don’t add an item directly to an onscreen list. Instead, you add items to a Java list (an ArrayList, for example). Then you tie the Java list to the onscreen list using an adapter. An adapter separates your code’s business logic from the app’s visible presentation. The adapter also smooths the look of changes in the onscreen list.
In Listing 2-6, I create a new adapter using three parts:
- The ever-present context — namely,
this - The list view’s layout — namely,
R.layout.my_list_layout - An
ArrayListof items
The ArrayList of items contains Java String objects, each of which is a reminder for me to do something (such as Pay your taxes, Take out the trash, or Finish writing Chapter 2). The new adapter contains enough information to connect the ArrayList with the visible listView object. Then, still in Listing 2-6, I marry the ArrayList to the listView by calling listView.setAdapter(adapter).
When the code in Listing 2-4 finishes running, Android calls the onActivityResult method in Listing 2-6. The onActivityResult method grabs the newly created result and adds that result to the code’s ArrayList (the listItems object). Finally, to make sure that the screen knows about this addition, the code calls adapter.notifyDataSetChanged().
 Calling
 setAdapter (as in Listing 2-6) binds a Java list to an onscreen list. The call does not bind one variable name to another. So, for example, in Listing 2-6, if you follow the listView.setAdapter(adapter) call with a second adapter = new ArrayAdapter statement, the second assignment has no noticeable effect.
The code in Listing 2-6 overrides an onActivityResult method. For several nice paragraphs about Android’s onActivityResult method, see Book III, Chapter 1.
After all is said and done (or after all is written and read; or after all is developed, published, and then downloaded), the user sees a screen like the one in Figure 2-10.
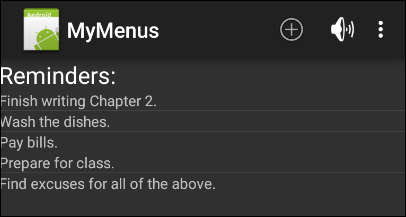
Figure 2-10: A list of items created by this section’s example.
Figure 2-10 shows what happens when the user selects ADD REMINDER or presses the plus icon several times. (Refer to Figure 2-8.) The menu in this example has another item — a HONK item. When the user clicks the HONK item, the app makes a honking sound. I thought for a while about ways to demonstrate that action. My only idea was to ask Wiley to add a little speaker to this page, like one of those greeting cards that plays “Somewhere My Love” when you open it. But in the end, I didn’t have the nerve to make that request. What do you think? It’s a very practical idea, isn’t it?
Doing more on the action bar
Once you’ve tasted a delicious Ice Cream Sandwich, the action bar shown earlier in Figure 2-1 is boring, boring, boring! You can add lots more pizazz to your action bar. In particular, you can put things that implement the CollapsibleActionView interface on your action bar. Android’s SDK provides a readymade thing of this kind. It’s called a search view.
Figure 2-7 shows you how a search view typically looks. When you add this thing to the action bar, your app’s search functionality doesn’t cover up other important items on your activity’s screen. To add a search view to the action bar, put the following element in the res/menu directory’s XML file:
<item android:id="@+id/action_search"
android:title="@string/action_search"
android:icon="@android:drawable/ic_menu_search"
android:showAsAction="ifRoom|collapseActionView"
android:actionViewClass=
"android.widget.SearchView" />
With only this <item> element, your action bar has a search view, but the search view doesn’t do anything. To make the search view do something, add the following code to your main activity. Put it in the onCreateOptionsMenu method (after the statement that calls the getMenuInflater method).
SearchView searchView = (SearchView) menu.findItem
(R.id.action_search).getActionView();
searchView.setQueryHint("Type your query here");
searchView.setOnQueryTextListener
(new SearchView.OnQueryTextListener() {
@Override
public boolean onQueryTextSubmit(String query) {
Toast.makeText(MainActivity.this,
"I found what you’re looking for!",
Toast.LENGTH_LONG).show();
return true;
}
@Override
public boolean onQueryTextChange(String newText) {
return true;
}
});
When the user enters text in the search view, this code responds with a happy toast message. I found what you’re looking for, says the toast message. It doesn’t really search for anything, but at least it’s cheerful! In general, responding to a search query involves things like content providers, which I cover in Book III, Chapter 5.
Creating a Context Menu
When the user long-presses a view, Android displays a context menu. The context menu displays options for the user. (Refer to Figures 2-3 and 2-4.)
Describing the menu
Listing 2-8 contains the XML document describing this section’s context menu.
Listing 2-8: The res/menu/list_menu_item_longpress.xml Document
<?xml version="1.0" encoding="utf-8"?>
<menu xmlns:android=
"http://schemas.android.com/apk/res/android">
<item android:id="@+id/menu_delete"
android:title="@string/menu_delete" />
<item android:id="@+id/make_noise2"
android:title="Make a quacking sound" />
</menu>
Notice that I don’t put any icon attributes in this menu. Context menus normally don’t have icons.
I’ve seen web posts containing tricks for adding icons to context menus. I haven’t tried any of these tricks, but I’m sure that some of them work.
Floating context menus
From Honeycomb onward, Android has two ways of handling context menus. The older way (not entirely obsolete) is called a floating context menu. Here’s how it works:
You want Android to inflate Listing 2-8's menu when the user long-presses a list view item. To achieve this, you make two connections:
- Connect the
listViewobject (declared in Listing 2-6) with context menus in general. You do this by adding one statement to Listing 2-6'sonCreatemethod.registerForContextMenu(listView); - Connect context menus in general with the menu in Listing 2-8. Listing 2-9 shows you how.
Listing 2-9: Handling a Long Press
@Override
public
void onCreateContextMenu(ContextMenu menu,
View view, ContextMenuInfo menuInfo) {
super.onCreateContextMenu(menu, view, menuInfo);
MenuInflater inflater = getMenuInflater();
inflater.inflate
(R.menu.list_menu_item_longpress, menu);
}
Listing 2-9 is very much like the onCreateOptionsMenu method in the “Defining the XML file” section. The method name is different, and the method in Listing 2-9 doesn’t return a boolean value. Other than that, it’s the same old stuff.
Handling item selections
To handle the selection of a context menu item, add the code from Listing 2-10 to your main activity.
Listing 2-10: Responding to a Context Menu Click
@Override
public boolean
onContextItemSelected(MenuItem item) {
switch (item.getItemId()) {
case R.id.menu_delete:
deleteReminder(item);
return true;
case R.id.make_noise2:
MediaPlayer mediaPlayer =
MediaPlayer.create(this, R.raw.quack);
mediaPlayer.start();
return true;
}
return super.onContextItemSelected(item);
}
void deleteReminder(MenuItem item) {
AdapterContextMenuInfo info =
(AdapterContextMenuInfo) item.getMenuInfo();
listItems.remove(info.position);
adapter.notifyDataSetChanged();
}
Listing 2-10 looks a lot like Listings 2-2 and 2-3. The most significant difference is in the code to delete a list view item. Listing 2-10 doesn’t start a secondary activity, so you don’t need an intent, and you don’t need an onActivityResult method like the one in Listing 2-6.
Grabbing information about the selected list view item is one step more complicated than you might expect. The reason for this is that you’re dealing with two different items — the list view item that the user long-pressed and the context menu item that the user clicked.
In Listing 2-10, I call getMenuInfo to create an AdapterContextMenuInfo instance. Then I use the instance’s public position field to tell me which list view item the user long-pressed. I remove the list view item corresponding to the info.position value.
Contextual action mode
In Honeycomb and later Android versions, you can use contextual action mode to deal with context menus. With contextual action mode, menu items don’t float in a separate group on the screen. Instead, these items appear in a contextual action bar (CAB) — a list that hangs at the top of the screen like the activity’s regular action bar. (Refer to Figure 2-4.)
Listing 2-11 shows you how to use contextual action mode.
Listing 2-11: Using Contextual Action Mode
ListView listView;
ArrayList<String> listItems = new ArrayList<String>();
ArrayAdapter<String> adapter;
@Override
public void onCreate(Bundle savedInstanceState) {
super.onCreate(savedInstanceState);
setContentView(R.layout.main);
listView = (ListView) findViewById(R.id.listView1);
adapter = new ArrayAdapter<String>
(this, R.layout.my_list_layout, listItems);
listView.setAdapter(adapter);
listView.setChoiceMode
(ListView.CHOICE_MODE_MULTIPLE_MODAL);
listView.
setMultiChoiceModeListener(new MultiChoiceModeListener() {
int positionOfLongPressedItem;
@Override
public boolean onActionItemClicked
(ActionMode mode, MenuItem item) {
switch (item.getItemId()) {
case R.id.menu_delete:
deleteReminder(positionOfLongPressedItem);
mode.finish();
break;
case R.id.make_noise2:
MediaPlayer mediaPlayer = MediaPlayer.create
(MyMenusActivity.this, R.raw.quack);
mediaPlayer.start();
break;
}
return true;
}
@Override
public boolean onCreateActionMode
(ActionMode mode, Menu menu) {
MenuInflater inflater = mode.getMenuInflater();
inflater.inflate
(R.menu.list_menu_item_longpress, menu);
return true;
}
@Override
public void onItemCheckedStateChanged
(ActionMode mode, int position,
long id, boolean checked) {
positionOfLongPressedItem = position;
}
@Override
public void onDestroyActionMode(ActionMode mode) {
}
@Override
public boolean onPrepareActionMode
(ActionMode mode, Menu menu) {
return false;
}
});
}
void deleteReminder(int positionOfLongPressedItem) {
listItems.remove(positionOfLongPressedItem);
adapter.notifyDataSetChanged();
}
Listing 2-11 begins the way Listing 2-6 begins — by declaring a list view (a list of reminders, for example) and assigning an adapter for the list view. But in Listing 2-11, you set the list view’s choice mode to CHOICE_MODE_MULTIPLE_MODAL and create a MultiChoiceModeListener.
-
When the user long-presses a list item, Android calls the listener’s
onItemCheckedStateChangedandonCreateActionModemethods.The
onActionItemClickedmethod records the position of the item that the user long-pressed. For example, if the list view contains the items shown earlier in Figure 2-10, and the user taps the Finish writing Chapter 2 item, the position number is 0. For the Wash the dishes item, the position number is 1. And so on.The
onCreateActionModemethod inflates the options menu (the menu in Listing 2-8). This menu appears in the contextual action bar. (Refer to Figure 2-4.) -
When the user taps an item in the contextual action bar, Android calls the listener’s
onActionItemClickedmethod.In Listing 2-11, the
onActionItemClickedmethod responds differently depending on which menu item was tapped. For themenu_deleteitem, the method calls thedeleteRemindermethod.The
deleteRemindermethod in Listing 2-11 is a bit simpler than the corresponding method in Listing 2-10. In Listing 2-10, thedeleteRemindermethod calls the menu item’sgetMenuInfomethod to determine the position of the item in the menu. But in Listing 2-11, that position number is already stored in thepositionOfLongPressedItemfield. So thedeleteRemindermethod simply removes the item in that position.In the deleteRemindermethod in Listing 2-11, the call tonotifyDataSetChangedis not optional. If you omit this call, thelistItemscollection list loses an element, but the adapter doesn’t respond to the change. So the item doesn’t disappear from the user’s screen. In Listing 2-11, after callingdeleteReminder, I callmode.finish(). Thefinishmethod removes the contextual action bar so that the user no longer sees Figure 2-4's DELETE REMINDER menu item. (To see DELETE REMINDER again, the user must long-press one of the remaining reminders.)
More Stuff about Lists
The previous sections describe list views, but there are tons more to lists than list views. This section covers Android’s ListActivity class and shows more tricks you can do with lists.
Creating a list activity
On a typical phone screen, you might not have room to add a list view to an existing activity’s layout. An alternative is to create a separate activity containing nothing but the list. This strategy is so commonly used that the makers of Android created a special class for it. A ListActivity instance is an activity whose sole purpose is to display a list.
And speaking of lists, Listing 2-12 lists a ListActivity's code.
Listing 2-12: An Activity That’s Also a List
package com.allmycode.lists;
import java.util.ArrayList;
import android.app.ListActivity;
import android.content.Intent;
import android.os.Bundle;
import android.widget.ArrayAdapter;
public class MyListActivity extends ListActivity {
public void onCreate(Bundle savedInstanceState) {
super.onCreate(savedInstanceState);
Intent intent = getIntent();
String isChecked =
intent.getData().getSchemeSpecificPart();
ArrayList<Integer> listItems =
new ArrayList<Integer>();
for (int i = 0; i < 5; i++) {
if (isChecked.charAt(i) == '1') {
listItems.add(i);
}
}
setListAdapter(new ArrayAdapter<Integer>(this,
R.layout.my_list_layout, listItems));
}
}
The code in Listing 2-12 extends android.app.ListActivity, which is a subclass of Activity. So the listing’s MyListActivity class is an Android activity. But notice that Listing 2-12 has no setContentView call. Instead, a ListActivity instance gets its layout from the call to setListAdapter. This setListAdapter call is strikingly similar to some code in Listing 2-6, and that’s no accident. After all, a list is a list is a list (whatever that means).
Anyway, Listings 2-6 and 2-12 even use the same R.layout.my_list_layout resource — the layout described in Listing 2-7. Like a ListView instance’s layout, a ListActivity instance’s layout describes only one list item.
I don’t envision MyListActivity (the code in Listing 2-12) as a project’s main activity. The main activity calls startActivity to get MyListActivity going. In the call to startActivity, the main activity passes an intent containing a URI of the following kind:
checked:01011
I made up this opaque URI format in order to pass five yes-or-no values from the main activity to the list activity. With the 01011 URI, the list activity’s screen looks like the stuff in Figure 2-11.
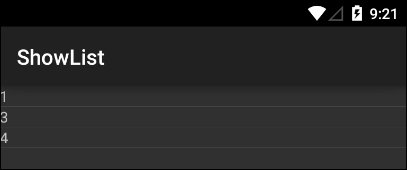
Figure 2-11: The result of sending checked:01011 to this section’s list activity.
The sequence 01011 is my way of representing “no” 0, “yes” 1, “no” 2, “yes” 3, and “yes” 4. So the numbers 1, 3, and 4 appear as items in the list. The loop in Listing 2-12 picks the 0s and 1s out of the incoming intent’s URI.
Here’s one more thing to remember about this section’s list activity. The activity’s incoming intent has my made-up checked data scheme. So, in the project’s AndroidManifest.xml document, I specify the checked scheme in the list activity’s intent filter:
<activity android:name=".MyListActivity">
<intent-filter>
<action android:name="action_required_but_not_used" />
<data android:scheme="checked" />
</intent-filter>
</activity>
The intent filter must have an <action> element, but in this example, I use an explicit intent to start MyListActivity. So I never use the <action> element’s name anywhere else in the project.
A client for the list activity
Listing 2-13 contains the code for a main activity. This main activity gives the user a way to fire up the app’s list activity.
Listing 2-13: Code to Trigger the List Activity
package com.allmycode.lists;
import android.app.Activity;
import android.content.Intent;
import android.net.Uri;
import android.os.Bundle;
import android.view.View;
import android.widget.CheckBox;
public class MainActivity extends Activity {
CheckBox[] checkBoxes = new CheckBox[5];
@Override
public void onCreate(Bundle savedInstanceState) {
super.onCreate(savedInstanceState);
setContentView(R.layout.activity_main );
checkBoxes[0] = (CheckBox) findViewById(R.id.a);
checkBoxes[1] = (CheckBox) findViewById(R.id.b);
checkBoxes[2] = (CheckBox) findViewById(R.id.c);
checkBoxes[3] = (CheckBox) findViewById(R.id.d);
checkBoxes[4] = (CheckBox) findViewById(R.id.e);
}
public void onShowListClick(View view) {
Intent intent =
new Intent(this, MyListActivity.class);
StringBuffer isChecked = new StringBuffer("");
for (CheckBox box : checkBoxes) {
isChecked.append(box.isChecked() ? "1" : "0");
}
intent.setData(Uri.parse("checked:"
+ isChecked.toString()));
startActivity(intent);
}
}
Listing 2-13 maintains an array of CheckBox instances. A loop composes a string of 0s and 1s from the states of the five boxes. Then Listing 2-13 wraps these 0s and 1s in an intent’s URI and passes the intent to the list activity.
Listing 2-14 describes the main activity’s layout, and Figure 2-12 shows the layout as it appears on the user’s screen.
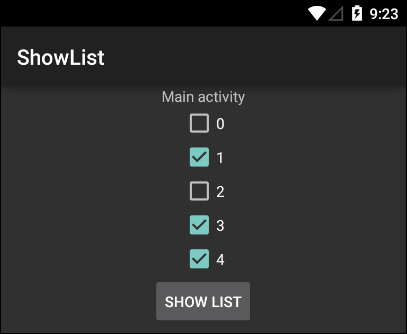
Figure 2-12: The user selects values to send to the list activity.
Listing 2-14: The res/layout/activity_main.xml File
<?xml version="1.0" encoding="utf-8"?>
<LinearLayout xmlns:android=
"http://schemas.android.com/apk/res/android"
android:layout_width="match_parent"
android:layout_height="match_parent"
android:gravity="center_horizontal"
android:orientation="vertical" >
<TextView
android:id="@+id/textView1"
android:layout_width="wrap_content"
android:layout_height="wrap_content"
android:text="@string/main_activity" >
</TextView>
<CheckBox
android:id="@+id/a"
android:layout_width="wrap_content"
android:layout_height="wrap_content"
android:text="@string/box0" >
</CheckBox>
<CheckBox
android:id="@+id/b"
android:layout_width="wrap_content"
android:layout_height="wrap_content"
android:text="@string/box1" >
</CheckBox>
<CheckBox
android:id="@+id/c"
android:layout_width="wrap_content"
android:layout_height="wrap_content"
android:text="@string/box2" >
</CheckBox>
<CheckBox
android:id="@+id/d"
android:layout_width="wrap_content"
android:layout_height="wrap_content"
android:text="@string/box3" >
</CheckBox>
<CheckBox
android:id="@+id/e"
android:layout_width="wrap_content"
android:layout_height="wrap_content"
android:text="@string/box4" >
</CheckBox>
<Button
android:id="@+id/button1"
android:layout_width="wrap_content"
android:layout_height="wrap_content"
android:onClick="onShowListClick"
android:text="@string/show_list" >
</Button>
</LinearLayout>
Displaying two (or more) values in a list item
When you display a list on the user’s screen, you often display more than one value per entry. Maybe each entry has a title and a subtitle, or a keyword and an icon. Anyway, the preceding section’s list has only one value in each list entry. Displaying more than one value is both easy and difficult. (Huh?)
It’s easy because switching from single-value entries to multi-value entries doesn’t involve any large strategy changes in your code. You still have a Java list, an onscreen list, and an adapter. Whatever tricks you use to pass data to a list activity work equally well with both single- and multi-value entries.
Displaying more than one value is difficult because you have to wield a complicated data structure in which the Java list meshes with the onscreen list. Figure 2-13 describes the situation.

Figure 2-13: An adapter for the list in this section’s code.
A Java map is a list of key/value pairs. To create an adapter, you create a Java list of maps. Each map in the Java list represents one entry in the onscreen list.
So now the trick is to tell Android how one map turns into one onscreen entry. To do this, you create two arrays — an array containing the map key names and an array containing an entry’s views. Android associates the key names with the views as though they’re partners in a contra dance. Listing 2-15 contains the code.
Listing 2-15: Putting Two Values in Each List Entry
package com.allmycode.lists;
import java.util.ArrayList;
import java.util.HashMap;
import android.app.ListActivity;
import android.content.Intent;
import android.os.Bundle;
import android.widget.SimpleAdapter;
public class MyListActivity extends ListActivity {
public void onCreate(Bundle savedInstanceState) {
super.onCreate(savedInstanceState);
Intent intent = getIntent();
String isChecked =
intent.getData().getSchemeSpecificPart();
ArrayList<HashMap<String, String>> data =
new ArrayList<HashMap<String, String>>();
for (int i = 0; i < 5; i++) {
if (isChecked.charAt(i) == '1') {
HashMap<String, String> map =
new HashMap<String, String>();
map.put("number", Integer.toString(i));
map.put("letter",
(new Character((char) (i + 65))).toString());
data.add(map);
}
}
String[] columnNames = { "number", "letter" };
int[] textViews = new int[2];
textViews[0] = R.id.numberView;
textViews[1] = R.id.letterView;
setListAdapter(new SimpleAdapter(this, data,
R.layout.my_list_layout, columnNames, textViews));
}
}
This section’s example uses the main activity from Listing 2-13. Other than the enhanced list activity in Listing 2-15, the only other change from single-valued to double-valued entries is the use of a new layout. The new layout for a list entry (see Listing 2-16) has two text views instead of one.
Listing 2-16: A res/layout/my_list_layout.xml Document with Two Text Views
<?xml version="1.0" encoding="utf-8"?>
<LinearLayout xmlns:android=
"http://schemas.android.com/apk/res/android"
android:layout_width="match_parent"
android:layout_height="match_parent"
android:orientation="horizontal">
<TextView android:id="@+id/numberView"
android:layout_width="wrap_content"
android:layout_height="wrap_content"></TextView>
<TextView android:id="@+id/letterView"
android:layout_width="wrap_content"
android:layout_height="wrap_content"
android:padding="20dp"></TextView>
</LinearLayout>
Listing 2-15 puts into code what Figure 2-13 illustrates with a drawing. The most noteworthy feature in Listing 2-15 is the use of a SimpleAdapter. Unlike the ArrayAdapter of Listing 2-12, a SimpleAdapter can handle multi-value list entries.
To connect an onscreen list with the rows in a database table, use the android.widget.SimpleCursorAdapter.
Figure 2-14 shows the result of sending the numbers 1, 3, and 4 to this section’s list activity. To keep the example tidy, I don’t do anything fancy to associate a second value with each number. Instead, I use new Character((char) (i + 65))).toString(). This code converts from int values 0, 1, 2, 3, and 4 to char values 'A', 'B', 'C', 'D', and 'E'.
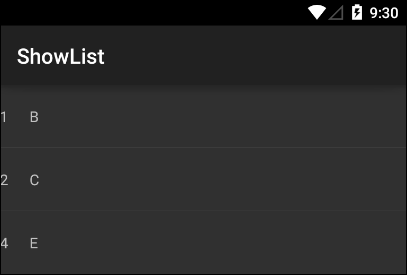
Figure 2-14: A list with two values in each entry.
Creating a Pop-Up Menu
A pop-up menu is a list of menu items that appears when the user taps a widget (a text view, an image, or whatever) on the activity’s screen. The pop-up menu appears near the widget that the user taps. Like many of Android’s newer features, pop-up menus popped up in API 11 (Honeycomb).
To associate a pop-up menu with a widget, add an android:onClick attribute to the widget’s element in the layout file.
<ImageButton
android:layout_width="wrap_content"
android:layout_height="wrap_content"
android:src="@drawable/ic_launcher"
android:onClick="showPopup" />
The android:onClick attribute’s value is the name of a method to be called when the user clicks the widget. Listing 2-17 has just such a method.
Listing 2-17: Making a Pop-Up Menu Pop Up
package com.allmycode.popup;
import android.app.Activity;
import android.os.Bundle;
import android.view.MenuItem;
import android.view.View;
import android.widget.PopupMenu;
import android.widget.Toast;
public class MainActivity extends Activity {
@Override
protected void onCreate(Bundle savedInstanceState) {
super.onCreate(savedInstanceState);
setContentView(R.layout.activity_main);
}
public void showPopup(View v) {
PopupMenu popup = new PopupMenu(this, v);
popup.setOnMenuItemClickListener
(new PopupMenu.OnMenuItemClickListener() {
@Override
public boolean onMenuItemClick(MenuItem item) {
int id = item.getItemId();
if (id == R.id.action_1) {
Toast.makeText(MainActivity.this, "Pop!",
Toast.LENGTH_LONG).show();
} else if (id == R.id.action_2) {
Toast.makeText(MainActivity.this, "Snap!",
Toast.LENGTH_LONG).show();
}
return true;
}
});
//Before API Level 14, use this:
//MenuInflater inflater = popup.getMenuInflater();
//inflater.inflate(R.menu.menu_popup, popup.getMenu());
popup.inflate(R.menu.menu_popup);
popup.show();
}
}
In Listing 2-17, the showPopup method creates a pop-up menu and then creates a listener for the pop-up menu. The listener’s onMenuItemClick method handles clicks of the pop-up menu’s items.
To complete this example, you need a layout file for the pop-up menu. Here’s a file for the menu shown earlier in Figure 2-5.
<menu xmlns:android=
"http://schemas.android.com/apk/res/android"
xmlns:tools="http://schemas.android.com/tools"
tools:context=".MainActivity">
<item android:id="@+id/action_1"
android:title="@string/pick_me"/>
<item android:id="@+id/action_2"
android:title="@string/no_pick_me"/>
</menu>
In the pop-up, each menu item has an id. So, in Listing 2-17, you use the id to decide which item has been clicked.
Notifying the User
One of Android’s cool features is its status bar. The status bar appears at the top of the screen. The user drags the bar downward to see all the current notifications. (See Figure 2-15.)
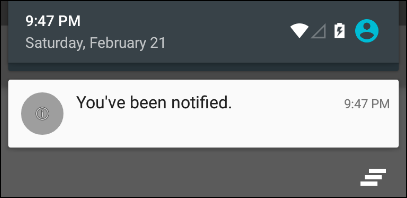
Figure 2-15: Android notifies the user.
In this section, you add notifications to the device’s status bar.
Simple notification
If you want to notify the user and you don’t need any bells or whistles along with the notification, Listing 2-18 is for you.
Listing 2-18: Notification, and Nothing Else
package com.allyourcode.simplenotificaton;
import android.app.Activity;
import android.app.Notification;
import android.app.NotificationManager;
import android.content.Context;
import android.os.Bundle;
import android.view.View;
public class MainActivity extends Activity {
@Override
protected void onCreate(Bundle savedInstanceState) {
super.onCreate(savedInstanceState);
setContentView(R.layout.activity_main);
}
public void onButtonClick(View view) {
Notification.Builder builder =
new Notification.Builder(this);
builder.setSmallIcon
(android.R.drawable.ic_menu_info_details);
builder.setContentTitle("You’ve been notified.");
Notification notification = builder.build();
NotificationManager notificationMgr =
(NotificationManager)
getSystemService(Context.NOTIFICATION_SERVICE);
notificationMgr.notify(1, notification);
}
}
Listing 2-18 is a no-frills activity. When the user clicks a button, Android creates the notification shown in Figure 2-15. To do this, Listing 2-18 uses three classes — Notification.Builder, Notification, and NotificationManager. Here’s the scoop on these three classes:
-
As the name suggests, you use the Notification.Builder class to build a notification object. In Listing 2-18, you call the builder’s
setSmallIconandsetContentTitlemethods.- The
setSmallIconmethod specifies an icon to appear on the notification. - The
setContentTitlemethod specifies the large text that appears on the notification. (Compare the method call in Listing 2-18 with the text in Figure 2-15.)
The Notification.Builderclass is an inner class of theandroid.app.Notificationclass. For info about Java’s inner classes, refer to Chapter 4 in Book II. - The
-
You call the
buildmethod of theNotification.Builderclass to create an actualNotificationobject. The builder.build()method that’s called in Listing 2-18 isn’t available until API Level 16. If your project’s minimum SDK is lower than 16, callbuilder.getNotification()instead. -
A
NotificationManagerobject handles notifications for the user’s device.In particular, the
notifymethod belonging to aNotificationManagerposts a notification on the user’s device. In Listing 2-18, you callnotifyto post the notification that you create a few statements earlier.The notify method has two parameters.
-
The
notifymethod’s first parameter is anintvalue. Thisintvalue (a value of your choosing) identifies the notification for future reference. For example, the callnotificationMgr.cancel(1)would get rid of the notification that I create in Listing 2-18 because, in Listing 2-18, I call
notifywith parameter value1. - The method’s second parameter is the notification that’s being posted.
-
Notifications normally don’t jump out on the device’s screen. To see a notification, the user has to swipe down from the top of the screen (and some users hardly ever do this). But starting with Android Lollipop, you can grab the user’s attention with a heads-up notification. A heads-up notification appears on the screen as soon as your code calls notify.
To create a heads-up notification in this section’s example, add
builder.setPriority(Notification.PRIORITY_MAX);
builder.setDefaults(Notification.DEFAULT_VIBRATE);
to the code in Listing 2-18.
To turn an ordinary notification into a heads-up notification, you call two methods — setPriority and setDefaults. The particular setPriority call that you add to Listing 2-18 says “This builder creates notifications with the highest possible priority.” The setDefaults call that you add says “Make the device vibrate.” (Someone at Google thinks that you shouldn’t have a heads-up notification without making the device vibrate. So, after wondering why the call to setPriority asking for the highest possible priority isn’t sufficient, and after checking several online forums for an answer, I added this setDefaults call specifying the vibrating business.)
A not-so-simple notification
In the section entitled “Creating a list activity,” you create a list from a bunch of check boxes. The items in the list are passive. If the user clicks an item in the list, nothing happens. Later, in the “Simple notification” section, you create a notification. But again, the notification doesn’t do anything. If the user taps the notification, nothing happens. (Well, the user smudges the screen at bit, but that doesn’t count.)
This section adds code to the activity in Listing 2-12. With the new code, tapping a list item creates a notification, and tapping that notification starts a new activity. (See Figures 2-16 and 2-17.)
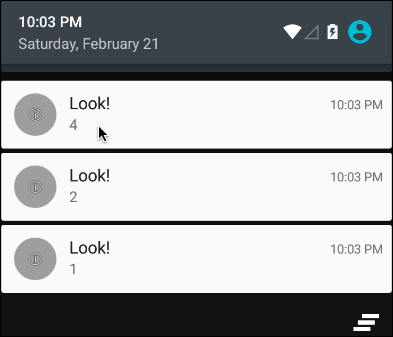
Figure 2-16: Tapping a notification (on the emulator using a mouse).
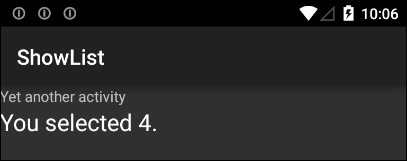
Figure 2-17: After tapping a notification, you see another activity.
The replacement for Listing 2-12 is in Listing 2-19.
Listing 2-19: Every Click Counts!
package com.allmycode.lists;
import android.app.ListActivity;
import android.app.Notification;
import android.app.NotificationManager;
import android.app.PendingIntent;
import android.content.Context;
import android.content.Intent;
import android.net.Uri;
import android.os.Bundle;
import android.view.View;
import android.widget.ArrayAdapter;
import android.widget.ListView;
import java.util.ArrayList;
public class MyListActivity extends ListActivity {
int notificationNumber = 0;
NotificationManager notificationMgr;
/* Code copied from Listing 2-14… */
public void onCreate(Bundle savedInstanceState) {
super.onCreate(savedInstanceState);
Intent intent = getIntent();
String isChecked =
intent.getData().getSchemeSpecificPart();
ArrayList<Integer> listItems =
new ArrayList<Integer>();
for (int i = 0; i < 5; i++) {
if (isChecked.charAt(i) == '1') {
listItems.add(i);
}
}
setListAdapter(new ArrayAdapter<Integer>(this,
R.layout.my_list_layout, listItems));
}
/* Code to respond to a list item click… */
@Override
public void onListItemClick(ListView listView, View view, int position, long id) {
makeNewNotification(listView, position);
}
/* Code to create a status bar notification… */
private void makeNewNotification
(ListView listView, int position) {
String numberValue =
listView.getItemAtPosition(position).toString();
Notification.Builder builder =
new Notification.Builder(this);
builder.setSmallIcon
(android.R.drawable.ic_menu_info_details);
builder.setContentTitle("Look!");
builder.setContentText(numberValue);
builder.setAutoCancel(true);
Intent intent =
new Intent(this, YetAnotherActivity.class);
intent.setData(Uri.parse("number:" + numberValue));
intent.addFlags(Intent.FLAG_ACTIVITY_NEW_TASK);
PendingIntent pendingIntent =
PendingIntent.getActivity(this, 0, intent, 0);
builder.setContentIntent(pendingIntent);
Notification notification = builder.build();
notificationMgr = (NotificationManager)
getSystemService(Context.NOTIFICATION_SERVICE);
notificationMgr.notify
(notificationNumber++, notification);
}
/* Goodbye, cruel world… */
@Override
public void onDestroy() {
super.onDestroy();
for (int i = 0; i <= notificationNumber; i++) {
notificationMgr.cancel(i);
}
}
}
To respond to a list item click, simply add an onListItemClick method to your code. This section’s example uses two of the method’s four parameters — namely, the list view that the user clicked and the position number of the clicked entry. In Listing 2-19, I pass those parameters' values to my homegrown makeNewNotification method.
Here’s what happens inside the makeNewNotification method:
- Using the list view’s
getItemAtPostionmethod, I find the number value of the list item that the user clicked. I store this value for safekeeping in mynumberValuestring. - I create a
NotificationBuilderinstance, and set some of the instance’s properties.- The
setSmallIconmethod’sintparameter refers to one of Android’s standard icons. -
The title is the large text that appears on the notification.
In Listing 2-19, the title is Look! (Refer to Figure 2-16.)
-
The text is whatever smaller text appears on the notification.
In Listing 2-19, this text is the position number of the list item that the user clicked. Again, refer to Figure 2-16.
- The call to
setAutoCanceltells Android to remove the notification after the user clicks the notification.
- The
-
Continuing on the tour of Listing 2-19, the next step in displaying a notification is to create an intent.
- The intent’s purpose is to invoke
YetAnotherActivity. - The intent has a URI, such as
number:3, indicating that the user clicked either the topmost or bottommost notification in Figure 2-15.
The intent’s purpose is to invoke
YetAnotherActivity, but this invocation doesn’t happen right away. In fact, the code in Listing 2-19 does not start an instance ofYetAnotherActivity. Instead, the code attaches this intent to the notification that’s being built. The intent won’t be used for startingYetAnotherActivityuntil the user views (and then taps) the notification. - The intent’s purpose is to invoke
-
The code in Listing 2-19 turns the
YetAnotherActivityintent into a pending intent. A pending intent is an intent that one component asks another component to execute.In this example, the code in Listing 2-19 asks the notification to execute the intent. (To be more precise, with the call to
setContentIntent, Listing 2-19 tells the notification “Wait until the user taps you. Then execute this intent.”) -
As in Listing 2-18, the code builds a notification and feeds the notification to a
notifymethod. Calling thenotifymethod places the notification in the device’s status bar.In this example, the user can click more than one list item. So the app might call
makeNewNotificationmore than once. In the call tonotify, theintparameter gets 1 added to it each time. So each notification has its own identification number. Notifications' identification numbers don’t cross application boundaries. If two different applications create notifications with identification number 1, there’s no conflict. But within an application, identification numbers shouldn’t conflict. If your app calls notificationMgr.notifytwice with the sameintparameter value, Android replaces the first notification with the second. Only one of the two notifications appears in the status bar.
The last method in Listing 2-19 is the onDestroy method. This onDestroy method deletes any notifications that the code created. By the time Android calls the onDestroy method in Listing 2-19, some of the original notifications may have already been canceled. (The call to setAutoCancel does some of that housekeeping.) Fortunately, nothing bad happens when you try to cancel a nonexistent notification.
In case you’re wondering, Listing 2-20 contains my YetAnotherActivity code. In the YetAnotherActivity class, I grab the notification’s identification number and display it on the screen.
Listing 2-20: Using the Result of the Pending Intent
package com.allmycode.lists;
import android.app.Activity;
import android.content.Intent;
import android.os.Bundle;
import android.widget.TextView;
public class YetAnotherActivity extends Activity {
TextView textView;
@Override
public void onCreate(Bundle b) {
super.onCreate(b);
setContentView(R.layout.yet_another_layout);
textView = (TextView) findViewById(R.id.textView1);
Intent intent = getIntent();
String numberValue =
intent.getData().getSchemeSpecificPart();
textView.setText("You selected " + numberValue + ".");
}
}